
Test Studio not only gives you the possibility to store manual tests and keep them manageable in a neat repository, but it also guides their execution process. Generally, problems in manual test execution are raised at many levels. The first problem is the lack of relevant critical proofs on the system state, interactions, and responses during execution, especially for test steps marked as failing. In such cases, the difficulty in tracking back and reproducing failures particularly related to intermittent bugs increases. The second problem is complementary to the first one where even if these helpers do exist, accessing them can be a challenging task in a scattered environment. The third problem is the increased complexity in monitoring and verifying the test execution process when the reporting granularity does not start at a test step level.
Test Studio dedicates a special runner for tests based on manual templates that functions differently from that of automated tests. This runner frees manual testing from the preceding difficulties by guiding the execution in a step-by-step manner. In addition, it integrates the process of gathering and saving visual aids, which makes capturing the system state an eeasy and a straightforward task.
Enter the Func-6_FileInfo_Create_Failing_Hybrid test, and click on the Run button from the Quick Execution tab to start the manual test runner.
A window is launched comprising of two steps as shown in the following screenshot:
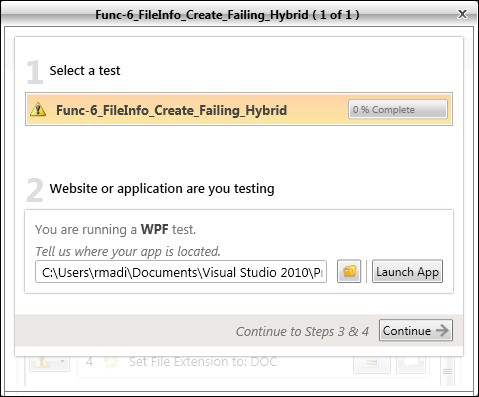
Test runner for manual tests
The first step represents the percentage of execution completion. Upon test startup, zero percent of the test is completed. This number is updated as the test runs and can be sought at any point in the test's execution. The second step prompts the tester whether Test Studio should launch the application before the manual execution starts where changing an executable application is still allowed by browsing the filesystem after clicking on the button showing the folder icon.
Click on the Launch App button to start the File Comparer application against which the automated tests will execute. After the
File Comparer Login window appears, click on the Continue button to bring the test steps into view.
The runner now displays step 3 of the process which is a test step for execution, assessment, and annotation. At the bottom of the window, step 4 is also displayed, which holds the overall test status. The following screenshot shows the invoked window with the created manual and automated steps:
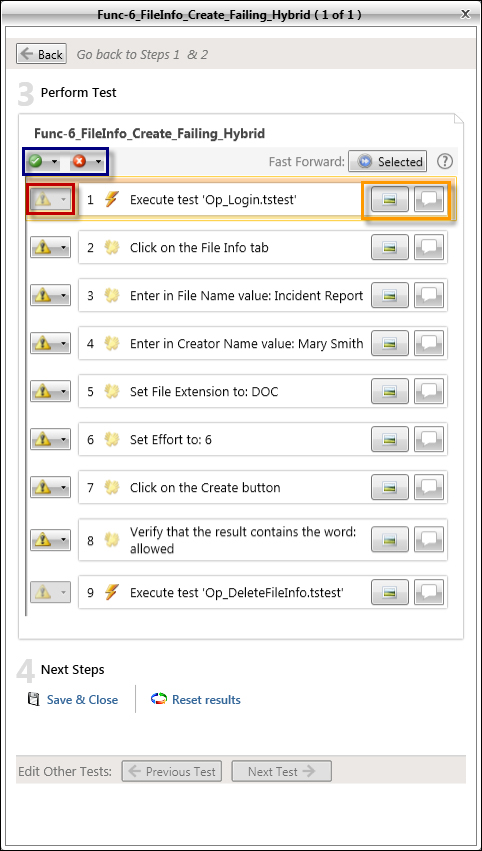
Executing and annotating test steps
The uppermost set of outlined buttons is used to change the result status for manual steps in the batch mode. The second set of outlined buttons is used for steps' annotation. Finally, the last outlined button and all subsequent similar ones denote the individual step result.
As it was intended during the test design, the Op_Login test is supposed to execute automatically. Therefore, select this step by simply clicking on it, and then click on the Selected button following the
Fast Forward label. The runner will execute the UI operations against the Login window by populating its Username and Password fields and then clicking on the Login button.
Notice how the test result button icon for this automated step is changed to a green tick symbol representing the automatic result of the test. This button is disabled for automated steps and therefore cannot be manually updated. Click on the Notes button corresponding to the button located in the right side of the set highlighted in orange. A rich text editor is expanded to receive custom notes that can contain any relevant details. Enter the line Pre-Conditions have successfully executed and click on the Done button.
The next set of steps is the manual ones. Manually execute the instructions of the next step and update the result depending on whether you were able to execute it successfully or not. Repeat the same procedure and stop at step 9.
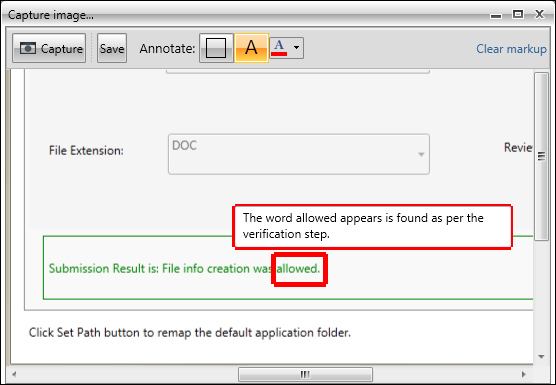
The outcome of step 8 dictates the overall test end result, hence it is worth attaching to it a snapshot of the current system state. Click on Capture, which is the left button of the set highlighted in orange. In the Capture image window, click on the Capture button on the upper-left corner to take a snapshot of the desktop. Then you can use the Annotate buttons to draw a rectangle around the result in order to make it remarkable as shown in the following screenshot:
Capturing images during manual steps execution
This wraps up manual steps for this test. Step 9 is supposed to clean up the created data. This is an automatic operation, hence select it and click on the Selected button. Again the underlying test is executed by Test Studio, and the result is set right upon completion.
We have now reached step 4 where we have either the option to save the result or to reset it and start over. Click on the Save & Close button to stop the manual runner and end the execution.
The manual test execution process that used to bear the load underneath the tedious tasks of creating, organizing, maintaining, running, and reporting test results of manual tests has now become simpler as we have seen. Test Studio shares the load by taking over the mechanical tasks to leave your focus on the analysis and usage of its annotation abilities to capture significant data.
Suppose that you want to associate the manual test to the input values different from those that are hardcoded inside its definition, then there are normally two options, either create a duplicate test for each set of input or store these inputs in an Excel workbook and come up with a way to associate it with the test. The disadvantages of the preceding suggested strategies are redundancy and deficiency in having all the test data centralized in one repository and accessible through one portal. Consequently, both the strategies lead to a less maintainable and manageable solution. Here again, the situation calls for the need to convert the test definition to a data-driven one.
Therefore, go to the Project tab and then right-click on the Func-6_FileInfo_Create_Failing_Hybrid test under the Manual Test Scripts folder. Choose the Data Bind option from the context menu and set the values for the Bind test to
data source window as follows:
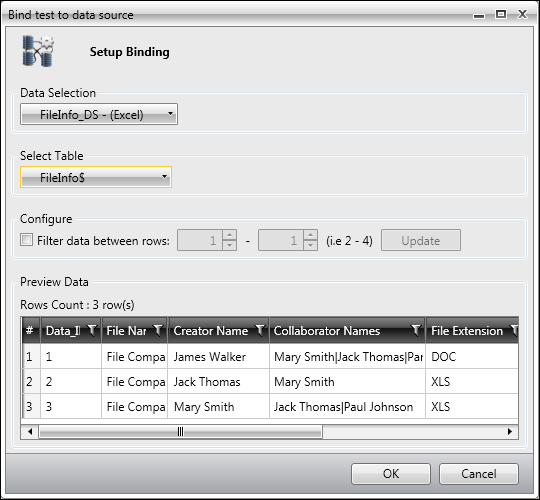
Binding a manual test to a data source
This data source is of the type Excel and was used previously for the fully automated version of this test with the purpose of automating a data-driven execution.
The properties of the test are updated by Test Studio, as shown in the following screenshot:
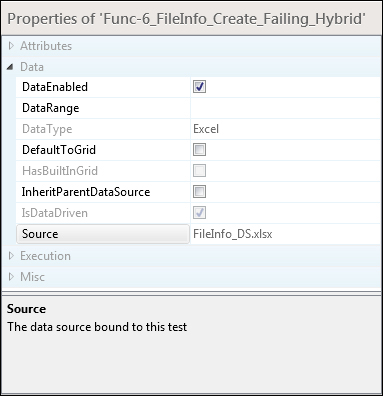
The DataEnabled property for data-driven manual tests
The test property for DataEnabled is set to true where the Source now refers to the data source belonging and residing within the whole project solution. Notice how this feature facilitates the finding and accessing of input data to be fed into the manual test where it makes Test Studio a unique gateway for gathering all the information needed to execute a test.
As automation becomes integrated in the company testing strategy, little by little, the manual test cases that are well suited for automation will eventually all finish by becoming fully automated. The previous sections have demonstrated how Test Studio allows a congruent storage for automated and manual tests. We have also seen how these extreme types can be merged by adding automatic steps to manual tests and vice versa. Now we will see how Test Studio supports the complete transition of a test case from its manual to automated state through its built-in features.
For instance, after automating all the manual steps for Func-6_FileInfo_Create_Failing_Hybrid and removing the data binding source, it will change to something similar to the following screenshot:

Automated steps for the Func-6_FileInfo_Create_Failing_Hybrid test
This test no longer needs a manual runner to execute. Hence, to change the associated runner, go to the Project tab, and select the test to display its properties in the Properties pane. From the Misc section, uncheck the IsManual property as shown in the following screenshot:
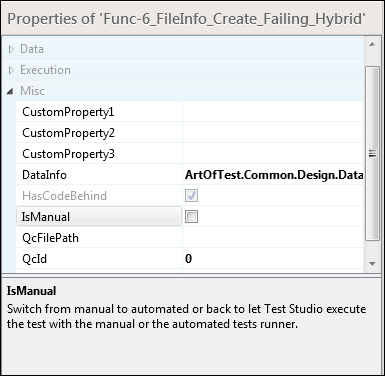
Editing the IsManual property for manual tests
In the Project Files pane, notice how the test icon changes to that of a WPF template. The test will now use the automation runner to execute, which (as we have seen in the previous chapters) will start off by automatically executing the steps in contrast with the manual runner. Whenever a manual step is encountered within the test, the execution will pause until the step is manually executed and verified.