
At the beginning of this book, we looked at test reusability as a strategy for enhancing maintenance. We tried to minimize duplicating the same functionality in multiple tests and even in the constituent steps. The test maintainability topic was frequently present in the examples throughout this book mainly because of how much it affects test durability and effectiveness over time in addition to how much it lowers the automation cost. The simplest scenario which describes all the aforementioned characteristics is when having the login functionality implemented inside a number of tests. If at some point in time the login window is redesigned to allow the choice between Windows or regular member authentication before being able to input the credentials, then all the automated login functionality scattered among the tests should also change! Hence, your tests:
- Lack durability, since they are vulnerable to changes outside the functionality they are testing
- Lack effectiveness, since they become useless if they do not function
- Require high maintenance cost, since they require a great amount of time and effort to be updated as changes are introduced
This chapter continues on this topic by illustrating two more methods that can be used to substitute a repeated logical group of steps with external calls, either to other automated tests or to extended libraries.
The first option seems familiar. We have already seen how to use the Test as Step Test Studio feature to invoke external tests in the form of a step in the calling test. In addition, we have particularly seen how a non data-driven test calls a data-driven test, a data-driven test calls a non data-driven test, and finally how a data-driven test calls another data-driven test. Nevertheless, notice how each test type had to be called in its defined context. This means that data-driven tests, when acting as a caller or a called test, had to be associated directly or indirectly with a data-driven table so that they run correctly. Similarly, a non data-driven test cannot be dynamically associated with data-table values where, if needed, the test has to undergo a manual conversion. In conclusion, this behavior takes away the flexibility of dynamically reusing the same test in data-driven and regular contexts.
The scenario starts where you, as a tester, were responsible for automating the File Info feature and were handed the functional manual test scripts. As you were looking through them, you noticed that they all revolve around setting some values for the UI elements. So you decided to apply a time and effort saving design which treats each subprocedure as a separate component in order to enhance the long term maintainability and reusability.
Note
Subprocedure is a term introduced in Chapter 2, Automating Functional Tests referring to a block inside a test case procedure constituted from the UI element's readiness verification steps and the UI operation's steps on that element.
So the solution stipulates creating an independent WPF test for each subprocedure as shown in the following diagram:
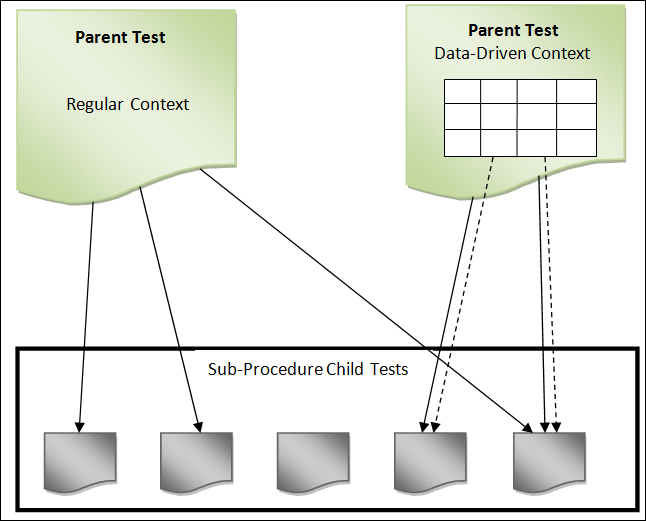
Reusing child tests in parent context
An arrow means that a parent test calls the child test with an arrow head. A dotted arrow means that the child with the arrow head is bound to one of the parent data table columns.
This design works fine for regular tests. But when the time comes to apply the same methodology on a data-driven test, you face a problem! In terms of theory, you want to use the second data-driven model mentioned previously, a data-driven test calling a non data-driven test, where you bind the parent test to a global data table inside the parent test and using the Test as Step feature, you add the needed child independent tests that will receive the input from the parent. So far, this is feasible. But what really happens is after binding the child test steps to data-table columns, they are always going to expect some values to be passed on from the parent. So how will the subprocedure tests behave when called again in the regular context? They will end up throwing exceptions because at runtime, the bound table column must have an existence and should always be initialized before reaching the last step.
We don't want to end up tying the subprocedure child tests to data sources. So, should you proceed by creating the same set of child tests for both data-driven and regular modes? The following example describes a workaround for this problem.
First, make sure that the authorization parameter is set to False in the settings.xml file found inside the File Comparer application's bin folder. Let's begin by creating a WPF test called Func-6_FileInfo_Create_Successful_Reg. For this test, record the creation of a file without filling the Creator Name field with any value. Then open the Op_FileInfo-FillCreatorName test created earlier and add a scripted step. Drag it into the If block such that it executes before the scripted step that is bound to a data table column. Update its implementation to:
string val;

try
{
    val = (string)GetExtractedValue("Creator Name");
}
catch
{
   SetExtractedValue("Creator Name","Mark Moore");
}
In this code, we are making use of the two methods provided by Test Studio that allow us to manipulate test variables. The GetExtractedValue method is supposed to read the value saved in a variable to which the caption is passed as a parameter, whereas the SetExtractedValue method provides the means to set the content for a variable. So, in our scenario, when the try block executes, it will result in an exception since the Creator Name variable is null. Consequently, the catch block executes and in turn uses the Create Name variable, but this time to set its content to Mark Moore. Thus, when the next steps executes, it will set the field value to Mark Moore.
From the test properties pane, locate the Data section and unselect the InheritParentDataSource checkbox.
Go back to the Func-6_FileInfo_Create_Successful_Reg application and using the Test as Step button, add the Op_FileInfo-FillCreatorName test. Run the test and notice how the Creator Name field is populated with the hardcoded value. To rerun the test with the Func-6_FileInfo_Create_Successful_DB test, revert the state of the InheritParentDateSource checkbox to true and run the test. This time the value populated in the Creator Name field is the one retrieved from the Paul Johnson database.
Further on the subject of reusability and maintenance, Test Studio offers the possibility of creating unified functionalities through library extensions. In the first chapter, we have seen how to override a useful function after test completion to add custom logging based on the overall test status. Now, suppose that this has been appended to the automation guidelines where every test has to supply this feature. Currently, the way to go about it is to edit test by test and implement the OnAfterTestCompleted function. This is of course a weary task (there is no need to mention that), and with this specific guideline amendment, all the subsequent tests will have to undergo the same feature change. So the solution resides in centralizing this functionality and making it dynamically available for the present and forthcoming tests.
Extension libraries can be employed to hold the targeted functionality. After designing and compiling such a library, we will add it to the Test Studio plugins. Hence, whenever any of the events related to the preceding functionality or any other similar one occur, our overridden versions will be seamlessly called in all the tests. Extension libraries are created within Visual Studio by referencing some of the Test Studio libraries and extending them.
For this purpose, start Visual Studio and create a project of the type Class Library. Name your project TestStudio.Extension. Now perform the following steps:
- Add references to the following four libraries:
ArtOfTest.WebAii.dllfound under Telerik | Test Studio | Bin of theProgram FilesdirectoryArtOfTest.WebAii.Design.dllfound under Telerik | Test Studio | Bin of theProgram Filesdirectory- The
System.Runtime.Serialization .NETlibrary - The
System.Windows.Forms .NETlibrary
- Add the following namespaces after the
usingblock statements:using System.IO; using System.Data; using System.Data.OleDb; using System.Windows.Forms; using ArtOfTest.WebAii.Design.Execution;
- Update the class definition to implement the
IExecutionExtensioninterface as follows:namespace TestStudio.Extension { public class TestStudioExtention : IExecutionExtension { } } - Right-click on the
IExecutionExtensionclass and choose the Implement Interface option from the context menu and then choose Implement Interface again from the child context menu list.With this action, a complete list of functions that can be implemented is listed as follows:
OnAfterTestCompleted
OnAfterTestListCompleted
OnBeforeTestListStarted
OnBeforeTestStarted
OnInitializeDataSource
OnStepFailure
In our example, we will customize the handling of list startup, test startup, and steps failure.
The OnBeforeTestListStarted function is called before a test list starts execution. For this event, we need to:
- Enable all test annotations, custom and native, in order to visually debug and compare the steps description to the actions driven on the screen
- Enable the logging for these annotations to be able to refer to them even after tests have executed
- Query windows event log and replicate any error to the test list log
The OnBeforeTestStarted function is called before a test starts. We will use this event to demonstrate how our version of the execution library is called in our example. Therefore, for this function we will call the log method to write a custom message.
The OnStepFailure function is called whenever a step executes and results in a failure. In this case, we are interested in verifying some of the system state conditions. Hence we will query the system information to assert if there exists a live connection to the machine.
To start implementing the preceding functions, remove the throw new NotImplementedException() statement for all the functions and update some of their implementations in this way:
- For the
OnBeforeTestStartedfunction, add the following log line:executionContext.Manager.Log.WriteLine("Reading from extension library"); - For the
OnBeforeTestListStartedfunction, add calls to firstly enable the display and logging of both kinds of annotations and secondly query the event log for errors:list.Settings.AnnotateExecution = true; list.Settings.AnnotationMode = ArtOfTest.WebAii.Core.AnnotationMode.All; list.Settings.LogAnnotations = true; list.Settings.QueryEventLogErrorsOnExit = true;
- For the
OnStepFailurefunction, add a call to log the connection status:executionContext.Manager.Log.WriteLine("Connection status: " + SystemInformation.Network); - For the
OnInitializeDataSourcefunction, addreturn null. Although this function will not receive any custom implementation, it has aDataTablereturn type and therefore must always have a return value. This does not apply to any other method (they should be left empty if not used).
Notice how the executionContext parameter object was utilized to access the runtime objects used by Test Studio throughout the test execution. The Manager object is an example and it holds references to other important objects such as Wait, Settings, Desktop, Applications, and so on. The Log object is also referenced by the Manager object and is frequently used in our examples.
Once the implementation is complete, compile the solution and copy the generated library from the solution's bin folder. Paste the copied library inside Test Studio's Plugins folder found under Telerik | Test Studio | Bin of the Program Files directory.
Accordingly, we will create a test and a test list inside Test Studio to demonstrate the behaviors we just implemented. Add a WPF test under the Automated Test Scripts folder and name it Func-15_FileInfo_Extended. Record the following steps to simulate the creation of file's metadata:
- Go to the File Info tab.
- Enter
Test Automation Guidelinesin the File Name field. - Enter
Paul Johnsonin the Creator Name field. - Choose the DOC extension.
- Set the Effort field to 7.
- Click on the Create button.
Then using the hover over the highlighting feature, add an incorrect verification against the submission result as follows:
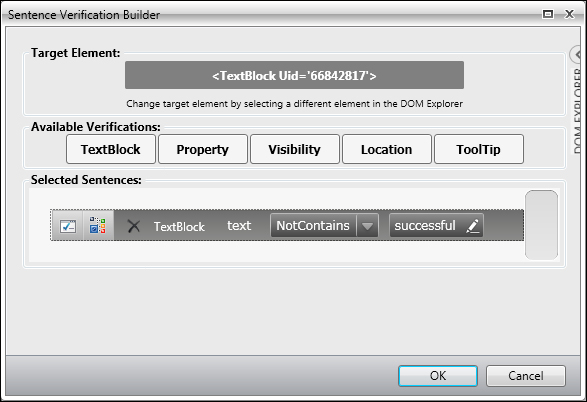
Adding a verification step
As depicted in the following screenshot, Test Studio will alert you with a message explaining that the constructed verification does not reflect the current text state. Since we are deliberately adding this step to satisfy the preconditions that will trigger the execution of the on step failure function, click on the Yes button:
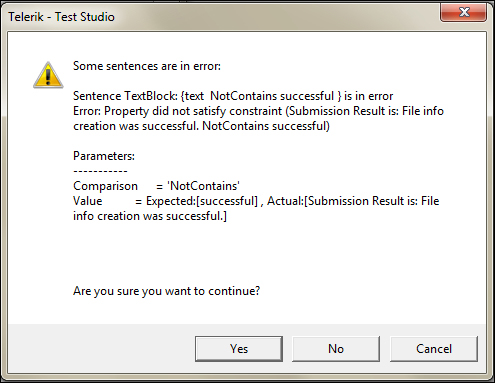
Test Studio alert window on erroneous verification steps
Go to the Lists tab and create a new list named List_Extended. Add the preceding created test to it and then run the list.
The default log folder is called WebAiiLog and is found on your C:. Browse for this folder and then open the first showing text document after sorting the file entries in a descending order based on the modified date. Notice how the log starts with our custom [Trace] : Reading from extension library message which ascertains that the execution is made according to our modifications. The runtime annotations appear next in the list which ends at the verification step. Finally, the last line is [Trace] : Connection status: True, which means that the on step failure method executed and the network status was successfully printed.