
- Create a Cube Game Object.
- Change the position of the cube by changing the X value of the Transform Component to 10.
You will notice that the cube's position in the scene reflects this new location.
- Change the rotation of the cube along the X-axis to 45.
You have now rotated the cube 45 degrees along the X axis.
- Change the scale of the cube's Transform Component to 10 on the X-axis.
You have not scaled the object along its X-axis.
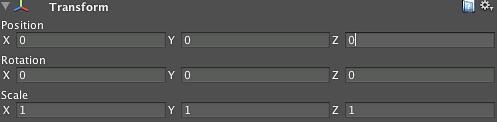
You can refine the location of an object within the scene by changing its Position attributes. These attributes represent where this object is in world space coordinates – the coordinate system of the scene itself. In addition, you can change the orientation of an object by adjusting its Rotation attributes. Finally, you can define an arbitrary scale for an object by updating the Scale attributes:
The Camera provides the viewport through which the user can view the content within your scene. The camera will capture everything that is within its frustum and project that content onto the frame buffer for rasterization onto the 2D display. The frustum defines a geometric shape, which is used to clip Game Objects in the scene. If a Game Object isn't within the frustum, the Camera assumes that it is not visible to the user and doesn't waste cycles trying to draw it. This concept is important and will become even more important, when we discuss occlusion culling later in the book. For now, just note that the Near Clip plane, the Far Clip plane, and the Field of View define the shape of this object and all of these settings can be configured easily in the Camera Component:
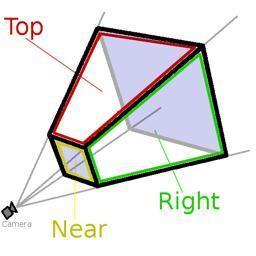
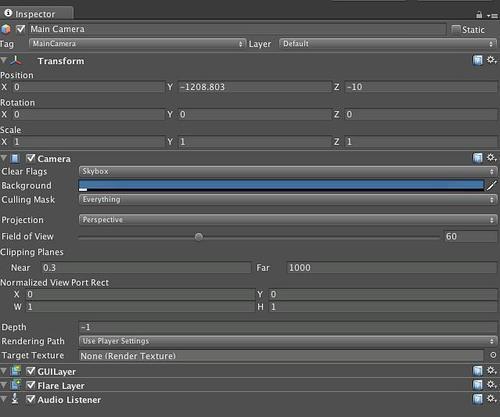
The Camera Component has several properties that define how much of the world the user will be able to see when the scene is rendered.
The near clip plane defines a plane such that objects closer to the camera are no longer displayed. This setting normally places the near clip fairly close to the camera so that objects can get close to the 'viewer' and not get clipped.
The far clip plane defines a plane such that objects beyond this distance are too far away and should not be drawn. The setting you choose for this will have a fairly substantial impact on your game's performance. While you may be able to increase this setting very far in the distance, realize that those objects far off in the distance are being rendered and consuming resources as if they were closer. So if you raise the far clip out to your virtual horizon and there is a city out there, but it's only a few pixels in size, you're still drawing that city in all its splendor and taking the performance hit to do so, even though it's scarcely visible.

You can set any Unity camera to one of two projection types: orthographic projection and perspective projection. These projections determine how the world seen by the camera is rendered.
A camera with orthographic projection removes the perspective correction from the camera's view and ensures that no matter how far an object is from the camera its distance will remain the same. The orthographic camera will be important when we build traditional 2-dimensional user interfaces and particularly important for 2D games.
The perspective camera takes into account the distance of a Game Object from the viewer, and based upon this applies a perspective correction such that objects further away appear smaller than they really are. For most games this is the primary mechanism used to draw content.
It is important to note that there are no constraints in Unity that require you to use one camera projection type or other in a scene. In fact, it is quite common to use multiple cameras for different purposes. You could, for example, have an orthographic camera that is responsible for drawing your user interface elements and a perspective camera that is responsible for your regular scene elements.
Lights are straightforward in concept. They illuminate objects in the scene so that they can be seen. Without lights, objects will appear to be dark and lifeless. With lights you can add mood to a scene and, through the shadows that they cast, add depth to the world. There are three primary types of light in Unity: Directional lights, Point lights, and Spot lights.
A Directional light is one that has an infinite distance from the scene. While you can position it in Unity, only the direction of the light is used in determining how the objects in the scene are lit. Directional lights are the cheapest lights that you can use in your scene. This is the fastest way to do global scene illumination as the position of the light doesn't impact how 'lit' something is within the scene, only the direction of the light.
In contrast to the directional light, the Point Light is a light source that has a position in the scene, but no direction – emitting light equally in all directions. This light is of average computational complexity and generally used for most effects in a game.
The most expensive light type, spot lights simulate the same effect that you would get from flashlights – a cone of light. This cone also has a fallout, such that light in the center of the cone is brighter than that at the edges of the cone. While there may be some situations where you might want to use a spot light, the expense of doing so on iOS devices makes this highly prohibitive.
While you can accomplish tremendous things with lights that approach realistic lighting, to do so requires an exceptional amount of computing power. When considering the computational and graphical capabilities of mobile devices, computing lights in real time is a sure way to ensure that our games and applications will have poor performance. This can be remedied by using light maps.
Light maps are best described as lighting a scene and baking the effect of those lights on the scene. Since it is computationally cheaper to blend light maps with material textures, we can accomplish through light maps what would normal have required more expensive lights. As luck would have it, Unity has built in support for light maps through the industry-leading Beast light mapping system.
With Beast you will be able to place lights in a scene, as you normally would, and Beast will compute the impact of those lights on the textures in the scene and create light maps for us. We can get exceptional results quickly and cheaply doing this.
Lights and Beast light mapping will be covered in more detail in the chapter on lighting.
Sound is an often-overlooked part of a good game and helps set the mood for the player. Watch your favorite movie (not a silent movie) with the sound turned off. You will notice that the experience is not as compelling as it was when the sound was on, and if this movie is something you know very well – you will find that your brain tries to fill in the blanks by recovering the dialogue and music from the movie in your memory. Sound is crucial for engagement and Unity has an arsenal of audio capabilities that cover the spectrum.
In the real-world, sound must be heard and if you are too far away from the emitter of the sound, you won't hear anything. Unity handles this concept of hearing through the audio listener. This Game Object is normally attached to the player's avatar, character, or other representation in the scene. The audio listener then acts as a microphone within your game world and anything that it hears – the player hears through the speakers.
By default, the audio listener is placed on the Main Camera in the scene. If you want the user to hear from the perspective of some other object, simply remove the audio listener from the Main Camera and attach it to the Game Object that you wish to represent the users center of hearing. In Unity, you cannot have multiple audio listeners active at the same time. While the audio listener is a component, it doesn't have any configurable properties.
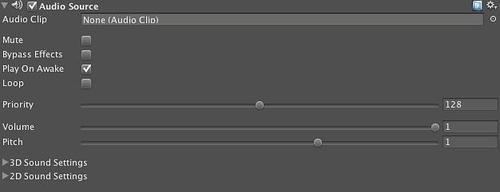
Audio sources represent things that make noise in the game world. You can add an audio source to a Game Object by selecting the Game Object and choosing Component | Audio | Audio Source. This will add the Audio Source component to your Game Object:
You will also see that in the Scene view your Game Object has a speaker icon on it. This denotes that this Game Object has an audio source component on it and generates sound:

While we have created an audio source, we have not associated an actual sound with it. This sound is what Unity refers to as an audio clip. Unity supports audio clips in pretty much every format you can encode sound to including .aif, .wav, .mp3, .ogg and even the tracker formats of .xm, .mod, .it and .s3m.