
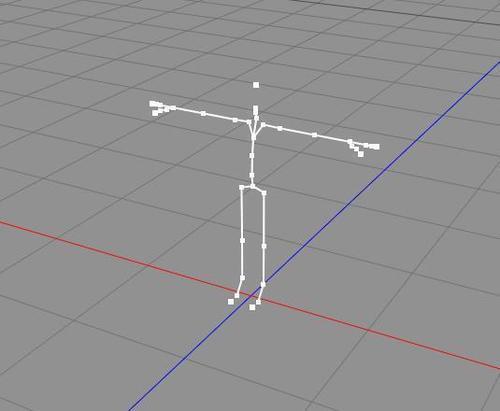
The character that we imported is what is known as a rigged character. A rigged character is one that has all of its bones for animation. These bones are what drive the movement of the mesh itself during animation. Let's disable the rendering of the mesh so we can see the bones themselves..
- Select the Soldier mesh in the Hierarchy view.
- In the Inspector view, scroll down to the Mesh Render component and click its check box. This will disable rendering of the mesh in Unity and in the Game:

- Open the Scene view of the project and select the mesh in the Hierarchy. You should only see the bones for the soldier character we imported:
As mentioned earlier, Unity's animation system is fairly robust and has an easily scriptable animation blending system built right into it. As a consequence, we can deal with simple animations such as walk, run, use weapon, and so on, and we can have Unity blend between the animations to allow us to walk while using the weapon.
The next step is to associate an animation with this rigging so that we can 'drive' our character around the scene. There are a number of ways that you can animate a character, such as motion capture or animating by hand. Unity supports two approaches for importing this content into our game: animation splitting and multiple animation files.
There are times when you will receive an asset which already has multiple animations baked onto a model. In many content-purchasing scenarios this is quite a common practice. In these situations, when you import the model you will have to tell Unity how to split the single large animation into multiple distinct animations. You will do this in the FBXImporter that appears when you bring the model into the Unity IDE:

By selecting the option to Split Animations, Unity will enable a table that will allow you to specify each animation that is present. For example in this scenario there is an animation called idle which runs from frame 1 through frame 25, a walk that plays from frame 26 through frame 50, and so on. Once you have imported the animations you can reference them by the names that you have given them in the table for all animation actions. We will discuss this in more detail shortly.
The preferred way to import animations is to use multiple animation files. To do this you create a separate model file for your animation data using the naming convention 'model'@'animation name'.fbx and simply drag this .fbx file into Unity, the same as you would any other asset.
Through this you can import your animations distinctly for each character and it becomes much easier in your workflow to modify these animations, without having to worry about which frames changed or ending up with extra frames in your animation data, to allow for potential changes. It is important to note that these files contain only animation data – not the actual model geometry. Further, it is important to note that Unity will not attempt to enforce the mapping of the model name to the name of your models:

For example, here we have imported some animations in an FBX file. There is no default model in our scene, but we can still use these animations since the bone hierarchy of these animations matches that of the character we already have in the game.
To use this animation within our game we need to select our character and in the Inspector expand the animation settings:

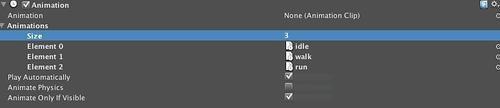
Here we see that our character has 0 animations specified. In addition in the Animation element we see that there is no animation scheduled to play. We can easily fix this by increasing the animation count to 3 to match the three animations we have imported:

These slots can all hold the animations that we have imported. The animation itself being represented by a document icon with a clock on it which, coincidentally, has the same name as the animation itself. Simply drag the animations onto these slots and you will have set up animations for the character:
If you want to set up a default animation for the character you can drag an animation onto the Animation slot. I have chosen to select the idle animation in this case:

Now your character is all setup and ready to animate. If you run the game in the editor you will see that your character moves from his default T position to the idle animation and plays through it:
