
Having good materials makes all the difference and the best materials have textures associated with them, so you can do with more than solid colors. I grabbed a texture that looked interesting. I'm using a rusted metal texture from OpenGameArt.org that came from the Rusted Metal Texture Pack created by p0ss (metall005-new-tileable.png in the downloadable content). It's easy to find free textures online—you'll find several good sites for textures in Appendix B, Additional Resources. Switch to the Design desktop and make sure that our scene is loaded, so that we are looking at the ship in the Scene Viewer window.
First, we need to import the texture, so go to the Data Explorer window and click on Import | Texture. Select the texture we downloaded and set the Height and Width to 256, so our texture does not take up a huge amount of memory. Our texture is now ready for use in the Material Editor window.
In the Material Editor window, click on Material | Open and open the main theme material. Once the material opens, go to the Texturing tab, as shown in the following screenshot:
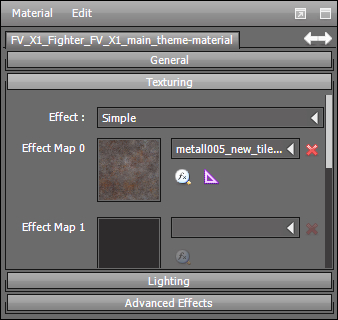
On the Effect Map 0 field, set the texture that we just imported. We also need to make some changes or the Lighting tab. Switch to the Lighting tab and check the Per Pixel Lighting option under Receive Dynamic Lighting. By computing the lighting at each pixel, it looks better than the colors we get from the vertexes. Continuing down the Lighting tab, place checkmarks in the Cast Dynamic Shadows and Receive Dynamic Shadows option so our ship doesn't look like a vampire—things like missing shadows can really throw a scene off. Lastly, we will change the Diffuse and Specular colors because they will tint the texture and make it dark. Set the colors to white, as shown in the following screenshot:

You may have noticed that the texture doesn't look like it has been applied. The reason is that the ship model had no UV coordinates. The UV coordinates tell 3D programs where to apply textures on the model. We are going to do a little hack; it won't make the ship look like rusted metal, but the effect is cool and at least we learned how to apply a texture!
Go back to the Texturing tab and click on the FX button next to the texture we applied. The Texture Mapping Modifier window will open. We will check the Enable Texture Mapping Modifier option and then check the Spherical checkbox for the Generation Mode option. If our model had UV coordinates, we would have checked the Explicit checkbox. This maps the texture as if our ship was a sphere—it's not accurate, but as we rotate the ship in the viewer, we will see cool effects in the metal.