
Particle effects allow us to set behaviors for large numbers of particles and then automate them to provide certain visual effects. In ShiVa, this is done by either providing a texture that can be used as the particles or by using the default colored square particles and then setting their properties in the Particle Editor window. The Particle Editor window, as seen in Chapter 2, Editor Fundamentals, is where we create particle effects; it includes a real-time preview of the effect so that we can make changes on the fly. We are going to use particle effects to create engine exhaust effects and explosions. Let's jump in and create the engine exhaust effects. We'll hit the highlights of the Particle Editor window as we move ahead in the chapter.
When working on particle and polytrail effects, it can be helpful to use the Preview desktop. Switch to the Preview desktop and then set the Particle Editor window to the left-hand side of the screen. Go to Particle System | Create and name it ShipExhaust. Click the Play button at the bottom of the Particle Editor window. The Scene Viewer window will appear as shown in the following screenshot:
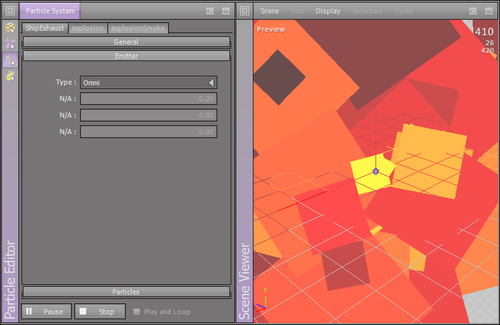
You can see that the particle effects are displayed in the Scene Viewer window—if we make changes in the Particle Editor window, we'll immediately see the results. Start with the General tab and check the Use Object Transform option, as shown in the following screenshot:
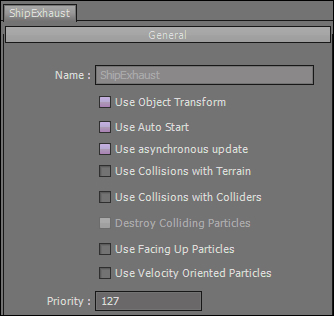
Setting the Use Object Transform option ensures that the effects will move with the object that they are attached to—in this case it will be the ship. The Use Auto Start option indicates that the particle effects will start immediately in the scene rather than being triggered at some point. The Use Asynchronous Update option is used so that particle effects don't start at the same time. The collision options are pretty straightforward and are useful if you are creating effects that will interact with the terrain or with other colliders. If we set the Use Facing Up Particles option, the particle effects orient themselves to the xz plane, indicating that the effects can be seen from overhead, otherwise the texture of the particle effect is vertical and won't be viewable from above. Finally, the Use Velocity Oriented Particles option causes the particles to orient along their velocity.
Move to the Emitter tab and change the Type field to Cone and leave the angle at 0.00, as shown in the following screenshot:
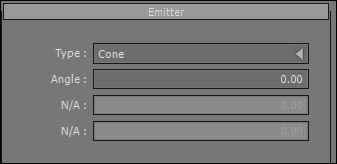
The Angle modifier determines the direction in which the effects move. The Type field determines the general shape of the overall effect. The best way to see what the different types do is to experiment a bit. In fact, the best way to get the effect we are looking for is by the trial-and-error method. Once you experiment a bit, it is easier to get a feel for what the different options do.
The last tab is the Particles tab; there are quite a few options to set in this tab and each option can have a major impact on the way the particles behave. Rather than discuss what each option does, we will talk about what we are trying to achieve by adjusting the settings. The basis for the exhaust effect is that it should be a bright, fire-like effect with a fairly high velocity to suggest a great deal of thrust. We also want to flare out a bit just to add a bit more depth. With that in mind, let's take a look at the settings, as shown in the following screenshot:
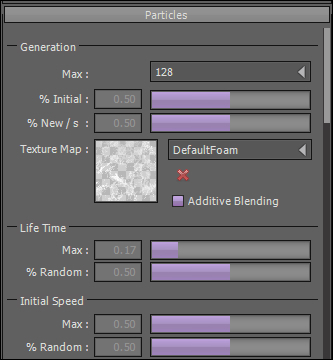
To set the required settings in the Particles tab, you need to perform the following steps:
- Since we are making a flame effect, we can actually accomplish quite a bit with just a few particles, so we will keep the Max particles field at 128.
- We also want a fairly steady flow of particles so leave the defaults for % Initial and % New/s.
- Set the Texture Map option to DefaultFoam. The DefaultFoam texture comes with ShiVa and provides a good base for effects that are a bit nebulous like fire, smoke, and foam.
- Make sure that the Additive Blending option is selected because it gives a nice bright color where the particles overlap, which is what we want in the case of fire since it is brighter in the center.
- Set the maximum life time of the particle, using the Max option, lower so the particles won't live as long—this will tend to keep the particles closer together.
- Keep the %Random option as it is—we want the flickering effect that comes from randomness.
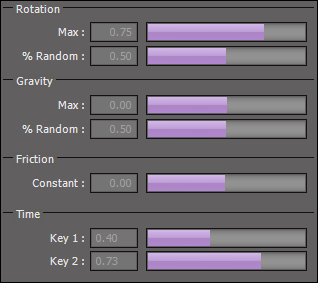
- Increase the Max setting in the Rotation section, as shown in the previous screenshot, so that the textures will spawn with random rotation making the fire appear more dynamic and natural.
- Leave the Gravity section settings at 0.00 as there is no gravity in space.
- Leave the Friction setting at the default. The friction changes the deceleration rate of the particles.
- The Time section is adjusted slightly higher just because it seemed to look a bit better. It is important to know how the key times affect the other settings. The key times are in percentages of the total particle lifetime. When we adjust the key times, we change the times at which the opacity, color, and size change. To really understand how this will affect your particles, the best thing is to spend some time adjusting the Key 1 and Key 2 values to see what they do.
- The default colors work for what we're doing, so skip them and take a look at the last set of properties, as shown in the following screenshot:
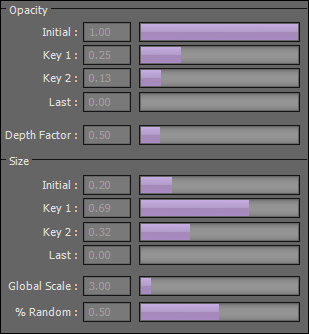
- Adjust the Opacity section of the particles in Key 1 and Key 2 to 0.25 and 0.13 respectively. This will make the fire fade out quickly around the edges as fire tends to fade away as the gases expand and cool.
- Set the Initial and the Key 1 values of the Size section to a low value, about 0.20 and 0.69, to get more of an exhaust shape.
- Adjust the Global Scale value up to 3.00 to have it match the size of the ship. It's best to attach the effect to the ship first and then see how it looks, but since I have done all that already when preparing for this chapter, a scale of 3.00 seemed to be just right.
- That's it for the particle exhaust, so save your settings.
Our ship model has several engine exhaust ports, so we need to apply the exhaust effects to each one of them. In order to do this, we will need to rely on our handy helper objects again. We'll group the helper objects with the ship and make sure that the ship is the parent object, but there are two ways to do this. We could add the helper objects to the scene, position them, and then make sure they get grouped with the ship, but the easier way is to just open the ship model separately.
Before we open the model, let's make sure that the model is updated with any changes we may have made in the scene. Switch back to the General desktop, load the scene, right-click on the ship model, and select Model | Update Model from Instance. This takes all of the changes we have made to the ship, including any child objects, and copies it into the model file. Now, we can load the ship model and add our particle effects.
Tip
Updating models and instances
It can often be very handy to update your model based on the changes that you have made to it in your scene. That way, future instances of the model will also have those attributes. Conversely, there may be times where you update the actual model outside of the scene—use Update Instance from Model to inherit those changes.
Double click on the ship model in the Data Explorer window. Once the ship is opened, we need to set up the other modules to which we need access. We'll need the Scene Viewer, Data Explorer, and Attribute Editor windows—the actual placement of the viewports is up to you.
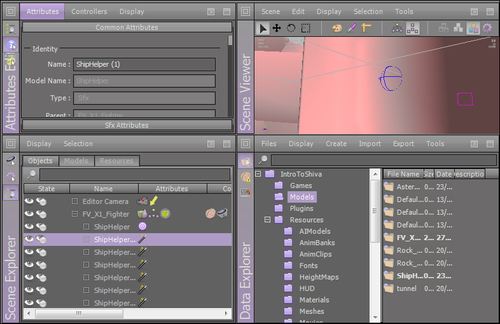
In the previous screenshot, we are zoomed in on the back of one of the engines. To attach the particle effects, follow these steps:
- In the Data Explorer window, click on Create | Model | Helper and name it ShipHelper.
- Drag-and-drop the ShipHelper helper from the Models folder into the scene right on the back of one of the engines. You'll be asked whether to convert the model to a group, click Yes.
- Orbit around the engine and the helper object to make sure that they are aligned at every angle.
- Once the helper is in place, right-click on the new object in the Scene Explorer window and select Attribute | Sfx | Add a particle emitter and select ShipExhaust.
- With the ShipHelper helper that we just added, go to the Attribute Editor window and change the y axis rotation to
-90degrees. Because our model is oriented on the x axis and particle effects are oriented on the z axis, we know that we will need to rotate the effects by90degrees. - Now, we can save it and test it in our scene and it should look just fine, except that there is only one engine set up so far.
To load the modified ship model back into the scene, load the scene and right-click on the ship and select Model | Update Instance from Model. This reloads the model and any attributes that have been changed. Run the game and see how it looks! Of course, it looks funny with only one engine running, as shown in the following screenshot:
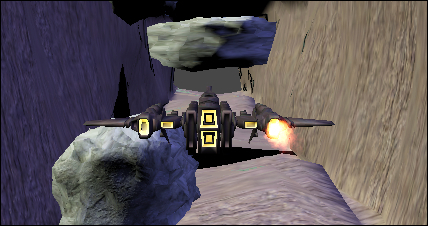
It's pretty easy to get the other engines set up, so let's do that now. Reopen the ship model and select the helper object that has the particle effects attached. Now click the Z key to go into translate mode. Click on Edit | Duplicate to make a copy (the shortcut is Ctrl + D) of the object. Use the translation arrows to move the duplicate helper object to the back of another engine. It will look better if we ignore the smaller engine-type object between the first engine and the body of the ship—it's fairly small for an engine and the particle effects will be too overwhelming if there are six in a fairly small area. We'll put two on the main engine, stacked on top of each other, and one on each wing. Keep making duplicates and placing them behind the engines until all four are done. Save, load the scene again, and run the game. Now it looks much better, just see the following screenshot:

Now that we know how to do particle effects, it will be much easier to jump in and make a few more, especially considering that we will be using the same texture. Go back to the Preview desktop and open the Scene Viewer and Particle Editor windows. Create another new particle effect by clicking Particle System | Create and name it Explosion. The following are the suggested settings:
- Uncheck Use Auto Start
- Set % Initial to
1.00 - Set % New / s to
0.00 - Set texture to
DefaultFoam - Check Additive Blending
- Set the Max value in the Life Time section to
0.12 - Set the Max value in the Initial Speed section to
0.20 - Set the Max value in the Rotation section to
0.42
Now we have an explosion that we can use for collisions. But we need to have a way by which we can put them to use in our scene. Once again, helper objects are going to save the day. In the following steps, a helper object is created:
- Go to the General desktop.
- In the Data Explorer window, click on Create | Model | Helper and name it
ExplosionHelper. - Double click on the new model so that it opens in the Scene Viewer window.
- Right-click on the helper object and go to Attributes | Sfx | Add a Particle Emitter and choose
Explosion. - Right-click on the model and select Controllers | AI | Create AI and name the AI as
ExplosionAI. - Open
ExplosionAIin the Code Editor window and create three number variables callednOffsetX,nOffsetY, andnOffsetZ, all set to0.00. - Create an object variable and name it as
hShip. - Create the
onInithandler and usehShipto store a handle to the ship by entering the following code:this.hShip ( application.getCurrentUserSceneTaggedObject ( "Ship" ) )
- Next, we need to create a handler that will position the explosion and start the particle effects, so create a custom handler named
onExplosionand pass it three parameters—x,y, andz, which represents the position of the collision where the explosion should occur. Enter the following code:-- The coordinates passed in are the location of the collision, so we subtract -- them from the location of the ship to get the position of the explosion in -- relation to the ship. We'll use this in onEnterFrame. local nX, nY, nZ = object.getTranslation ( this.hShip ( ), object.kGlobalSpace ) this.nOffsetX ( nX - x ) this.nOffsetY ( nY - y ) this.nOffsetZ ( nZ - z ) -- Move the explosion to the collision location and start the particle effects object.translate ( this.getObject ( ), x, y, z, object.kGlobalSpace ) sfx.stopAllParticleEmitters ( this.getObject ( ) ) sfx.startAllParticleEmitters ( this.getObject ( ) )
Basically, in the previous code, we get the ship location, calculate the offset to the collision spot so that we can use it later and then place the explosion and set it off.
- We'll also need to create
onEnterFrameto update the position of the explosion as the ship moves. Enter the following code:-- Get the location of the ship local nX, nY, nZ = object.getTranslation ( this.hShip ( ), object.kGlobalSpace ) -- Subtract the offset to get the location of the initial collision local x = nX - this.nOffsetX ( ) local y = nY - this.nOffsetY ( ) local z = nZ - this.nOffsetZ ( ) -- Move the explosion to keep up with the ship object.translateTo ( this.getObject ( ), x, y, z, object.kGlobalSpace, 1 )
The previous code is where we use the calculated offset, so that we know where to place the explosions in each frame as the ship moves. We use the offset to calculate the new position and update the location of the explosion.
- Save the model, open up the Game Editor window and drag-and-drop the
ExplosionHelperhelper object into the scene. The location doesn't matter since it will not be visible initially. - Right-click on the
ExplosionHelperhelper object and select Edit Selection Tag and name itexplosion.
We have just about everything set up, but we need a way by which we can actually trigger the explosions. When the ship gets struck by an asteroid, we are going to make the ship invulnerable for three seconds and make it 50 percent transparent as a result. To make his happen, in ShipAI, add a new Boolean value called bInvulnerable
and set the initial value to false. We'll set this flag when a collision occurs. Next, add a new function called CheckCollision
that we will call in the onEnterFrame handler and then add the following code:
-- Get the last collision time so we can keep track of timers
local nLastCollisionTime = dynamics.getLastCollisionTime ( this.hShip ( ) )
-- Get number of collisions to see if a collision occurred
local nHitCount = dynamics.getLastCollisionContactCount ( this.hShip ( ) )

-- Number of collisions is > 0 then a hit has occurred
if(nHitCount > 0) then
    this.DoCollision()
end

-- Check if the ship is invulnerable and if it has been 3 seconds
if(this.bInvulnerable() and nLastCollisionTime > 3 ) then
    this.MakeInvulnerable ( false )
end
First, we check the elapsed time since the last collision and the number of collisions that have occurred in this frame. If there were any hits, then we make a call to the next function that we will create, that is, DoCollision.
Then, if the ship is currently invulnerable we'll see if the elapsed time has exceeded 3 seconds and if it has, then it is time to turn off invulnerability with a call to MakeInvulnerable, which we will define soon, and pass it false.
Since we are referencing the DoCollision function in the previous code, we better set one up. Create a new function called DoCollision and enter the following code:
this.DoExplosion ( )

this.ClearHorizontalMovement ( )
this.ClearVerticalMovement ( )
this.MakeInvulnerable( true )
Once again we make a call out to another function. DoExplosion will handle creating the actual explosion and the rest of this function sets up the ship properties. First, we clear out all the movement and then we have another reference to MakeInvulnerable, this time with true, which will change the opacity of the ship and turn off collisions. Since we have referred to it twice, let's create MakeInvulnerable before setting up the DoExplosion function. Create a new function called MakeInvulnerable, give it a parameter called bInvincible
and then enter the following code:
-- The collisions are opposite the invincibility
dynamics.enableCollisions ( this.hShip ( ), not bInvincible )
-- Toggle the invulnerability
this.bInvulnerable ( bInvincible )

-- Set the opacity depending on the invulnerability
local nOpacity
if( bInvincible ) then
    nOpacity = 0.5
else
    nOpacity = 1
end

shape.setMeshOpacity ( this.hShip ( ), nOpacity )
First of all, we toggle the collisions by calling enableCollisions
and pass in the opposite parameter of bInvincible, since when the ship is invincible the collisions are off and vice versa. Next, we set the invulnerability flag and then set the opacity of the ship. We are almost there; just create one more function called DoExplosion and enter the following code:
-- Get handles to scene and the explosion object.
local hScene = application.getCurrentUserScene ( )
local hExplosion = scene.getTaggedObject ( hScene, "explosion" )

-- Get the location of the collision
local nColX, nColY, nColZ = dynamics.getLastCollisionContactPositionAt ( this.hShip ( ), 0 )
-- Send the onExplosion event to the ExplosionAI
object.sendEvent ( hExplosion, "ExplosionAI", "onExplosion", nColX, nColY, nColZ )
We do the usual housekeeping of setting up local variables—we have one for a reference to the scene, one to reference the new explosion helper object that we created, and the last three will hold the location in which the collision occurred. Using this information, we then send the location of the collision to the explosion helper via the onExplosion event.
That's it! We can save and compile the code and run the game. Now when we click on the Play button, an explosion occurs when we get hit by asteroids and we are given a recovery time to get back in the game.