
As I mentioned before, this can be the most difficult part of deploying our game, but it won't be so bad for us since we are only doing a single platform. We are also not going into the nitty-gritty details of installing each piece, because it is already well documented on ShiVa's site and on the sites of each of the platforms. For detailed installation including links to platform-specific sites, check http://www.stonetrip.com/developer/doc/authoringtool/installation. We'll look at the websites where the installation information and downloads are, but we'll assume that each piece is installed successfully. If you do run into trouble, try the ShiVa forums or the platform-specific help pages if the problem is with platform-specific software.
The link for the Android toolchain installation is http://www.stonetrip.com/developer/doc/authoringtool/installation#Android_target. The required tools are as follows:
- Android SDK
- Android NDK
- Cygwin
- Apache Ant
- Java SE Development Kit
- Eclipse
- ADT plugin for Eclipse
It should be pretty apparent now why this can be challenging, but the great thing is that once we set this up we will be able to use it over and over again. It is a small price to pay for easy development in the long-term.
The documentation mentions something about unzipping the files, but the download is actually an executable. The rest of the instructions are fine, but make sure you don't use spaces in your pathnames. To make things easier, you can create a C:Android folder and put the SDK and NDK in there. Once the SDK is installed, the Android SDK Manager will start and you will need to download the required files. This depends on the device you want to use. For this example, we will be using Droid Charge, so we will select Android 2.3.3 (API 10). We'll just download the SDKs—don't bother with the simulator files unless you want to run your game in one of the simulators instead of an actual device. Also, make sure to install the USB driver if you will be using a USB to deploy your game.
The Android NDK is a simple ZIP file extraction. Again, make sure that you don't use spaces in the path.
Cygwin is an interesting program and if you have never taken a look at it outside of ShiVa, it is well worth your time. With Cygwin, you can run Linux applications within Windows. Just follow the ShiVa setup, but again make sure that the Cygwin path that you use has no spaces.
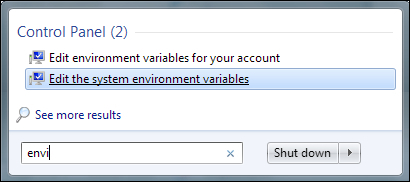
The instructions are pretty easy because you just have to extract the files to a path, but you also have to set system environment variables. For Windows 7, click on the Start menu and start typing environment—pretty soon an option pops up with the Edit the system environment variables option; click on it, as shown in the following screenshot:
Then click on Environment Variables. In Windows XP, do as outlined in the following steps:
- Right-click on My Computer on your desktop.
- Select Properties.
- Click on the Advanced tab.
- Click on Environment Variables.
Once this is done, click on the New button at the bottom of the screen to create a new system environment named ANT_HOME, as shown in the following screenshot:
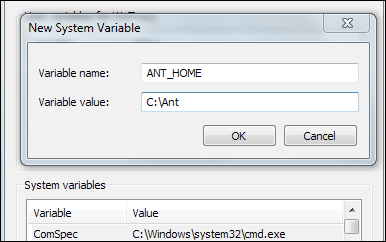
Enter the path to which you have extracted the Ant files.
The installation is straightforward and then you have to set a JAVA_HOME environment variable, so use the steps as described in the Ant section. The path should be something like C:Program FilesJavajdk1.6.0_30. You'll know you are in the right folder if you see a bin subfolder.
Eclipse is an Integrated Development Environment (IDE) and is what you would probably use if you were developing Android apps without ShiVa. It is a fairly complex piece of software that can be used in a million different ways and has plugins for just about everything. In this case, make sure you follow the instructions on ShiVa's installation page—it is easy to get overwhelmed by all of the options on the Eclipse download site. The instructions then have you install the Android Development Tools (ADT) plugin. Doing so will provide customizations within Eclipse to make Android development a bit easier. For our deployment, we won't actually have to do work within Eclipse, but it is required nonetheless.
The first time you run Eclipse with the ADT tools installed, you will be prompted for the Android SDK location. Make sure to select Use existing SDKs and point it to the location that we created previously.