
Our HUD now displays a title, but there's no background. What we really need is a menu so that we can choose our destiny! Let's start by adding an interesting background and then, since buttons and their associated actions form the backbone of menus, we'll make some buttons.
If you're not much of an artist, you can take the easy way out which is what we are going to do here. We're simply going to have our asteroid model rotate slowly in front of a generic space field. I created a really simple space field in Gimp and named it SpaceField.png. Import it as usual and then create the scene by following these steps:
- In the General workspace of the editor, click on Edit | Scene | Create in the Game Editor window and name the new scene
Startup. The scene will open for editing. - Drag-and-drop an asteroid model into the middle of the scene. Right-click on the asteroid and select Controllers | Dynamics | Remove Controller so that we don't have any weird dynamics. Since the asteroid model is scaled up 5 times, you will need to zoom out so that the asteroid just fills most of the screen.
- Drag-and-drop DefaultDynamicLightSet into the scene so there is some light and then rotate it a bit until you get some interesting-looking shadows on the asteroid.
- To make the asteroid rotate, we need to use AI; so right-click on it and select Controllers | AI | Create AI and name it
IntroAI. - Switch to the Code workspace and the
IntroAIAI will already be open, so click Add Handler and select onInit. - In the onInit event handler, add the following code:
local hAsteroid = this.getObject ( )
-- Get the frame render time
local nFrameTime = application.getLastFrameTime ( )
-- Rotate the asteroid in local space so it will rotate forever
object.rotateTo ( hAsteroid, 10, 0, 10, object.kLocalSpace, nFrameTime * 0.6 )
All we need to do is get a handle to the asteroid, compute the last frame time, and then rotate the asteroid based on the frame time. If you recall that when we computed the ship movement we did the same frame time computation so that the animations would be smooth regardless of the rendering speed. The rotation uses
kLocalSpaceso that the rotation will continue indefinitely. - To get a nice space field background, open the Ambience Editor window, go to the General tab and in the Background section, set the texture to SpaceField, and the color value sliders all the way to the left.
This should give us everything that we need for the background of our menu. Now let's add some buttons.
Buttons rely on actions in order to function, otherwise they would only be labels. Actions are the way by which HUD can trigger actual commands and send messages to the rest of the game. In the case of the Start and Quit buttons, we will send events to the MainAI AI, so let's modify MainAI to handle those events by following these steps:
- Create two new custom event handlers in
MainAIand name themStartGameandQuit. These are simple one line events. The following is the code forStartGame:this.GameState ( )
Remember that at the beginning of the chapter, we set up our game states and that the actual game runs in the
GameStatestate. Since we start in theInitialStatestate, we just need to use thethisobject and the state name to load theGameStatestate. - The
Quithandler is similarly easy, as shown in the following line of code:application.quit ( )
This is the command to quit the application, so we put it to use. Unfortunately, these aren't the only things we need to change. Recall that
InitialStatewas designed to handle starting the game, but now we need a way to display the menu. This is done with thenewTemplateInstancecommand. - We are going to add the menu into the
InitialStatestate'sonEnterhandler and hence we change theInitialStateto be the initial state; do this by right-clicking on it and select Set as Initial State. - Go to the
InitialStatestate'sonEnterhandler and add the following code:if( application.setCurrentUserScene ( "Startup" ) ~= nil ) then hud.newTemplateInstance ( application.getCurrentUser ( ), "InitialMenu", "InitialMenu" ) else log.error ( "Unable to load initial scene" ) endThe
newTemplateInstancecommand takes in the user, the HUD we want to use, and what name we want to refer to it as in our code. You can see that we keep the names the same—it makes things easier. That will take care of loading the introduction screen and menu, but how do we transition to the actual game? - First, when transitioning out of
InitialStatewe now need to dispose of our menu and then load theGameStatestate, so in theonLeavehandler ofInitialState, we are going to enter the following code:hud.destroyTemplateInstance ( application.getCurrentUser ( ), "InitialMenu" ) this.StartGame ( )
The first command destroys the HUD, otherwise it will stay on the screen in the next scene. Next, we are calling the
StartGamefunction which is where we moved our startup code. Why do we now run the startup code inInitialState? Because, we could be enteringGameStateseveral times during a game if the player is opening the in-game menu, so we don't want the game to restart each time. - Remove the
StartGamecode from theGameStatestate'sonEnterevent handler.Tip
Designing the state carefully
Be careful when designing your states and think about what each state should encompass. Initializing the state of your game, for example, would be executed each time you moved to and from other states, such as menus, unless the game initialization is handled as a separate state.
Now that we have the needed event handlers, let's create the HUD actions that will call those events using the following steps:
- In the HUD Editor window, right-click on Actions and select Add Action. Name the action
StartGameand click OK. - Right-click on StartGame and select Add Command. The Command type field allows us to set the type of action that the command will perform. The only one we will cover is the
SendEventToUserthat allows us to send events to user AIs such as MainAI. You can find information about the other command types at http://www.stonetrip.com/developer/doc/api/hud#Command. - Select MainAI for the AI model and onStartGame for the event.
- Create a new action named
QuitGameand follow the same previous steps, but set the event toonQuit. Now we have everything we need to create some buttons. - Add a button by right-clicking on Components and select Add Component, or use the Component menu. Name this one btnStart, set the Type option to Button and check the Viewport aspect ratio independent option.
- We will position and size the button by using the mouse instead of manually entering parameters. We can click and drag to move the component and click and drag the component border to resize. It should be at about
50.00and45.00for the position and40.00and11.00for the size. - Next, go to the Appearance tab and set the shape to a rounded rectangle. The Corners radius option becomes enabled, but we will leave the radius at
5. Change the BackColor option to 0, 0, 0, and 255 and the BorderColor color's Alpha option to 0. All these settings are shown in the following screenshot: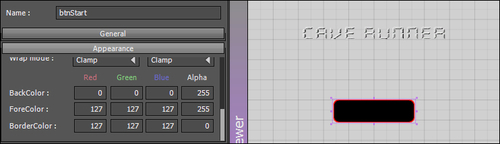
- We now have a rounded rectangle button that is sized and shaped the way we want. The last options to set are on the Button tab. In the Text box, enter Start Game and make sure Text Alignment is set to Center, both horizontally and vertically. Next, set Clicked Action to StartGame and click OK. We now have the start button created and if we click on the Components heading, we can see what our HUD looks like so far, as shown in the following screenshot:
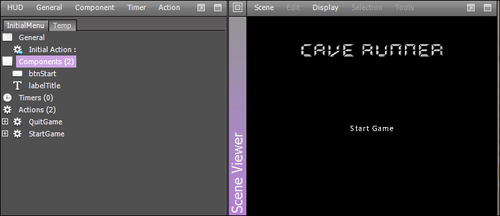
The black background will actually be replaced with our startup scene, so it is hard to get a feel for what it will actually look like, but it's a start. Now, we need the Quit button to finish off this menu, so let's take a shortcut and copy btnStart.
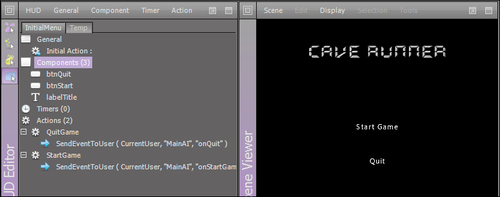
Right-click on btnStart and select Copy. You can either paste the button into Components directly, or you can create a new component and then paste only certain sets of information into the new component. You can see what paste options exist by clicking on the Component menu. You'll see that you can paste General, Appearance, Events, and Type, but for our purposes it will be easier to paste as a component, so right-click on Components and choose Paste and paste the btnStart button. You'll have to rename it, so set the name as btnQuit. Double-click on btnQuit and make the following changes:
- Position: Move to a position below the start button
- Text: change the text on the Button tab to Quit
- Clicked Action: Change to QuitGame on the Button tab
- After setting all these parameters, the HUD Editor window will appear as shown in the following screenshot:
Now, our InitialMenu looks complete. Of course, if we are making a full-featured game we would probably have menu items for options, instructions, and high scores, but now the concept is the same no matter how many menu items there are.
Make sure you save the HUD and then in the General workspace, drop the InitialMenu HUD item to the Resources tab of the Game Editor window. Run the game. You should see the startup scene with the title and buttons for starting and quitting the game. What's more, both buttons actually work!
We have one more menu to add, however, so don't celebrate yet. We need an in-game menu that will pause the game and give us the option to quit or restart the game. We just need the settings now that we know how to set up the HUD. Follow these steps to create your pause menu:
- Create a new event handler in MainAI called
Restartwith the codethis.InitialState ( ), since all we have to do on restart is return to the initial state. - Create a new HUD named
InGameMenu. - Create a new action named ResumeGame with the following settings:
- Command Type:
SendEventToUser - AIModel:
MainAI - Event:
onStartGame
- Command Type:
- Copy ResumeGame, paste it as a new action named RestartGame and change Event to onRestart.
- Paste another new action named QuitGame and change the event to onQuit.
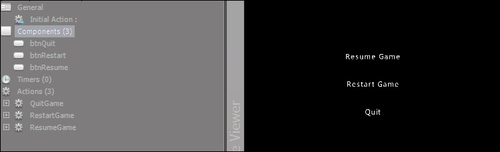
- Add a component named btnResume with the following settings:
- Type:
Button - Position:
50and65 - Size:
40and11 - Check Viewport aspect ratio independent
- Shape:
RoundedRectangle - BackColor:
0,0,0, and255 - BorderColor: For Alpha, set
0 - Text:
Resume Game - Text Alignment:
Center - Clicked Action:
ResumeGame
- Type:
- Copy btnResume, rename it btnRestart and change the following settings:
- Position:
50and51 - Text:
Restart Game - Clicked Action:
RestartGame
- Position:
- Paste another copy of btnResume, name it btnQuit and change the following settings:
- Position:
50and37 - Text:
Quit - Clicked Action:
QuitGame
- Position:
- Save the HUD and drag it into the Resource tab of the Game Editor window.
- After setting all these parameters, the HUD Editor window will appear as shown in the following screenshot:
You may have noticed that we are reusing the onStartGame event for the ResumeGame action. This works because we put the actual code for starting a new game in InitialState. Now, we need to fix the MenuState state so that it will pause the game and load the menu. In the onEnter handler of MenuState, enter the following code:
local hUser = application.getCurrentUser ( )
local hScene = application.getCurrentUserScene ( )
scene.setPaused ( hScene, true )
hud.newTemplateInstance ( hUser, "InGameMenu", "InGameMenu" )
First, we get a handle to the current user and the scene and then use those to pause the game and load the HUD that we just created. When exiting MenuState, we basically use onLeave to reverse what we did in onEnter, as shown in the following code:
local hUser = application.getCurrentUser ( )
local hSCene = application.getCurrentUserScene ( )
scene.setPaused ( hScene, false )
hud.destroyTemplateInstance ( hUser, "InGameMenu" )
Again, we get the current user, the scene, unpause the scene, and then destroy the menu HUD. Of course, we don't actually have anything on the screen that will allow us to enter the in-game menu; but in the next section, we will add an overlay that will give us access to our in-game menu.