
The scripting in ShiVa is called Artificial Intelligence (AI), which calls up images of robots realizing humanity is a sickness that must be eradicated, but fear not, it is much more benign than that. AIs are simply behaviors that can be added via scripting to objects, scenes, and so on. In fact, AI is needed to load the first scene of our game. Speaking of which, let's set that up now. Click on Edit | User Main AI | Create in the Game Editor window to create the game's main AI. The usual dialog opens asking us for the name of the new AI. Let's call this MainAI, so we know exactly what it does.
Our newly created MainAI now shows up in the User Main AIs information box. The AI also opens for us to edit, but in our current view we can't see the AIModel Editor window. Click on the Code view in the upper right-hand corner of the main window to open the scripting view. The Code view is shown in the following screenshot:
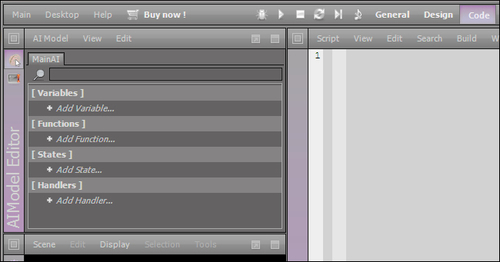
This view shows us everything we need to do some serious scripting. We will go over the specifics in the next chapter, but for now let's do some basic scripting to get our game going.
First, we need to declare a variable to point to our ship since it is such an important piece of our game. Click the + next to the Add Variable... option in the AIModel Editor window.
This will open the Variable window, which is shown in the following screenshot:
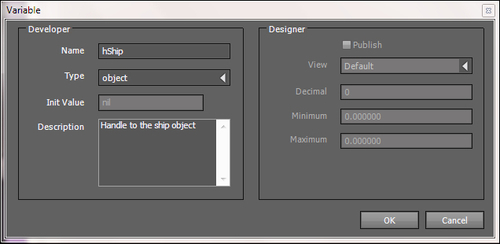
In ShiVa, we usually start variable names with a letter that signifies what the variable does. In this case, we are creating a handle, or a reference, to our ship object, so let's call it hShip. Select object for the variable type and enter a nice description of what the variable does. Click on the OK button to create the variable. The hShip variable shows up under Variables now and we can write the code for setting up our scene.
Scroll down in the AIModule Editor window until you see the Handlers option. A handler is code that is executed when a certain event occurs. They work a bit differently from the variables in that there are many pre-defined handlers—for the most part, you pick one that is already defined by ShiVa, but we will be creating custom handlers in Chapter 4, Physics and the Environment. In this case, we are going to create an onInit handler. This handler will execute only when the scene is initialized, so it is a great place to set up any resources the scene will need. Click on the + sign next to the Add Handler... option and select onInit. The handler is created and the code is automatically opened for editing, as shown in the following screenshot:
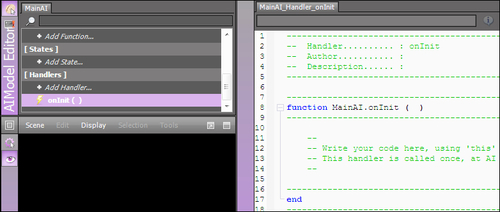
We can see that there is a template for scripting code. Feel free to enter the Author and Description fields although they aren't required, but we must keep any other edits strictly between the function definition and the end statement. ShiVa uses the Lua language syntax, which is similar to Python. The code for setting up our scene is pretty simple and is as follows:
-- Set the current scene to Level1 and
-- compare to nil to make sure the scene loaded
if( application.setCurrentUserScene ( "Level1" ) ~= nil ) then
    -- Get a handle to the ship by using the ships 'name'
    this.hShip ( application.getCurrentUserSceneTaggedObject ( "Ship" ) )
else
    -- Send an error message to the log
    -- if the scene can not be set
    log.error ( "Unable to load initial scene" )
end
The first line loads our scene by name and also checks that it was successful by comparing the result to nil (ShiVa's version of null). If the result was nil, it means that the scene was unable to load, so the code jumps to the else statement and logs the error. Otherwise, if the scene is not nil, then we assign a value to our hShip variable by asking the application to find the object that is tagged Ship.
This code is enough to get our game running, so let's save it by selecting Script | Save All in the Script Editor window and then compile the code by selecting Build | Compile, or simply press F7 on your keyboard. As long as there are no errors, you should see a success message in the Build window at the bottom of the screen. If there are errors, the Build window will show error messages with line numbers and a short description of the problem. These messages can be a bit cryptic at times, so make use of your favorite internet search engine or stop by the developer forums—chances are that someone has had the same error. Before we run the game again, let's add one more thing so we get more than a static screen.
Click on the + sign next to the Add Handler... option again, but this time select the onEnterFrame event. This event occurs each time a frame is being processed so it is a good place to put things such as animations that will update each frame. In this case, we are going to animate the camera, so that it rotates around the ship. Again, the code is not very complex and is as follows:
-- Test if the ship exists first
if(this.hShip ( ) ~= nil) then
    -- Get a handle to the camera
    local hCamera = application.getCurrentUserActiveCamera ( )
    -- Get the location(translation) of the ship
    local x,y,z = object.getTranslation ( this.hShip ( ), object.kGlobalSpace )
    -- Tell the camera to rotate around
    -- the ship location - x, y, z
    object.rotateAround ( hCamera, x, y, z, 0, 1, 0, object.kGlobalSpace )
    -- Tell the camera to look at the ship
    object.lookAt ( hCamera, x, y, z, object.kGlobalSpace, 1 )
end
The first thing to notice is that, similar to the onInit code, this code is wrapped in an if statement. The if statement is checking that the ship exists, because without it this code will not work.
Next, we get a handle to the only camera in the game so that we can manipulate it. We also get the location of the ship—ShiVa calls this the translation—and we tell ShiVa we want that in reference to the global space. Then we tell the camera to rotate around the x, y, and z axes (the ship location) at a rate of 0, 1, and 0 (rotations around the x, y, and z axes) degrees respectively. This sets the camera rotating around the y axis of the ship's location at 1 degree per frame. Lastly, we need to point the camera at the ship, otherwise the ship would go in and out of the view as the camera rotates. Using the lookAt function, we turn the camera towards the x, y, and z axes (again, the ship's location) in the global space. The last argument in the lookAt function is the rate at which the function will look toward the location—a setting of 1 will cause the action to occur in one frame, while values between 0 and 1 will cause the action to be averaged over several frames, creating a smooth transition.
That's it! Save the code by clicking on Script | Save All in the Script Editor window and then compile the code by selecting Build | Compile All.
Switch back to the General view and click on the Play button. If everything was entered correctly, you should see the camera slowly rotating around the ship. Congratulations! I told you it wouldn't be much, but we are just getting started, there's more to come.