
In our game, we have our ship, moving asteroids, and stationary obstacles such as the tunnel and rocks. Each object type will need a different combination of sensors, dynamics, and colliders to do their job properly. Let's start by configuring the ship.
We will use a set of sensors to approximate the shape of the ship. By giving the ship a sensor, we will be able to detect when the ship collides with obstacles and when it enters an area that triggers the spawning of asteroids. To add the sensors, do the following steps:
- Right-click on the ship object in the Scene Viewer or Scene Explorer window.
- Go to Attributes | Sensor | Add a box sensor. Repeat this step twice for a total of three sensors.
- Switch to the Attribute Editor window and click on the Sensor Attributes tab.
- Click on the sensor name to edit that sensor's settings. Enter the following settings:
Name
ID
Shape
X
Y
Z
Size
Sensor 00Box0-0.5080.540Sensor 11Box-13.5004654Sensor 22Box-30019320
These sensor boxes give us a rough outline of the ship to provide a bit more accuracy than one big sensor box could alone. The numbers in the previous table were determined by approximating the shape of the ship. How closely you approximate these shapes is up to you, but when it comes to complex shapes, the more sensors and dynamic objects you add, the more it will negatively affect performance. Optimizing a game involves finding the delicate balance between performance and realism. Adding the ship dynamics is almost identical to adding the sensors.
The ship must be a dynamic object in order to get direct access to where the asteroids make contact with the ship. We will create explosions on the ship exactly where the asteroid strikes it and sensors do not directly give us this kind of information—they simply tell us a collision has occurred. We will add the ship dynamics as follows:
- Right-click on the ship object in the Scene Viewer or Scene Explorer window.
- Go to Controllers | Dynamics | Create controller.
- Switch to the Attribute Editor window and click on the Dynamics Controller tab.
- Below the Bodies box, click on the Add button twice so that there are three bodies listed.
- Click on the body name to edit that body's settings. Enter the following settings:
Name
ID
Shape
X
Y
Z
Size
Body 00Box0-0.5080.540Body 11Box-13.5004654Body 22Box-30019320
Also scroll down to the Flags section and uncheck the Enable Dynamics and Enable Gravity checkboxes. By disabling them, we don't have to worry about the ship bouncing all over the place when it hits something, and since the ship is flying it doesn't make sense to have gravity. There are a lot of other settings in the Dynamics Controller tab that you can experiment with, but for our purposes we won't need to mess with most of them.
Now that the ship has been configured, let's set up the asteroids, which will only be dynamic objects, but will use sensors to spawn them when the ship enters an area.
Since we are only going to have one type of moving obstacle, we will have an AI model to control spawning objects and then tie the model to sensors throughout the level. To make things even easier, we will add several sensor areas to a single sensor so that it is easier to add and manage multiple trigger areas. The following steps are performed for adding a sensor:
- To add a sensor, start by going to the Data Explorer window and click on Create | Model | Sensor. We will call this AsteroidSensor, since it is going to trigger the creation of asteroids.
- Next, we load the scene again and drag the AsteroidSensor from the Data Explorer window to the Scene Viewer window. For the moment, we won't worry too much about the actual location of the sensor, but we will at least line it up on the x axis.
Note
In Chapter 3, Behaviors and Scripting, we made sure that our ship and tunnel lined up on the x axis, so that it would be easier to align the objects in our game, and now we will see how this little detail will help.
- In the Scene Viewer window or the Scene Explorer window, click on the AsteroidSensor sensor and then open the Attributes Editor window, as shown in the following screenshot:
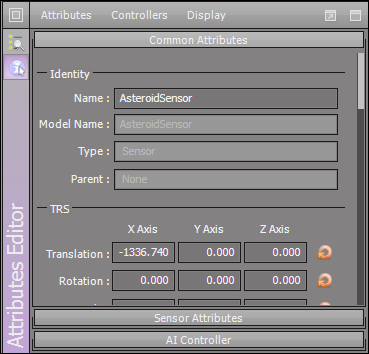
By setting the Y and Z axis to 0.000, we ensure that our sensor is on the x axis. Now, we can focus on placing the sensor where we want it in the tunnel. We'll place it pretty far down the tunnel so that we can add some other obstacles before the asteroids start coming. In this case, -1156 or so seems to be just right.
Now that our first sensor is in place, we need to create a few more. I mentioned before that we would add several sensor areas to a single sensor. To do this, we will right-click on the AsteroidSensor sensor in the Scene Explorer window or Scene Viewer window and select Attributes | Sensor | Add a Sphere Sensor. In the Attribute Editor window, click on the Sensor Attributes tab and see that there are now two sensors in the window. Add two more sensors, so that we have a total of four, as shown in the following screenshot:
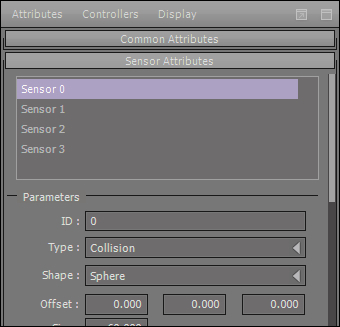
As we click on each of the sensors listed, we'll see that the attributes listed in the Parameters section will change. Each sensor area can have a different shape, size, and offset. In this section, we will make all of the sensors, spheres have a Size of 60. This makes the sensor almost fill the entire tunnel. Next, we need to set the ID of the sensor area so that we know which area is hit when there is a collision. In this case, we will set Sensor 0 to have an ID of 0, Sensor 1 will be 1, and so on. We also need to space the sensor areas out by 500 units each, as shown in the following table:
|
Name |
ID |
Shape |
X |
Y and Z |
Size |
|---|---|---|---|---|---|
|
Sensor 0 |
0 |
Sphere |
|
|
|
|
Sensor 1 |
|
Sphere |
- |
|
|
|
Sensor 2 |
|
Sphere |
- |
|
|
|
Sensor 3 |
|
Sphere |
- |
|
|
Now that we have our sensor in the right place, we need to set up the asteroids. In order to make sure that we conserve system resources, we are going to create an AI model to manage the asteroids that we have in the scene. We will create four asteroids that will be re-used for each of the asteroid spawn points. In order for this to work, it was important to make sure the sensor areas were spaced sufficiently apart so that the asteroids would be off the screen in time to respawn. Just in case some of them aren't, we will add additional logic to make sure that they are not visible before recycling them.
The asteroids were created in Blender by sub-surfacing a cube several times and then applying a displacement modifier based on the stock noise texture. After applying the Rock_Obstacle_Material.png (the original texture can be found at http://www.polygonblog.com/wp-content/uploads/2010/04/seamless-texture-high-res.jpg), found in the project files, we have a fairly decent asteroid, as shown in the following screenshot:
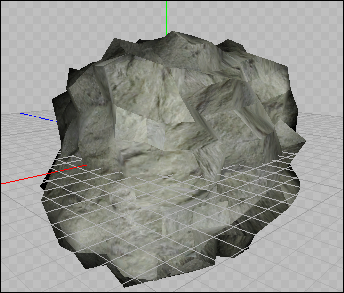
Import the asteroid (Rock Obstacle.dae), but make sure that you change the name of the model to Asteroid via the Model name field and then do the following steps:
- Open the Textures folder in the Data Explorer window.
- Rename the imported textures, since they will be imported with a name like Rock_Obstacle_rock20obstacle or something similar. The texture that ends with "n" is the normal map. Rename the textures to RockObstacle and RockObstacle-n.
- Open Rock_Obstacle_Material in the Material Editor window and adjust the lighting as usual; enable the Receive Dynamic Lighting and Per Pixel Lighting checkboxes.
- Adjust the sliders for the Diffuse color all the way to the right, so that we can see the texture colors.
- On the Texture tab, assign the RockObstacle texture to Effect Map 0 and the RockObstacle-n texture to Normal Map.
- Save the material.
- Open the Rock_Obstacle model in the Scene Viewer window; you should be seeing the textures now.
- Click to select the rock and open the Attributes Editor window. Set the scale to
5for all three axes. - Right-click on the asteroid and select Controllers | Dynamics | Create Controller to add a dynamic controller. The dynamics will make the asteroids collide and spin realistically.
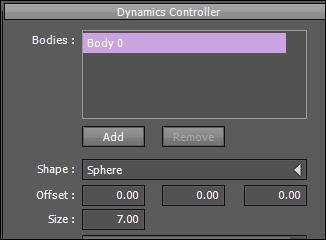
- Since we are in space, we will want to disable gravity. Open the Attributes Editor window and click on the Dynamics Controller tab.
- Make sure that under the Rigid Body Collection heading, the Shape field is set to Sphere. A size of 7.00 in the Size field is about the right size to approximate the size of the asteroid we are using. This is shown in the following screenshot:
- Keep scrolling down until you find the Enable Gravity checkbox; uncheck the box—the last thing we want is a bunch of asteroids sitting in the bottom of the tunnel.
- Close the model and save it.
Depending on the size of the asteroid you create, you may need to resize it to fit the scene. In this case, we'll keep the model the same for the asteroid and then scale it up for large boulder obstacles in the tunnel. Load our scene, so that we are prompted to save our asteroid model, if you haven't closed it already.
Since the asteroids will be random spawns, we aren't going to add them to the scene like we usually do, but we want to make sure that they are available to the game at runtime. In order to do this, we will take advantage of the Resources tabs in the Game Editor window. Click on the Models tab and drag the Asteroid model to the tab. Now we will be able to load the asteroid into the scene at runtime.
Tip
Dynamic Resources
If you have resources that are not physically laid out in your scene, but will be added later during runtime, don't forget to add them to the tabs (Models, Resources, and so on) in the Game Editor window. This will allow you to access the resources via your scripts and add them dynamically to your scene.
When it comes to having an AI model control the asteroids, it makes sense that the AI will be on a more global level rather than attached to an object in the scene. Hopefully, you still have the Game Editor window open, because we have something more to do in there. Remember how we added the MainAI directly to the game? We are going to do the same with the AsteroidManagerAI model. Click on the Main tab and then click on Edit | User Main AI | Create. Call AsteroidManagerAI and click on the OK button. We should see the new AI show up in the User Main AI window. User AIs are processed as the game starts up and are not attached to an object. For this new AI, we will have it load the asteroids on start up and then control the spawning of asteroids.
The steps for loading the asteroids are as follows:
- To load the asteroids, move to the Code desktop and add an
onInithandler to the AsteroidManagerAI model. - We need some way of keeping track of the asteroids, so create an empty table variable named
tAsteroids. - It will also be nice to change the number of asteroids used as we balance the game, so create a number variable named
nMaxAsteroidsand set it to4. - Create a function called
LoadAsteroids—remember, we should try to keep our code relatively clean, so theonInithandler will simply call this function. - In the
onInithandler, let's add the following line of code:this.LoadAsteroids()
- Add the following code to the
LoadAsteroidsfunction:local hScene = application.getCurrentUserScene ( ) for currentAsteroid = 0, this.nMaxAsteroids ( ) - 1 do local hAsteroid = scene.createRuntimeObject ( hScene, "Asteroid" ) dynamics.enableDynamics ( hAsteroid, false ) table.add ( this.tAsteroids ( ), hAsteroid ) end
First, since we will be loading objects into the scene, we need a handle to the scene, so we use the application object to get the current scene. Next, we loop nMaxAsteroids
a number of times to load the asteroids one at a time.
Each time we loop, we will load an asteroid by name and assign it to hAsteroid
. Before adding it to the table that will store the asteroids, we need to turn off dynamics, so that the asteroids don't immediately start interacting with the environment. Then, we add the asteroid in the table for later use.
We have the asteroids loaded and ready to go, but where did they actually go in the scene? When I created the asteroid in Blender, I centered it at 0,0,0 so that is where the model loads in ShiVa3D. When the game starts up, there will be four asteroids all at the origin of the coordinate system waiting to be used. Since that is also where our ship starts, move the ship forward a bit so that we don't see the asteroids at the start of the game—about -60 units should be fine. Now let's focus on the code that will spawn the asteroids in the appropriate locations. Continue modifying the AsteroidManagerAI by following these steps to set up the asteroids:
- We need to create a few more variables, so create a number variable named
nMaxAsteroidSpeedand set it to300. This will be the maximum for our asteroid's random speed. - Create a number variable named
nMinAsteroidSpeedand set it to50. This will be the minimum speed of the asteroid. - Create a number variable named
nAsteroidOffsetand set it to500, which is the distance from the sensor (further down the tunnel) that the asteroid will spawn. - Create a new function named
SpawnAsteroidsand a handler namedonSpawnAsteroids. We haven't created a custom handler yet, but it is super easy. Click on Add Handler | Custom and name it. Notice that the name is prepended with "on" automatically, so to createonSpawnAsteroidsjust enterSpawnAsteroids. - In the
onSpawnAsteroidshandler, addhSensor,nSensorID, andhTargetas arguments and then the following code:this.SpawnAsteroids ( hSensor, nSensorID, hTarget )
Note
All we are doing is passing the arguments from the event handler through to our function. You've probably noticed we do this frequently and there is a good reason. We can access variables and handlers from other objects, but there is no mechanism for accessing functions directly so we do it through handlers.
- To pass the data through, open the
SpawnAsteroidsfunction, addhSensor,nSensorID, andhTargetas arguments in the function definition in the script and then, just below that, add the following code:-- Get the location of target of the asteroids (ship) local nTargetX, nTargetY, nTargetZ = object.getTranslation ( hTarget, object.kGlobalSpace ) --Get the location and radius of the sensor that was triggered local nSensorX, nSensorY, nSensorZ = sensor.getSphereCenterAt ( hSensor, nSensorID, object.kGlobalSpace ) local nRadius = sensor.getSphereRadiusAt ( hSensor, nSensorID ) -- Loop through the asteroids and set a new location and speed for currentAsteroid = 0, this.nMaxAsteroids ( ) - 1 do -- Get the current asteroid out of the asteroid table local hAsteroid = table.getAt ( this.tAsteroids ( ), currentAsteroid ) if( hAsteroid ~= nil ) then -- Get the asteroid location on X axis local nAsteroidX, y, z = object.getTranslation ( hAsteroid, object.kGlobalSpace ) -- Compare to the ships location - we only want to reset asteroids that are -- behind the ship if( nAsteroidX > nTargetX ) then -- Gaussian random finds a random spot within a circle -- The offset is so the asteroids don't spawn right on top of the ship local nX = math.gaussianRandom ( nSensorX, nRadius ) - this.nAsteroidOffset ( ) local nY = math.gaussianRandom ( nSensorY, nRadius ) local nZ = math.gaussianRandom ( nSensorZ, nRadius ) -- Set the new location and speed of the asteroid. object.setTranslation ( hAsteroid, nX, nY, nZ, object.kGlobalSpace ) local speed = math.random ( this.nMinAsteroidSpeed(), this.nMaxAsteroidSpeed() ) -- Enable dynamics so that the asteroids rebound of objects. dynamics.enableDynamics ( hAsteroid, true ) -- Point the asteroids at the ship and apply the speed object.lookAt ( hAsteroid, nTargetX, nTargetY, nTargetZ, object.kGlobalSpace, 1 ) dynamics.setLinearVelocity ( hAsteroid, 0, 0, -speed, object.kLocalSpace ) end end end
That's a long bit of code, so let's take a while to break it down. In the first few lines, we are just setting up our local variables based on the information passed in from the handler. We get the translation (or location) of the target object, which in this case will be our ship, and the center and radius of the sensor area that was triggered. This information is important, because we are going to use the sensor area as the area that our asteroids will spawn, but offset the actual location further down the tunnel in order to give the player time to react.
Next, we start a loop that iterates once for each asteroid. We use the for loop index variable, currentAsteroid
, to access the asteroids in the following code:
local hAsteroid = table.getAt ( this.tAsteroids ( ), currentAsteroid )
The getAt function requires a reference to the table and the index of the object we want. By using the for loop index, we are able to access all of the asteroids sequentially. We then check that hAsteroid is not nil, because otherwise the rest of the code could trigger errors and crash the game. If there are no valid objects returned from the asteroids table, then no asteroids will be spawned, but at least the game will continue to run. If the asteroid is valid, we get the current location of the asteroid by using the following code:
local nAsteroidX, y, z = object.getTranslation ( hAsteroid, object.kGlobalSpace )
Notice that we have a good name for the x value, but y and z are simply named y and z. This is a case where the function returns three values, but we only want one. We only want the x coordinate, so we can tell if the asteroid is behind our ship. I put y and z in the expression to demonstrate what is happening—we can actually leave the y and z out of the expression and the first value will be assigned to nAsteroidX, while the others are simply discarded.
Now that we have the x coordinate of the asteroid, we can check it against the position of the ship in the following code:
if( nAsteroidX > nTargetX ) then
If the asteroid's x coordinate is greater than the ship's x coordinate, then the asteroid is behind the ship and can't be seen. If this is the case, it is okay to respawn that asteroid and use it for the current spawn point. The code then determines a random location within the sensor area, as shown in the following code snippet:
local nX = math.gaussianRandom ( nSensorX, nRadius ) - this.nAsteroidOffset ( )local nY = math.gaussianRandom ( nSensorY, nRadius )
local nZ = math.gaussianRandom ( nSensorZ, nRadius )
The gaussianRandom function is interesting in that it takes a center point and a radius and returns a random number within that circle. By doing this in all three axes, we generate a random point in 3D space within the sphere with that center point and radius. With the random coordinate in hand, we then set the attributes of the asteroid so that it goes in action. This is shown in the following code snippet:
object.setTranslation ( hAsteroid, nX, nY, nZ, object.kGlobalSpace )
local speed = math.random ( nMinAsteroidSpeed, nMaxAsteroidSpeed )
dynamics.enableDynamics ( hAsteroid, true )

object.lookAt ( hAsteroid, nTargetX, nTargetY, nTargetZ, object.kGlobalSpace, 1 )
dynamics.setLinearVelocity ( hAsteroid, 0, 0, -speed, object.kLocalSpace )
There are quite a few lines of code, but all we are doing is the following:
- Setting the new location of the asteroid.
- Getting and setting a random speed.
- Enabling the dynamics.
- Aiming the asteroid at the ship by using the
lookAtfunction to point the asteroid toward the ship. - Giving the asteroid a little push by setting the linear velocity. By setting the z coordinate to speed in the local coordinate system, it makes the asteroid travel in the direction it is facing.
We need to turn on the dynamics, since we turned them off when the asteroids were loaded into the scene and without them, the asteroids would not act realistically. The lookAt function simply aims an object at another object. Shiva3D considers the z axis as the forward facing side of the object. What this means is that once we have the asteroid pointed at the ship, we then need to apply the random speed to the z axis, which we do in the last line of code. Notice that since the asteroid is a dynamic object, we set the speed by calling the setLinearVelocity function. By using the kLocalSpace argument, we can set the velocity straight forward from the object regardless of the direction it is facing.
After doing all that work, it would be very satisfying to start up the game and see the asteroids in action, but we still need to set up the AI for the sensors themselves and put sensors on the ship as well. Fear not! It will be worth the effort and we don't have long to go.
Without a trigger, the spawns we just set up will do nothing. Fortunately, the trigger is straightforward. We just need to tie into the onCollisionBegin handler of the AsteroidSensor sensor and send the data to the asteroid manager informing that the ship collided with the sensor. Of course, the AsteroidSensor will need AI, so let's do the following steps to provide AI for the sensor:
- In the Scene Viewer window or the Scene Explorer window, right-click on the AsteroidSensor sensor.
- Select Controllers | AI | Create AI and name the AI AsteroidSensorAI.
- Create a new
onSensorCollisionBeginhandler with the following code:local hUser = application.getCurrentUser ( ) user.sendEvent ( hUser, "AsteroidManagerAI", "onSpawnAsteroids", this.getObject ( ), nSensorID, hTargetObject )
The onCollisionBegin handler has the following arguments:
nSensorID: The ID of the sensor that registered the collisionhTargetObject: The handler of the object that collidednTargetSensorID: The ID of the object's sensor that collided
All we need to pass to the asteroid manager is the sensor that had the collision, the sensor area and the object that collided (the ship) as shown in the previous bullet.
We first get a reference to the user because we have to send events to the User AIs via the user object. The user.sendEvent call is the same as when passing an event to an object. We specify the user, the name of the AI, the event and then the arguments. By passing this.getObject()
, we pass a reference to the sensor object itself. We have already seen how the event is consumed by the asteroid manager. The last thing we need to do is to set up the tunnel and stationary rock obstacles.
The tunnel and the rock obstacles will collide with the asteroids and the ship, so they must be set up as colliders and sensors. Set up the tunnel as follows:
- Open the tunnel model in the Scene Viewer window by double-clicking it in the Data Explorer window.
- Select the tunnel by clicking it and then right-click the tunnel and select Attributes | Collider | Set as collider.
- Right-click the tunnel again and select Attributes | Sensor | Add a box sensor. Repeat this step thrice for a total of four sensors.
- In the Attributes Editor window, select the Sensor Attributes tab.
- We are going to set up sensors in the walls, ground and ceiling so select a sensor to edit its settings. Enter the settings as follows:
Name
ID
Shape
Offset
Size
Sensor 00Box5020201461008Sensor 11Box-5020201461008Sensor 22Box0500146201008Sensor 33Box0-500146201008
Now that we have the tunnel configured, we should update the model with our changes, so click on Model | Update Model from Instance so that any new tunnels we add will have the sensors and colliders set. Feel free to add more tunnels and place them end to end so you have more room to work with. Next, we will create rock obstacles and add the same combination of colliders and dynamics.
The rock obstacles will be based on the asteroid model. To create the rock obstacles, follow these steps:
- In the Data Explorer window, right-click on the asteroid model and select Duplicate Selection. Set the name to
Rock_obstacle. - Double-click the new model to open it and then click to select it in the Scene Viewer window.
- Right-click and select Controllers | Dynamics | Remove Contoller to get rid of the dynamics.
- Scale the asteroid by
25units in each direction. - Right-click and select Attributes | Collider | Set as collider.
- Right-click and select Attributes | Sensor | Add a box sensor.
- In the Attributes Editor window, select the Sensor Attributes tab and resize the sensor, if necessary, so that it roughly matches the size of the model—about
1.3works. - Reload the scene so that you are prompted to save the model.
Place a bunch of rock obstacles. You can place them as is and scale some of them in one direction so that they look like pillars, rotate them, and move them around, as shown in the following screenshot:
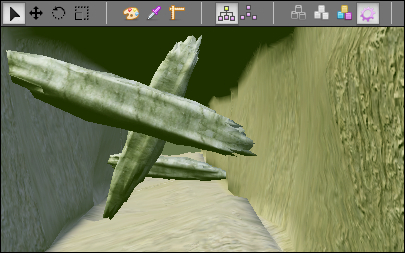
Keep in mind that as you change the shape of the obstacles, you may have to change the sensors. Those pillars, for example, need box sensors and the size is 2.5 on each axis.