
As you have probably noticed by now, modules make up the bulk of the editor so it's about time we introduced you to the bunch of them. Since we won't be covering everything, there will be many features of each module that I don't mention. For these features, I refer you to the online documentation at http://www.stonetrip.com/developer/doc/. In the tree-view on the left-hand side, click on Editor | Modules.
Let's start by taking a look at the common features they all share, although technically these features are part of the editor and not the modules themselves, but we'll just pretend they are.
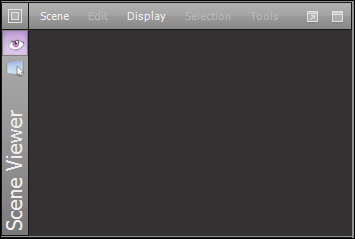
The previous screenshot shows a basic module (I picked an empty one so you wouldn't get distracted). The first thing to notice is the squares in the top left-hand corner. Clicking on these squares opens the module selection menu where you can select a module which will then be displayed in this viewport. Below the squares, you will see a few small icons that are the module history—it shows you which modules have been opened in this viewport, so that you can toggle back and forth as needed. Going further down is, of course, the name of the module currently being displayed.
Across the top, we have the menu options for the currently displayed module followed by the viewport controls. The viewport controls are very handy especially if you have a small display or multiple displays. The first control (the one with the arrow) causes the viewport to detach from the editor, so that it is floating above it. The good thing about this option is that you can move the viewport out of the editor completely and place it on another monitor. If the viewport has a module history, the vacant space will be filled with the next module in the history, or will otherwise be empty. Closing the detached viewport will return that module to the original viewport. These changes are not saved in the desktop management options.
The icon in the top right-hand corner is handy for small displays because it makes the current viewport maximize to fill the entire editor. Clicking the icon again will return the desktop to its previous state. I find that I use this option constantly when working from my laptop. Alright, on to the modules!
I'm glad we are doing this one first, because it is one of my absolute favorites and I am sure it will become one of yours too, unless you never make any mistakes. This module is meant to be used in conjunction with the debug controls in the editor.
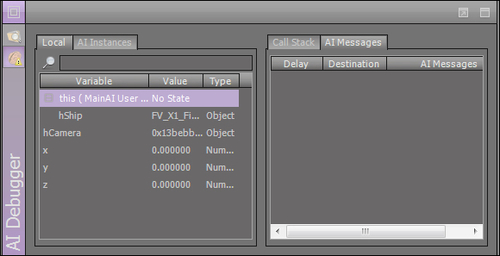
Here, I put our game into the debug mode and stepped it through the animation sequence in the onEnterFrame handler. You can see that it is showing the value of the local variables such as the hCamera and our x, y, and z location coordinates. You can also see the hShip variable that is an AIModel variable. It is absolutely invaluable to be able to see what is happening behind the scenes when troubleshooting bugs and this module gives us that kind of access.
We briefly saw about this in the previous chapter. The AI Model Editor window enables us to create AI models and add functions, handlers, states, and variables. The menu options are very simple and are mostly for creating, saving, and compiling AI models. Since this module is pretty straightforward and we will be using it so much, we will cover it in more detail in Chapter 3, Behaviors and Scripting.
The Ambience Editor window is where we add all the little extras that can provide a little extra detail to our game. Most of the ambience features are outside the scope of this book, but you can use it to add things such as an ocean, sky textures, music, and effects such as bloom and ambient occlusion.
The Attributes Editor window is where we will be editing our game object properties. These properties cover things such as translation, rotation, scale, visibility, and so on. As we add new aspects such as dynamics controller and collisions to our objects, there will be additional attributes to edit.
We have already seen the Data Explorer window in the previous chapter and its use is pretty straightforward. You can think of it as the ShiVa File explorer. Using the Data Explorer, we can browse the resources that are available to our game, create new resources, or import existing resources.
In the first chapter, we used the Game Editor window to create our first game and add our MainAI to the game—that is mostly what the Game Editor window is used for. We will be declaring resources needed by our game in this module. If we will be working with a resource that we don't have in our scene when the scene first starts, that resource will need to be added via the Game Editor window, so that it will be accessible once the game starts. Within this module, there are tabs for the different objects that can be made available to the game.
The HUD Editor window overlays the game and mainly acts as a user interface. By using the HUD Editor window, we can add visual elements such as buttons, text boxes, images, and so on; and also add things such as timers and actions. This is another module that works in coordination with the Scene Viewer window, so we will need to have both modules open when trying to modify the HUD elements. We will be using the HUD Editor window to display information such as the number of lives left and a menu system to the player.
Although very handy, this module is fairly boring. It simply displays log messages from a running game. The Log Reporter window does not have a traditional menu and instead relies on a right-click menu. The menu options allow you to filter or clear the logs. We can also apply filtering by selecting a tabbed window for the specific type of message that we are looking for.
A PolyTrail effect is one that is attached to a moving object and streams out behind that object. PolyTrails are effective as skid marks, rocket exhaust, shooting stars, and so on. Like particle effects, PolyTrails are fun to experiment with and are a good way to add a little more detail to a scene.
Particle effects are a system of particles that behave according to a set of rules. Since the particles exhibit both individual and group behaviors, it is possible to create realistic looking effects that appear random in nature. One of the most enjoyable modules to play with, the Particle Editor window allows us to configure particle systems to create a myriad of effects from fire and explosions to asteroid fields and beyond.
Easily the most used module, the Scene Viewer window has many different uses. The main use is, of course, to display and edit a scene, but we'll also use it to view just about everything that we can preview visually—models, particle effects, gameplay, and so on. Because this module is so versatile, there are a large number of options available; these options are shown in the following screenshot:
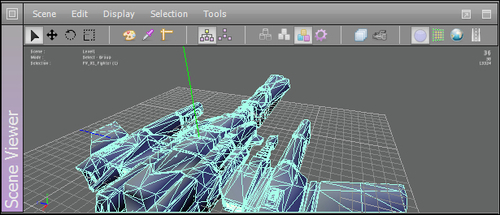
The options are divided between a traditional menu and a toolbar. Many of the options on the toolbar are also found in the traditional menus. The different options of the traditional menu are explained as follows:
- The Scene menu: The simplest menu; it offers options to see the scene info, save, close, or switch scenes.
- The Edit menu: This menu has a huge number of options such as transforms, object attributes, and grouping. Most of the options which we will use regularly, we will access via the toolbar, by using right-clicks and hotkeys—it's simply more efficient that way.
- The Display menu: Not surprisingly, this menu contains options for filtering which objects are displayed on the scene, display properties, and rendering options. This is where we can control whether our scene is displayed as wireframe, solid, textured, and so on.
- The Selection menu: This menu provides us with different ways to select objects and filter the categories of objects that can be selected. For instance, if we select the Objects with Camera Attributes option from the menu, we will only be able to select objects that have Camera attributes. The Selection mode also comes in handy when working with groups because we'll need to switch to a Single mode to select individual objects within the group.
- The Tools menu: This one is easy to cover because all of the options are labeled adv, so they are only available to those with an advanced license.
The different toolbar options are shown in the following screenshot:
These options are explained as follows:
- Manipulation controls: These buttons change the way we interact with the selected object in the scene. The different modes are Selection, Translate, Rotate, and Scale.
- Cursor modes: This menu is used to change what the cursor does within the scene. These modes are Painting Mode, Material Picking Mode, and Measure Distance Mode.
- Selection modes: This menu is used to check if we can select individual objects within a group or not.
- View modes: This decides how the objects are displayed within the scene, that is, wireframe, Gouraud, textured, or runtime.
- Pop-up windows: Clicking on these buttons open the Layers window and the Cameras window.
- Selection filtering: By selecting one of these, you can limit which objects within the scene are selectable. You can select objects, Navigation points, Terrain chunks, or Road points.
In addition to the menus and toolbar, the Scene Viewer window contains information overlaying the window. In the bottom left-hand corner are the global axes that help to keep you oriented within the scene.
There are some basic navigation controls that we should go over otherwise, it can be difficult to get around a scene. These are as follows:
- Middle-click and drag: Rotates the scene
- Alt + middle-click and drag: Pans the scene
- Alt + right-click and drag: Zooms in and out
- Alt + left-click and drag: Rotates the scene
- Left-click an object: Selects the object
- Right-click when object is selected: Context sensitive menu is displayed
The Scene Explorer window is a great way to see what objects are in your scene; it becomes more essential as the number of objects in a scene grows.
The Display menu has several ways to filter the list of resources and there is a search bar, so it is always easy to quickly find the object you are looking for. In addition to making it easy to find objects, we can also right-click on objects to use the context sensitive menus to edit attributes and behaviors right from the explorer. Last, but not least, the objects have a series of icons next to them that help us tell at a glance whether an object is a camera, shape, collider, and so on.
The Script Editor window provides basic editing of the scripts within an AI Model. We have already seen the useful functions of this window in Chapter 1, Getting Started. There are also useful editor keyboard shortcuts explained in Appendix A, Editor Hotkeys of this book.