
The first thing to know about creating Heads-Up Display (HUD) is that there are three categories of resources that can be created, so let's get things set up and take a look. I like to work in the Preview desktop for the extra room, so switch desktops and then pull up the HUD Editor window in the left viewport. Click on HUD | Create and create a HUD with the name InitialMenu . On the left-hand side of the following screenshot, we can see the three categories (we won't count General):
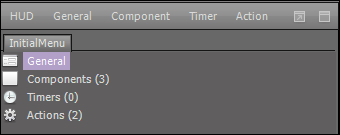
We don't count General since it is only used for changing Initial Action, which is used if you need the HUD to do something when it is first loaded. The Component menu contains visual elements of the HUD such as buttons, labels, and videos. The Timer menu allows you to set timed actions in your game. The Action menu represents the code that is processed when buttons are clicked, timers run out of time, and so on.
Let's add some components so that we have an idea how they work. The HUD we create will be the initial menu that appears when the game is first started, so we are going to need a title and a button for starting the game and one for quitting. Right-click on Components | Add Component, or use the Component menu at the top and select Add. Component creation is a bit different than what we are used to because it doesn't ask for a name right off the bat. Instead, the component is immediately created, so enter the following settings:
- Name:
labelTitle - Position:
50.00and83.00 - Size:
71.00and11.00 - Check Viewport aspect ratio independent and Ignored by mouse
It is important to note that the units for the Position and Size settings are in percentages. That means if the component's Origin file is set to Center and the Position field is set to 50.00 and 50.00, then the object will be centered on the screen. This is nice because we know that the layout will be the same no matter what resolution or device. The other option that helps keep the layout the same is the Viewport Aspect Ratio Independent checkbox—when checked, the components will maintain their size ratio independent of what screen ratio the device is using. The last option we are concerned with is the Ignored by mouse option, which takes the component out of the processing loop for things like mouse over effects, clicks, and so on.
Also on the General tab, we see that there is a field for selecting the type of component. The different types that are available for components are as follows:
- Container: Groups other components
- Label: Shows text
- Edit: Allows player to enter text
- Button: Contains text or image that the player can click
- Check: Input in the form of a checkbox
- Progress: Displays a progress bar
- DVInput: Displays images from the device's camera
- Movie: Plays a movie file in the HUD
- List: Displays a list
- Slider: Input in the form of a slide bar
- RenderMap: A component that can be rendered to by objects such as cameras
- PixelMap: A component that can be directly drawn on using brushes, fills, shapes, and so on
Moving to the Appearance tab, we find options that change the way the component looks. For this label, we are going to get most of the appearance from a texture. We find or create the texture as usual and import it using the Data Explorer window. In this case, we will use a texture that simply displays the words cave runner in a futuristic font. Click on the arrow in the BackTexture field and select the Cave_Runner texture from the list.
The texture is 300 x 60 pixels and the size of the component was sized to give the title the best look. The texture is shown in the following screenshot:
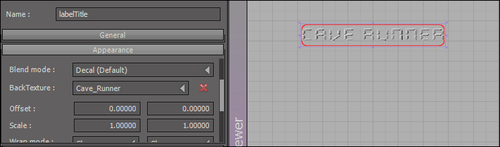
Scroll down a bit to the color properties and set the Alpha heading of the BorderColor option to 0 so that the border does not appear. That's it, so click the OK button at the bottom to finish creating the label. We now have the game title on the screen and we will finish up the screen by adding the Start Game and Quit buttons.