
If we were going through creating a real game, we would have loaded our game on a device a long time ago; in fact, we would probably have loaded it on several devices to make sure things were working as we went along. To be honest, this game has been loaded on a device several times to make sure that the game would work when it was finished. Now, we will set up the ShiVa Authoring Tool with the necessary tools and settings to deploy the game to an Android device.
In this chapter, we will cover the following:
- Modifying our game slightly to be phone-friendly
- How to use the Authoring Tool
- How to install the tools
- How to configure our project
- How to deploy it to the device
It's one thing to develop a game on a computer, but there are some different considerations that need to be made when deploying the game to a mobile device. First of all, we have been using the keyboard for our input, but that will not work for most phones. We also haven't paid much attention to screen orientation or other input, such as using the Esc key. We need to make some basic modifications to our code so that it will be playable. First, let's change the screen orientation to landscape and set up touch events, as shown in the following steps:
- In
MainAI, we are going to recreate theonInithandler and enter the following code:local hUser = application.getCurrentUser ( ) -- Check the OS type and set landscape for Android if( system.getOSType ( ) == system.kOSTypeAndroid ) then application.setOption ( application.kOptionViewportRotation, 1 ) endBy using
input.enableMultiTouch ( hUser, true ), we get a reference to the user and then, if the OS is an Android (we could do the same for other devices, but we are focusing on Android here), call thesetOptionfunction of theapplicationobject to set the viewport rotation option. Setting the rotation to1will rotate the screen 90 degrees clockwise so that the screen is in landscape. We only set the rotation for Android, so that the screen will still be normal when running it on a computer. Next, we enable multi-touch with a call to the aptly namedenableMultiTouchfunction. This will ensure that we can capture screen touch events.Tip
Multi-touch performance
Enabling multi-touch is actually something you will want to do only if you are planning on processing multi-touch events because it consumes much more processing power. It is being used in this case to show you how you can enable it. Usually, the normal mouse events will function as touch events.
- The accelerometer will control the movement of the ship, and when the player touches the screen anywhere but the menu key, it will put the ship in vertical mode so that it can turn completely vertical—if you remember, we used the Space bar for this on the keyboard. The accelerometer is actually implemented as a joystick, so in
MainAI, add anonJoypadMovehandler with the following code:object.sendEvent ( this.hShip ( ), "ShipAI", "onJoypadMove", nJoypad, nPart, nAxisX, nAxisY, nAxisZ )
This simply passes the input through to the ship AI model for processing.
- We need to do the same for touch events, so create an
onTouchSequenceBeginhandler with the following code:object.sendEvent ( this.hShip ( ), "ShipAI", "onTouchSequenceBegin" )
- Also add an
onTouchSequenceEndhandler with the following code:object.sendEvent ( this.hShip ( ), "ShipAI", "onTouchSequenceEnd" )
Both of these handlers also just pass the events through to the ship AI model. Here, we are at the end of the book and have had to do several of these types of processes, so you can probably figure out what comes next—let's create the event handlers in
ShipAI. - We'll create the touch events first since they are much easier. First, create the
onTouchSequenceBeginhandler inShipAIwith the following code:this.GoVertical ( true )
Yep, it's that easy! because we set it up to work that way with the space bar and all we are doing is adding a different way to trigger the change.
- The
onTouchSequenceEndcode is just as easy:this.GoVertical ( false )
- Make sure you add that handler with the code. Remember that all we are doing is calling a function that sets the vertical mode and then in the
onEnterFramehandler we move the ship vertical if the ship is in vertical mode. TheonJoypadMovehandler is not terrible, it just takes some trial and error to get the settings the way we want them. Create anonJoypadMovehandler with the following code:if( nAxisX > 0.2 ) then this.MoveRight ( ) elseif( nAxisX < -0.2 ) then this.MoveLeft ( ) else this.ClearHorizontalMovement ( ) end if( nAxisY < -0.8 ) then this.MoveUp ( ) elseif( nAxisY > -0.4 ) then this.MoveDown ( ) else this.ClearVerticalMovement ( ) endThe
onJoypadMoveevent handler receivesnJoypad,nPart,nAxisX,nAxisY, andnAxisZas arguments, but the only function arguments we are interested in are the axis values. The axis values tell us how far the device is being tilted. When the phone is in landscape, the x axis represents tilting the device from side to side. For each axis, the range of values is-0.9to0.9, and we want to make sure that there is a bit of "dead" space in the centre so that the controls are not overly sensitive. We'll set the threshold to be0.2so that anything over0.2will trigger thethis.MoveRightfunction and anything less than-0.2will callthis.MoveLeft. If it is neither, we simply clear the horizontal movement so the ship will go straight.Next, we do the same with the y axis, except that we need slightly different thresholds since most people will probably angle the device towards themselves so that they can see it better. The values defined in our code seemed to work well, but as with most settings it may need to be changed when the game is being tested.
Tip
Multi-platform accelerometer
There are better ways to make the input apply to different orientations and devices—a search of the StoneTrip developer forums at http://www.stonetrip.com/developer/forum/ will yield such information.
- The last thing to change is to accept the "back" button to end the game. The Android device will already automatically minimize the game when the Home key is pressed and the game will pause, but currently the back button does nothing. To fix this, we are going to add the following code to
MainAI.onKeyboardKeyUp:local hUser = application.getCurrentUser ( ) if(kKeyCode == input.kKeyEscape) then user.sendEvent ( hUser, "MainAI", "onQuit" ) end if(this.hShip ( ) ~= nil) then object.sendEvent ( this.hShip ( ), "ShipAI", "onKeyboardKeyUp", kKeyCode ) endWe need to add the highlighted code that sends an event to the
MainAIAI'sonQuithandler, which we already created whenkKeycodeequals the Esc key (back key). That's all there is to it! Now with all of our changes, we have landscape mode, full accelerometer, touch control, and we can also exit the game by pressing the back key on the Android device. The last thing we need to do before looking at the Authoring Tool is to export the game so that we can build it. To export the game, go to the Data Explorer module and select Games from the tree view. Click and highlight the CaveRunner game and click Export | Export Game. The following dialog window is then displayed: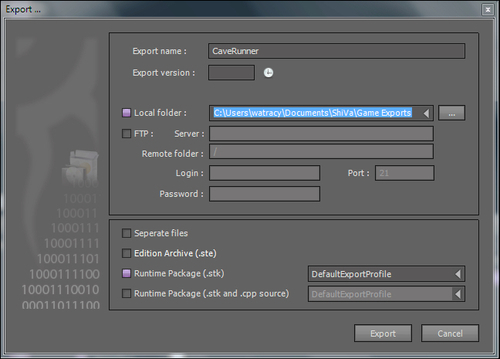
- The only thing we really need to do is make sure Local folder points to a location that makes sense and then check Runtime Package (.stk). Click the Export button and the game will be exported for use by the Authoring Tool.