
The Map screen consists of a header and a map that shows players that are in the vicinity. The user should be able to zoom in and zoom out of the map, show or hide landmarks and information for pedestrians, as well as change the cartographic mode to aerial, hybrid, road, or terrain. In this section, you will create this screen according to the MVVM design pattern.
A design of the screen is prepared in the MapPage.xaml file (in the Views directory). The Map control can be added to the page from the Toolbox window or by adding the Map element to the XAML code manually.
The selected parts of the XAML code are presented and described as follows:
<phone:PhoneApplicationPage (...)
  xmlns:Models="clr-namespace:SpaceAim3D.Models"
  xmlns:Controls="clr-namespace:Microsoft.Phone.Maps.Controls;
    assembly=Microsoft.Phone.Maps"
  xmlns:Location="clr-namespace:System.Device.Location;
    assembly=System.Device" (...) >
  <phone:PhoneApplicationPage.Resources>
    <Models:OpacityConverter x:Key="opacityConverter" /> (...)
  </phone:PhoneApplicationPage.Resources>
  <Grid Style="{StaticResource SA3DBackgroundGrid}"> (...)
    <Border (...) Style="{StaticResource SA3DMainOuterBorder}">
      <Border Style="{StaticResource SA3DMainInnerBorder}">
        <Grid>
          <Controls:Map Center="{Binding Center, Mode=TwoWay}"
            ZoomLevel="{Binding Zoom, Mode=TwoWay}"
            CartographicMode="{Binding Mode, Mode=TwoWay}"
            LandmarksEnabled="{Binding Landmarks, Mode=TwoWay}"
            PedestrianFeaturesEnabled="{Binding Pedestrians,
              Mode=TwoWay}" />
          <Button (...) Command="{Binding CmdZoomIn}">
            <Image Source="/Assets/MapZoomIn.png" />
          </Button> (...)
          <Button (...) Command="{Binding CmdLandmarks}"
            Opacity="{Binding Landmarks, Converter=
              {StaticResource opacityConverter}}">
            <Image Source="/Assets/MapLandmarks.png" />
          </Button> (...)
        </Grid>
      </Border>
    </Border>
  </Grid>
</phone:PhoneApplicationPage>
At the beginning, the required namespaces (SpaceAim3D.Models, Microsoft.Phone.Maps.Controls, and System.Device.Location) are added. The next part specifies resources, including the OpacityConverter resource. It is the value converter that changes a logical value to a float value (representing an opacity). The converter is used to present various map options using appropriate opacity. If the option is enabled, the opacity should be higher, that is, the image should be better visible. Otherwise, lower opacity is used and the image is less visible to the user. The OpacityConverter class is explained later in this chapter. Apart from the converter, the style for Button controls is defined in the resources, but is not shown in the preceding code. It specifies their height and width (as 80 pixels), as well as a default opacity (set to 0.6).
In the following part of the code, the Grid layout control is used to arrange the whole page. It contains two rows and just one column, thus, exactly the same as the Menu screen. Inside the Grid layout control, two Border controls are added to have a double border with different thicknesses and colors. It is worth mentioning that the SA3DBackgroundGrid, SA3DMainOuterBorder, and SA3DMainInnerBorder resources (representing styles) are specified in the App.xaml file.
The most important control in the preceding code is the Map control. It has many properties, but here you use only five of them:
Center- The coordinates of a point that will be in the center of the mapZoomLevel- Decides how big an area is presentedCartographicMode- Chooses the aerial, hybrid, road, or terrain modeLandmarksEnabled- Indicates whether models of landmarks are presentedPedestrianFeaturesEnabled- Decides whether additional information dedicated to pedestrians is shown
These settings are bound to properties of the view model, as shown in the following figure. All bindings use the two-way mode. Thus, you are able to update data whenever either the source (property of the view model class) or the target (dependency property of the Map control) has changed.
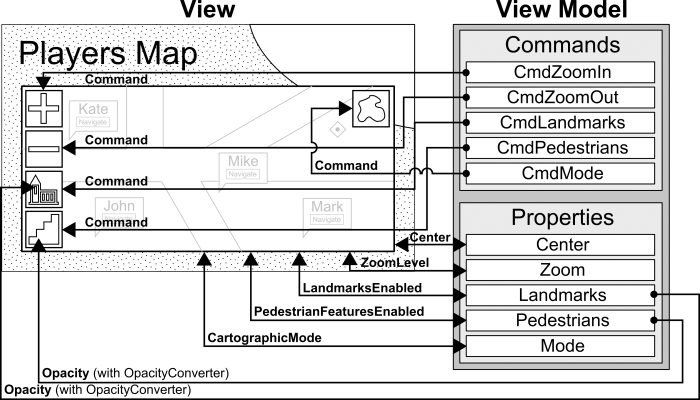
The player can interact with the map by clicking on buttons that have images. For some options (for example, showing or hiding landmarks), the opacity of the button can be changed using the value converter. In such a case, the Converter property of the Binding object is used and the value converter object from the resources is specified. The binding mechanism ensures that whenever the value of the Landmarks property or Pedestrians property (from the view model) changes, the opacity of a particular button is updated automatically.
Each Button control contains an image as its content. You also specify a command that is executed when the user clicks on the button. It can be achieved by assigning the Binding object (with the command name) to the Command property of each Button. For instance, when the player clicks on the option regarding zooming in the map, the CmdZoomIn command should be executed.
The view binds some data from the view model (including the current zoom level and cartographic mode), as well as specifies the commands that should be executed. Thus, you need to create the MapViewModel class, which is derived from the ViewModel class, and contains properties, commands, and methods that are called whenever particular commands are executed. The most important parts of the code are presented as follows:
public class MapViewModel : ViewModel
{
  private const double ZOOM_DEFAULT = 12.0;
  private const double ZOOM_MAX = 20.0; (...)
  private double m_zoom = ZOOM_DEFAULT;
  public double Zoom
  {
    get { return this.m_zoom; }
    set
    {
      this.m_zoom = value;
      this.OnPropertyChanged("Zoom");
    }
  }
  public ICommand CmdZoomIn { get; set; }
  public ICommand CmdZoomOut { get; set; } (...)
  public MapViewModel()
  {
    this.CmdZoomIn = new Command(this.ZoomIn);
    this.CmdZoomOut = new Command(this.ZoomOut); (...)
  }
  private void ZoomIn()
  {
    if (this.Zoom < ZOOM_MAX) { this.Zoom += ZOOM_CHANGE; }
  } (...)
  private void ToggleLandmarks()
  {
    this.Landmarks = !this.Landmarks;
  } (...)
  private void ChangeMode()
  {
    switch (this.Mode)
    {
      case MapCartographicMode.Aerial:
        this.Mode = MapCartographicMode.Hybrid; break; (...)
    }
  }
}
At the beginning, you define a few constant values that will be used in this class, including a default zoom level (ZOOM_DEFAULT as 12.0), its minimum value (ZOOM_MIN as 1.0), and a single change value used after clicking on the buttons for zooming in or zooming out (ZOOM_CHANGE as 1.0).
The next part of the code contains definitions of five properties (Zoom, Mode, Landmarks, Pedestrians, and Center). For each of them, an additional private field is created, which stores the current value and can be used for assigning the default value. It is important that each property contains the get and set accessors. The get accessor simply returns the value of a suitable private field, while the set accessor updates it and calls the OnPropertyChanged method. Thus, you can determine that the value for this particular property has changed and maybe some UI elements need to be updated.
As mentioned earlier, the view model class can also contain commands that are executed when the user interacts with the view. Here, you specify five commands (CmdZoomIn, CmdZoomOut, CmdLandmarks, CmdPedestrians, and CmdMode). Each of them is defined as a property, however, you can use the auto-implemented one, instead of defining a body for the get and set parts.
You can decide what operations are performed when the command is executed, by assigning a new instance of the Command class to a suitable property. In its constructor, you can easily indicate what method will be called in such a situation. These operations, for all commands, are made in the constructor of the MapViewModel class.
The last part of this class consists of private methods, called for particular commands. For instance, when a player clicks on the zoom in button, the CmdZoomIn command is executed and the ZoomIn method is called. Here, you simply increase the value of the Zoom property. Of course, you also check if the current zoom level is not too high.
The group of features that show or hide landmarks and information for pedestrians should be handled in a different way. For them, the value of a suitable property should be negated. With the usage of data binding mechanism, a modification is automatically reflected in the user interface.
The cartographic mode should be changed in a cyclical way. This is achieved through the use of the switch instruction. After each click, the mode is changed to the next mode, starting from the default (for example, terrain).
When the view model class is prepared, you should not forget to modify the code-behind file regarding the Map page. Here, in MapPage.xaml.cs, you should add a new private field (m_viewModel), set its default value (to a new instance of the MapViewModel class), and assign the field value to the DataContext property (in the constructor).
To be able to convert a Boolean value into an opacity you need to create the OpacityConverter class (in the Models directory), which implements the IValueConverter interface:
public class OpacityConverter : IValueConverter
{
  public object Convert(object value, Type targetType,
    object parameter, CultureInfo culture)
  { return System.Convert.ToBoolean(value) ? 0.6f : 0.2f; } (...)
}
The OpacityConverter has to implement the Convert and ConvertBack methods. The first one is used to convert a Boolean value to a float value and in your case, converts an option availability to an opacity value. If the option is enabled, the opacity is set to 0.6, otherwise, it is set to 0.2.