
The web service for your game will be created in the Microsoft Visual Studio Express 2012 for Web environment that can be downloaded from http://www.microsoft.com/visualstudio/plk/products/visual-studio-express-for-web. You should install, register, and run it. The whole installation process and the user interface, are very similar to the version of IDE that is dedicated to development of the Windows Phone applications, which you used in previous chapters.
To create a new WCF service project, you should choose the File and New Project options from the menu. In the newly opened window, select WCF Service Application (from the Visual C# and WCF groups), specify a name (SpaceAim3D.WebService in the example), choose a location, and click on OK. The project template is created automatically.
The newly generated SpaceAim3D.WebService project contains a few files, including Service1.svc and IService1.cs. Remove these two files and add new WCF Service item (with SA3DService as name) from the Add New Item window. The ISA3DService.cs and SA3DService.svc files are generated automatically. Now, you can start working on the implementation of the newly created web service for the game!
The service needs a place to store the data of players, including their locations and results. You can use files, such as text, XML, or binary. However, this approach has some disadvantages, for instance, related to the performance. For this reason, the SQL Server database is chosen as a centralized place where the service stores all required data. This makes it possible to store huge amount of data and get access to the data very quickly. Therefore, it is a good solution even when the number of players increases significantly.
To add a new SQL Server database, choose the Add and New Item options from the context menu of the SpaceAim3D.WebService project. From the Add New Item window, select the Visual C# language, the Data option, and choose the SQL Server Database item from the list. After specifying a name (Db.mdf in this case), click on Add.
Then, a message with the question whether you want to place the database file in the App_Data folder is shown. Click on the Yes button, and after a short period of time, the Db.mdf file will appear in the App_Data folder in the Solution Explorer window. When you double-click on the Db.mdf file, the Database Explorer window should appear, as shown in the following screenshot:
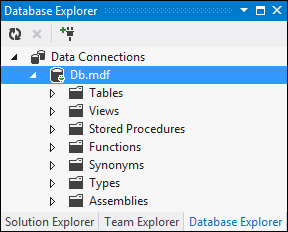
The Database Explorer window allows you to manage the database, for example, to create, modify, and remove the tables or stored procedures. To keep simplicity of the web service, the database contains only two tables, without any additional views, stored procedures, and functions. However, in more complex scenarios, using such functionalities can be very beneficial.
To create a new table, choose the Add New Table option from the context menu of the Tables node in Database Explorer. It opens the designer, where you can easily create a schema of the table by typing the names, data types, and so on in a graphical way or by completing the T-SQL CREATE TABLE statement presented at the bottom of the window.
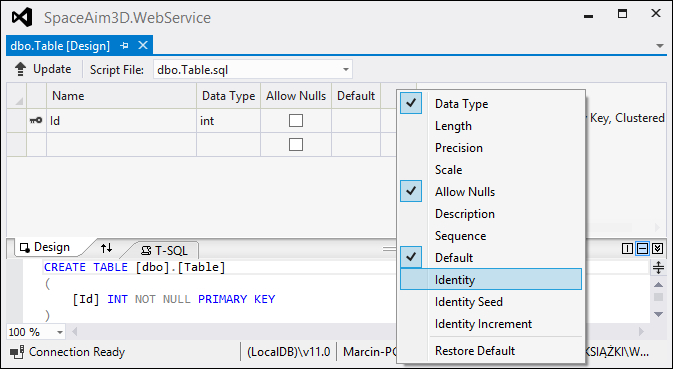
By default, the designer shows four grid columns: the name of the table column, the data type, the value indicating whether the NULL values are allowed, and the default value. It is also possible to decide whether the column is a
primary key.
However, you will also need to select a column as an identity. Therefore, values in this column are automatically increased when new rows are added. It is a very comfortable way of identifying elements, because each element has an automatically assigned unique integer identifier. To add the identity field to the designer, right-click on the row next to the Default field and select the Identity option, as shown in the following screenshot:
Then, provide information regarding the Players table using the designer. At the end, change the table name (in the T-SQL section) to [dbo].[Players]:

To make changes in the database, click on the Update button (in the top-left part of the window) and then click on Update Database (in the new window). The table should be automatically created and visible in Database Explorer. If you want to update a list of tables shown in this window, just click on the Refresh button.
The second table is named Results. You can create it in the similar fashion as the Players table. The table design and T-SQL code are shown in the following screenshot:
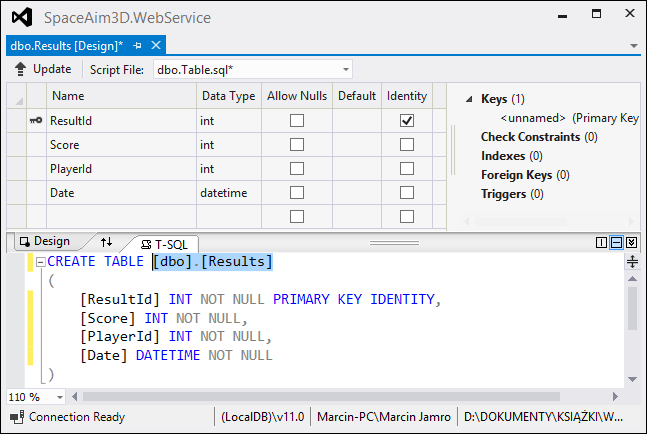
The Results table should be connected with the Players table, because each result is assigned to a particular player. You can create a foreign key, using the designer, by choosing the Add New Foreign Key option from the context menu of the Foreign Keys node (in the top-right part of the window). Then, you should set a suitable name for the constraint (for example, FK_Results_Players) and adjust the T-SQL statement, as shown in the following code:
CONSTRAINT [FK_Results_Players] FOREIGN KEY ([PlayerId])
REFERENCES [dbo].[Players]([PlayerId])
At the end, click on the Update and Update Database buttons.
Now, you have the database with two tables storing the players and results data. However, you need a mechanism for getting suitable information from the database. A suitable solution will be prepared in this section of the book.
LINQ (Language-Integrated Query) is a technology that makes it possible to execute queries on data stored in various locations, including the database, XML file, and a collection of objects. With the use of LINQ, you can easily get access to data, select results meeting a suitable condition, and add, modify, or remove these data.
The syntax of the LINQ queries has many similarities to SQL (Structured Query Language), but this syntax is integrated with a programming language, such as C#. Moreover, two syntaxes are available—query and method. The first one is very similar to the SQL statements, while the other uses many extension methods that are called on an object collection, for instance, to select a specific set of data. A simple example is presented in the following code. However, many other examples will be shown and described in the following sections of this chapter.
var query = from p in players
            where p.Length > 3
            select p;
var method = players.Where(p => p.Length > 3);
The players variable stores is a list of names (List<string> type). The first part of the code represents the query syntax, and returns the names of all the players which are longer than three characters. The code contains the from, where, and select keywords that behave very similarly to the related parts in the SQL query.
The second part presents the method syntax. Here, you call the Where extension method on the collection, and pass the lambda expression as a parameter. This expression specifies the predicate that the string variable has to contain more than three characters. After execution, the method variable stores exactly the same data as the previously obtained data using the query syntax.
When using LINQ, it could be beneficial to declare local variables with the var keyword. Therefore, you do not need to specify an exact result type, which in some scenarios, can be quite complex. It is worth mentioning that in case of the example presented previously, both the query and method variables have the IEnumerable<string> type.
To operate on the data stored in the database easily, you can generate a set of LINQ classes representing rows from particular tables. Such operations can be performed easily using the IDE. At the beginning, choose the Add and New Item options from the context menu of the SpaceAim3D.WebService project, and then choose the Data tab. Next, select the LINQ to SQL Classes item from the list, specify its name (Db.dbml in this case), and click on the Add button. The Db.dbml file is generated automatically.
The next step consists of indicating which classes should be generated. To do this, select both tables from the Database Explorer window (by clicking on the Players and Result nodes from the Tables node with the Ctrl key), and drag-and-drop them into the design surface (on the left section of the Db.dbml designer). As a result, you should get a graphical view of classes, as shown in the following screenshot:
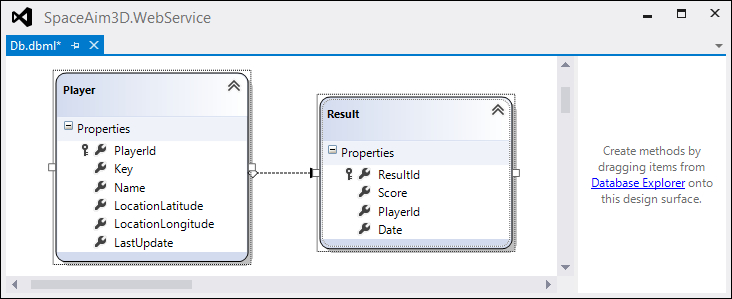
The Player class has been generated for the Players table. It contains the same properties as columns available in the table. Similarly, the Result class represents a single row from the Results table. Both the tables are connected with a relationship that is also visible in case of classes. You can easily get a collection of results for a particular player by using the Results property of the Player class.
In the following section of this chapter, you will use the Player and Result classes to perform various operations on the data stored in the database.
The web service should perform the following operations:
- Returning the current ranks (overall and from the last 24 hours)
- Receiving the score reached by the player
- Returning locations of other players
- Receiving the current location of the player
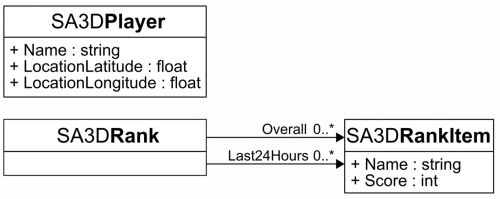
Instances of the SA3DPlayer, SA3DRank, and SA3DRankItem classes will be returned from the particular operations. These classes are different from automatically generated classes which are described earlier. Such a solution allows to return only data required by the client. Therefore, this approach can limit the amount of data that needs to be sent between the web service and the mobile application consuming it.
As shown in the following diagram, the SA3DPlayer class stores only the player name and the GPS coordinates (latitude and longitude). The SA3DRank class contains two properties related to ranks—overall and from the last 24 hours. A single rank item is represented by the SA3DRankItem instance, which stores the player name and the score.
Another interesting problem is related to the player authentication, especially if you do not want to use login IDs and passwords. For this reason, the proposed solution identifies the players by keys generated by the game. When the web service receives the current location or score from the user with an unknown key, the data are stored as a new player. Later, he or she can perform any operation by passing the saved key as the unique identifier.
An implementation of the web service is composed from two stages. At the beginning, you will create the SA3DPlayer, SA3DRankItem, and SA3DRank classes. Then, a code of the ISA3DService interface and the SA3DService class should be prepared.
The code of the SA3DPlayer class, and its short explanation, is presented as follows:
[DataContract]
public class SA3DPlayer
{
  [DataMember]
  public string Name { get; set; }
  [DataMember]
  public float LocationLatitude { get; set; }
  [DataMember]
  public float LocationLongitude { get; set; }
}
The class contains three properties, which represent the name of the player (Name) and the GPS coordinates (LocationLatitude and LocationLongitude). It is important that the class is decorated with the DataContract attribute. By doing this, you indicate that its instances can be serialized and returned by the web service. Similarly, each property should be decorated with the DataMember attribute that indicates that it is included in the data contract. Both the attributes are defined in the System.Runtime.Serialization namespace.
The SA3DRankItem class is created in a similar way as the SA3DPlayer class, and it contains only two properties. The first one specifies the player name (Name with the string type), while the other represents the score (Score with the int type). Of course, you should use the DataContract and DataMember attributes in the same way as shown earlier.
The last required class is named SA3DRank. It contains two properties, and each of them is an array of the SA3DRankItem instances, as shown in the following code:
[DataContract]
public class SA3DRank
{
  [DataMember]
  public SA3DRankItem[] Overall { get; set; }
  [DataMember]
  public SA3DRankItem[] Last24Hours { get; set; }
}
The class is used to transfer both the required ranks (overall and from the last 24 hours) from the database to the game easily.
The ISA3DService interface performs a very important role in the web service implementation, because it indicates which operations are available.
As shown in the following code, the ISA3DService interface specifies four methods:
[ServiceContract]
public interface ISA3DService
{
  [OperationContract]
  SA3DRank GetResults();
  [OperationContract]
  void SendResult(string key, string name, int score);
  [OperationContract]
  SA3DPlayer[] GetPlayers(string key);
  [OperationContract]
  void SendLocation(string key, string name, float latitude,
    float longitude);
}
The first method (GetResults) does not take any parameters and returns the SA3DRank instance. Therefore, it is a way of obtaining all the ranks data, which are required by the Ranks screen. The second method (SendResult) takes three parameters (the user key, the name, and the score), and can be used to save the current result. The next method (GetPlayers) returns an array of the SA3DPlayer instances, representing players other than the one that calls the method. The last method (SendLocation) takes four parameters (the user key, the name, and the GPS coordinates), and can be called to update the current location of the player.
The ISA3DService interface is decorated with the ServiceContract attribute and each method with OperationContract. This indicates that a particular method is included in the service contract, and can be called by the clients. The methods without the OperationContract attribute are accessible within the web service implementation, however, they cannot be called by the clients.
The SA3DService class implements the ISA3DService interface. Therefore, it has all methods from the interface, namely GetResults, SendResult, GetPlayers, and SendLocation. Their implementation is shown and described in this section.
To get access to the data stored in the database, you will create a new instance of the DbDataContext class, as shown in the following line of code. You do not need to specify additional connection properties, because the default ones have been automatically generated and saved by the IDE. It is worth mentioning that the DbDataContext class contains the Players and Results properties, which represent suitable tables from the database. You can use them to get the data from these tables or to perform additional operations, such as removing a particular row.
private DbDataContext _db = new DbDataContext();
The GetResults method executes two queries that return the ranks data:
public SA3DRank GetResults()
{
  var overall = from r in this._db.Results
                orderby r.Score descending
                select new SA3DRankItem()
                  { Name = r.Player.Name, Score = r.Score };
  var last24h = from r in this._db.Results
                where r.Date.AddHours(24) >= DateTime.Now
                orderby r.Score descending
                select new SA3DRankItem()
                  { Name = r.Player.Name, Score = r.Score };
  return new SA3DRank()
  {
    Overall = overall.Take(10).ToArray(),
    Last24Hours = last24h.Take(10).ToArray()
  };
}
The first query (with the result stored in the overall variable) returns the SA3DRankItem instances based on data from the Results table (represented by the Results property of the DbDataContext class), however, it sorts data by the score in the descending order. Thus, the best scores will be at the beginning of the collection. The second query (with results stored to last24h) is similar, but the additional condition is specified. Thus, only the results which were achieved within the last 24 hours, are returned.
In the second part of the previous code, a new instance of the SA3DRank is created and returned. The first 10 elements from the overall collection are taken (with the Take extension method), converted to an array (by calling ToArray), and stored as the value of the Overall property. Similar operations are performed in the case of results from the last 24 hours.
The GetPlayers method returns the data of active players from the database:
public SA3DPlayer[] GetPlayers(string key)
{
  var vicinity = from p in this._db.Players
                 where p.Key != key
                   && p.LocationLatitude != null
                     && p.LocationLongitude != null
                     && p.LastUpdate.AddHours(1) >= DateTime.Now
                     select new SA3DPlayer()
                 {
                 Name = p.Name,
                    LocationLatitude = (float)p.LocationLatitude,
                    LocationLongitude = (float)p.LocationLongitude
                 };
  return vicinity.ToArray();
}
Here, the where part is more complex, and is used to select the data for the players who have different key than the key of the current player (p.Key != key). What is more, the GPS coordinates have to be sent at least once (p.LocationLatitude != null and p.LocationLongitude != null), and the last location update was not earlier than an hour ago (p.LastUpdate.AddHours(1) >= DateTime.Now). At the end, the result is converted to an array and returned.
As shown in the following code, the SendResult method involves both selecting and adding data to the database:
public void SendResult(string key, string name, int score)
{
  var player = this._db.Players.SingleOrDefault(p => p.Key == key);
  if (player == null)
  {
    player = new Player() { Key = key, LastUpdate = DateTime.Now };
    this._db.Players.InsertOnSubmit(player);
  }
  player.Name = name;
  Result result = new Result()
    { Player = player, Score = score, Date = DateTime.Now };
  this._db.Results.InsertOnSubmit(result);
  this._db.SubmitChanges();
}
At the beginning, try to get player's data by the given key. Such an operation is performed by using the method syntax of LINQ, and by passing a suitable lambda expression as the parameter of the SingleOrDefault method. This method returns an instance of the Player class (if exactly one result meets the predicate), null (if no results are found), or throws an exception (if more than one result is consistent with the predicate).
If the database does not contain suitable data, a new row should be created. It can be achieved with LINQ by creating a new Player instance, setting the suitable properties values, and calling the InsertOnSubmit method on the Players property of the DbDataContext class. The changes are not saved until the SubmitChanges method is called.
When you are certain that suitable data are available (or will be available after calling the SubmitChanges) in the database, update the player name according to a value passed as the parameter. Then, create a new Result instance and connect it with your player data by assigning a reference to the player variable as a value of the Player property of the Result instance. Apart from this, set the score and the current date. At the end, indicate that such data should be added to the Results table and submit the changes.
As you can see in the following code, the SendLocation method is similar to the SendResult method, which is described earlier:
public void SendLocation(string key, string name, float latitude,
  float longitude)
{
  var player = this._db.Players.SingleOrDefault(p => p.Key == key);
  if (player == null)
  {
    player = new Player() { Key = key, LastUpdate = DateTime.Now };
    this._db.Players.InsertOnSubmit(player);
  }
  player.Name = name;
  player.LocationLatitude = latitude;
  player.LocationLongitude = longitude;
  player.LastUpdate = DateTime.Now;
  this._db.SubmitChanges();
}
Here, you need to obtain the Player instance representing data of the current player or create such an object if it does not exist. Then, modify the values of the Name, LocationLatitude, LocationLongitude, and LastUpdate properties, and save the modifications by calling the SubmitChanges method.