
Windows Phone 8 devices can also be equipped with sensors other than the accelerometer such as the gyrometer and the compass. The developer can use available classes to obtain data from these sensors. They can be then processed and used for steering or providing a design that changes, for example, when the player rotates the phone. Other sensors are not used in the native part of the game, but their short description is also presented in the book.
To observe values returned by additional sensors, is a good idea to connect the mobile phone to PC and debug the application deployed on the phone. You can present values read from the sensors in the Output window.
To write to the output you use the OutputDebugStringW function that is also available via OutputDebugString macro. You add following two methods to the GameHelpers class that make it possible to write content to the output in an easier way:
void static Debug(float value);
void static Debug(float x, float y, float z);
These methods are named Debug. The first one takes just one parameter representing a floating-point number, and the other one takes three parameters (x, y, z). It is important to include the string header file and add the using directive for the std namespace, because you will use the wstring type in the implementation, which is shown in the following block of code:
void GameHelpers::Debug(float x, float y, float z)
{
  wstring text = to_wstring(x) + L" " + to_wstring(y) + L" "
    + to_wstring(z) + L'
';
  OutputDebugString(text.c_str());
}
void GameHelpers::Debug(float value)
{
  wstring text = to_wstring(value) + L'
';
  OutputDebugString(text.c_str());
}
Both methods convert floating-point numbers to wstring values and combine them with additional parts of text such as spaces (L" "). At the end, the pointer to constant wchar_t data (obtained by calling c_str method on the wstring instance) is passed as a parameter to OutputDebugString.
Gyrometer (gyroscope) is a sensor that can be used for measuring angular velocity along particular axis (x, y, and z). Reading data from it is similar to the scenario with accelerometer. All required modifications can be made in the GameRenderer class.
At the beginning, you add two private fields representing the gyrometer (m_gyrometer) and data obtained from it (m_gyrometerReading):
Gyrometer^ m_gyrometer;
GyrometerReading^ m_gyrometerReading;
In the constructor, you need to initialize the gyrometer. However, if such a sensor is not available in the device (for example, in case of the emulator), an exception is thrown. For this reason, you need to catch the COMException. Similar to the accelerometer, getting data of a default gyrometer is possible using the GetDefault static method, as shown in the following code:
GameRenderer::GameRenderer() : (...)
{
  try { m_gyrometer = Gyrometer::GetDefault(); }
  catch (Platform::COMException^ e) { }
}
A part of code that reads data from the gyrometer is located in the Update method:
void GameRenderer::Update(float timeTotal, float timeDelta)
{
  if (m_gyrometer != nullptr)
  {
    m_gyrometerReading = m_gyrometer->GetCurrentReading();
    float x = (float)m_gyrometerReading->AngularVelocityX;
    float y = (float)m_gyrometerReading->AngularVelocityY;
    float z = (float)m_gyrometerReading->AngularVelocityZ;
    GameHelpers::Debug(x, y, z);
  } (...)
}
Here, you check whether you have access to the sensor (by verifying that m_gyrometer field is not equal to the null pointer). Then, the current data from the gyrometer are obtained by calling the GetCurrentReading method, which returns the GyrometerReading instance. You can access angular velocity along x, y, and z axis by using particular properties of the GyrometerReading class (AngularVelocityX, AngularVelocityY, and AngularVelocityZ respectively). To present read data in the Out
put window, you use the Debug method of the GameHelpers class. Currently you can launch the application in the emulator. However, just after clicking on the Play! option on the Menu screen, a window with information about a first-chance exception is shown:
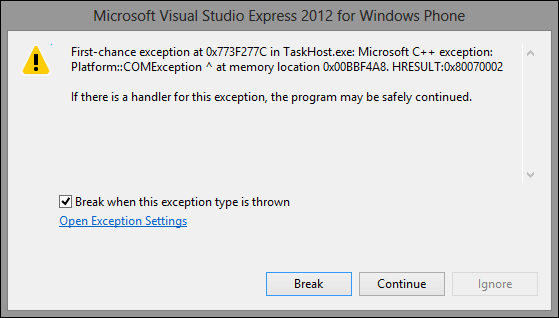
It means that the emulator does not support a gyroscope. However, you handled the COMException, thus, you can click on Continue. Of course, no information about angular velocity is shown in the Output window.
You can test the scenario of reading data from the gyrometer by debugging the application on a phone equipped with such a sensor. Then, you should see many numbers in the Output window, grouped into three. They represent angular velocity along x, y, and z axes.
Another sensor that can be used directly in the native part of the game is the
Compass (magnetometer). It measures a heading towards the north geomagnetic pole and north geographical pole. Using the compass is significantly easier due to availability of the Compass and CompassReading classes. As an example, you will present values read from the compass in the Output window. All required modifications in the code of your game involve only the GameRenderer class and are described in this section.
At the beginning, you need to add two private fields, representing both the compass and the obtained data (instances of Compass and CompassReading respectively):
Compass^ m_compass;
CompassReading^ m_compassReading;
Some additional modifications are necessary in the constructor. Here, you set the value of the m_compass field using the static GetDefault method of the Compass class. Then, you specify a suitable report interval in milliseconds (1000 in your example), as shown in the following code:
GameRenderer::GameRenderer() : (...)
  m_compass(Compass::GetDefault())
{ (...)
  if (m_compass != nullptr) { m_compass->ReportInterval = 1000; }
}
Reading data from the compass is performed in the Update method. Here, you check if the compass is available and then obtain current values by calling the GetCurrentReading method. You can get a heading towards the north geomagnetic pole by the HeadingMagneticNorth property, and towards the north geographical pole by the HeadingTrueNorth property. It is worth mentioning that in the second scenario, you need to use an additional property, named Value, to get access to double value, as shown in the following code:
void GameRenderer::Update(float timeTotal, float timeDelta)
{
  if (m_compass != nullptr)
  {
    m_compassReading = m_compass->GetCurrentReading();
    GameHelpers::Debug(
      (float)(m_compassReading->HeadingMagneticNorth));
    GameHelpers::Debug(
      (float)(m_compassReading->HeadingTrueNorth->Value));
  } (...)
}
An interpretation of data obtained from the compass is presented in the following figure. When the device is located towards the magnetic or true north, a suitable property is equal to 0. If it is located to the east, the same property is equal to 90 (degrees). Obtained values are between 0 and 360, thus they represent an angle.

You can now run the application in the emulator, however, no new data are shown in the Output window. To test the compass, you need to launch the game on a real device equipped with such a sensor. Then, some new results are presented in the Output window. The first number represents a heading towards the north geomagnetic pole, and the other, towards the north geographical pole.