
In previous chapters, you learned how to create the Windows Phone 8 project that presents various features available for developers. Currently, your example is almost ready, thus it is high time to prepare it for submission to the Windows Phone Store and make it available for users from various countries.
In this chapter you will learn how to test the application and prepare it for submission. The process of testing the game may be very complex, but it can be made easier by using dedicated tools, which will be presented in this chapter. While developing the game for the Windows Phone 8 platform, you should carefully test various aspects, including using sensors, different screen resolutions, localization, and, of course, the performance.
Let's continue your work in the last part of this book and publish the Space Aim 3D game!
Many application details are specified in the manifest file. Thus, you will modify it to set the correct application name, description, as well as choose suitable tile images. You can adjust these settings on the Application UI page in the Manifest Designer.
As presented in the following screenshot, set the Display Name field to Space Aim 3D, and adjust the Description field as well. What is more, you should choose the suitable App Icon, which is an image with size 100 x 100 pixels. It represents your application, thus you should provide the game with a proper icon that the user can easily recognize.
In the exemplary game, the icon shows the planet and a few asteroids, which are the main elements in the game. What is more, the image contains the game title. It is important, because you clear the content of the Tile Title setting. Thus the user will not see additional small text with a name of the application, after pinning the tile to the Start screen.
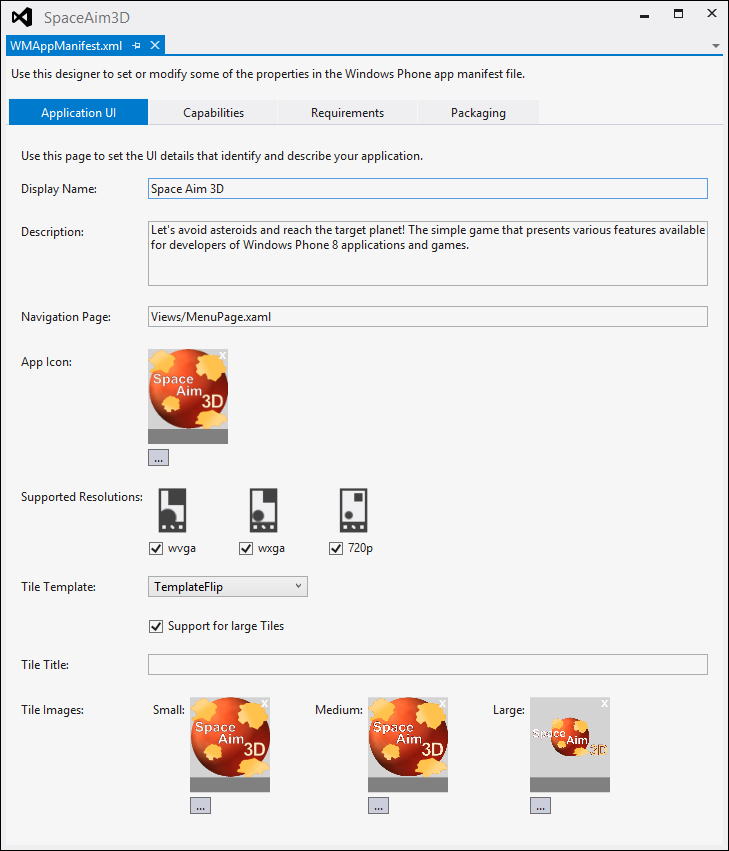
Apart from some basic settings, you can also choose tile images. They will be shown on the default tile when the player taps the game to the Start screen.
The Windows Phone 8 platform supports three kinds of tile templates: flip, iconic, and cycle. They differ by a way of presenting content. Of course, you can select a suitable one also in the Manifest Designer by choosing an option from the Tile Template list.
The flip tile template is the default option, which allows you to present two sides of the tile and flip between them. Thus, you can present the game logo on the front side and some more information on the other side. The tile flips automatically. You can specify settings regarding the background images, titles shown on the front and back sides, the content presented on the other side, as well as the number displayed on the tile.
The iconic tile template shows the content in a bit different way. Here, a small icon is used to present the application, together with an optional number, for example, regarding received messages in your project. Of course, you can set some properties, including the tile title, the image, as well as the background color.
The cycle tile template is the last available type, which makes it possible to present up to nine images that are changed automatically. Thus, it can be a suitable way to present a tile for the application which works with many images. In case of the cycle tile template, you can also adjust a few settings, such as the title or the shown images.
With the usage of the Manifest Designer, it is very easy to prepare the basic version of the default tile for the application, just by selecting a suitable template type and choosing images which should be shown on the tile, depending on its size. You can also enable or disable the support for a large tile.
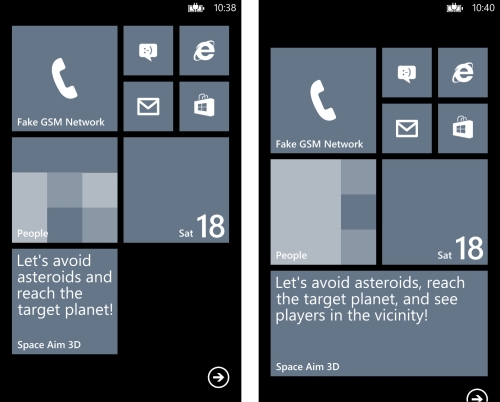
After adjusting the tiles, you may receive a result as shown in the following screenshot:

As you can see, the tile is presented in three various sizes: small, medium, and large. What is important, you do not just rescale the image, but provide three separate images in particular sizes, which look good regardless of the tile size. Here, you can also find the Space Aim 3D shortcut in the application list. However, you can expect that it appears in the Games group instead. Fortunately, you do not need to worry about it, because after downloading the game from the store, its shortcut will be shown in the proper place.
As you could remember, the flip data template, which you chose, can present two sides of the tile, but now you do not see this effect. Thus, in the following part of this section you will learn how to configure the default tile to support flipping and how to set the background image and the content at the back. To do so, you should open the WMAppManifest.xml file, but not in the Manifest Designer. You need to choose the View Code option from the context menu of this file.
What is interesting, the XML code contains information that you had set in a graphical way. Thus, it can be an additional way of adjusting some settings and adding more complex features, which are not supported directly by the Manifest Designer. The TemplateFlip node, specified in the WMAppManifest.xml file, is as follows:
<TemplateFlip>
  <SmallImageURI (...)> (...) </SmallImageURI>
  <Count>0</Count>
  <BackgroundImageURI (...)> (...) </BackgroundImageURI>
  <Title></Title>
  <BackContent>Let's avoid asteroids and reach the target planet!</BackContent>
  <BackBackgroundImageURI></BackBackgroundImageURI>
  <BackTitle>Space Aim 3D</BackTitle>
  <LargeBackgroundImageURI (...)> (...) </LargeBackgroundImageURI>
  <LargeBackContent>Let's avoid asteroids, reach the target planet, and see players in the vicinity!</LargeBackContent>
  <LargeBackBackgroundImageURI(...)></LargeBackBackgroundImageURI>
  <DeviceLockImageURI></DeviceLockImageURI>
  <HasLarge>True</HasLarge>
</TemplateFlip>
Here, you specify the BackContent, BackTitle, and LargeBackContent elements to adjust a way of presenting the back side of the tile. The first setting is a string which will be displayed on the other side of the medium-sized tile. The second setting is the title shown on the back side (regardless of the tile size), while the other is a string shown on the large tile.
When you deploy the application to the emulator or the phone, and tap it to the start screen, you should see that the tile flips automatically, and it should present some additional content on the back side. What is more, it differs depending on the tile size, as shown in the following screenshots:
You have completed the basic configuration of the application, as well as learned how to set up the default tile. However, a few other modifications are necessary on the Packaging tab. Here, you specify the author and publisher data, as well as a version of the application. Other tabs (Capabilities and Requirements) remain unchanged, because you made the required modifications earlier.