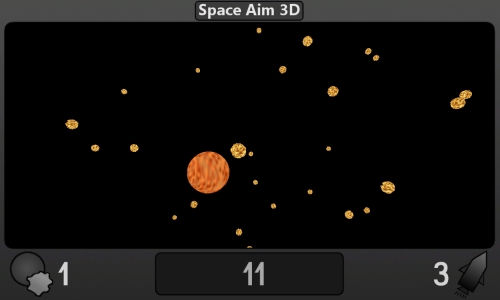
The next stage of developing your game is related to adding the rocket display. It presents the number of the current level (on the left), the score (in the middle), and the number of remaining rockets (on the right). In this section, you will learn how to create texture in the .dds format, draw it using the sprite batch mechanism, prepare the
sprite font, and display some text on the screen.
The rocket display should be shown on the whole screen only if the game is in the STARTING or PLAYING state. It needs to support all available screen resolutions, regardless of the aspect ratio. The number of current level should be aligned to the left, the number of remaining rockets should be aligned to the right, while the score should be aligned to the center.
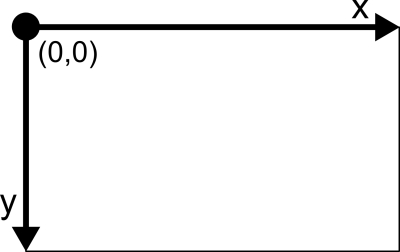
It is worth mentioning that coordinates in 2D graphics in landscape mode are organized as presented in the following diagram. The (0,0) point is located in the top-left corner, and at this point, the rocket display background image should be placed:
The background of the rocket display will be drawn as a texture, prepared in DDS format (Microsoft DirectDraw Surface). The texture can be understood simply as a bitmap that can be placed in some specific location on the screen. In this case, additional text is rendered on this image using the bitmap-based font.
The texture in DDS format can be created, for example, in Paint.NET software, which can be downloaded from http://www.getpaint.net/.
Let's start by creating a bitmap with size 2048 x 1024 pixels (powers of two). However, the rocket display background is smaller and has dimensions 1366 x 768 pixels. Such a resolution is not supported by the Windows Phone 8 platform, however, it allows you to use the same image for all three available resolutions. In case of the 16:9 ratio, the whole image (but rescaled) will be shown. If the user has a device with screen resolution in 15:9 ratio, stripes from both sides will be removed, but the most important part of the image will be drawn.
The Paint.NET window with the rocket display image is shown in the following screenshot:
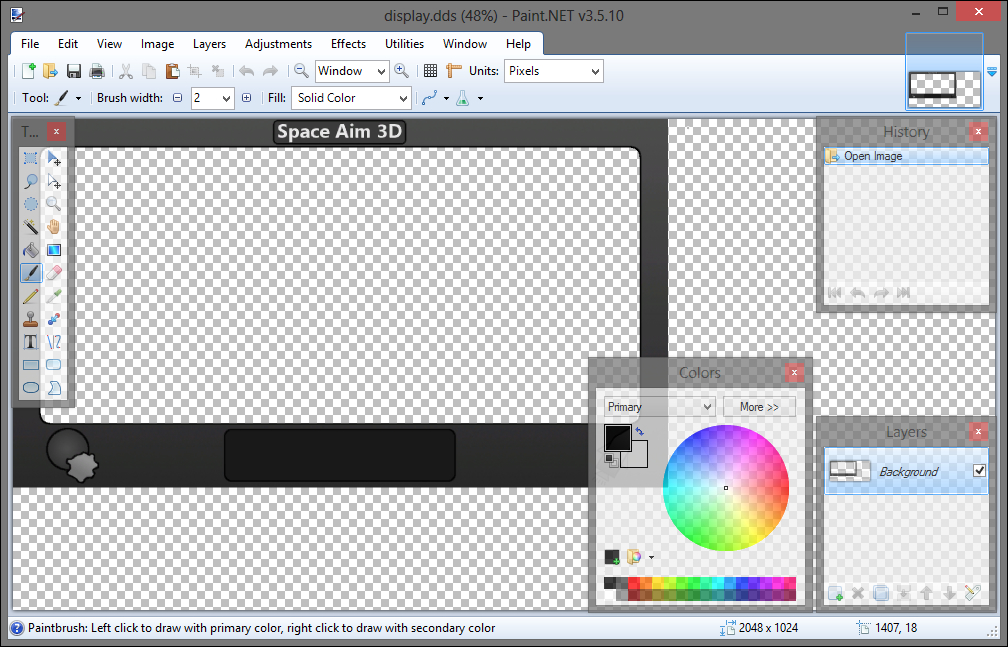
After creation of the bitmap, it can be saved as the display.dds file. Then, you should copy it to the Assets directory, which already contains the asteroid.obj and planet.obj files.
At the end, include the file in the SpaceAim3DComp project by choosing the Include In Project option from the context menu of the .dds file. Earlier, you need to ensure that the Show All Files option is checked in the Solution Explorer window.
The rocket display requires text which presents a number of the current level, remaining rockets, and the score. To be able to draw some text on the screen, you will prepare a sprite font that is based on the bitmap.
Fortunately, the DirectXTK library contains an additional project called MakeSpriteFont, which makes it possible to easily create sprite fonts for the files available in the operating system. To generate them, you need to build this project. At the beginning, launch a new instance of the Microsoft Visual Studio Express 2012 for Windows Phone.
Then, open a project by choosing the File and Open Project options from the menu, and selecting the MakeSpriteFont.csproj file from the MakeSpriteFont directory located in the main DirectXTK catalog. Then, rebuild the solution, by choosing the Build and Rebuild Solution options from the menu. If the project is built successfully, the MakeSpriteFont.exe file is created automatically inside the binDebug directory in the project's folder. Copy a path to the Debug directory and run the command line by pressing the Windows button + R and typing cmd. Then, navigate to the folder whose path you have in the clipboard, and generate the display.spritefont file by the following command:
MakeSpriteFont.exe "Pacaya" display.spritefont /FontSize:70
Here, Pacaya is a name of the font and 70 is its size.
Tip
You can use various fonts to generate sprite fonts. Here, Pacaya from the open font library (http://openfontlibrary.org/en/font/pacaya) is used. It is available at SIL Open Font License (OFL).
If the sprite font is generated successfully, you should see the following result in the command line:
Importing Pacaya
Cropping glyph borders
Packing glyphs into sprite sheet
Premultiplying alpha
Writing display.spritefont (CompressedMono format)
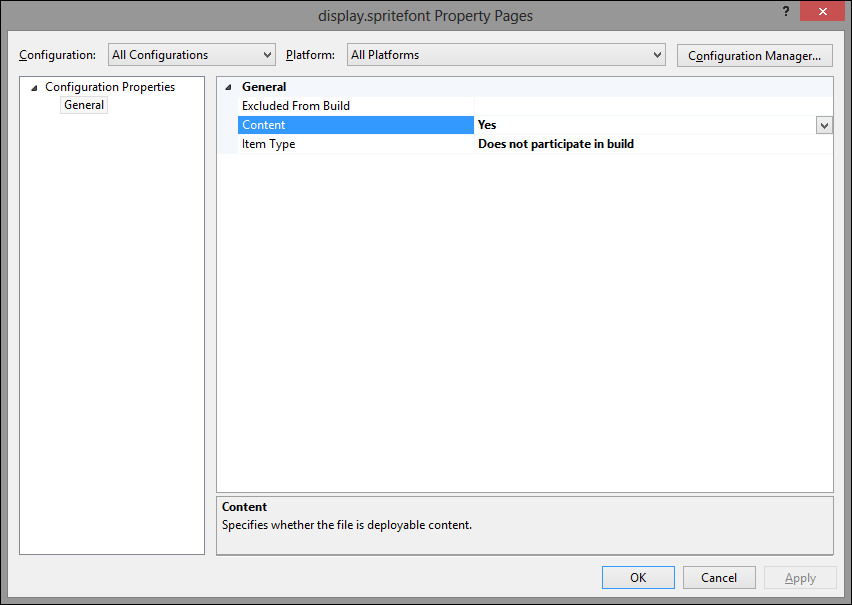
Next, copy the generated display.spritefont file to the Assets directory inside the SpaceAim3DComp project and include it into the project. You will also need to set the Content property to Yes, by choosing the Properties option from the context menu of the file, changing Configuration to All Configuration, Platform to All Platforms, and setting a suitable value for the Content property, as shown in the following screenshot:
An implementation of the rocket display is based on the additional class called RocketDisplay. It handles all operations related to drawing the texture and text. Also, a few small modifications need to be made in the GameRenderer class.
At the beginning, specify settings related to the rocket display as constant values in the Constants.h
file:
#define SA3D_DISPLAY_TEXTURE_FILE L"Assets\display.dds"
#define SA3D_DISPLAY_TEXTURE_WIDTH 1366
#define SA3D_DISPLAY_FONT_FILE L"Assets\display.spritefont"
#define SA3D_DISPLAY_MARGIN_BOTTOM 115.0f
#define SA3D_DISPLAY_MARGIN_SIDE 175.0f
#define SA3D_MAX_SCREEN_HEIGHT 768.0f
#define SA3D_MAX_SCREEN_WIDTH 1280.0f
The values contain a path to the .dds file with the background image, its width, a path to the font file, as well as bottom and side (left and right) margins, which are used to specify a text location. The last two constant values define the maximum supported screen width and height. They are used to place and scale the graphics and text correctly on devices with various screen resolutions, even in different aspect ratios.
The implementation of the rocket display is available in the RocketDisplay class, which prepares required resources (a texture and a font), as well as draws the display.
At the beginning, in the RocketDisplay.h file, you need to include the string, SpriteBatch.h, SpriteFont.h, DDSTextureLoader.h, and Constants.h header files. They are necessary for drawing 2D graphics and loading textures from DDS files. Then, add two using directives, related to the std and DirectX namespaces. The class contains two public methods, as shown in the following code:
class RocketDisplay
{
public:
  void Prepare(ID3D11Device *device);
  void Draw(SpriteBatch *spriteBatch, float height, float width,
  int level, int score, int rockets, float scaleX, float scaleY);
private:
  unique_ptr<SpriteFont> m_font;
  ID3D11ShaderResourceView *m_texture;
};
The first method prepares resources, and the other draws the rocket panel based on data passed as parameters. Apart from methods, the class has two private fields that store pointers to the sprite font (m_font) and to the ID3D11ShaderResourceView instance, representing the texture (m_texture).
The Prepare method loads the texture from the .dds file, whose path is stored in the constant value (SA3D_DISPLAY_TEXTURE_FILE). This is possible by calling the CreateDDSTextureFromFile function, available in DirectXTK. The last part of the Prepare method loads font data, based on a name of its file, represented by the SA3D_DISPLAY_FONT_FILE constant. You create a new instance of the SpriteFont class, using the unique_ptr, thus you will use a smart pointer. The code of the Prepare method is as follows:
void RocketDisplay::Prepare(ID3D11Device *device)
{
  CreateDDSTextureFromFile(device,
    SA3D_DISPLAY_TEXTURE_FILE, nullptr, &m_texture,
    MAXSSIZE_T);
  m_font = unique_ptr<SpriteFont>(new SpriteFont(device,
    SA3D_DISPLAY_FONT_FILE));
}
The Draw method performs four operations—drawing the background image and three strings (the number of the level, remaining rockets, and the score). All actions are performed using the
sprite batch, which is a mechanism that allows drawing 2D graphics on the screen. An instance of the SpriteBatch will be created in the GameRenderer class, before calling the Draw method on the RocketDisplay instance. Therefore, a pointer to SpriteBatch is passed as a parameter. The code of the Draw method is shown in the following block:
void RocketDisplay::Draw(SpriteBatch *spriteBatch, float height,
  float width, int level, int score,
  int rockets, float scaleX, float scaleY)
{
  float textureWidth = SA3D_MAX_SCREEN_HEIGHT *
    SA3D_MAX_SCREEN_WIDTH / (height / scaleX);
  float margin = (SA3D_DISPLAY_TEXTURE_WIDTH - textureWidth) / 2;
  spriteBatch->Draw(m_texture, XMFLOAT2(-margin * scaleX, 0),
    nullptr, Colors::White, 0, XMFLOAT2(0, 0),
    scaleY, SpriteEffects_None);
  float yCoordinate = (SA3D_MAX_SCREEN_HEIGHT
    - SA3D_DISPLAY_MARGIN_BOTTOM) * scaleY;
  float levelX = (SA3D_DISPLAY_MARGIN_SIDE - margin) * scaleX;
  wstring levelString = to_wstring(level);
  const wchar_t *levelText = levelString.c_str();
  m_font->DrawString(spriteBatch, levelText,
    XMFLOAT2(levelX, yCoordinate),
    Colors::LightGray, 0, XMFLOAT2(0,0), scaleX);
  wstring rocketsString = to_wstring(rockets);
  const wchar_t *rocketsText = rocketsString.c_str();
  XMFLOAT3 rocketsTextSize;
  XMStoreFloat3(&rocketsTextSize,
    m_font->MeasureString(rocketsText));
  float rocketsX = (SA3D_MAX_SCREEN_WIDTH -
    SA3D_DISPLAY_MARGIN_SIDE + margin -
    rocketsTextSize.x) * scaleX;
  XMVECTOR rocketsColor = Colors::LightGray;
  if (rockets == 2) { rocketsColor = Colors::Yellow; }
  else if (rockets == 1) { rocketsColor = Colors::Red; }
  m_font->DrawString(spriteBatch, rocketsText,
    XMFLOAT2(rocketsX, yCoordinate),
    rocketsColor, 0, XMFLOAT2(0,0), scaleX);
  wstring scoreString = to_wstring(score);
  const wchar_t *scoreText = scoreString.c_str();
  XMFLOAT3 scoreTextSize;
  XMStoreFloat3(&scoreTextSize,
    m_font->MeasureString(scoreText));
  float scoreX = ((SA3D_MAX_SCREEN_WIDTH - scoreTextSize.x) / 2)
    * scaleX;
  m_font->DrawString(spriteBatch, scoreText,
    XMFLOAT2(scoreX, yCoordinate),
    Colors::DarkGray, 0, XMFLOAT2(0,0), scaleX);
}
At the beginning, you calculate the expected width of the texture. It can take two values, depending on the aspect ratio—1280 (15:9) and 1365.33 (16:9). As you remember, your texture has width equal to 1366 pixels. Thus, almost the whole image will be presented on devices with 16:9 aspect ratio. Otherwise, the stripes from both sides (left and right) will be removed, and the image will be centered on the screen. After calculating the expected texture width, you can easily obtain a value of margin, representing a width of a single strip on the left or on the right, which is hidden. By using the described approach, you can use the single texture for all resolutions supported by the Windows Phone 8 platform.
The scaleX and scaleY parameters are very important, because they make it possible to arrange the screen similarly in all supported resolutions. As presented in the following diagram, the width and height, as well as the scale are different in case of various resolutions. For this reason, to place the object in the middle of the screen, you cannot just put it in (600, 350) coordinates. In WXGA resolution, it will work fine, but in WVGA, the image will be drawn in the bottom-right corner. With the usage of scale, you can calculate a suitable location on the screen.

However, in case of various aspect ratios, you need two scale factors—one for x coordinate, and the other for y. As you could see in the diagram, in case of 1280 x 720 resolution, these scale factors are different, thus such an approach gives you more flexibility than using just one value.
The Draw method of the SpriteBatch class takes a few parameters, including a pointer to ID3D11ShaderResourceView that represents the texture, a position where the texture should be drawn, its rotation, and scale. In this case, you want to draw the texture represented by the m_texture field, place its top-left corner in the (-margin * scaleX, 0) coordinates, not rotate, and rescale by the scaleY value passed as a parameter.
To draw the text on the screen, you can use the DrawString method of the SpriteFont class. It takes a few parameters including a pointer to the SpriteBatch instance used for drawing, a text that should be displayed, its location on the screen, color, rotation, or scale. It is important that this method takes the text as const wchar_t *, thus you need to call the c_str method on the wstring instance before calling the DrawString method. A location of the text is calculated using the scaleX and scaleY parameters.
The number of remaining rockets should be placed all the time aligned to the right and located next to the rocket image. It requires to calculate the x coordinate in a way presented in the following diagram (on the left), using the formula: x = sw–z–tw, where sw denotes the screen width, tw denotes text width, and z is equal to the predefined margin adjusted by the additional margin related to shown or hidden strips. That means that if the stripes are hidden (image is narrowed) you should limit the margin by a width of the single strip. Of course, a result should be multiplied by the scaleX parameter.
To draw all texts on the rocket panel, use the same y coordinate, as calculated earlier.

It is worth mentioning that you can easily draw text in various colors. As presented in case of the number of remaining rockets, you can change the color depending on the number. If it is equal to two, use yellow (Colors::Yellow). When the user has only one remaining rocket it becomes red (Colors::Red). Otherwise, the light gray color is applied (Colors::LightGray).
To measure a text, you can call the MeasureString method on the SpriteFont instance that represents a font, which you want to use for measuring. This method returns an instance of XMVECTOR, that can be then converted into XMFLOAT3 by the XMStoreFloat3 method, as shown in the code.
The last text shows the player score. It should be displayed between the number of level and remaining rockets. For this reason, it should be placed in the middle of the screen all the time, with respect to the x coordinate. The y coordinate should have the same value as in case of other captions. The formula for calculating the x coordinate can be: x=(sw–tw)/2. It is also presented in the previous diagram (on the right).
Apart from implementation of the RocketDisplay class, you will need to make some small changes in GameRenderer. They are related to a presentation of the rocket display every time when the game is in the STARTING or PLAYING state. What is more, you should create an instance of the SpriteBatch class that is used to draw 2D graphics.
At the beginning, let's include the RocketDisplay.h and SpriteBatch.h header files. Then, you create four private fields, which represent the rocket display, sprite batch used for drawing, and scale factors.
RocketDisplay m_rocketDisplay;
unique_ptr<SpriteBatch> m_sbDrawing;
float m_scaleX;
float m_scaleY;
Next, modify the CreateWindowSizeDependentResources method in a way that makes it possible to initialize the rocket display, by calling the Prepare method. Also, create an instance of the SpriteBatch class using unique_ptr. At the end, a value of the m_scaleX field is calculated by dividing the screen width (obtained from the m_renderTargetSize field) by the maximum supported screen width (1280 in this case). Similarly, set a value of the m_scaleY field, as follows:
void GameRenderer::CreateWindowSizeDependentResources()
{
  Direct3DBase::CreateWindowSizeDependentResources();
  m_rocketDisplay.Prepare(m_d3dDevice.Get());
  m_sbDrawing = unique_ptr<SpriteBatch>(
    new SpriteBatch(m_d3dContext.Get()));
  m_scaleX = m_renderTargetSize.Width / SA3D_MAX_SCREEN_WIDTH;
  m_scaleY = m_renderTargetSize.Height / SA3D_MAX_SCREEN_HEIGHT;
  UpdateProjectionMatrix();
}
The SpriteBatch instance, created in the CreateWindowSizeDependentResources method, is used in the Render method, as shown in the following code:
void GameRenderer::Render()
{ (...)
  m_sbDrawing->Begin();
  switch (m_game.GetState()) { (...) }
  m_sbDrawing->End();
}
Here, you call the Begin and End methods. The first one is called just before the switch statement, and the other—when it ends. Between them, you can draw textures and texts, as presented in the RocketDisplay implementation.
The last required modification in the GameRenderer class involves the RenderPlaying method:
void GameRenderer::RenderPlaying()
{
  RenderPlanetAndAsteroids();
  m_rocketDisplay.Draw(m_sbDrawing.get(),
    m_renderTargetSize.Height, m_renderTargetSize.Width,
    m_game.GetLevel(), m_game.GetScore(),
    m_game.GetRocketsNumber(), m_scaleX, m_scaleY);
}
Here, you call the Draw method (on the RocketDisplay instance) with a set of parameters, including game data (for example, the number of remaining rockets), screen resolution (width and height), and a pointer to the SpriteBatch instance. This method draws the rocket display background image, together with the number of the current level and remaining rockets, as well as the score.
Let's launch the game and see the display of the rocket as shown in the following screenshot. Currently, you know how to draw textures and texts on the screen, thus you can proceed to another part of this chapter where you will get to know how to support many languages in the native part.