
In the previous chapters, you created the playable version of your game that consists of not only the basic part, but is also equipped with a few additional features, including geolocation, augmented reality, and ranks. In the current part of the book, you will learn how to integrate the application with Facebook and Twitter, by allowing the user to publish a post on the wall and tweet. You will also get to know how to read data from RSS feeds, save and load settings, as well as prepare the local rank using the isolated storage mechanism.
Nowadays, the social networks are very popular. They make it possible to find and contact other people with the same interests, living or working in similar location, or even who have the same friends as you have. You can publish photos, update your status information, send private messages to particular users, or comment on entries published by others. Many social networks exist, including Facebook, Twitter, and LinkedIn.
An integration of your applications with social networks can be beneficial in many ways. First of all, you can allow users to log in with their existing credentials, thus, they do not need to create separate logins and passwords for various projects. You can also read content from social networks (such as posts, messages, users' data, or a list of friends) and present it in your application. Apart from reading, you can add some new information as well. Thus, you are able to publish a new status, or even send a private message.
Various operations with Facebook and Twitter social networks can be performed with the usage of APIs (Application Programming Interfaces) available for developers. They support various actions such as publishing a post on the Facebook wall or updating the Twitter status (known as tweeting). It is worth mentioning that many operations can be taken only after a successful user authorization, which can be done, for example, using the OAuth 2.0 Authorization Framework. After a successful log in, a special token is assigned, which is used to authenticate your further requests to the API.
As an example regarding the Facebook API, you will implement a mechanism of logging to your Facebook account and posting the message on the wall directly from the managed part of your game. A detailed step-by-step description is presented in this part of the book.
Every user who has a Facebook account can publish a message on the wall, using the Space Aim 3D Facebook application. To create such an application, you should perform the following steps:
- Open https://developers.facebook.com/apps website.
- Log in using Facebook credentials or create a new account.
- Register as a developer (only if you have not done it yet), by pressing the Register as a Developer button and finishing the short process.
- Press the Create New App option.
- Set a suitable application name, for example,
Space Aim 3D. - Set a namespace, for example,
spaceaim. - Copy the App ID from the top of the summary website of your application, which should be automatically shown when a configuration of the application is finished.
- Edit application settings (the Basic group) by adding a suitable entry to the App Domains field.
- Choose Website with Facebook Login (and type an address as Site URL) in Select how your app integrates with Facebook part.
- Save changes.
Your Facebook application is ready. Let's launch the IDE and start development!
You will perform various operations on the Facebook API using the Facebook C# SDK. It is a library that makes the development significantly easier, because you do not need to implement mechanisms for sending requests to API, parsing responses, and many others, on your own.
The Facebook C# SDK can be installed with the usage of the
NuGet package manager, either in a textual or visual way. To open the textual console, you should navigate to Tools |Library Package Manager| Package Manager Console option from the menu. The new window, where you can type commands, is opened automatically. Here, you can use the Install-Package command to install a suitable library in your project, as follows:
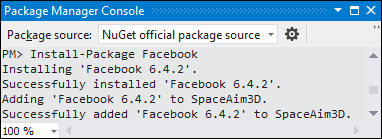
As shown in the preceding screenshot, to add the Facebook C# SDK library into the SpaceAim3D project, you need to type Install-Package Facebook and press Enter. The reference is added automatically and you can start development.
It is worth mentioning that the Install-Package command installs, by default, the current stable version of the package (Version 6.4.2 is used here). However, with the NuGet package manager, you can perform many useful operations, including choosing other versions or uninstalling the package.
According to general assumptions, the player should be able to post the message on the Facebook wall after clicking on the suitable button on the Web screen. Thus, you need to modify both the view and the view model parts.
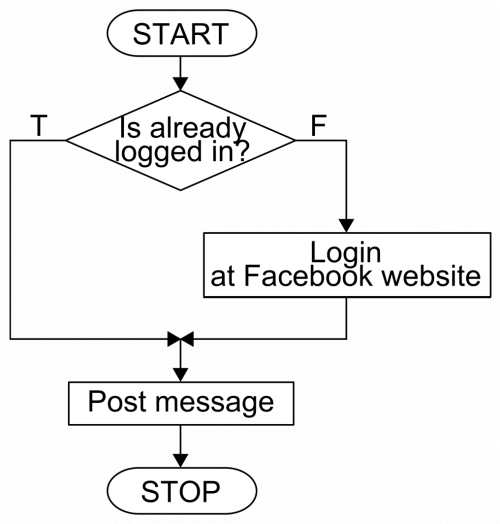
First, you need to understand how you can perform various operations using the Facebook C# SDK. At the beginning, you should check whether the user is already logged in. In such a situation, you directly move to a part that posts the message. If the user is not logged in, you open the special Facebook login website in the web browser, and then wait until the user is authorized. Only then you can post the message. Of course, you can stop such a process at any time by pressing the back button. Then, the user is moved to the Menu screen. The process is shown in the following diagram:
The implementation code, presented in the following part of this chapter, is based on the example available at https://github.com/facebook-csharp-sdk/facebook-windows-phone-sample.
To adjust the Web screen to support the Facebook login process, you should make a minor change in the XAML code. Here, you add the WebBrowser control just before the closing Grid tag (after the last Border element):
<phone:WebBrowser Grid.Row="1" Grid.Column="0" Grid.RowSpan="2"
  Grid.ColumnSpan="2" Visibility="{Binding FbVisibility}"
  Source="{Binding FbUri}" Navigated="Fb_Navigated"
  x:Name="FbBrowser" />
The web browser will be used to present the Facebook login page. This control should be placed in both rows and both columns, which you set using the Grid.RowSpan and Grid.ColumnSpan properties. You also bind the Visibility and Source properties to suitable properties from the view model, as well as specify the control name (FbBrowser) and the method called when the web browser navigates to a new page (Fb_Navigated). By using the data binding mechanism in case of the Source property, you can easily change the currently presented website by modifying the value of the FbUri property in the view model.
The following part of code specifies the style of the WebBrowser control:
<phone:PhoneApplicationPage.Resources>
  <Style TargetType="phone:WebBrowser"> (...)
    <Setter Property="IsScriptEnabled" Value="True" /> (...)
  </Style>
</phone:PhoneApplicationPage.Resources>
The web browser should support scripts (IsScriptEnabled), have the white background (Background), and have a border with 2 pixels width in a suitable color (BorderThickness and BorderBrush). To place the control in a proper place on the screen, you use 10 pixels margin (Margin).
Some modifications are necessary in the code-behind file. First of all, let's modify the OnNavigatedTo method:
protected override void OnNavigatedTo(NavigationEventArgs e)
{
  base.OnNavigatedTo(e);
  this.FbBrowser.ClearCookiesAsync();
  this.m_viewModel.NavigationService = this.NavigationService;
  this.m_viewModel.OnNavigatedTo(e);
}
Here, you need to call the OnNavigatedTo method from the view model when the user navigates to the page. Furthermore, you clear cookies, thus, the current Facebook user session is terminated. By such an approach, whenever the user opens the Web screen from the main menu, the login process has to be repeated.
The Fb_Navigated method (from the view model) is called whenever the WebBrowser control navigates to some website:
private void Fb_Navigated(object sender, NavigationEventArgs e)
{
  this.m_viewModel.Fb_Navigated(e);
}
As you could see, the code-behind file contains only a very simple code, which calls suitable methods from the view model.
The last modifications are required in the view model class for the Web screen. They are related to the process of posting the message on the wall of the currently logged in user. At the beginning, you add a few constants:
private const string FB_APP_ID = "[ App ID ]";
private const string FB_PERMISSIONS = "publish_stream";
private const string FB_REDIRECT_URI = GameHelpers.PROJECT_WEBSITE;
private const string FB_RESPONSE_TYPE = "token";
private const string FB_DISPLAY = "touch";
The first constant (FB_APP_ID) stores the App ID property of your Facebook application. The second (FB_PERMISSIONS) represents required permissions. In your example, you need only publish_stream, which indicates that the application can publish something at the wall. The following three constants store other values useful while preparing the address of the login website.
Next, you add a new field that is an instance of the FacebookClient class from the Facebook namespace:
private FacebookClient m_fbClient = new FacebookClient();
The FacebookClient class makes it possible to perform various operations on the Facebook API, and is provided by the Facebook C# SDK.
As you remember, the view requires the FbVisibility and FbUri properties from the view model. The first one indicates whether the WebBrowser control is currently visible, while the other stores an address of the active website:
private Visibility m_fbVisibility = Visibility.Collapsed;
public Visibility FbVisibility { (...) }
private Uri m_fbUri = null;
public Uri FbUri { (...) }
In the constructor, you specify what method is called when the message is posted at the wall or any error (related to this operation) occurs:
public WebViewModel()
{ (...)
  this.m_fbClient.PostCompleted += this.Fb_PostCompleted;
}
You also need to ensure that the WebBrowser control is hidden after opening the Web screen. To do so, you assign a suitable value to the FbVisibility property in the OnNavigatedTo method:
public void OnNavigatedTo(NavigationEventArgs e)
{
  this.FbVisibility = Visibility.Collapsed;
}
The PublishAtWall method is called after clicking on the button in the user interface. It starts a process of posting the message on the Facebook wall:
private void PublishAtWall()
{
  if (this.m_fbClient.AccessToken == null)
  {
    var par = new Dictionary<string, object>();
    par["client_id"] = FB_APP_ID;
    par["redirect_uri"] = FB_REDIRECT_URI;
    par["response_type"] = FB_RESPONSE_TYPE;
    par["display"] = FB_DISPLAY;
    par["scope"] = FB_PERMISSIONS;
    this.FbUri = this.m_fbClient.GetLoginUrl(par);
    this.FbVisibility = Visibility.Visible;
  }
  else { this.Fb_PostMessage(); }
}
First of all, you check if the token is unavailable. In such a case, you specify parameters used to generate an address of the website for log in. You set, for example, client_id (the App ID), response_type (returning a token), as well as the scope property (additional permissions required by your application). The address is generated by the GetLoginUrl method. At the end, you set values of the FbUri and FbVisibility properties. Then, the WebBrowser control will be visible and presents the suitable Facebook login page.
If the user has been already logged in, you can directly call the Fb_PostMessage method. It is responsible for sending a suitable request to the Facebook API to post the message at the wall of the currently logged in Facebook user.
When the web browser navigates to a new page (for example, with the Facebook login form), the Fb_Navigated method is called:
public void Fb_Navigated(NavigationEventArgs e)
{
  FacebookOAuthResult authResult;
  if (this.m_fbClient.TryParseOAuthCallbackUrl(e.Uri,
    out authResult))
  {
    this.FbVisibility = Visibility.Collapsed;
    if (authResult.IsSuccess)
    {
      this.m_fbClient.AccessToken = authResult.AccessToken;
      this.Fb_PostMessage();
    }
  }
}
Here, you try to obtain the authorization result, which is represented by the FacebookOAuthResult instance. If it is obtained correctly, you hide the WebBrowser control (by setting the FbVisibility to Collapsed) and store the token. Now, you can post the message by calling the Fb_PostMessage method, whose code is as follows:
private void Fb_PostMessage()
{
  var par = new Dictionary<string, object>();
  par["message"] = AppResources.WebFbPost;
  this.m_fbClient.PostTaskAsync("me/feed", par);
}
The Fb_PostMessage method makes it possible to asynchronously send a request to post the specific message at the wall. To set the content, you specify a value for the item with the message key in the parameters dictionary. Then, such settings are passed, together with an information where the message should be posted (a wall of the currently logged in user), to the PostTaskAsync method.
The last required method is the Fb_PostCompleted:
private void Fb_PostCompleted(object sender,
  FacebookApiEventArgs e)
{
  Deployment.Current.Dispatcher.BeginInvoke(() =>
  {
    MessageBox.Show(
      e.Error != null ? AppResources.WebFbMessageFailure :
      AppResources.WebFbMessageSuccess,
      AppResources.WebFbMessageTitle, MessageBoxButton.OK);
  });
}
It is called when the operation of posting the message is finished, either successfully or unsuccessfully. This method is executed not from the UI thread, thus you need to use the Dispatcher object. Here, you present an information about the process status in the form of the message box. By using the Show method with three parameters, you can specify not only a text, but also a title and buttons that will be shown below.
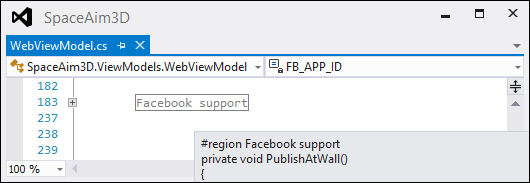
You have finished the view model implementation related to the feature which posts a message at the wall of the currently logged in Facebook user. To improve a readability of the code, you can use the #region and #endregion preprocessor directives. They make it possible to extract a part of the code in the form that can be collapsed and expanded in the IDE. To do so, you should place the #region directive (with a suitable comment) before the first line of the code part, and the #endregion, after the last line, as follows:
#region Facebook support
(...)
#endregion
The IDE can then collapse and expand the code, as well as present a content preview if the mouse is over the collapsed part, as shown in the following screenshot:
Let's launch the game, navigate to the Web screen and press the Publish at Facebook wall button. The web browser appears and you can type the Facebook account credentials. Then, you should see the message, as in the following screenshots:
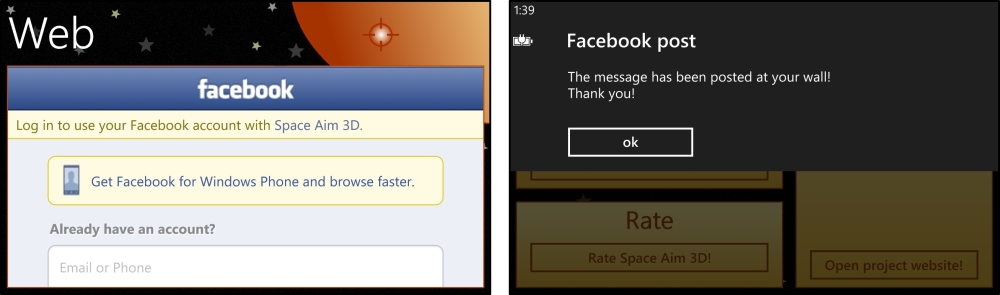
It is worth mentioning that post duplication is not allowed. If you press the button again, you will receive an information that the message has not been posted successfully.