
Twitter is another popular social network, however, it is different from Facebook. It focuses on sending short messages between users. Each message should have no more than 140 characters. Similar to Facebook, Twitter also provides developers with an API that makes it possible to perform various operations such as updating the status or reading tweets published by other users.
The Twitter API uses the REST (Representable State Transfer) protocol for exchanging data. Such a protocol is used together with HTTP to create the response in some format such as XML or JSON. Furthermore, also the request type (for example, POST or GET) has an important role in case of REST-based services.
In the example game, you will use the Twitter API to update the status of the currently logged in Twitter user to the information about playing the Space Aim 3D game. A detailed description how to integrate the game with Twitter is presented in this part of the book.
To create a new Twitter application, you should open the website for Twitter developers (available at https://dev.twitter.com/apps) and log in. Then, you press the Create a new application button and specify the following application details:
- Name – A name of your application, for example,
Space Aim 3D - Description – A short information about the application, for example,
The application that makes it possible to tweet about the Space Aim 3D game - Website – An address to the application website
Next, you need to read and agree to the Developer Rules Of The Road. When the application is created successfully, you are automatically moved to its page.
Here, you choose the Settings option, change the Application Type property from Read only to Read and Write, and click on the Update this Twitter application's settings button. Now, you should be able to update the status of the user (to tweet) using your Twitter application.
To connect to the Twitter API from your game, you should copy the Consumer Key and Consumer Secret values available at the website of your Twitter application.
To make development of the game easier, you will use the LINQ to Twitter library. It provides the developers with many possibilities regarding the Twitter API.
To add LINQ to Twitter to the project, you should install it using the NuGet package manager with the Install-Package linqtotwitter command. In this book, the library in Version 2.1.07 is used.
The implementation code, presented and described as follows, is based on examples from http://linqtotwitter.codeplex.com/wikipage?title=LINQ%20to%20Twitter%20Samples.
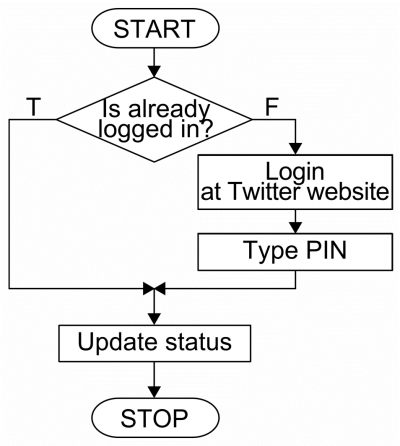
Using the LINQ to Twitter requires an additional stage in comparison to the Facebook C# SDK. Here, the user needs to type the PIN, which is displayed after a successful log in. It means that you need to provide not only the web browser, but also a set of additional controls which make it possible to type the PIN and then accept it.
However, other parts of the process are very similar. At the beginning, you check whether the user is already logged in. In such a case, you simply update the status. Otherwise, you present the website where the user can log in, wait until the correct PIN is entered, and then update the status. The flowchart of this process is as follows:
An implementation requires some changes in the XAML and C# code. They are presented and explained in this part of the book.
A few modifications are necessary in the user interface of the Web screen. Just after the existing WebBrowser control, you add another one (with TwBrowser name), which is dedicated to the process of logging into the Twitter account. You also create the Border control that composes an area where the user should type the PIN. It contains the TextBlock (a short instruction how to log in) and the StackPanel layout control with the TextBox (a field where the user can type the PIN) and the Button (to confirm that the PIN is entered). Both the WebBrowser and the Border controls should be placed in the second and third rows, as well as in both columns. The suitable part of the XAML code is shown in the following block:
<phone:WebBrowser Visibility="{Binding TwVisibility}"
  Source="{Binding TwUri}"
  x:Name="TwBrowser" (...) />
<Border Visibility="{Binding TwVisibility}" (...)
  Style="{StaticResource TwPINArea}">
  <StackPanel>
    <TextBlock Text="[ localized string ]"
      Foreground="{StaticResource SA3DFontBrush}"
      TextWrapping="Wrap" FontSize="20" />
    <StackPanel Orientation="Horizontal">
      <TextBox Text="{Binding TwPIN, Mode=TwoWay}"
        Style="{StaticResource TwPINTextBox}" />
      <Button Content="Go!" FontSize="30" Background="White"
        Command="{Binding CmdTwPINGo}" />
    </StackPanel>
  </StackPanel>
</Border>
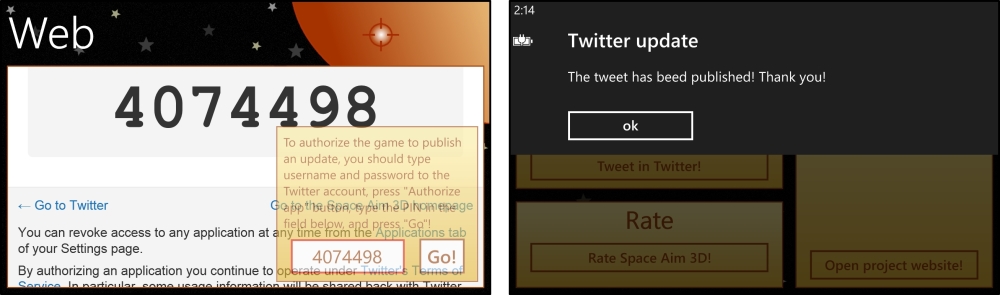
The final view of the Web screen, with the active part related to Twitter, is shown in the following screenshot (on the left). On the right, the message informing about the successful status update is presented:
A style of controls from the PIN area is specified in resources:
<Style TargetType="Border" x:Key="TwPINArea"> (...) </Style>
<Style TargetType="TextBox" x:Key="TwPINTextBox"> (...) </Style>
The first style (with the TwPINArea key) involves the Border control and sets its vertical and horizontal alignment (to bottom and right, respectively), margin (20 pixels), padding (10 pixels except the bottom, where there should be no padding), width (330 pixels), border (2 pixels, a brush from the SA3DDarkBrush resource), background (the SA3DBackgroundBrush resource), opacity (0.6), and visibility (collapsed).
The other style (with the TwPINTextBox key) is related to the TextBox control where the user enters the PIN. It has a suitable width and height (210 and 80 pixels, respectively), font size (30 pixels), text alignment (center), as well as a foreground brush (from the SA3DFontBrush resource), border brush (the SA3DDarkBrush resource), and a background color (set to white).
A small modification is required also in the code-behind file. Here, you need to call the ClearCookiesAsync method on the TwBorder control, in the OnNavigatedTo method. Such an operation can be performed just after the similar action regarding the web browser for the Facebook integration.
All other necessary changes are made in the view model class for the Web screen. At the beginning, you add three constant values:
private const string TW_CONSUMERKEY = "[ Consumer Key ]";
private const string TW_CONSUMERSECRET = "[ Consumer Secret ]";
private const string TW_PIN_REGEX = @"^d{7}$";
The TW_CONSUMERKEY and TW_CONSUMERSECRET store the Consumer Key and the Consumer Secret values regarding your Twitter application. The last one (TW_PIN_REGEX) is the regular expression used to verify whether the PIN is in the correct format (only seven digits).
Apart from the constant values, you create a private field representing a mechanism of authorization that is based on the PIN entered by the user. The field stores an instance of the PinAuthorizer class from the LinqToTwitter namespace, provided by the LINQ to Twitter library:
private PinAuthorizer m_twPinAuthorizer = null;Then, you add the CmdTwPINGo command, which is executed when the player confirms the entered PIN. Apart from it, you define three properties together with private fields. The TwVisibility property represents a visibility of the WebBrowser control and additional controls for entering the PIN. The next one (TwUri) stores an address of the currently opened website (for example, Twitter log in page), and the other (TwPIN) contains the PIN entered by the user. It is used by the data binding mechanism, thus, its value is equal to the content of the TextBox control, where the user types the PIN. The suitable part of the C# code is as follows:
public ICommand CmdTwPINGo { get; set; }
private Visibility m_twVisibility = Visibility.Collapsed;
public Visibility TwVisibility { (...) }
private Uri m_twUri = null;
public Uri TwUri { (...) }
private string m_twPIN = string.Empty;
public string TwPIN { (...) }
In the constructor, you decide what method is called when the CmdTwPINGo command is executed (Tw_Authorize in your case):
public WebViewModel()
{ (...)
  this.CmdTwPINGo = new Command(() => this.Tw_Authorize());
}
When you navigate to the Web screen, you will hide both the WebBrowser control (for logging into the Twitter account) and the PIN area. You can achieve it by assigning the proper value to the TwVisibility property:
public void OnNavigatedTo(NavigationEventArgs e)
{ (...)
  this.TwVisibility = Visibility.Collapsed;
}
The Tweet method is called after clicking on the Tweet in Twitter button:
private void Tweet()
{
  if (this.m_twPinAuthorizer == null
    || !this.m_twPinAuthorizer.IsAuthorized)
  {
    this.TwVisibility = Visibility.Visible;
    this.m_twPinAuthorizer = new PinAuthorizer();
    this.m_twPinAuthorizer.Credentials =
      new InMemoryCredentials()
      {
        ConsumerKey = TW_CONSUMERKEY,
        ConsumerSecret = TW_CONSUMERSECRET
      };
    this.m_twPinAuthorizer.UseCompression = true;
    this.m_twPinAuthorizer.GoToTwitterAuthorization =
      new Action<string>(this.Tw_NavigateToLoginPage);
    this.m_twPinAuthorizer.BeginAuthorize(
      new Action<TwitterAsyncResponse<object>>(
        this.Tw_BeginAuthorized));
  }
  else { this.Tw_Tweet(); }
}
Here, you check whether the mechanism of authorization is not set or the user is unauthorized. In such a situation, you show controls related to the Twitter support. Then, the PinAuthorizer instance is created and the credentials are specified. Next, you choose a method that will be called when the login page should be shown (GoToTwitterAuthorization). At the end, the BeginAuthorize method is called that starts the authorization process.
If the user is already logged in correctly, you just call the Tw_Tweet method, which sends a request of updating the status.
In the Tw_NavigateToLoginPage method, you just set an address of the website, which should be opened in the WebBrowser control. After execution, a suitable Twitter login page will be presented. The suitable code is as follows:
private void Tw_NavigateToLoginPage(string link)
{
  Deployment.Current.Dispatcher.BeginInvoke(() =>
    { this.TwUri = new Uri(link, UriKind.Absolute);});
}
In the Tw_BeginAuthorized method, you present the error message when the current status of the authorization process is TwitterApiError or RequestProcessingException. In other situations, no actions are taken, as shown in the following code:
private void Tw_BeginAuthorized(
  TwitterAsyncResponse<object> status)
{
  switch (status.Status)
  {
    case TwitterErrorStatus.TwitterApiError:
    case TwitterErrorStatus.RequestProcessingException:
      Deployment.Current.Dispatcher.BeginInvoke(
        () => MessageBox.Show(AppResources.WebTwError));
      break;
  }
}
The Tw_Authorize method is called when the user presses the Go! button placed in the PIN area. Here, you check whether the PIN matches the regular expression. Only then, you call the CompleteAuthorize method and hide the web browser, as well as the PIN area.
private void Tw_Authorize()
{
  if (Regex.IsMatch(this.TwPIN, TW_PIN_REGEX))
  {
    this.m_twPinAuthorizer.CompleteAuthorize(this.TwPIN,
      new Action<TwitterAsyncResponse<UserIdentifier>>(
        this.Tw_AutorizationCompleted));
    this.TwVisibility = Visibility.Collapsed;
  }
  else { MessageBox.Show(AppResources.WebTwIncorrectPIN); }
}
The following Tw_AuthorizationCompleted method is executed when the user entered the PIN, and the CompleteAuthorize method is called:
private void Tw_AutorizationCompleted(
  TwitterAsyncResponse<UserIdentifier> result)
{
  switch (result.Status)
  {
    case TwitterErrorStatus.Success:
      this.Tw_Tweet();
      break;
    default:
      Deployment.Current.Dispatcher.BeginInvoke(() =>
        MessageBox.Show(AppResources.WebTwIncorrectPIN));
      break;
  }
}
Here, you check whether the operation status is Success. Then, you call the Tw_Tweet method. Otherwise, you present a suitable message.
The Tw_Tweet method is used only to send a request of updating the status of the currently logged in user:
private void Tw_Tweet()
{
  TwitterContext tc = new TwitterContext(this.m_twPinAuthorizer);
  tc.UpdateStatus(AppResources.WebTwStatus,
    new Action<TwitterAsyncResponse<Status>>(
      this.Tw_TweetCompleted));
}
Here, you create a new instance of the TwitterContext class, passing the authorizer as a parameter. Then, you call the UpdateStatus with two parameters, representing a text of the new status and additional action taken in case of success or failure of this operation.
The Tw_TweetCompleted method is called when the process of updating the status is finished, either successfully or unsuccessfully. Here, you present a suitable information depending on the operation status, as shown in the following code:
private void Tw_TweetCompleted(TwitterAsyncResponse<Status> obj)
{
  Deployment.Current.Dispatcher.BeginInvoke(() =>
  {
    MessageBox.Show(
      obj.Status == TwitterErrorStatus.Success ?
      AppResources.WebTwMessageSuccess :
      AppResources.WebTwMessageFailure,
      AppResources.WebTwMessageTitle, MessageBoxButton.OK);
  });
}You have just finished an implementation of the Web screen part that is related to Facebook and Twitter social networks. Now, you can launch the game in the emulator or on the phone, open the Web screen, and click on the Publish at Facebook wall or Tweet in Twitter buttons to check whether the mechanisms described previously work correctly.