
When you complete testing your game, you can start the submission process. It contains many stages and part of them is presented in the following diagram (based on http://msdn.microsoft.com/library/jj206729):

The process starts with the Not completed status. Then, it changes to, for example, Signing passed and Certification passed. At the end, the submission process is in the Published state. Of course, some problems can occur while analyzing the application before publishing in the Windows Phone Store. Then, the process can be moved to some other states (for example, Signing failed or Certification failed).
To start the submission process, open the https://dev.windowsphone.com website, navigate to Dashboard, and click on the Submit app and App info options. Then, you can specify the application alias (defining how the application is named in the Dev Center, for example, Space Aim 3D), category (for example, games), subcategory (for example, action + adventure), as well as choose a suitable pricing, market distribution, and distribution channels.
The Windows Phone 8 applications and games can be distributed in two ways: beta and in the public store, as presented in the following diagram:
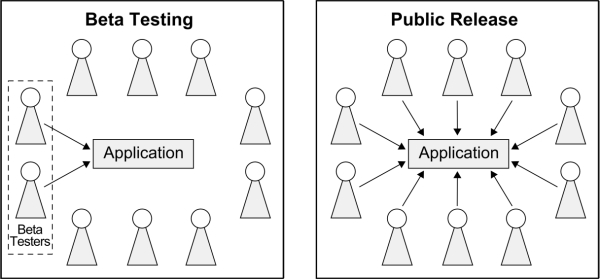
In the beta testing, the application can be downloaded and installed only by a limited set of beta testers, defined by the author of the submission. What is more, the application is not visible in the store while browsing through it. Regarding the public release, anyone can access your game, of course according to some additional restrictions set in application details.
Using the beta testing mechanism is a very good way to improve the quality of the final version of your application or game. Additional beta testers could find errors, propose changes, and give you great feedback that could be beneficial for the further work on the project. It is important that the beta version will automatically expire after 90 days since its first submission. What is more, the beta testers need Microsoft accounts.
You can also decide whether your game should be automatically available in the store as soon as it is certified or you will add it manually later. The trial version of your project can be prepared as well. Thus, the users can try it for free, but with a limited functionality or for a limited period of time. While submitting the game, you can also select game ratings certificates, which may be required in some countries. Of course, various settings mentioned earlier can be either active or inactive depending on previous selections. At the end, click on the Save button.
The last required modifications in the code, which you need to take before submitting the .xap file, are related to configuration of the map services. They should use correct credentials, which you can obtain from the Windows Phone Dev Center. To do so, click on the Map services and Get token options. Then, let's save the generated values, namely Map service ApplicationID and Map service AuthenticationToken. At the end, click on the Close button.
The process of setting the proper application ID and authentication token will be performed by the MapViewModel class. Here, you should add two private constant fields representing these settings (MAP_APPLICATION_ID and MAP_AUTHENTICATION_TOKEN) and assign them the values obtained earlier from the Windows Phone Dev Center.
Then, you should prepare the SetMapCredentials method, which updates the maps settings. Here, you set new values of the ApplicationId and AuthenticationToken properties, as shown in the following code:
public void SetMapCredentials()
{
  MapsSettings.ApplicationContext.ApplicationId = MAP_APPLICATION_ID;
  MapsSettings.ApplicationContext.AuthenticationToken = MAP_AUTHENTICATION_TOKEN;
}
You need to set the credentials when the Map control is loaded. Thus, you handle the Loaded event (in the MapPage.xaml file), as shown in the following code snippet:
<Controls:Map (...) Loaded="MapPlayers_Loaded">
  (...) </Controls:Map>
Then, you call the SetMapCredentials method (on the MapViewModel instance) inside MapPlayers_Loaded.
Now you can proceed towards submitting the .xap file, by choosing the Upload and describe your XAP(s) option. When the page is loaded, click on the Add new hyperlink, and select the .xap file. Then, the uploading process is started. You need to wait until it is completed, which can take some time, depending on the file size. It is worth mentioning that the maximum size of the .xap file is 1 GB.
After uploading, you need to complete the form with the data regarding the project. Here, you specify, for example, the version number, description, as well as URL of website with the privacy policy. What is more, the details read from the .xap file are presented. You should also upload some images, including the application icon and screenshots. Of course, you can use the same as previously chosen while preparing the game details in the Store Test Kit. It is important that the application details can be provided in many languages. The correct language version will be chosen automatically based on the currently set language on the user's phone.
To complete this step of submitting the project, click on the Save button. It navigates you to the page where you can review the provided information and either go back to edit it or submit it. When you select the second option, you have just finished submitting your first game to the store! Now, you should wait for the e-mail message with further information.
If you submit the beta application, you will receive information about its availability soon, together with an address to the website where you can download the game. Then, you can open it on the mobile device, install, and try it! Of course, other beta testers can test your project in the same way.
Regarding the public release, a process of certification can take significantly more time, but you will receive information when it is completed or some errors occur.