
The current version of the exemplary game presents the game world in 3D with additional 2D graphics. The game logic is also prepared, thus you can crash the rocket, reach the planet, and play at consecutive levels. However, at the beginning of this book, it was decided to introduce the maps, geolocation and augmented reality features to present other players in the vicinity. In this chapter, you will learn how to implement such functionalities in the Windows Phone 8 application.
You have already added the application page with the Map control. Currently, you need to adjust it to present locations of other players, as well as add a special indicator of your current location. The following figure represents a sketch of the
Map screen:
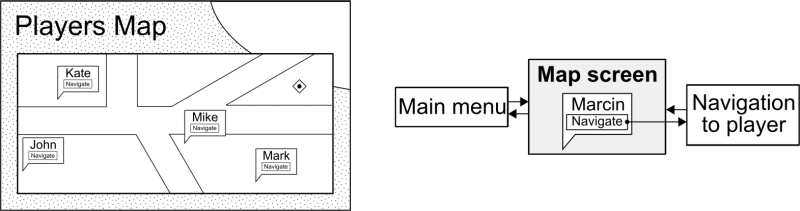
Each player's location is represented by an indicator with the player name at the top. The Navigate button launches navigation to the player's last location. Your current GPS position is represented by the special indicator, which should be automatically moved when the location is changed. What is more, when the GPS coordinates are obtained for the first time, the map should be automatically centered in such a location. The process of obtaining the GPS location can take some time, thus additional status information should be presented above the map. All of these features will be implemented in this part.
The Windows Phone Toolkit contains a set of additional components which can be used while developing the Windows Phone 8 applications. They include many controls (such as AutoCompleteBox and ListPicker), as well as navigation transitions and extensions to the Map control, which you will use in this chapter. More information about the toolkit is available at the project's website: http://phone.codeplex.com.
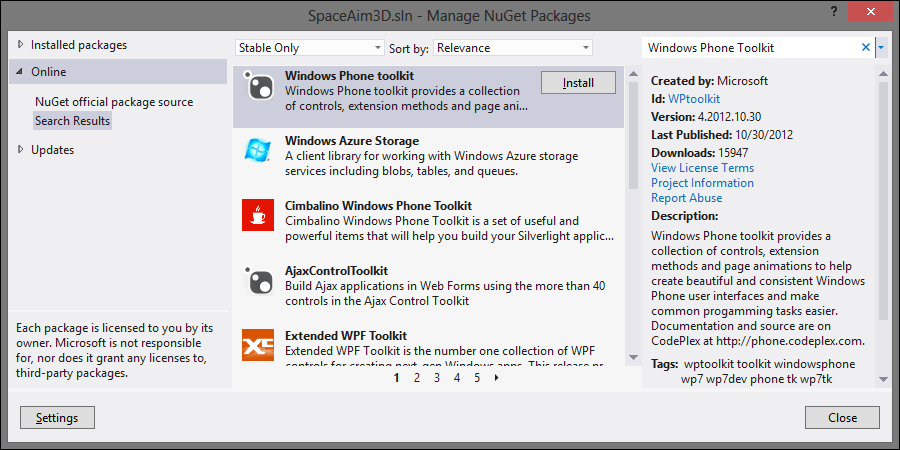
The Windows Phone Toolkit can be easily installed using the NuGet package manager. To open it, navigate to Tools (from the main menu), Library Package Manager, and then Manage NuGet Packages for Solution. In the newly opened window, click on the Online group, type Windows Phone Toolkit in the search box (in top-right part). Then, click on the Install button next to the Windows Phone Toolkit result. You can also see the license terms, the description, as well as the number of downloads, as presented in the following screenshot:
After clicking on the Install button, you should indicate where the Windows Phone Toolkit should be installed. You should select the SpaceAim3D project, click on OK, and the library should be installed successfully. At the end, you can see that a reference to Microsoft.Phone.Controls.Toolkit is added to the References node in the Solution Explorer window.
After adding the Windows Phone Toolkit, you should rebuild the solution. However, you may receive an error with the following message: 'GestureEventArgs' is an ambiguous reference between 'Microsoft.Phone.Controls.GestureEventArgs' and 'System.Windows.Input.GestureEventArgs'. Fortunately, you can easily fix it by adding the following using directive to the MenuPage.xaml.cs file:
using GestureEventArgs = System.Windows.Input.GestureEventArgs;
The error tells you that you have the using directives for the Microsoft.Phone.Controls and System.Windows.Input namespaces and want to use the GestureEventArgs class. However, both these namespaces contain a class with such a name, thus it is unknown which of them you really want to use. You can fix the error by specifying which class you want to use when you type GestureEventArgs (by the using directive, as shown in the previous line of code) or change its name to the full version that contains also the namespace (by replacing GestureEventArgs ambiguous reference with System.Windows.Input.GestureEventArgs).
At the beginning, you will add a possibility of presenting locations of other players on the map. To simplify the task, you will use extensions to the Map control that are available in the Windows Phone Toolkit. A process of implementation involves all three parts from the MVVM design pattern.
Each indicator on the map represents data of a single user (name and coordinates). Thus, you create a new class named PlayerData (in the .cs file inside the Models directory), which stores such data as follows:
public class PlayerData
{
  public string Name { get; set; }
  public GeoCoordinate Location { get; set; }
}
The class contains two properties representing the name and location. It is worth mentioning that the latitude and longitude are stored as an instance of the GeoCoordinate class (from the System.Device.Location namespace).
Some additional modifications are necessary in the view model for the Map screen. First of all, you create a new field named m_players, which stores a collection of player data, as well as the public property, as shown in the following part of code:
private ObservableCollection<PlayerData> m_players =
  new ObservableCollection<PlayerData>();
public ObservableCollection<PlayerData> Players
{
  get { return this.m_players;}
  set
  {
    this.m_players = value;
    this.OnPropertyChanged("Players");
  }
}
Here, you use the ObservableCollection generic class implementing the INotifyCollectionChanged interface . Therefore, that makes it possible to react to changes in the collection. By using this class, you can implement a mechanism of updating the user interface as soon as an item is added or removed from the collection.
Whenever the player navigates to the Map screen, you should remove all items from the Players collection and add some test data with player names and locations. For instance, you can indicate that player Marcin is currently in location specified by the following GPS coordinates: 50.0401 as latitude and 22.0070 as longitude, which is configured as follows:
public void OnNavigatedTo(NavigationEventArgs e)
{
  this.Players.Clear();
  this.Players.Add(new PlayerData() { Name =
    "Marcin", Location = new GeoCoordinate(50.0401, 22.0070) }); (...)
}
The NavigateToPlayer method will make it possible to start navigation to the particular player. However, currently it does not contain any code:
public void NavigateToPlayer(PlayerData player) { }A design of the Map screen is specified in the XAML code. Here, you also decide how the data of a single player is presented on the map. As mentioned earlier, you will be using the Windows Phone Toolkit to accomplish this task. Thus, you need to map a suitable namespace to the Toolkit prefix, as follows:
<phone:PhoneApplicationPage (...)
  xmlns:Toolkit="clr-namespace:Microsoft.Phone.Maps.Toolkit;
    assembly=Microsoft.Phone.Controls.Toolkit" (...)>
</phone:PhoneApplicationPage>
Additional modifications are necessary in the Map element and are shown in the following code:
<Controls:Map x:Name="MapPlayers"
  Center="{Binding Center, Mode=TwoWay}"
  ZoomLevel="{Binding Zoom, Mode=TwoWay}"
  CartographicMode="{Binding Mode, Mode=TwoWay}"
  LandmarksEnabled="{Binding Landmarks, Mode=TwoWay}"
  PedestrianFeaturesEnabled="{Binding Pedestrians, Mode=TwoWay}">
  <Toolkit:MapExtensions.Children>
    <Toolkit:MapItemsControl>
      <Toolkit:MapItemsControl.ItemTemplate>
        <DataTemplate>
          <Toolkit:Pushpin GeoCoordinate="{Binding Location}">
            <StackPanel>
              <TextBlock Text="{Binding Name}"
                Style="{StaticResource PlayerName}" />
              <Button Tag="{Binding}" Click="BtnNavigate_Click"
                Content="[ localized string ]"
                Style="{StaticResource NavigateButton}" />
            </StackPanel>
          </Toolkit:Pushpin>
        </DataTemplate>
      </Toolkit:MapItemsControl.ItemTemplate>
    </Toolkit:MapItemsControl>
  </Toolkit:MapExtensions.Children>
</Controls:Map>
Here, you set a key for the Map control (as MapPlayers) and specify how data of a single player is presented, using the MapItemsControl element (with the Toolkit prefix). It has the ItemTemplate property, which is a data template representing a single player data. The Pushpin element should be placed in a particular GPS location (the GeoCoordinate property bound to Location) and its content should be composed from two controls (inside StackPanel), namely TextBlock with player name and Button allowing you to start navigation to the last location of the player. The Tag property of the Button element is bound to the PlayerData instance, which you will use for navigation.
As you could see in the preceding XAML code, you do not bind to the collection of players data (the Players property). You will assign this collection, which should be presented on the map, programmatically from the code-behind file. Such an approach is easier in case of the Map extensions.
An appearance of both TextBlock and Button is specified using styles. The one with the PlayerName key applies only to the player name. It sets the font size to 24, indicates that white bold font should be used, and also centers the text vertically and horizontally. The button style (the NavigateButton key) sets a suitable foreground color (white), font size (20), border brush (white) and thickness (1), as well as padding and margin to place the element in a proper location.
Apart from the XAML part, you need to add some code in the code-behind file.
In the constructor, you assign a proper source for the MapItemsControl element, which is defined in the XAML code, as shown in the following block of code:
public MapPage()
{(...)
  MapItemsControl items = MapExtensions.    GetChildren(this.MapPlayers)[0] as MapItemsControl;
items.ItemsSource = this.m_viewModel.Players;
}
Unfortunately, you cannot just get access to this object via name, thus you use the MapExtensions static class and its method, named GetChildren. You get the first child of the extension, which is an instance of MapItemsControl. At the end, you assign the collection of player data to the ItemsSource property. Therefore, adding or removing any item from this collection will automatically be visible in the UI.
Whenever the player navigates to the Map screen, you also call the OnNavigatedTo method from the view model class, as follows:
protected override void OnNavigatedTo(NavigationEventArgs e)
{(...)
  this.m_viewModel.OnNavigatedTo(e);
}
When the user clicks on the Navigate button in the indicator, you start navigation to the player location, as presented in the following code:
private void BtnNavigate_Click(object sender, RoutedEventArgs e)
{
  Button button = (Button)sender;
  PlayerData player = (PlayerData)button.Tag;
  this.m_viewModel.NavigateToPlayer(player);
}
However, the same method will be called for all player indicators. Thus, you need to find a way how to get data of the player whose indicator is chosen. You can do it by casting the sender object into the Button instance and reading the Tag property, which stores the PlayerData instance. Finally, you call the NavigateToPlayer method from the view model class.
Now you can launch the application and open the Map screen. After moving to a suitable location on the map, you can see three indicators representing other players, which are shown in the following screenshots:
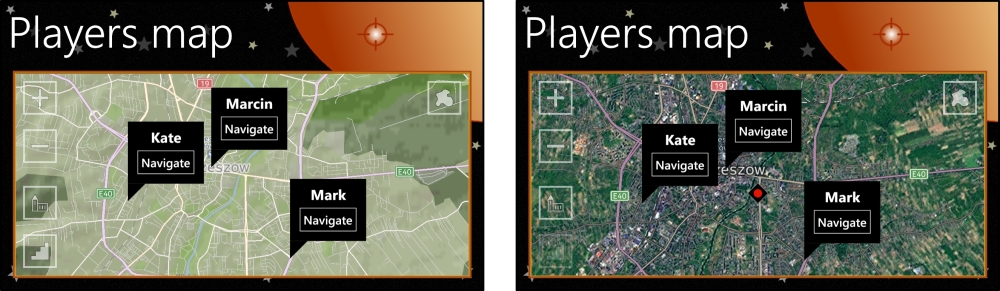
Currently, you can see other players on the map, however, your location is not presented. In this part, you will implement a mechanism of getting your GPS coordinates that will be used to indicate your current location, as shown in the preceding screenshot (on the right). You will also learn how to get and present the status of the GPS receiver.
It is worth mentioning that the current location indicator should be moved while your location is changed. Thus, you can use this implementation not only in scenarios when the phone is not moving, but also in applications used in cars or during sport activities.
At the beginning, you will modify the view model of the Map screen. Here, you want to obtain the current location and the status of the GPS receiver. These data will be used by the data binding mechanism to present suitable information in the UI.
You add the private field (m_geolocator), which is an instance of the Geolocator class from the Windows.Devices.Geolocation namespace, as follows:
private Geolocator m_geolocator;
The field makes it possible to obtain your current GPS coordinates. You will use them to present the indicator in a proper location.
Then, you define two public properties (UserLocation, GeolocatorStatus) and two supporting private fields. You can do it in the same way as in case of other properties:
private GeoCoordinate m_userLocation = GeoCoordinate.Unknown;
public GeoCoordinate UserLocation { (...) }
private string m_geolocatorStatus = string.Empty;
public string GeolocatorStatus { (...) }
When the player navigates to the Map screen, the OnNavigatedTo method is called. You should modify its code as follows:
public void OnNavigatedTo(NavigationEventArgs e)
{
  this.GeolocatorStatus = AppResources.GeolocatorInitializing;
  this.m_geolocator = new Geolocator();
  this.m_geolocator.DesiredAccuracy = PositionAccuracy.High;
  this.m_geolocator.MovementThreshold = 1;
  this.m_geolocator.StatusChanged += this.Geolocator_StatusChanged;
  this.m_geolocator.PositionChanged += this.Geolocator_PositionChanged; (...)
}
Here, you set the status message of the GPS receiver to a value of the localized string with the GeolocatorInitializing key (exemplary value: Initializing GPS receiver…). Of course, you should prepare translations for all supported languages. Then, the geolocator is initialized. You create a new instance of the Geolocator class, set values of the DesiredAccuracy and MovementThreshold properties, as well as handle the StatusChanged and PositionChanged events. The DesiredAccuracy property can be set to Default or High, and it specifies a way of getting the current GPS coordinates. The MovementThreshold property indicates a distance (in meters) that has to be taken to raise the PositionChanged event.
Whenever the status of the GPS receiver is changed, you want to present the suitable information to the user. For this reason, every call of the Geolocator_StatusChanged method causes translation of the status into a text message and assigning it to the GeolocatorStatus property. This operation has to be performed using Dispatcher, because is not executed on the UI thread, as shown in the following code:
private void Geolocator_StatusChanged(Geolocator sender,
  StatusChangedEventArgs args)
{
  Deployment.Current.Dispatcher.BeginInvoke(() =>
  {
    string status = this.ResolveGeolocatorStatus(args.Status);
    this.GeolocatorStatus = status;
  });
}
The Geolocator_PositionChanged method is called whenever the current location is changed. Its code is presented as follows:
private void Geolocator_PositionChanged(Geolocator sender,
  PositionChangedEventArgs args)
{
  Deployment.Current.Dispatcher.BeginInvoke(() =>
  {
    GeoCoordinate location =
      new GeoCoordinate(args.Position.Coordinate.Latitude,
        args.Position.Coordinate.Longitude);
    if (this.UserLocation == GeoCoordinate.Unknown)
      { this.Center = location; }
    this.UserLocation = location;
  });
}
Here, you get the current GPS coordinates (by the Position property of the args parameter) and store them in the location variable. Then, you check whether it is the first position update. In such a situation, the map should be automatically centered, which can be achieved by assigning a value to the Center property. At the end, you assign the obtained GPS coordinates to the UserLocation property.
The ResolveGeolocatorStatus method translates the status enumeration value (for example, NotAvailable, Disabled, Initializing, and Ready) into a text message that is presented to the user, as shown in the following code:
private string ResolveGeolocatorStatus(PositionStatus status)
{
  switch (status)
  {
    case PositionStatus.NotAvailable:
      return AppResources.GeolocatorNotAvailable; (...)
    default: return string.Empty;
  }
}
For instance, when the device is in the Initializing state, the Initializing GPS receiver… information is presented. In case of the Ready state, the status message is cleared. You should define all necessary statuses as localized strings.
The remaining modifications are necessary in the view part. Here, you need to add the element representing the user location, as well as prepare a place for status information.
At the beginning, you add the UserLocationMarker element as the second child of MapExtensions.Children, as follows:
<Controls:Map x:Name="MapPlayers" (...) >
  <Toolkit:MapExtensions.Children>
    <Toolkit:MapItemsControl> (...)
    </Toolkit:MapItemsControl>
    <Toolkit:UserLocationMarker GeoCoordinate="{Binding     DataContext.UserLocation, ElementName=Page}" />
  </Toolkit:MapExtensions.Children>
</Controls:Map>
You bind the GeoCoordinate property to UserLocation. However, you need to use a bit different approach due to specificity of the Map extensions. For this reason, you need to set the ElementName binding property, which indicates the Map page, as well as include DataContext in the binding path.
You need to get access to PhoneApplicationPage (the root element) by name, thus you will set Page as its name:
<phone:PhoneApplicationPage x:Name="Page" (...) >
The TextBlock control, presenting the status information, is added just after Button controls and before the closing Grid tag:
<TextBlock Text="{Binding GeolocatorStatus}"
  Style="{StaticResource StatusText}" Margin="0,-30,0,0" />
Its Text property is bound to GeolocatorStatus from the view model class. Its appearance is defined by the StatusText style, which sets a proper font size (16), height (25 pixels), as well as horizontal and vertical alignment (to right and to top).
Now, you can launch the game and navigate to the Map screen. The process of GPS receiver initialization is started automatically. After a short period of time, you will read the GPS coordinates, and the current location indicator will be presented on the map.