
So far, our hero can move to the left and right of the screen, but it is a little flat. As we have some animation in our spritesheet, let's put that into action.
As described earlier, in order to get the animation running, we will need the following prerequisites:
- An Animator component in our game object
- An Animator controller to manage our animation that is bound to the animator
- At least one animation clip to play in the controller
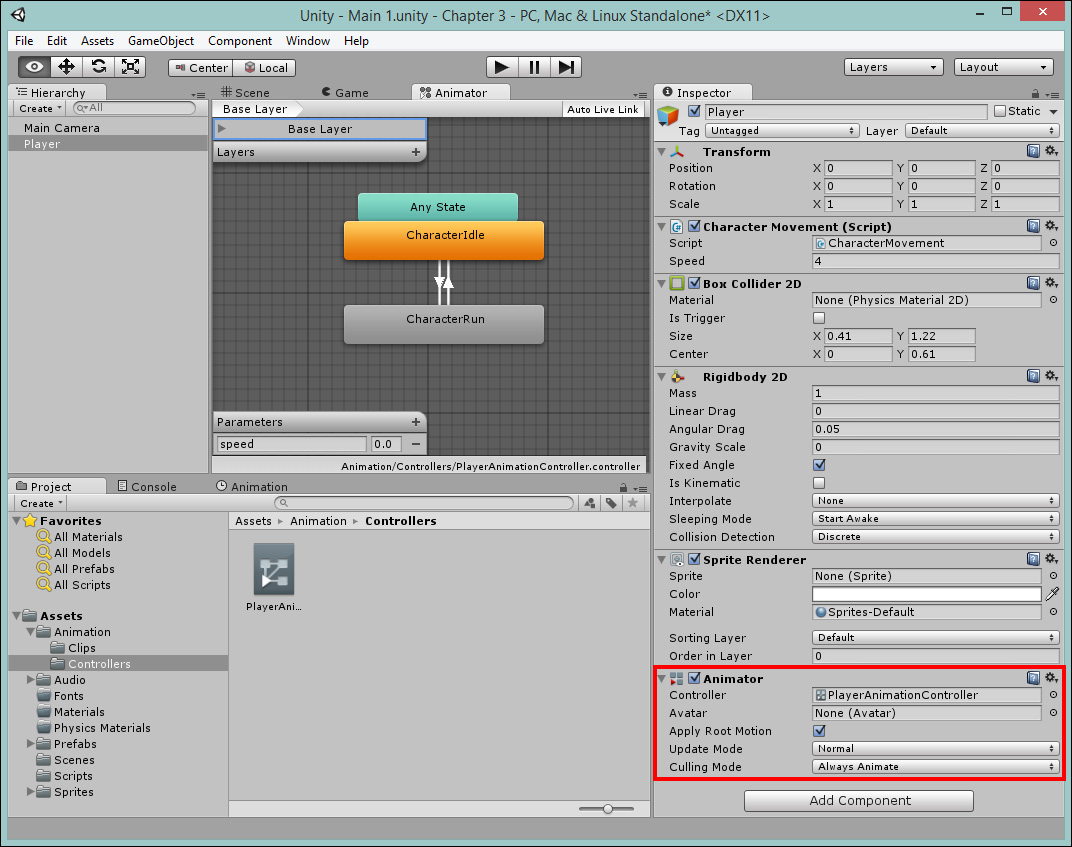
To get started, first we need to add the Animator component to the player's game object by navigating to Add Component | Miscellaneous | Animator in the Inspector pane. Leave all the other options alone for now.
Next, create a new animation Controller in Assets/Animation/Controllers by navigating to Create | Animator Controller in the Project window (or by right-clicking on it while viewing the folder). Then, drag the new controller to the Controller property in the Animator component we just created.
You should now have something that looks like the following screenshot:
Now, we just need to add our animation clip. Open the new animation Controller (if you haven't done so already) by double-clicking on it, then open the Animation window by navigating to Menu | Window | Animation (or press Ctrl or Command 6).
Tip
You may have to rearrange your Windows at this point, as the default location for the Animation window is next to the Project view. I recommend moving it next to the main window so you can see both the Project folder and the Animation window at the same time.
This is easily done by dragging the tab for the Animation window to the desired point. When it gets near a point in the editor where it can dock, it will do so automatically.
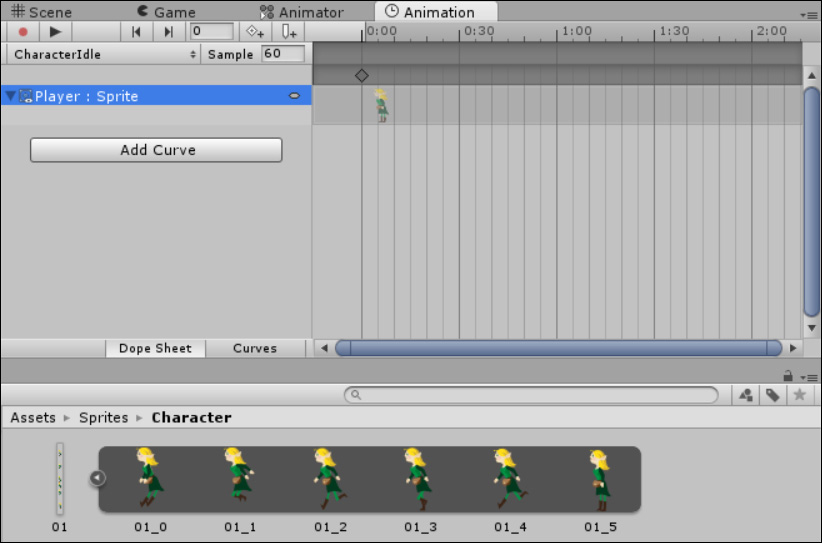
To add your first animation clip, create a new clip by opening the clip selection drop-down menu and selecting [Create New Clip] (as shown earlier in the Animator Dope Sheet section, marked as item 2). This will prompt you for a location to save the new clip. Save it under Assets/Animation/Clips as CharacterIdle.anim.
For the idle animation, we only need to add one sprite to show the hero standing at rest, so drag the sprite named 01_5 onto the timeline at position 0, as shown here:
The Animation controller should now look like the following screenshot, with a single state for the idle animation (highlighted in orange to denote it is in the default state):

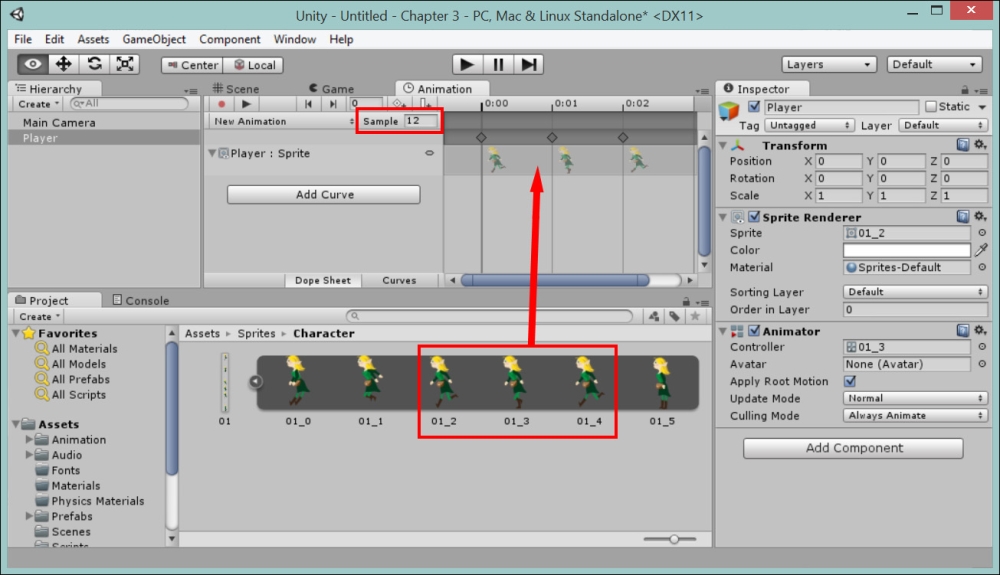
To add the running animation, you'll need to add another clip. This time it is called CharacterRun, and instead of just dragging a single sprite, we will add three sprites to form one animation set. First, set the Sample rate to 12 in the Animation window; select the 01_2, 01_3, and 01_4 sprites together and drag them to the timeline window, which will order them on the timeline appropriately as shown in the following screenshot:
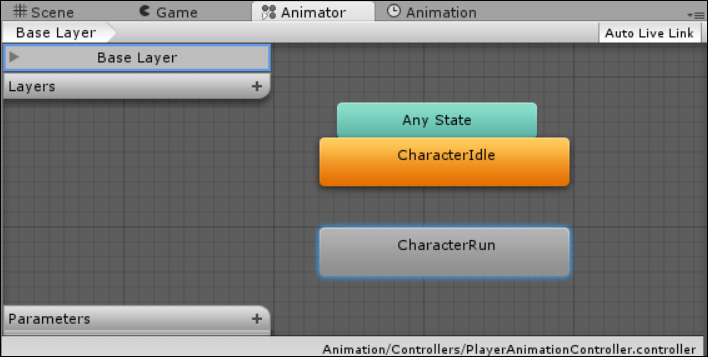
Looking at the Animation controller now, you will see that an additional state is added to the view; the main difference being that it is gray (as it's not the default), and at this point, nothing connects the two states together:
Tip
You can also create the animation clips with multiple sprites by selecting the sprites in the Project view and dragging them together to the Scene or Project hierarchy. This will automatically create a new game object complete with Sprite Renderer, Animation component, Animation Controller, and Clip for the set. If you start this way and add an idle animation clip later, just be sure to check which state is the default state.
There is a lot of power in Unity to automate the creation of animations.
At the moment, our two states are not connected. So when we run the project, the hero is always idle (lazy guy); let's change that.
To tell the controller to move between the two states, we need the following prerequisites:
- A transition link between the two states
- A parameter or event to activate the transition
- Something to change the value of that parameter, usually in a script
So, first we create the transition between the default idle state by right-clicking on the CharacterIdle state and selecting Make Transition. This will change the mouse cursor to an arrow. Then, click on the state we want to transition to, which in this case is the CharacterRun state. Clicking on the new transition shows you the properties of that transition in the inspector, as shown in the following screenshot:
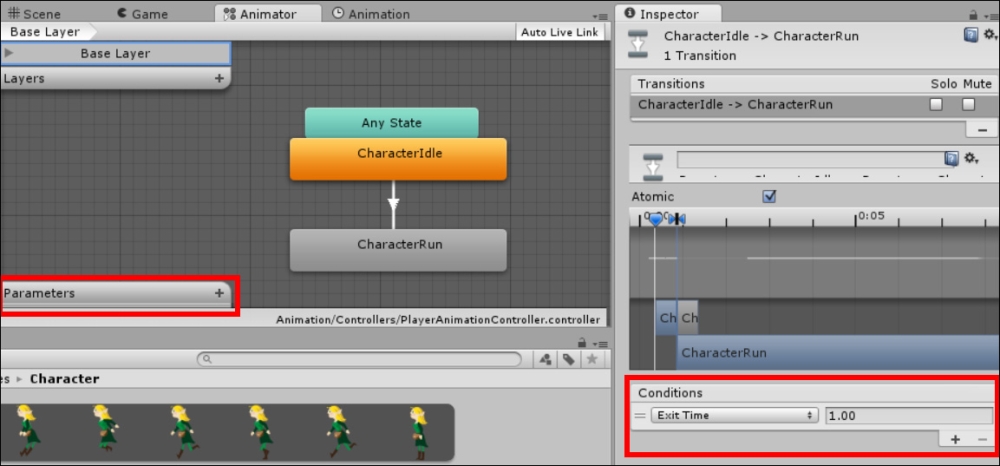
As shown in the Inspector pane, at the lower-right corner, by default, the new transitions are controlled by a single parameter called Exit Time, which simply means that when the first animation ends, it will transition to the second. We don't want that here as we want to control when the Run animation is activated.
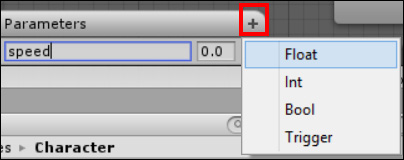
First, we need a new parameter, which we will be able to access later from our character controller script. So click on the + symbol as indicated in the parameter section of the animation controller and add a new Float parameter called speed.
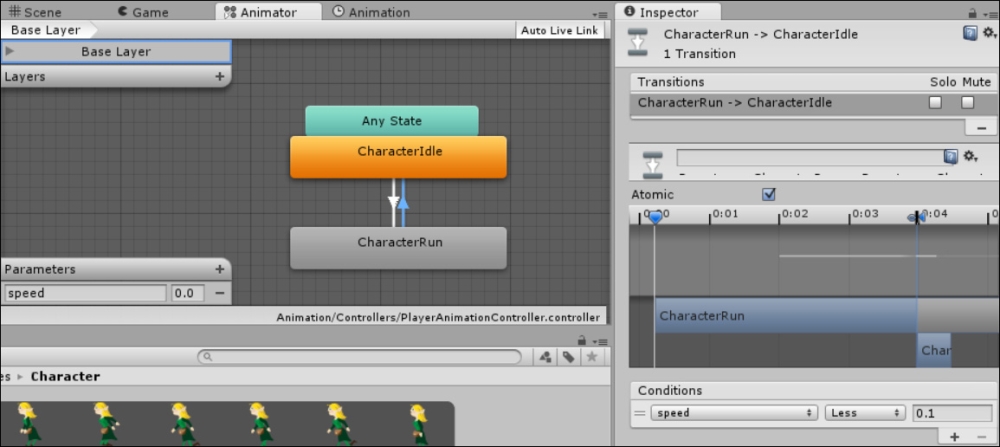
Now in the Inspector pane, change the Exit Time parameter by clicking on it and selecting the new
speed parameter; give it a value of 0.1. This tells the animator that when the speed is greater than 0.1 units, it will transition from the idle state to the run state.
Next, repeat the process and add a transition from the CharacterRun state back to the CharacterIdle state, choosing the same parameter value; however, this time, set it to Less with a value of 0.1, as shown in the following screenshot:
If you run the project at this point, the character still doesn't run when it moves. For this, we need to update our Character movement script.
Like most things in Unity, to access another component, we just need a reference to it. With the animation controllers, it is no different.
Update your CharacterMovement.cs script by performing the following steps:
- A new Animator reference to hold a link to our sprites animator is needed, as mentioned in the following code:
//Reference to the player's animator component.
private Animator anim;
- Discover the actual animator from the sprite object within the
Awakefunction to ensure we capture it at startup using the following code:void Awake() { //Setting up references. playerRigidBody2D = (Rigidbody2D)GetComponent(typeof(Rigidbody2D)); playerSprite = transform.Find("PlayerSprite").gameObject; anim = (Animator)playerSprite.GetComponent(typeof(Animator)); } - In the
Updatefunction, we update afloatparameter we defined earlier in the animator with the value of the movement that we got from the user control. Refer to the following code:void Update(){ //Cache the horizontal input. movePlayerVector = Input.GetAxis("Horizontal"); anim.SetFloat("speed", Mathf.Abs(movePlayerVector));
Now if you run the project, your hero will start running in the correct direction when you tell him to and then rest when you stop.
If you also arrange Windows in a way that you can see both the Game and Animator windows at the same time, you will see that each state will become active as and when it reacts to the input.
We have a nice run and stand animation, but wouldn't it be better if our hero had a spring in his step? So let's extend our running animation, and also highlight one of the pitfalls of doing so and how to fix it by performing the following steps:
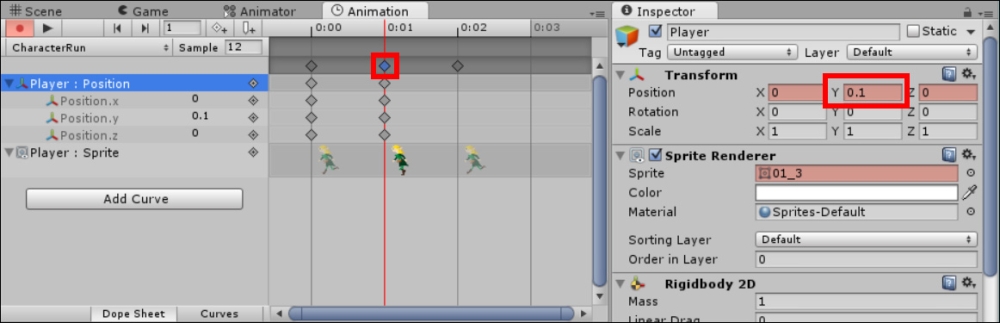
- Select the Player game object, open the Animation window, and select the CharacterRun animation clip.
- Click on the middle keyframe in the animation.
- In the Inspector pane, change the Y Transform value to
0.1.
This will update your animation as follows:
However, when you now run your project and make the hero run around, you will see the hero doing his new run animation and bobbing up and down as expected. However, it will soon stop moving; what the heck? The reason is simple; by setting the Y property of the game objects in the Transform pane, you also have to set the X and Z properties to 0 because they are all part of the Transform pane's Vector3 property. This may be changed in future versions of Unity. However, currently, it isn't possible to just animate a single property of constructs, such as vectors or other complex types.
There is a workaround, which is more on the lines of how you should create complex game objects that have many parts. Just split Character from the rendering of its sprite by performing the following steps:
- Rename our current Player game object to
PlayerSprite. - Create a new game object named
Player. - Click and drag the PlayerSprite game object to be a child of the Player game object.
- Reset all the Transform pane's values of both the Player and PlayerSprite game objects (otherwise, everything will be an offset).
- Remove the
MovementController,RigidPhysics2D, andBox Colliderscripts from the PlayerSprite game object and add them to the Player game object again.
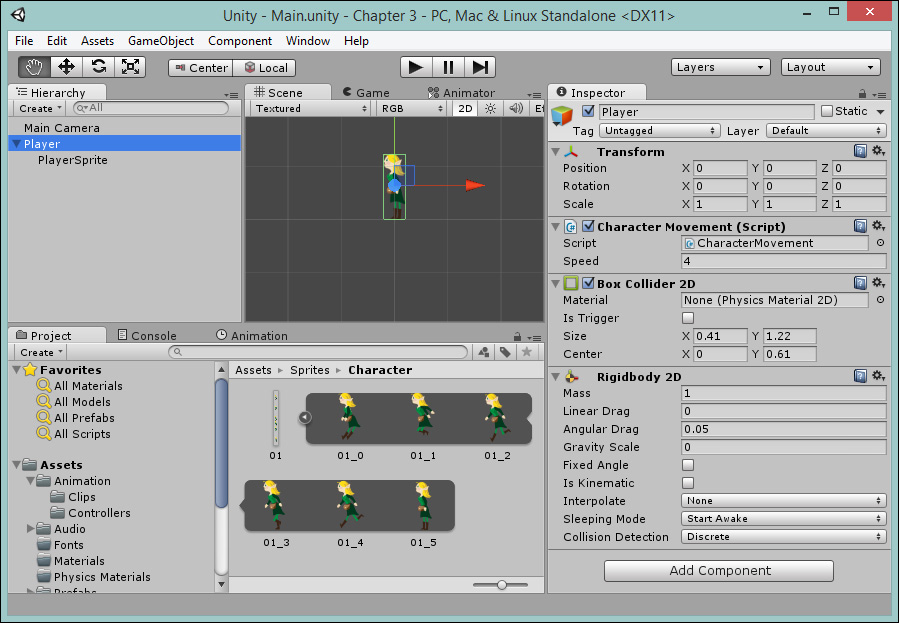
The Player (Controller) game object view will look like the following screenshot:
The PlayerSprite (Animator/Sprite Renderer) game object view is shown in the following screenshot:
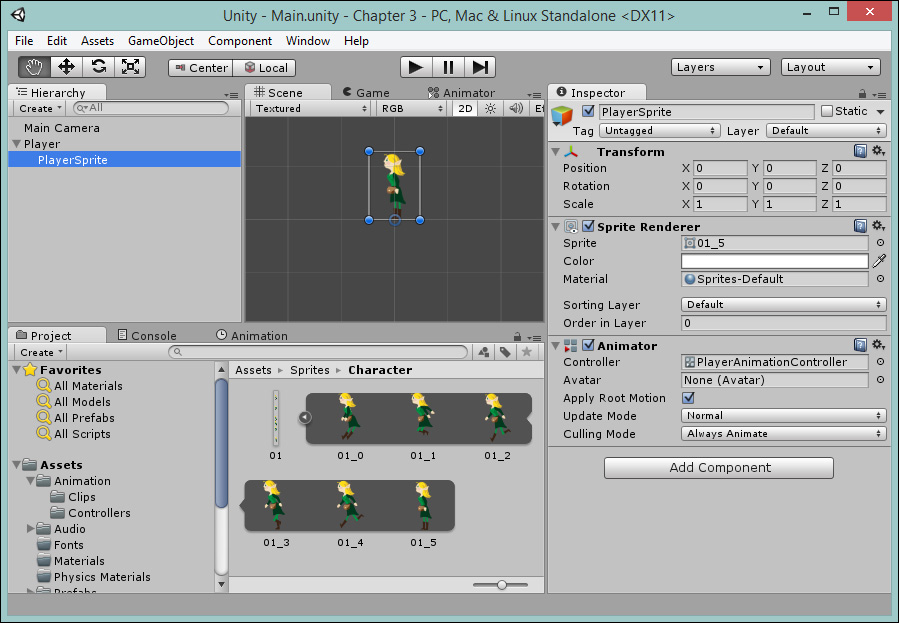
With our scene reordered, the player's movements and physics are controlled by the parent Player object, and Sprite Rendering and Animator are controlled by the child PlayerSprite object. We just need to update our control script so it knows where to find everything. Perform the following step:
- Edit the
CharacterMovement.csC# script and update it as follows:- Add a reference to the point of the new PlayerSprite game object as follows:
//Reference to the player's sprite GameObject. private GameObject playerSprite; - Add a discovery for the PlayerSprite game object and alter the discovery for the animation component based on the new
playerSpritereference as follows:void Awake() { // Setting up references. playerRigidBody2D = (Rigidbody2D)GetComponent(typeof(Rigidbody2D)); playerSprite = transform.Find("PlayerSprite").gameObject; anim = (Animator)playerSprite.GetComponent(typeof(Animator)); } - Alter the
Flip()logic to work with the PlayerSprite game object's rendering option as follows:void Flip() { //Switch the way the player is labelled as facing. facingRight = !facingRight; //Multiply the player's x local scale by -1. Vector3 theScale = playerSprite.transform.localScale; theScale.x *= -1; playerSprite.transform.localScale = theScale; }
- Add a reference to the point of the new PlayerSprite game object as follows:
So, when we run the game now, the entire Player object is moved by the script and the animation runs independently.
As a nice last touch, let's clean up the running of the animation to be a bit smoother. At present, the hero jerks up and down with the frames it has, but we can improve this by using the Curves features of the Animation editor.
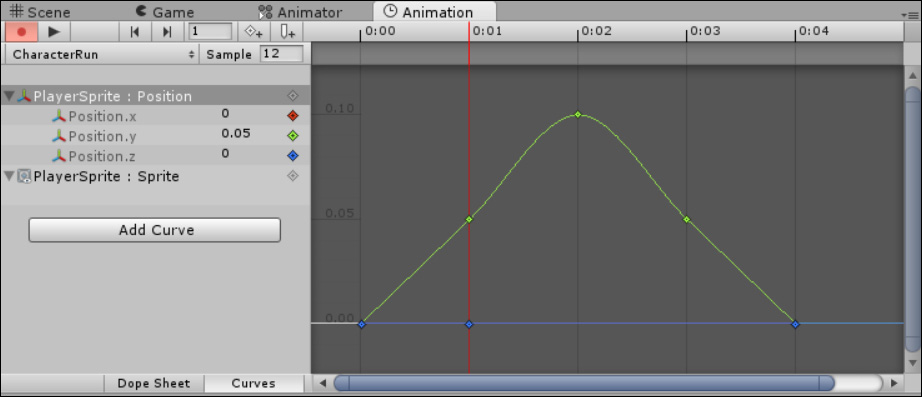
To do this, let's make some space in the Animation window's timeline to add a few extra frames by performing the following steps:
- Move the last keyframe back from 0.02 to 0.04.
- Drag the 01_3 sprite again onto the timeline at 0.02 and 0.03.
- Set the Position.y property from
0.01to0.05. - Set the Position.y property from
0.02to0.1. - Set the Position.y property from
0.03to0.05. - Click on the Curves button at the bottom of the Animator window to switch between the views.
With extra frames and settings, you should now see the curve as shown in the following screenshot:
Now, while running the project, the slight hop in our hero's step should look a lot smoother.