
Moving on from theory, we need to look at something to put on our map of the world, such as somewhere for our player to travel to and explore.
We not only need to provide graphical support in the game to open up areas on the map or just show the journey between two points, but we also need to connect these points with scenes in our game.
Now, we have already started the coding framework behind our places manager with the creation of the NavigationManager script, which keeps track of all the places available in the world for our player to travel to. Just add a few more routes for the manager to look after and that's up and running.
Then, there is the visual side. As we want a common way to create places/markers on the map, we can start to use prefabs in Unity so that we only have to design them once and then just reuse them on our map.
Start off by copying your world texture into your project Assets folder in AssetsSpritesEnvironment, and use any image you wish to use or generate one from http://donjon.bin.sh/fantasy/world/ or http://donjon.bin.sh/world/ like I have done.
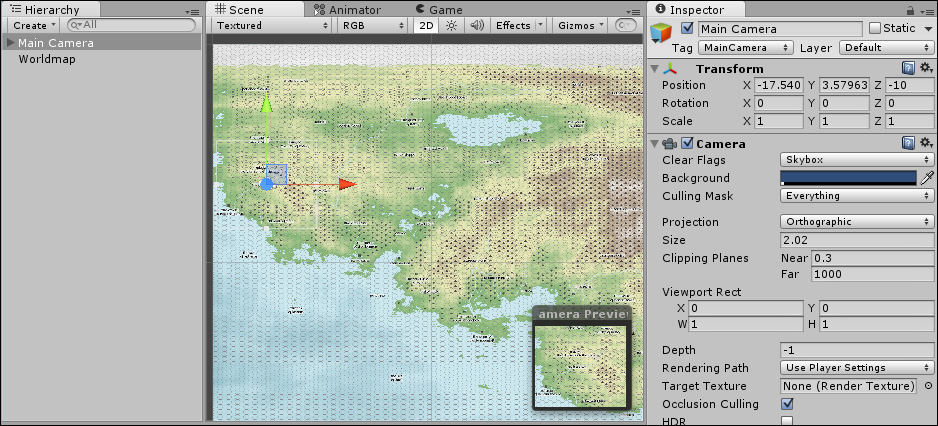
With that in place, create a new scene in AssetsScene and call it World (this has to be the same as the name used in your NavigationManager script). In your scene, drag your world texture to the hierarchy and update your MainCamera script to show the starting region for your world.
As the world texture I have used is rather large, I have set this to the top-left region of the map as shown in the following screenshot:
With the world that the player can travel to in place, we need to add the player to the map and some places of interest.
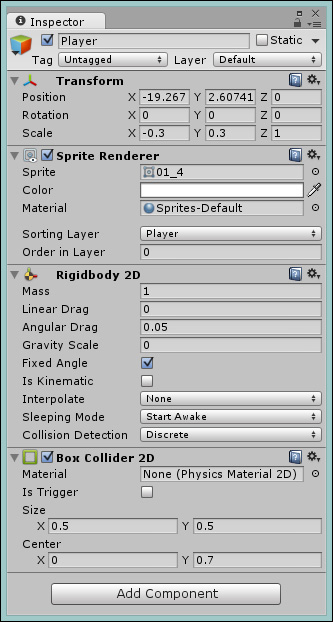
Adding the player is simple; just create a new empty game object and call it player, then add the Rigidbody2D and BoxCollider2D components to it so that it will be able to interact with other points on the map. (You could use location testing, but it's simpler to use the physics system and it's not much overhead.)
Finally, it's best for the player to have something to see moving when traveling, so add a Sprite Renderer to the player game object and use a sprite image that suits it. I used the running hero sprite for effect but you could use whatever you wish.
You should end up with something like the following:
Creating prefabs is very easy; just start creating a game object as you would do normally and once you are happy with the result, drag the whole object to the project view. The beauty is that just about anything can become a prefab for reuse in your game.
Note
When you create a prefab and use it in your scene, any changes to the prefab will be automatically updated on all the objects you created with that prefab. However, changes to those objects themselves do not update the prefab or any other copies. All changes are one way from the prefab itself.
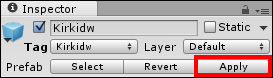
If you want to update the prefab, select the Prefab option in the editor and change it. Alternatively, select an instance in the scene, change the required properties, and then click on Apply to save the changes back to the prefab, as shown in the following screenshot:
This will only affect existing components and properties that were already on the prefab. To add new components or scripts to the prefab, you must edit the prefab itself.
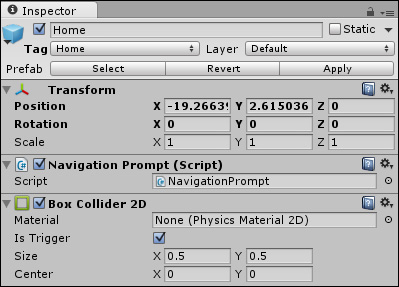
The following screenshot shows a game object setup for a place of interest on our map as an empty game object with a simple BoxCollider2D component (set as a trigger). We can also see the NavigationPrompt script we used in earlier chapters to bring up the traveling GUI.
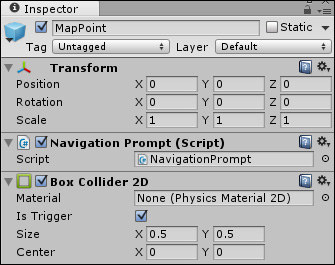
Finally, rename the new prefab to MapPoint so that we know what the prefab is for in our folder structure.
Note
With a collider set as a trigger, it will cause the OnTrigger functions (OnTriggerEnter2D and OnTriggerExit2D) to be called in scripts as opposed to the normal OnCollision functions (OnCollisionEnter2D and OnCollisionExit2D). Bear this in mind when applying scripts that rely on a collider. We will update our NavigationPrompt script accordingly.
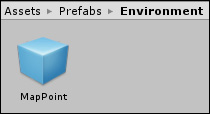
With the prefab created, just drag it to the project's Assets window in AssetsPrefabsEnvironment. You will get a new Prefab asset for a map's place of interest, as shown in the following screenshot:
Note
For the sake of simplicity, I've kept the example simple, but you could expand on it to include a sprite renderer and use an additional image per place to identify it. Some great examples of map point icons can be found at http://calthyechild.deviantart.com/art/Fantasy-Map-TutorialxResources-258559867, which provides some great free resources and images.
Once the prefab is created, we can start to use it since this game object has now become the first instance of our MapPoint prefab. So, rename it to Home and place it over the town where the player starts, and then create a new tag for Home so that we can add it to our NavigationManager script.
Next, create a new instance of our MapPoint prefab by dragging the prefab on to the scene and placing it over the town of Kirkidw. Rename it to Kirkidw and create/set a tag with the same name.
Note
As highlighted earlier, if you wish, you can also add a sprite to the place's game object to highlight the town's position on the map. If you want, you can add the sprite renderer to the prefab and change the sprite image on each instance appropriately. If it's a common image, then just set the sprite on the prefab.
For the best results and to make the scene easy to read, add any new map points as children of the background texture (worldmap); this keeps the points of interest both anchored to the texture and neatly organized.
The map points we have defined are set as triggers. We use triggers when we do not want any physics interactions between the collider and other rigid bodies; all we want is to be notified that one collider has moved over (in the case of 2D) or interacted with another collider.
As we are now using triggers, we need to swiftly update our NavigationPrompt script to work with triggers. So, open the NavigationPrompt script and add the following function in it:
void OnTriggerEnter2D(Collider2D col)
{
  //Only allow the player to travel if allowed
  if (NavigationManager.CanNavigate(this.tag))
  {
    showDialog = true;
  }
}
The function in the preceding code does exactly the same as the OnCollisionEnter2D function, which we already have, but this will now respond to the colliders that have been set as triggers using the is Trigger flag.
As the player can now venture out of town, we need to update our NavigationManager script with additional places to visit, including our home town. We can do this simply by adding additional routes to our NavigationManager script as follows:
public static Dictionary<string, Route> RouteInformation = new Dictionary<string, Route>() {
{ "World", new Route {
RouteDescription = "The big bad world", CanTravel = true}},
{ "Cave", new Route {
RouteDescription = "The deep dark cave", CanTravel = false}},
{ "Home", new Route {
RouteDescription = "Home sweet home", CanTravel = true}},
{ "Kirkidw", new Route {
RouteDescription = "The grand city of Kirkidw", CanTravel = true}},
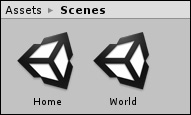
};Nice and easy; although you should note one small flaw. We use the scene name as a way to identify the area that we want to travel to and currently our home scene is called Main. So, rename the Main scene to Home, which should leave you with the following scenes in AssetsScenes:
With the map set up, we can head into the land of scripting to handle the players. Additionally (as highlighted earlier), we also need to ensure that the player doesn't move when the navigation GUI is displayed.
Before we begin, you should recall earlier that I mentioned about screen and world space conversion and the need to convert 3D (Vector3) coordinates to 2D (Vector2 or zero, I valued Vector3) else our calculations will be off. As our map will be controlled by click or touch (to spice things up a bit), we need to be able to access where the player has interacted on our map.
To this end, I added a set of extension methods to a new class called WorldExtensions in AssetsScriptsClasses, replacing its contents with the following:
using UnityEngine;
public static class WorldExtensions
{
  public static Vector3 ToVector3_2D(this Vector3 coordinate)
  {
    return new Vector3(coordinate.x, coordinate.y, 0);
  }

  public static Vector2 GetScreenPositionIn2D(this Vector3 screenCoordinate)
  {
    Vector3 wp = Camera.main.ScreenToWorldPoint(screenCoordinate);
    return new Vector2(wp.x, wp.y);
  }

  public static Vector3 GetScreenPositionFor2D(this Vector3 screenCoordinate)
  {
    Vector3 wp = Camera.main.ScreenToWorldPoint(screenCoordinate);
    return wp.ToVector3_2D();
  }
}
The following extensions at the end of the current script are just for simplicity, but you could define them anywhere:
- Convert any Vector3 in to a 2D Vector3 with a zero
zvalue - Convert a screen space coordinate and return a Vector2 for 2D
- Convert a screen space coordinate and return a Vector3 with a zero
zvalue for 2D
Note
The this keyword signifies that this is an extension method, allowing the function to be accessed by calling the function normally:
var clickPoint = WorldExtensions.GetScreenPositionFor2D(Input.mousePosition);
Otherwise, you could directly access the function from the type identified by the this keyword:
var clickPoint = Input.mousePosition.GetScreenPositionFor2D();
Extension methods are a very powerful and easy way to extend functions and methods on to existing object types. For more information on extension methods, visit http://msdn.microsoft.com/en-gb/library/bb383977.aspx.
With our helpers in place, next we'll create a new MapMovement script in the project under AssetsScripts and replace its contents with the following:
using UnityEngine;

public class MapMovement : MonoBehaviour
{
  Vector3 StartLocation;
  Vector3 TargetLocation;
  float timer = 0;
  bool inputActive = true;
}
The properties are just there to track the progress of the player, and there is a flag to track when the GUI is active.
Next, we can add the input handling functions to the script in the Update method. Whenever you are giving an input, it's better to use Input as it gives more accurate results, as shown in the following script:
void Update () {

  if (inputActive && Input.GetMouseButtonUp(0))
  {
    StartLocation = transform.position.ToVector3_2D();
    timer = 0;
    TargetLocation = WorldExtensions.GetScreenPositionFor2D(Input.mousePosition);
  }
  else if (inputActive && Input.touchCount == 1)
  {
    StartLocation = transform.position.ToVector3_2D();
    timer = 0;
    TargetLocation = WorldExtensions.GetScreenPositionFor2D(Input.GetTouch(0).position);
  }
}
The process is very simple; test whether the user has clicked the mouse (Input.GetMouseButtonUp(0)) or touched the screen (Input.touchCount == 1). The value could be greater than 1, but we want just one touch in this case. When they do so, record the current position of the player as the start point, and where the user has touched or clicked as the end point (target).
Now that we have a place to move the player to, we just need to add the ability to move the player once we have selected a target location and get the player moving on his merry way. So, add the following to the end of the previous Update function:
  if (TargetLocation != Vector3.zero && TargetLocation != transform.position && TargetLocation != StartLocation)
  {
    transform.position = Vector3.Lerp(StartLocation, TargetLocation, timer);
    timer += Time.deltaTime;
  }
In the preceding code, we simply check whether the user has selected a destination and check that we are not there already. If everything is fine, then we just keep updating the player's position using the Lerp function gradually over time.
With that done, simply add the script to the player game object we created in our scene earlier and run the project.
Although it works, you should instantly see one issue: when the players starts on the map, they are actually interacting with the place on the map they started from (Home in this case). Because it is interacting with that place already, this causes the navigation prompt to appear and asks them whether they want to go home.
As our player is not a scaredy cat and wants to venture further, let's fix that.
When organizing your map navigation, input prioritization is an important point. When you have both GUI input and player input challenging for control, you should be able to manage which is currently active at any one time; otherwise, if both are active, you will get unexpected or duplicate results.
For instance, once you have your player moving using the mouse/touch, then the GUI to travel to that destination pops up and accepts input in both the GUI and the map movement at the same time. Hence, when you click on a button to travel or stay, then the map character will also move.
To combat this, the simplest and best way is to reuse our MessagingManager script with a new message to handle whether the GUI is taking input or the game is.
Note
It may be advantageous to have both the GUI and game input working at the same time, for example, in situations where you have in-game buttons for actions. In these cases, you would test where on the screen the player interacted to decide which area gets the input. However, when the pause menu or alternate screen appears, you are still going to need to handle input priority.
So in the MessagingManager script, we add the following new handler to manage the GUI events. We also need to track whether the GUI is displayed or not, so we also need to manage a parameter for the event using a Boolean (true means GUI is displayed and false means GUI is hidden):
private List<Action<bool>> uiEventSubscribers = new List<Action<bool>>();
Then, like before, we need a subscribing and broadcasting function for the new event:
// Subscribe method for UI manager
public void SubscribeUIEvent(Action<bool> subscriber)
{
  uiEventSubscribers.Add(subscriber);
}

// Broadcast method for UI manager
public void BroadcastUIEvent(bool uIVisible)
{
  foreach (var subscriber in uiEventSubscribers.ToArray())
  {
    subscriber(uIVisible);
  }
}

// Unsubscribe method for UI manager
public void UnSubscribeUIEvent(Action<bool> subscriber)
{
  uiEventSubscribers.Remove(subscriber);
}

// Clear subscribers method for manager
public void ClearAllUIEventSubscribers()
{
  uiEventSubscribers.Clear();
}
Note
You will note we only use a copy of the subscribers array. This is to ensure that the loop does not fall over when new subscriptions are added or existing ones are removed while it is progressing through the loop. It is unlikely in this scenario; however, it is a good practice to follow either this option or use locking methods to ensure that the array cannot be updated when the listis being traversed.
This ensures that when GUI events happen (if the game is paused and a pause menu is displayed or, as in this case, when the travel prompt appears), the GUI system just has one place to tell all scenes and objects that are listening through messaging when the GUI is in focus in the game (everyone else stop talking, GUI has the floor), and when it's finished
So, next we need to update our NavigationPrompt script to broadcast when the GUI is displayed and when it is hidden. First, let's refactor a bit and add a new method that controls what happens when the dialog state needs to change:
void DialogVisible(bool visibility)
{
  showDialog = visibility;
  MessagingManager.Instance.BroadcastUIEvent(visibility);
}
This just sets the showDialog flag we were using to the new state and then follows up by sending a broadcast of the new state (true means visible and false means not invisible). Next, wherever we were previously changed the showDialog flag, we need to update it to use the new helper function. So, change the showDialog flag to the following:
showDialog = false -> DialogVisible(false);

showDialog = true -> DialogVisible(true);
Next, we need to update the MapMovement script to add in the messaging handlers so that the script knows when the GUI is displayed. So, add the following Start function to subscribe to the MapMovement script for the new UI events:
void Start()
{
  MessagingManager.Instance.SubscribeUIEvent(UpdateInputAction);
}
Then, add the corresponding function to toggle the inputActive flag we created earlier:
private void UpdateInputAction(bool uiVisible)
{
  inputActive = !uiVisible;
}
This just updates the inputActive property whenever the GUI informs us that it's onscreen.
Tip
If you like Lamdas, you could actually write the preceding code to subscribe to the MessagingManager line as follows:
MessagingManager.Instance.SubscribeUIEvent(uiVisible => inputActive = !uiVisible);
However, I've kept it simple in the project for all to read and it's a good practice to keep them separate in case you need to add more handling.
For more information on Lamdas, see the MSDN article at http://msdn.microsoft.com/en-gb/library/bb397687.aspx.
If you run the code at this point, you will notice that all the changes we just made did not actually fix the problem. When we click on the play button, the player still moves to the click position. The reason for this is very simple: your machine is just too darn quick.
Basically, when you click on the GUI button, the UI event is fired. In the MapMovement script, however, it receives this straightaway and changes the inputActive flag. Then, when the Update method is called, the script thinks the UI has already gone away and receives the same click action and then proceeds to move the player.
We can handle this in one of two ways—either we can change the script execution order (visit http://docs.unity3d.com/Manual/class-ScriptExecution.html for more details, but this can become quite messy to manage), or we can simply update the inputActive flag at the end of the Update loop.
To keep things simple, let's do the latter. So, create the following new property at the top of the MapMovement script:
bool inputReady = true;
Then, instead of updating the inputActive flag directly, you would update the new flag instead. This allows us to delay the change in the input status for the script. So, update the UpdateInputAction method as follows:
private void UpdateInputAction(bool uiVisible)
{
  inputReady = !uiVisible;
}
Finally, at the end of the Update method, we would set the inputActive flag to the value of the new inputReady flag after checking all the user input and allowing the screen prompt to close first:
inputActive = inputReady;
Now when you run the project and the GUI is displayed, clicking on the play button no longer causes the player to move as well.
If you recall, back in Chapter 3, Getting Animated, I showed you the animation curves that can alter how a sprite or inspector value can be changed over time. You can also use these just about anywhere in Unity. So, we'll apply this to our MapMovement script to control how the player transits from his start position to his destination. To do this, simply add a new public parameter to the top of the MapMovement script (this can work on any script implementing MonoBehaviour) as follows:
public AnimationCurve MovementCurve;
When viewed from the editor, this will give you the custom inspector for an animation curve as shown in the following screenshot:
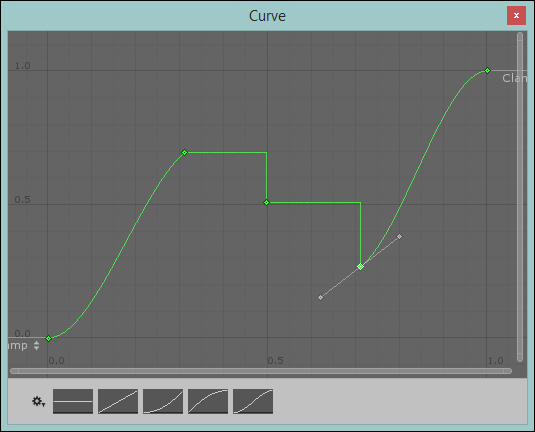
When you click on the curve, you will get the animation curve editor, as shown in the following screenshot:
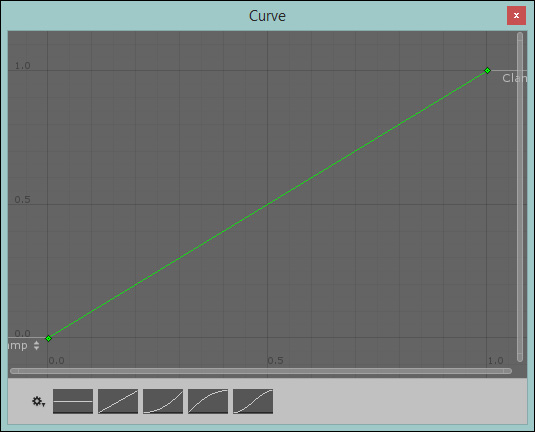
By default, no curve is defined and you have to configure a new curve. In the preceding screenshot, you can see a basic linear curve that grows over time. But this being an editor, you can apply just whatever kind of curve you want—either start with one of the presets at the bottom of the editor or start altering the curve by adding new animation keys (by right clicking on the curve and selecting Add key) and changing the curve characteristics. You can even create something as wacky as the one shown in the following screenshot:
With your curve parameter available and configured, we can then alter our previous Lerp function in the MapMovement script to use the curve parameter as follows:
if (TargetLocation != Vector3.zero && TargetLocation != transform.position && TargetLocation != StartLocation)
{
  transform.position = Vector3.Lerp(StartLocation, TargetLocation, MovementCurve.Evaluate(timer));
  timer += Time.deltaTime;
}
This, now gives us the ability to control how the Lerp function behaves at a very fine level.
To ensure that the hero doesn't actually run home on seeing the big bad wild world, we just need to simply stop him looking at home until he has actually gone far enough from home to actually miss it. To do this, we simply need to disable the collider on the player until he is not colliding with home anymore. We will perform the following steps to do this:
- Achieving the start location is simple; just add a new property to the
MapMovementscript to track whether the player has actually started travelling yet. The code is as follows:bool startedTravelling = false;
- Next, we ensure that when the map scene starts, the player's
BoxCollider2Dcomponent is actually turned off. We do this in theAwakefunction before anything is updated or checked. The code is as follows:void Awake() { this.collider2D.enabled = false; } - Next, we change our
Updatefunction to take note of the new flag and also perform the check as follows:void Update() { if (TargetLocation != Vector3.zero && TargetLocation != transform.position && TargetLocation != StartLocation) { transform.position = Vector3.Lerp(StartLocation, TargetLocation, MovementCurve.Evaluate(timer)); timer += Time.deltaTime; } if (startedTravelling && Vector3.Distance(StartLocation, transform.position.ToVector3_2D()) > 0.5) { this.collider2D.enabled = true; startedTravelling = false; } }Here, we added another statement after the movement code to test whether the following conditions are satisfied:
So once the player has moved a sufficient distance, the hero will then be able to interact with places on the map again.
- Finishing off, we need to update the
StartTravellingflag whenever the player taps or clicks a destination, or else the collider will never get enabled by the preceding code. So, update theUpdatefunction to set this appropriately by setting the following in both of theifstatements:if (inputActive && Input.GetMouseButtonUp(0)) { StartLocation = transform.position.ToVector3_2D(); timer = 0; TargetLocation = WorldExtensions.GetScreenPositionFor2D(Input.mousePosition); startedTravelling = true; } else if (inputActive && Input.touchCount > 0) { StartLocation = transform.position.ToVector3_2D(); timer = 0; TargetLocation = WorldExtensions.GetScreenPositionFor2D(Input.GetTouch(0).position); startedTravelling = true; }
The last snag to watch out for is when the player shoots straight through the town we are currently prompting them about and continues going. Thankfully, this one is very easy to handle.
We just need to check when our input has been disabled by the GUI by checking the new inputReady flag. If the input has only just been disabled, we do this by updating the end of the Update method in our MapMovement script as follows:
  if (!inputReady && inputActive)
  {
    TargetLocation = this.transform.position;
    Debug.Log("Stopping Player");
  }
  inputActive = inputReady;
}
So, when the UI event has turned off the inputReady flag but has not yet been synchronized with the inputActive flag, we simply stop the player in their tracks and fix their target position to their current position.
When you are transitioning between scenes/levels within Unity, it can appear a bit jarring to the player when a scene just freezes and then another one pops up. Even when you make the loading of the scene as fast as possible, there is still a flicker on the screen that is not smooth or fluid (as designers like to say).
Thankfully, we can easily fix this by adding some code to manage the transition between the towns and world in our game. We will do this by adding a Fading manager to our game.
To start off, in the same way as we did with the Conversation manager in the previous chapter, we will create a new class and apply our singleton framework to it. This is simply because there should only ever be one agent in our game managing the fading of a scene so it does not cause an issue if a player enters and then immediately exits a scene.
So, create a new FadeinOutManager C# script in the root of your project's Assets folder and replace its contents with the following code to create a singleton manager that can be used by any scene:
public class FadeInOutManager : Singleton<FadeInOutManager>{
// guarantee this will be always a singleton only –
// can't use the constructor!
  protected FadeInOutManager() { }
}
With this in place, we can start building the manager. First, start off with some properties as shown in the following code:
  // The texture to display when fading
  private Material fadeMaterial;
  // Fading parameters
  private float fadeOutTime, fadeInTime;
  private Color fadeColor;

  //Place holder for the level you will be navigating to
//(by name or index)
  private string navigateToLevelName = "";
  private int navigateToLevelIndex = 0;

  //State to control if a level is fading or not,
  //including public property if access through code
  private bool fading = false;
  public static bool Fading
  {
    get { return Instance.fading; }
  }
The properties are documented and used to control how long the fade should last when leaving the current scene into the next; there is an additional Material property so that you can use different textures to display on the screen when fading (maybe your game logo). Finally, there are some tracking properties if you are using the class to navigate scenes by index or scene name.
With the properties in place, we now need the following initialization code:
  void Awake () {
    //Setup a default blank texture for fading if none is supplied
    fadeMaterial = new Material("Shader "Plane/No zTest" {" +
      "SubShader { Pass { " +
      "    Blend SrcAlpha OneMinusSrcAlpha " +
      "    ZWrite Off Cull Off Fog { Mode Off } " +
      "    BindChannels {" +
      "      Bind "color", color }" +
      "} } }");
  }
In the previous code, we are simply setting up a default fading material in case you don't pass one as a parameter.
Next, as we need to draw our fading image (the image is a part of the material, even if it's only a black color) to the whole screen, we are going to need a little helper function to do that using some of Unity's primitive drawing functions.
Note
Primitives, in graphics terms, refers to when you manually draw lines, quads, or shapes using manually-created vertexes, vertices, and indexes. For more information about the editor, visit https://docs.Unity3D.com/Documentation/Manual/PrimitiveObjects.html. For more information on using the low-level graphics library in scripting, visit https://docs.Unity3D.com/Documentation/ScriptReference/GL.html.
Now, you can create a new C# class to hold the following drawing function if you wish, but I have simply appended it to the FadeInOutManager script. Use whichever method suits you; I kept it in FadeInOutManager because it's integral to the operation of that function. It's still static, so it is still reusable wherever I need it. The code of the required class is as follows:
public static class DrawingUtilities
{
  //Helper utility to draw a full screen texture
  public static void DrawQuad(
    Material aMaterial,
    Color aColor,
    float aAlpha)
  {
    aColor.a = aAlpha;
    aMaterial.SetPass(0);
    GL.PushMatrix();
    GL.LoadOrtho();
    GL.Begin(GL.QUADS);
    GL.Color(aColor);
    GL.Vertex3(0, 0, -1);
    GL.Vertex3(0, 1, -1);
    GL.Vertex3(1, 1, -1);
    GL.Vertex3(1, 0, -1);
    GL.End();
    GL.PopMatrix();
  }
}
This is just a very basic function using the low-level graphics library (the GL library, more information about this library can be found at http://docs.unity3d.com/ScriptReference/GL.html) to define a simple 2D plane that will be displayed in front of the camera. On that plane, I set the material/texture that will be drawn with it and then adjust the alpha (transparency) of the plane. To see how this is used, let's add the following core fading coroutine to the manager:
  private IEnumerator Fade()
  {
    float t = 0.0f;
    while (t < 1.0f)
    {
      yield return new WaitForEndOfFrame();
      t = Mathf.Clamp01(
        t + Time.deltaTime / fadeOutTime);
          DrawingUtilities.DrawQuad(
            fadeMaterial,
            fadeColor,
            t);
    }
    if (navigateToLevelName != "")
      Application.LoadLevel(navigateToLevelName);
    else
      Application.LoadLevel(navigateToLevelIndex);
    while (t > 0.0f)
    {
      yield return new WaitForEndOfFrame();
      t = Mathf.Clamp01(t -                   Time.deltaTime / fadeInTime);
      DrawingUtilities.DrawQuad(
        fadeMaterial,
        fadeColor,
        t);
    }
    Fading = false;
  }
This coroutine is very simple and yet so powerful; walking through it, what happens is as follows:
- When the fade starts, we define a fading value and set it to zero.
- Then, we run a while loop that runs until our fade value is
1(full fade). In this loop, we perform the following actions:- Wait for the last frame to be drawn (keeps it smooth)
- Update our fade value based on how much time has passed against how long the fade should last
- We use the
Mathf.Clamp01function to ensure the value does not go above a certain range, limiting it to a maximum value - Then, we use the drawing function we created earlier to draw a plane/quad to the screen using our fading value as the alpha value
- When fading out has completed, we load the next level as normal. However, we check whether we have used an index or a name for the scene selection.
- Finally, we repeat step 2, but this time fading in instead of out by looping our fading value to 0.
- When finished, we set the fading flag to
falseto indicate that the script execution is complete.
Now, it is very important how we launch this coroutine because it could be interrupted at any time, either by the existing game or by another fade being requested before the last fade finished. To be able to stop it from anywhere in the game, we need to ensure it is only launched using its string name. This allows us to use the StopAllCoroutines function to kill it.
To show coroutines, the following is the method used to start the fading process:
  private void StartFade(float aFadeOutTime, float aFadeInTime, Color aColor)
  {
    fading = true;
    Instance.fadeOutTime = aFadeOutTime;
    Instance.fadeInTime = aFadeInTime;
    Instance.fadeColor = aColor;
    StopAllCoroutines();
    StartCoroutine("Fade");
  }
As you can see, when fading starts, we set the flag to denote fading has started, capture the values for the manager used to control the fading motion, stop any existing coroutines from running that might be from the existing scene or a previous fading action, and kick off the Fade coroutine.
All that's left to complete our FadeInOutManager script is the public function that scenes will be able to use to kick off the process. The code for this script is as follows:
private void StartFade(
  float aFadeOutTime,
  float aFadeInTime,
  Color aColor)
{
  fading = true;
  Instance.fadeOutTime = aFadeOutTime;
  Instance.fadeInTime = aFadeInTime;
  Instance.fadeColor = aColor;
  StopAllCoroutines();
  StartCoroutine("Fade");
}
Then, we need the following public static (available anywhere) function that you can use to start the level fading process:
public static void FadeToLevel(
  string aLevelName,
  float aFadeOutTime,
  float aFadeInTime,
  Color aColor)
{
  if (Fading) return;
  Instance.navigateToLevelName = aLevelName;
  Instance.StartFade(aFadeOutTime, aFadeInTime, aColor);
}
I've included many more overloads for the manager in the sample project. So, it is as flexible as it needs to be for the game, including the ability to pass a material to change the fading image, specify alternate fading values, or fade to another level by index instead of name.
Next, in order to actually navigate to the world, we need to enable our NavigationManager script to actually load out next scene and use the new FadeInOutManager to transition smoothly.
So, open up the NavigationManager script in AssetsScriptsNavigation and look for the following lines:
    public static void NavigateTo(string destination)
    {
        //Application.LoadLevel(destination); <- commented out for now as we have nowhere to go :D
    }
Update the previous lines with the following lines:
    public static void NavigateTo(string destination)
    {
        FadeInOutManager.FadeToLevel(
          destination,
          2f,
          2f,
          Color.black);
    }
Now, if you return to the town scene and run it and try to leave the town for the Big Bad world, it will fail—but in a nice way.
Note
If you still have the messaging scripts attached to the RightBorder game object (the right-most bounds of the town), you'll notice a Greybeards conversation will start. This is because of the simplistic nature of the messaging system. Just remove the scripts from that object for now to stop that.
The reason is simple, because we haven't told Unity we have any scenes in our game yet. You have only been effectively testing whatever scene you have been in at the moment.
To add new scenes, we need to set up the Build Settings options for our project to tell it we have some additional scenes to choose from. Open Build Settings by navigating to File | Build Settings from the main menu or use Ctrl + Shift + B on the keyboard. The Build Settings window looks as shown in the following screenshot:
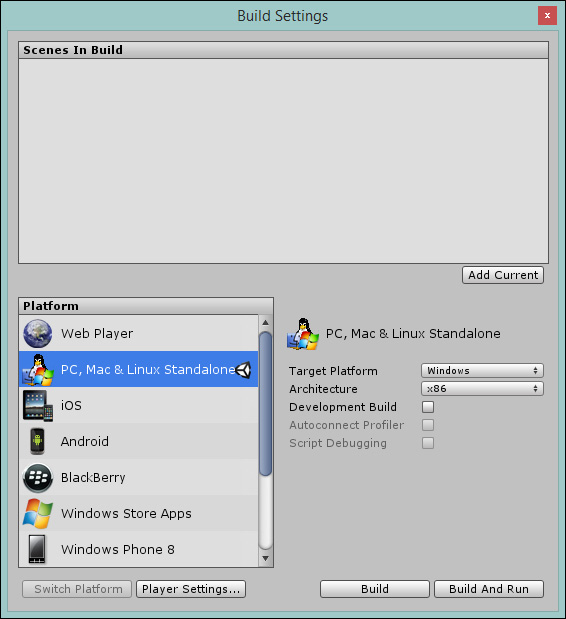
From here, you control how each platform will be built and what is contained within the build. It's also used to change the default editor settings and screen aspects (as described in Chapter 4, The Game World) that are available. We will cover more on this later in Chapter 12, Deployment and Beyond, when we start building for platforms such as Windows, Windows Phone, iOS, or Android.
As you can see in the following screenshot, the Scenes In Build list is currently empty. So when we run the game, it will just run the current scene in the editor. To update this list, either drag the scenes from the project hierarchy or use the Add Current button to add the scene you are currently viewing. So, add the two current scenes into the Scenes In Build list as shown here:
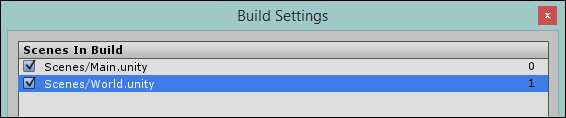
Now, one important thing to note is the order of the scenes. As you may expect, Unity will always start the project with scene 0, so be sure that the town is the first scene in the list. You can do this by simply dragging the scenes up or down.
Now, when you start the game from the town and run screaming from the town, you will nicely fade out from the town into the Big Bad world.
Tip
This ordering of scenes is very useful and powerful. Some developers like to put levels in order so that they can use the index to progress through.
However, another trick if you are having trouble with a particular scene in your game when running on a device is to reorder the scenes in the build so that the troublesome one is the starting scene. This saves you from having to keep playing through till you get to that scene or writing code to accelerate you. Granted, you need to ensure whatever settings required for the scene are set on load if you debug this way.