
Armed with the data we need for our player character in our game world, let us now turn to the visual side of things and get our first 2D visual elements into our game, starting with our hero.
Before the new 2D system was implemented in Unity 4.3, setting up a 2D-rendering system was a tortuous affair that required importing texture assets, creating a 2D-fixed camera system, implementing 2D lighting and a rendering pipeline, and either constraining a physics system to just two dimensions or building your own. It didn't stop there as there was a lot more to contend with, including an endless Z-order fighting to draw the textures correctly (which the new 2D-sorting layers resolve quite nicely). Most developers just ended up using one of the many 2D asset packages from the store to solve a lot of these issues, but it was still a huge challenge to get them right.
Now, with Unity's 2D pipeline, things are a lot simpler. I almost envy new developers who come to the platform for the extra free tools they wish to arm themselves with to build their projects. Unity doesn't stop there though as there are many more new developments heading our way, such as the new GUI system that was introduced at the Unite keynote in Vancouver.
Tip
If you haven't done so already, I recommend that you at least watch the keynotes from Unity's Unite conferences at http://Unity3D.com/unite. Watch more if you can as they will provide you with a keen insight into what is to come and also how to use it in advance in most cases.
Some sessions will also show you how to better use the existing features as a lot of the sessions are created from the leading issues in the forums.
When a Unity project is in 2D mode, the first change you will notice is that when new images are imported into the project, they are configured as sprites instead of just normal textures, as shown in the following screenshots:

Imported texture properties
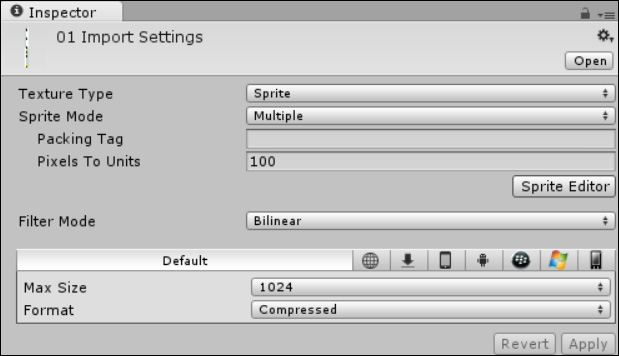
Imported sprite properties
So, let's go into a bit more detail as to what these new properties mean.
Setting this option changes the import settings for the asset. Only note the changes that take place when you click on Apply or OK on the Import Settings change dialog.
This setting tells Unity whether there is a single sprite or multiple sprites within the imported image. Only after you select Multiple will the Sprite Editor become available.
This is a customizable option that lets you set groups to pack sprites into texture atlases. By setting this up, it tells Unity to group all the objects with the same tag under a separate texture atlas/sheet together, thereby overriding the default behavior of placing all the assets on the same atlas. Any assets without a tag will be grouped onto the default atlas.
Tip
Texture Atlas packing is a Unity Pro feature that will not be covered in this book. You can read more about it at http://docs.Unity3D.com/Documentation/Manual/SpritePacker.html.
If you don't have access to Unity Pro, there are a few texture packing tools out in the wild that prepack the assets for you (such as Nvidia's texture asset tools available at https://developer.nvidia.com/legacy-texture-tools). Once there, Unity will automatically split them up for you; more on this later.
This option is just a setting that allows you to scale the image asset at import time, the default being 100 pixels per unit (or scaled up to 100 percent).
Note
This setting is important because it sets the relative scale of the assets you will import to your defined game units. This is just as important in 2D as it is in 3D. Your base game unit guides you on how all the assets will scale appropriately to each other, and more importantly, to the camera.
You can manage the game scale through this setting, or you can handle this scale through the original texture's sizes; the choice is up to you.
When Sprite Mode is set to Multiple, the button to open the editor (![]() ) becomes available.
) becomes available.
Once you click on the Sprite Editor button, you will be presented with the new Sprite Editor main window.
All the other settings under the sprite Inspector are pretty much the same with the exception of the texture compression setting.
Note
When the sprite texture type is selected, you will get warnings if your image is not using a power of 2 size texture; this means that the height must be a multiple of 2 against the image's width, so W2/H4 is a power of 2 whereas W3/H4 is not. This is not critical as Unity will still make best efforts to compress the image; it just won't be as small as it should be. Unity will warn you about this with the following information box in the inspector:

Tip
If your sprites look blocky or blurry on screen, be sure to check your sprite texture's import compression level. If the texture's resolution is higher than your import setting, then Unity will do its best to compress the texture (scale it down), which can cause some weird onscreen artifacts (especially if the difference is large, for example, a 4KB texture compressed down to 1KB). Make sure this is what you want or resize your original textures.
Sprite Editor, as the name suggests is Unity's new tool to allow the carving up of spritesheets and texture atlases to identify individual sprites for use in your game; also, it comes with several simple yet powerful features to control how the individual sprites will be imported, as shown in the following screenshot:
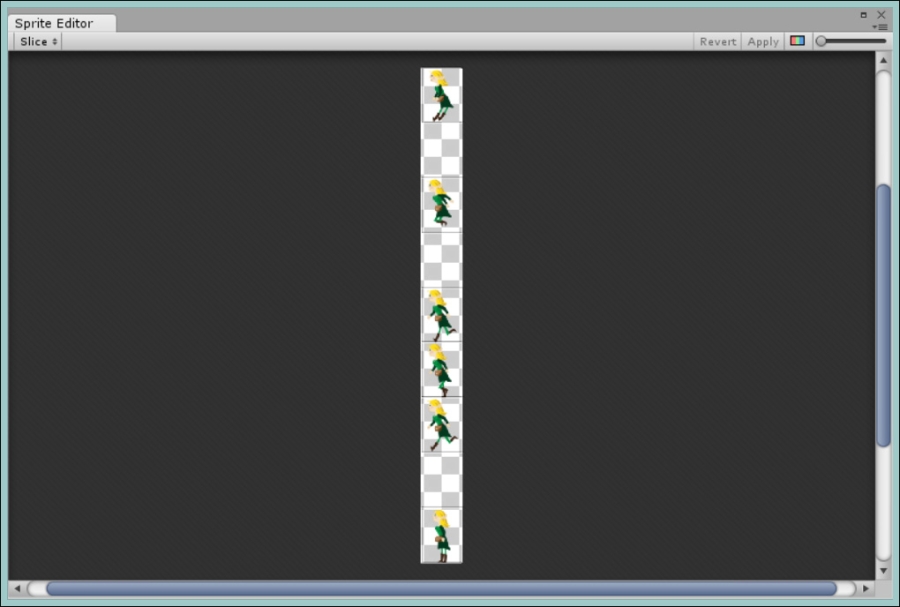
In the editor, you have two sets of functions: the sprite splitter and the view controls.
The splitter or slicer has two modes, automatic and grid (manual), in which it can carve up your spritesheet to create individual images for use in your game.
Unity has put some very smart logic into its automatic sprite carving system that can quite easily identify regions in your spritesheet where your images are packed. Plus, you have some advanced options to guide the system to make it fit for your game, as shown in the following screenshot:
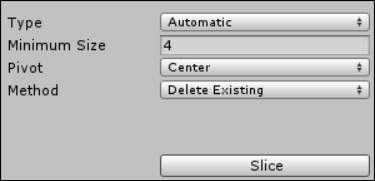
The carving is based on the alpha regions within the texture, so bear this in mind. The following are the advanced options provided by Unity:
- Minimum size: Setting the minimum size of the sprite defines the smallest pixel-grouping size on the image to select a single sprite. Setting this to a larger value constrains the selection logic to look for larger groups of sprites. It can also be viewed as the minimum space between the sprites on the sheet.
- Pivot: As the name suggests, it allows you to set the default pivot position at import time for the sprites that it creates by default.
- Method: This option has the following options to guide the selection logic to identify sprites:
- Delete existing: Selecting this option will clear all the existing sprite ranges from the sheet.
- Smart: This option will try to identify common patterns in the sprites from the sheet meant for selection. In some cases, it is able to identify groups that make up a single sprite together.
- Safe: This option focuses on tighter regions around each element it identifies on the spritesheet, thereby making the edges as close as possible.
The grid option is a lot simpler with no complex logic. It simply allows you to define (as the name suggests) a grid over the spritesheet with defined cell sizes by setting the height and width options, as shown in the following screenshot:

Unity will then automatically identify sprites based on that grid. Note that it will also ignore any blank areas on the spritesheet by default, so keep this in mind if you need them.
Tip
If you do not see a selection box around your sprites, then check your height and width settings against the original size of the spritesheet. Normally, you will not see anything if the sizes are too big.
My advice is to start with a smaller size where the grid shows up and alter the width and height settings upwards until you are happy with the selection on the entire sheet, especially if you are unsure of the dimensions of each sprite.
The view controls simply change or affect what you are viewing in Sprite Editor, as shown in the following screenshot:
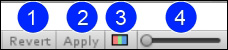
The following are the view controls provided by Unity:
- Revert: This control simply resets the texture back to the original settings the editor had when it was opened or when the apply option was used to save. Note that this is not simply an undo button as it completely resets the editor back to the beginning.
- Apply: As the name suggests, this applies any changes you have made in the editor. If you close the editor and keep the changes pending, you will be prompted to apply the changes. Note that once you apply your changes, these cannot be undone, so when you click on apply, be sure that the changes refer to what you actually want.
- Alpha/Color: This control simply changes the view between fully textured sprites or just the alpha regions. It is useful if you want to see what the automatic splitting options are using to identify individual sprites.
- Zoom slider: This control is used to zoom in and zoom out. Need I say more?
Once you have your individual regions identified on the spritesheet, you can still further change the import settings for each sprite as if they were imported individually; this is shown in the following screenshot:
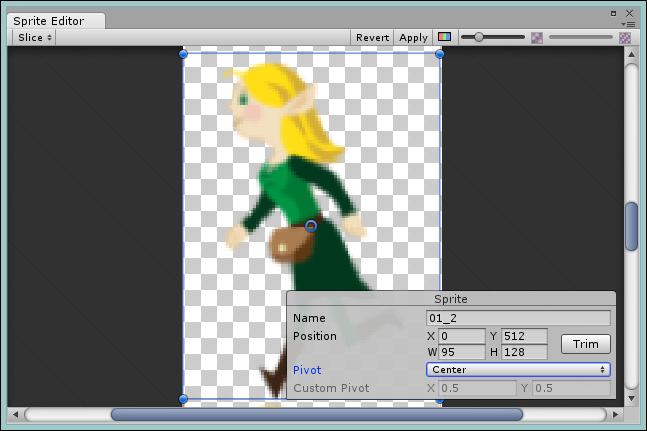
In the preceding screenshot where a single sprite is selected, you can clearly alter the name, the position of the spritesheet the sprite is picked from, its width and height, and also the pivot point using the sprite selection inspector.
Additionally, you can use the selection box surrounding the sprite to alter the settings graphically using the hook points in each corner or by dragging the pivot circle to the center to alter the pivot's rotation point.
The settings you will change with a single sprite selected will only affect that sprite and not the rest that are on the spritesheet, so keep this in mind if the sprite you are editing is part of an animation.