
As you would expect, we need to create a new scene for our battles. There is a choice to make whether you want to create several scenes for different battle areas or define one generic scene and randomize the contents of that scene to add variation. Obviously there are pros and cons to each approach, but ultimately the choice is up to you.
For now, we will keep things simple and just create a new scene and then configure it as our battle area. So, add a new scene called Battle to the project and make it look pretty with some additional background scene elements.
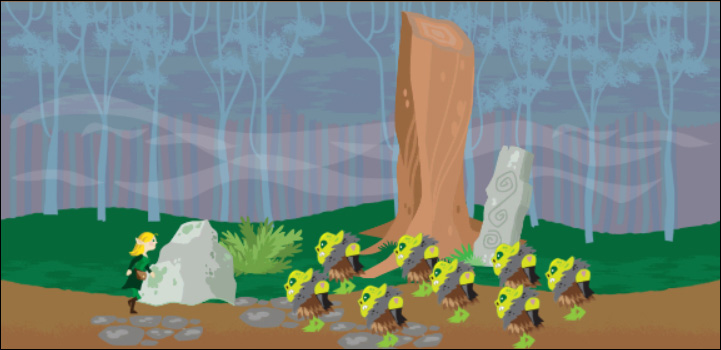
For this example, I have used the Fantasy background (EnvironmentsFantasyBackground01.png) with some of the environmental assets from our asset pack to create the following screenshot:

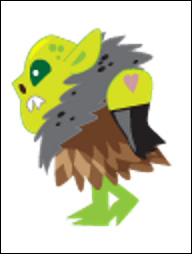
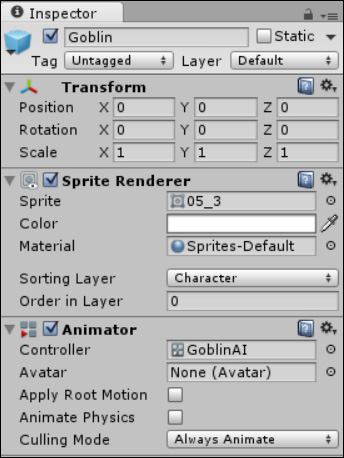
We need to create a prefab for our first enemy. Doing so is simple. First, let's start with the goblin character in the asset pack (Fantasy_Pack�1_Characters�5.png), split its sprite up using Sprite Editor, drag sprite image 05_03 on to the scene, and then rename the new game object to Goblin. The enemy would look as the following diagram:
With the character in place, it's time to give the nasty little fellow some logic; we won't use this just yet in this chapter but it's good to have it from the beginning (see Chapter 10, The Battle Begins, for the applied AI).
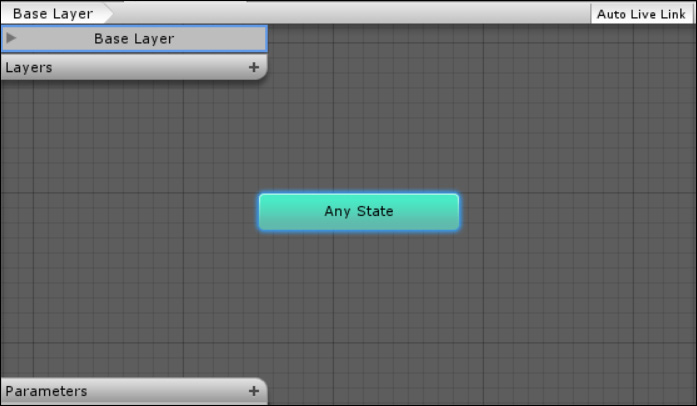
So create a new AnimatorController called GoblinAI.controller and place it in AssetsAnimationControllers, which gives us the basic Animator view, as shown in the following screenshot:
Next, we need some parameters to control the state machine, so add the following parameters to the controller by clicking on the + symbol on the parameters bar and selecting the correct data type, as shown in the following screenshot:
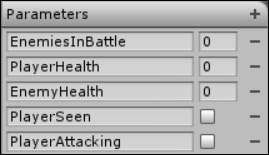
The parameters to be added and their data types are as follows:
EnemiesInBattle: IntPlayerHealth: IntEnemyHealth: IntPlayerSeen: BoolPlayerAttacking: Bool
Now that we have some input parameters, next up we need our states. So, create the states shown in the following screenshot on the current animation layer by right-clicking and navigating to Create State | Empty:
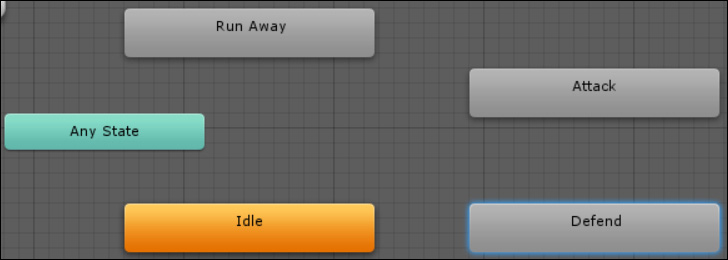
The states to be added are as follows:
- Idle
- Run Away
- Attack
- Defend
Note
You should note that the first state will be colored orange, whereas the rest are colored grey. This is simply because the first one you create becomes the default state (the state the state machine will start with). You can change the default state at any time by right-clicking on it and selecting Set As Default.
So with the parameters and states in place, all that is left is to connect everything up and finalize the state machine. So as we did in Chapter 3, Getting Animated, we need to create some transitions between the states along with the conditions for those transitions, as shown in the following screenshot:
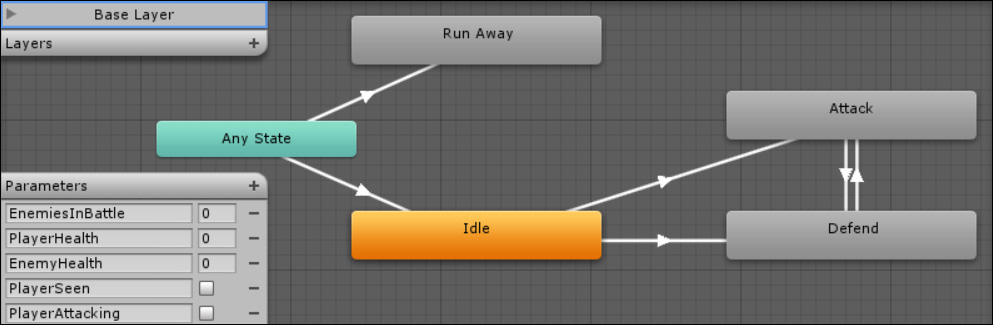
As seen in the previous screenshot, the states and their transitions are as follows:
- Idle | Attack and PlayerSeen is
truemeans attack the player when the Goblin sees him. - Idle | Defend, PlayerSeen is
true, and PlayerAttacking istruemeans if the player attacks first when they are seen by the Goblin, then defend. - Attack | Defend and PlayerAttacking is
truemeans switch to defend if the player attacks. - Defend | Attack and PlayerAttacking is
falsemeans as soon as the player stops attacking, switch back to Attack. - Any State | Idle and PlayerSeen is
falsemeans if the Goblin loses sight of the player at any time, go back to Idle. - Any State | Run Away, EnemyHealth is less than
2, and PlayerHealth is greater than2means the Goblin is basically a coward. If at any time their health drops too low and the player is a lot healthier, it will run away as fast as its little legs will take it.
Now that we have our AI state machine for our Goblin, select the Goblin game object in the Scene hierarchy and add a new Animator Component in the Inspector menu and drag the newly created animator to it, which should now look like the following screenshot:
Now that we have our Goblin set up, we just need to create a prefab from it. So drag the Goblin game object from the Scene hierarchy and place it in AssetsPrefabsCharacters. You can now delete the original in the scene as we don't need it anymore.
Note
If you ever need to change or add to a prefab, you can do this at any time by selecting the prefab and updating it in the Inspector menu. This will automatically update any scene object created from the prefab. However, if you add the prefab to the scene and then change it, the changes you make will only be for that instance in the scene and will not update the prefab.
As noted in the previous chapter, you can also update the prefab from the instance by clicking on the Apply button.
Now that we have our Goblin enemy, we need to be able to randomly drop some into the battle. For this, we need to set up some spawning points (because we don't want them to appear just anywhere) and a script to manage them.
So first create a new empty game object in the scene and call it SpawnPoints. This is just a container to keep the spawn points all together. Next, create nine more empty game objects, make them children of the SpawnPoints game object, and then name them Spawn1, Spawn2, and so on, as shown in the following screenshot:

Now, position each Goblin in the scene where you want it to appear.
Tip
While doing this, I find that adding the prefab manually to each spawn point and then positioning it makes it a lot easier to find the right spot. However, remember that the order in which you add them to the scene is important as it affects what order they are drawn in.
You can also alternatively add an editor script to the object to make it easy to use in an editor. See Chapter 10, The Battle Begins, for more information on editor scripts.
After a bit of tinkering, I ended up with the following (I also added a hero character for effect) screenshot:
Now we know where the Goblins are going to appear; we just need to get them there, so we'll manage this with a BattleManager script.
The purpose of this script is to manage the life cycle of the battle scene, from setting up the battle scene to taking turns to attack and finalizing the battle once complete.
We start off by creating a new BattleManager C# script and placing it at the top of the project Assets folder along with the other managers (if you wish, you can create a separate Managers folder and organize them there). As this script only works when we are in a battle, there is no need to make it a singleton. Battles come and go and they should only last for the length of the current battle.
First, we'll add some variables that we can configure from the scene using the following code:
    public GameObject[] EnemySpawnPoints;
    public GameObject[] EnemyPrefabs;
    public AnimationCurve SpawnAnimationCurve;
These lines maintain the spawn points the battle manager knows about, the possible enemy prefabs it can spawn into the scene, and a curve that we can use later to control how we animate the Goblins. More on this later.
Next, we have some control variables to manage the battle as it ensues. This is done using the following code:
    private int enemyCount;

    enum BattlePhase
    {
        PlayerAttack,
        EnemyAttack
    }
    private BattlePhase phase;
Note
These states are only temporary. In Chapter 9, Getting Ready to Fight, and Chapter 10, The Battle Begins, we will build on this for a more full-fledged system using Mecanim.
We keep a count of how many enemies are active in the scene as well as what phase the battle is in at the moment (along with our own enumeration of the states the battle can be in; you can always add more). Finally, we have a flag to monitor whether the enemy characters have actually started fighting.
Now when the script is run, it needs to initialize the battle arena; so add the following code to the Start method:
    void Start () {
        // Calculate how many enemies
        enemyCount = Random.Range(1, EnemySpawnPoints.Length);
        // Spawn the enemies in
        StartCoroutine(SpawnEnemies);
        // Set the beginning battle phase
        phase = BattlePhase.PlayerAttack;
}Keeping things simple for now, we generate a random number of Goblins who will attack (or be found wandering round the wood waiting to be chopped). Then, we spawn them in using a coroutine and start battle with the player going first.
Now that we know how many Goblins we need in the battle, we can spawn them in. I've used a coroutine here so we can animate them one by one as follows:
    IEnumerator SpawnEnemies()
    {
        // Spawn enemies in over time
        for (int i = 0; i < enemyCount; i++)
        {
            var newEnemy =
                (GameObject)Instantiate(EnemyPrefabs[0]);
            newEnemy.transform.position = new Vector3(10, -1, 0);

            yield return StartCoroutine(
                MoveCharacterToPoint(
                    EnemySpawnPoints[i], newEnemy));

            newEnemy.transform.parent =
                EnemySpawnPoints[i].transform;
        }
    }
Here, we loop through how many Goblins we'll need, create a new instance using the prefab we created earlier, set its position off screen, and then animate it on to the screen using yet another coroutine (shown in the following code). When the coroutine finishes animating, we anchor it to the spawn point it was meant for.
So that the Goblins don't appear, we use the AnimationCurve parameter we added to the script and a coroutine to move the Goblin from off screen to its intended spawn point, as follows:
IEnumerator MoveCharacterToPoint(GameObject destination,
GameObject character)
{
    float timer = 0f;
    var StartPosition = character.transform.position;
    if (SpawnAnimationCurve.length > 0)
    {
        while (timer < SpawnAnimationCurve.keys[
            SpawnAnimationCurve.length - 1].time)
        {
            character.transform.position =
                Vector3.Lerp(StartPosition,
                    destination.transform.position,
                        SpawnAnimationCurve.Evaluate(timer));

            timer += Time.deltaTime;
            yield return new WaitForEndOfFrame();
        }
    }
    else
    {
        character.transform.position =
            destination.transform.position;
    }
}
Using the same logic we used in the previous chapter when moving the character on the map, we work out where the game object is starting from and then use a while loop to keep the game object moving until it finally reaches its destination. However, to improve things, this time we base the loop on the length of the AnimationCurve parameter we have defined for this transition.
This allows greater flexibility and allows us to have more complex and longer animations.
- First we check whether there are animation steps (keys) within
AnimationCurve(if you want something to just pop in to place, then don't configure a curve) - If there are keys in the animation, then we keep iterating until we reach the last key in the animation based on the time of that step and our current iteration time
Then within the loop, we use Lerp for the position of the object from start to finish using the animation curve to control its time and rate.
Note
We only go to the next animation step when the next frame is ready (using the WaitForEndOfFrame function) else the animation would happen all at once; so we do it gradually each frame.
You could use yield return null; however, this happens indeterminately and could cause the coroutine to be called several times per frame depending on how long the last render/draw took. Since this is a smooth animation, we need to process it for each frame. If it is another operation that just needs controlled cycles/iterations, returning null may be preferred.
Next, we need to give the player a way to interact with the battle scene, so we'll add some GUI buttons that only appear if we are in the player's battle phase. We need the following code to do this:
void OnGUI()
{
if (phase == BattlePhase.PlayerAttack)
{
if (GUI.Button(new Rect(10, 10, 100, 50), "Run Away"))
{
NavigationManager.NavigateTo("World");
}
}
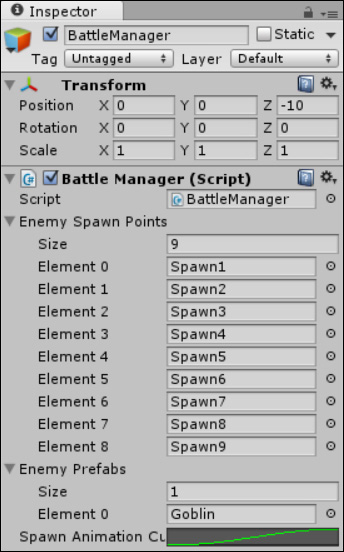
}Now, add a new empty game object to the battle scene, name it BattleManager, and then attach the new script to it. Once there, we can configure it by adding the spawn points we created earlier to EnemySpawnPoints and the Goblin prefab to the EnemyPrefabs parameter along with the Spawn Animation Curve, as shown in the following screenshot:
Now, as the player hits the yellow streaked button to run away (obviously skipped his ninja skill training back home), we see a very obvious problem: the map scene is starting afresh back at home. This is simply because we are not tracking where the player left the previous scene.
There are two ways to handle this: either we record where exactly everything is in every scene and where the player enters and exits, or we can simply track the last known position (or possibly a mixture of the two?).
For now, let us simply implement the last known position method. To do this, we are going to need a central place to remember everything about our game world (well, at least the important bits we want to track), such as the player's stats, options and preferences they have set, and where they have been in the world. Some of these will need saving for the next time the player runs the game and some are just for the current instantiation, but we will cover saving and loading later in Chapter 10, The Battle Begins.
The settings we need don't have to be part of any scene, actively tracked in the scene, or even interact with other game components. So we don't need a class that implements MonoBehaviour or ScriptableObject; we do, however, need it to be around all the time and not be reloaded in every scene. For this, we need a very simple static class (we implemented one of these earlier in Chapter 6, The Big Wild World, with NavigationManager).
Create a new C# script in AssetsScriptsClasses called GameState and populate it with the following code:
using System.Collections.Generic;
using UnityEngine;

public static class GameState {

    public static Player CurrentPlayer = ScriptableObject.CreateInstance<Player>();
    public static bool PlayerReturningHome;
    public static Dictionary<string, Vector3> LastScenePositions = new Dictionary<string, Vector3>();
}
Here, we have some simple static properties to:
- Track the player's stats
- A flag to note whether the player is running home away from a battle
- A dictionary to record the scenes the player has been to and the last position they were in that scene
Simple enough, but to avoid unnecessary code duplication I have also added some helper methods to the GameState class to manage and simplify the use of the LastScenePositions dictionary (to save time later).
So add the following code to the end of the GameState class:
    public static Vector3 GetLastScenePosition(string sceneName)
    {
        if (GameState.LastScenePositions.ContainsKey(sceneName))
        {
            var lastPos = GameState.LastScenePositions[sceneName];
            return lastPos;
        }
        else
        {
            return Vector3.zero;
        }
    }

    public static void SetLastScenePosition(
        string sceneName, Vector3 position)
    {
        if (GameState.LastScenePositions.ContainsKey(sceneName))
        {
            GameState.LastScenePositions[sceneName] = position;
        }
        else
        {
            GameState.LastScenePositions.Add(sceneName, position);
        }
    }
The preceding code is fairly similar but it ensures simple and effective use of any dictionary class, checking the following:
- When you request a value from the dictionary, it checks whether it exists first and then returns it
- If the value doesn't exist in the dictionary yet, it returns a default value
- When you add a new value to the dictionary, it checks whether it already exists, and if it does, then it updates the existing value
- If the value does not exist when you try to add it, it just adds it to the dictionary
Tip
Dictionaries are powerful when used correctly: you can find values by index (in this case a string) or you can find them by ID (like in arrays). You can even loop over dictionaries with for or foreach loops.
However, depending on how you use them, they may not perform well and can also generate garbage, so use them carefully.
For more details, see the C# article at http://blogs.msdn.com/b/shawnhar/archive/2007/07/02/twin-paths-to-garbage-collector-nirvana.aspx. The article is based on XNA but rings true for any C# platform.
There are also considerations when you need to serialize the values from a dictionary since they are handled differently on some platforms, and in some cases not even supported for serialization.
With the GameState class in place, we just need to update the MapMovement script for the map to load the last position if one exists, and save the last position when exiting the scene (and in any other scene that will need the logic).
So, update the MapMovement script's Awake method with the following code:
void Awake()
{
    this.collider2D.enabled = false;
    var lastPosition =
      GameState.GetLastScenePosition(Application.loadedLevelName);

    if (lastPosition != Vector3.zero)
    {
        transform.position = lastPosition;
    }
}
The previous code simply looks for a last position for the current scene, and if there is one, it moves the player to it.
Similarly, when closing the scene, we just need to store the last position. To do this, we add an OnDestroy method as follows and save the player's current position:
void OnDestroy()
{
    GameState.SetLastScenePosition(
        Application.loadedLevelName, transform.position);
}
Finally, we need our NavigationManager script to reset the new flag when the player finally returns home. So update the NavigationManager script's NavigateTo method with the following code:
public static void NavigateTo(string destination)
{
    if (destination == "Home")
    {
        GameState.playerReturningHome = false;
    }
    FadeInOutManager.FadeToLevel(destination);
}
Now when the NavigationManager script detects that the destination is the Home scene, it will update the flag to false in the GameState class.
We have our battle scene up and running, and when the player runs away he/she will still be at the place on the map where the battle occurred. Wouldn't it be nice to also enter the battle scene? So let's add that.
To keep things simple (you can always extend it later), we will just use a simple probability to work out whether the player is likely to enter a battle while travelling. If a battle is going to occur, we just figure out then where on the player's journey the battle will take place. This way it looks random and catches the player off guard when it happens (if it does, there's always a chance it won't).
Note
Alternatively, you could place empty game objects on the scene with colliders to change the probability of an event occurring and have a script to start a battle if one happens. Similar techniques are used in the Pokemon style games where deep grassy areas always have a higher probability of a random battle occurring.
So to start off, we will add a couple of extra parameters to control the battle event probability in the MapMovement script, as follows:
int EncounterChance = 100;
float EncounterDistance = 0;
Tip
Ideally, the EncounterChance parameter should be controlled by some logic based on the player's level and how dangerous the area of the world they are currently in, but you can extend that later if you wish.
It is set to 100 for now to ensure the player will always hit the first battle to send him home.
Next, in the FixedUpdate method where we track when a player taps or clicks on the map to move, we check the probability of an event occurring. If that event occurs, then set the EncounterDistance property as follows to denote when the event will occur along the player's journey:
if (inputActive && Input.GetMouseButtonUp(0))
{
    StartLocation = transform.position.ToVector3_2D();
    timer = 0;
    TargetLocation =
     WorldExtensions.GetScreenPositionFor2D(Input.mousePosition);

    startedTravelling = true;

    //Work out if a battle is going to happen and if it's likely
    //then set the distance the player will travel before it
    //happens
    var EncounterProbability = Random.Range(1, 100);
    if (EncounterProbability < EncounterChance &&
        !GameState.playerReturningHome)
    {
        EncounterDistance = (Vector3.Distance(StartLocation,
        TargetLocation) / 100) * Random.Range(10, 100);
    }
    else
    {
        EncounterDistance = 0;
    }
}We know that if an event occurs and when it does, all that is left is to act on it. So, in the Update method where we animate the player across the screen, we simply need an additional check to see whether we have travelled to the event and if so, stop and enter the battle. We can do so using the following code:
void Update()
{
    if (TargetLocation != Vector3.zero && TargetLocation !=
    transform.position && TargetLocation != StartLocation)
    {
        transform.position =
            Vector3.Lerp(StartLocation,
                TargetLocation,
        MovementCurve.Evaluate(timer));
        timer += Time.deltaTime;
    }
    if (startedTravelling && Vector3.Distance(StartLocation,
        transform.position.ToVector3_2D()) > 0.5)
    {
        this.collider2D.enabled = true;
        startedTravelling = false;
    }

    //If there is an encounter distance, then a battle must occur.
    //So when the player has travelled far enough,
    //stop and enter the battle scene
    if (EncounterDistance > 0)
    {
        if (Vector3.Distance(StartLocation,
            transform.position) > EncounterDistance)
        {
            TargetLocation = Vector3.zero;
            NavigationManager.NavigateTo("Battle");
        }
    }
}Now that the player has left home, found some nasty goblins, and run away, it would be nice if he didn't encounter anymore until he next leaves home.
So using the additional flag playerReturningHome we set in the GameState class, we can set this in the battle manager when the player hits the button. We also then need to unset this when the player leaves home again. So, update the OnGUI method in the battle manager to set the playerReturningHome flag to true.
Then for the home scene, set the flag to false when the player leaves. This can be achieved by either editing an existing script in the home scene or adding a new one to change the flag state in the OnDestroy method mentioned earlier, or update the NavigationManager script to set the flag when the player travels home. It is your choice. In the sample code, I have added this to the NavigationManager script.
It is up to you and your game's design whether this is true for all battles or just for the first; it all depends on the style of the game you are building.