
If you try and move the player left and right at the moment, our hero happily bobs along. However, you will quickly notice that we run into a problem: the hero soon disappears from the edge of the screen. To solve this, we need to make the camera follow the hero.
Tip
When creating new scripts to implement something, remember that just about every game that has been made with Unity has most likely implemented either the same thing or something similar. Most just get on with it, but others and the Unity team themselves are keen to share their scripts to solve these challenges. So in most cases, we will have something to work from. Don't just start a script from scratch (unless it is a very small one to solve a tiny issue) if you can help it; here's some resources to get you started:
- Unity sample projects: http://Unity3d.com/learn/tutorials/projects
- Unity Patterns: http://unitypatterns.com/
- Unity wiki scripts section: http://wiki.Unity3d.com/index.php/Scripts (also check other stuff for detail)
Once you become more experienced, it is better to just use these scripts as a reference and try to create your own and improve on them, unless they are from a maintained library such as https://github.com/nickgravelyn/UnityToolbag.
To make the camera follow the players, we'll take the script from the Unity 2D sample and modify it to fit in our game. This script is nice because it also includes a Mario style buffer zone, which allows the players to move without moving the camera until they reach the edge of the screen.
Create a new script called FollowCamera in AssetsScripts, remove the Start and Update functions, and then add the following properties:
using UnityEngine;

public class FollowCamera : MonoBehavior {

  // Distance in the x axis the player can move before the
  // camera follows.
  public float xMargin = 1.5f;

  // Distance in the y axis the player can move before the
  // camera follows.
  public float yMargin = 1.5f;

  // How smoothly the camera catches up with its target
  // movement in the x axis.
  public float xSmooth = 1.5f;

  // How smoothly the camera catches up with its target
  // movement in the y axis.
  public float ySmooth = 1.5f;

  // The maximum x and y coordinates the camera can have.
  public Vector2 maxXAndY;

  // The minimum x and y coordinates the camera can have.
  public Vector2 minXAndY;

  // Reference to the player's transform.
  public Transform player;
}
The variables are all commented to explain their purpose, but we'll cover each as we use them.
First off, we need to get the player object's position so that we can track the camera to it by discovering it from the object it is attached to. This is done by adding the following code in the Awake function:
    void Awake()
    {
        // Setting up the reference.
        player = GameObject.Find("Player").transform;
  if (player == null)
  {
    Debug.LogError("Player object not found");
  }

    }
Tip
An alternative to discovering the player this way is to make the player property public and then assign it in the editor. There is no right or wrong way—just your preference.
It is also a good practice to add some element of debugging to let you know if there is a problem in the scene with a missing reference, else all you will see are errors such as object not initialized or variable was null.
Next, we need a couple of helper methods to check whether the player has moved near the edge of the camera's bounds as defined by the Max X and Y variables. In the following code, we will use the settings defined in the preceding code to control how close you can get to the end result:
    bool CheckXMargin()
    {
        // Returns true if the distance between the camera and the
  // player in the x axis is greater than the x margin.
        return Mathf.Abs
(transform.position.x - player.position.x) > xMargin;
    }

    bool CheckYMargin()
    {
        // Returns true if the distance between the camera and the
  // player in the y axis is greater than the y margin.
        return Mathf.Abs
(transform.position.y - player.position.y) > yMargin;
    }
To finish this script, we need to check each frame when the scene is drawn to see whether the player is close to the edge and update the camera's position accordingly. Also, we need to check if the camera bounds have reached the edge of the screen and not move it beyond.
There is usually a lot of debate about which update method should be used within a Unity game. To put it simply, the FixedUpdate method is called on a regular basis throughout the lifetime of the game and is generally used for physics and time sensitive code. The Update method, however, is only called after the end of each frame that is drawn to the screen, as the time taken to draw the screen can vary (due to the number of objects to be drawn and so on). So, the Update call ends up being fairly irregular.
Note
For more detail on the difference between Update and FixedUpdate see the Unity Learn tutorial video at http://unity3d.com/learn/tutorials/modules/beginner/scripting/update-and-fixedupdate.
As the player is being moved by the physics system, it is better to update the camera in the FixedUpdate method:
 void FixedUpdate()
    {
        // By default the target x and y coordinates of the camera
        // are it's current x and y coordinates.
        float targetX = transform.position.x;
        float targetY = transform.position.y;

        // If the player has moved beyond the x margin...
        if (CheckXMargin())
            // the target x coordinate should be a Lerp between
            // the camera's current x position and the player's
 // current x position.
            targetX = Mathf.Lerp(transform.position.x,
 player.position.x, xSmooth *
Time.fixedDeltaTime );
        // If the player has moved beyond the y margin...
        if (CheckYMargin())
            // the target y coordinate should be a Lerp between
            // the camera's current y position and the player's
            // current y position.
            targetY = Mathf.Lerp(transform.position.y,
 player.position.y, ySmooth *
Time. fixedDeltaTime );

        // The target x and y coordinates should not be larger
        // than the maximum or smaller than the minimum.
        targetX = Mathf.Clamp(targetX, minXAndY.x, maxXAndY.x);
        targetY = Mathf.Clamp(targetY, minXAndY.y, maxXAndY.y);

        // Set the camera's position to the target position with
        // the same z component.
        transform.position =
         new Vector3(targetX, targetY, transform.position.z);
    }
Tip
As they say, every game is different and how the camera acts can be different for every game. In a lot of cases, the camera should be updated in the LateUpdate method after all drawing, updating, and physics are complete. This, however, can be a double-edged sword if you rely on math calculations that are affected in the FixedUpdate method, such as Lerp. It all comes down to tweaking your camera system to work the way you need it to do.
Once the script is saved, just attach it to the Main Camera element by dragging the script to it or by adding a script component to the camera and selecting the script.
Finally, we just need to configure the script and the camera to fit our game size as follows:
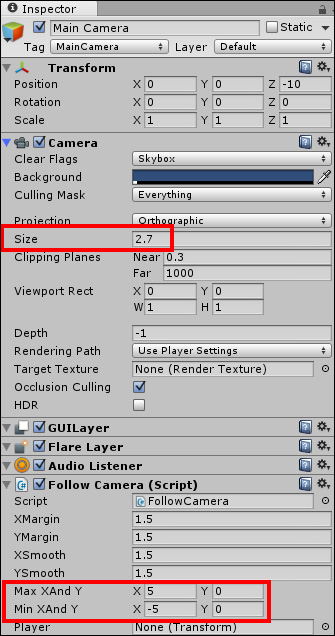
Set the orthographic Size of the camera to 2.7 and the Min X and Max X sizes to 5 and -5 respectively.
When dealing with cameras, there is always one thing that will trip us up as soon as we try to build for another platform—resolution.
By default, the Unity player in the editor runs in the Free Aspect mode as shown in the following screenshot:
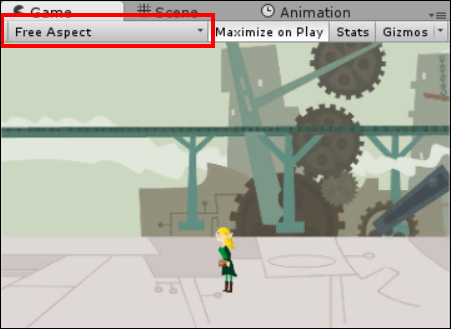
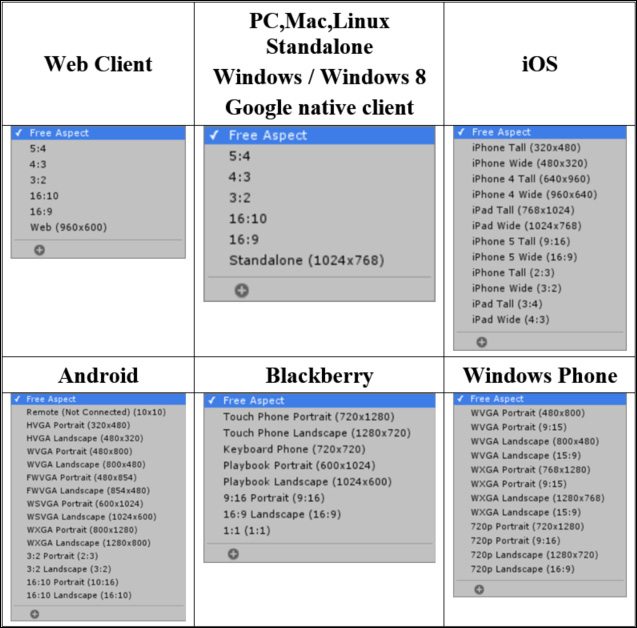
The Aspect mode (from the Aspect drop-down) can be changed to represent the resolutions supported by each platform you can target. The following is what you get when you switch your build target to each platform:
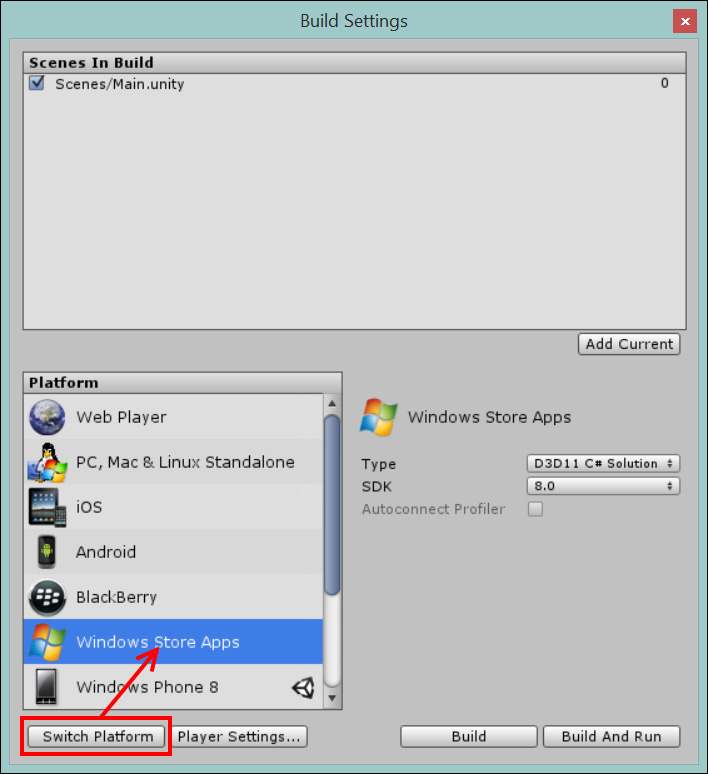
To change the build target, go into your project's Build Settings by navigating to File | Build Settings or by pressing Ctrl + Shift + B, then select a platform and click on the Switch Platform button. This is shown in the following screenshot:
When you change the Aspect drop-down to view in one of these resolutions, you will notice how the aspect ratio for what is drawn to the screen changes by either stretching or compressing the visible area. If you run the editor player in full screen by clicking on the Maximize on Play button (![]() ) and then clicking on the play icon, you will see this change more clearly. Alternatively, you can run your project on a target device to see the proper perspective output.
) and then clicking on the play icon, you will see this change more clearly. Alternatively, you can run your project on a target device to see the proper perspective output.
The reason I bring this up here is that if you used fixed bounds settings for your camera or game objects, then these values may not work for every resolution, thereby putting your settings out of range or (in most cases) too undersized. You can handle this by altering the settings for each build or using compiler predirectives such as #if UNITY_METRO to force the default depending on the build (in this example, Windows 8).
Note
To read more about compiler predirectives, check the Unity documentation at http://docs.unity3d.com/Manual/PlatformDependentCompilation.html.
If you are only targeting one device/resolution or your background scrolls indefinitely, then the preceding manual approach works fine. However, if you want it to be a little more dynamic, then we need to know what resolution we are working in and how much space our character has to travel. We will perform the following steps to do this:
- We will change the
minandmaxvariables toprivateas we no longer need to configure them in the Inspector window. The code is as follows:// The maximum x and y coordinates the camera can have. private Vector2 maxXAndY; // The minimum x and y coordinates the camera can have. private Vector2 minXAndY; - To work out how much space is available in our town, we need to interrogate the rendering size of our background sprite. So, in the
Awakefunction, we add the following lines of code:// Get the bounds for the background texture - world size var backgroundBounds = GameObject.Find("background").renderer.bounds; - In the
Awakefunction, we work out our resolution and viewable space by interrogating theViewPortmethod on the camera and converting it to the same coordinate type as the sprite. This is done using the following code:// Get the viewable bounds of the camera in world // coordinates var camTopLeft = camera.ViewportToWorldPoint(new Vector3(0, 0, 0)); var camBottomRight = camera.ViewportToWorldPoint(new Vector3(1, 1, 0)); - Finally, in the
Awakefunction, we update theminandmaxvalues using the texture size and camera real-world bounds. This is done using the following lines of code:// Automatically set the min and max values minXAndY.x = backgroundBounds.min.x - camTopLeft.x; maxXAndY.x = backgroundBounds.max.x - camBottomRight.x;
In the end, it is up to your specific implementation for the type of game you are making to decide which pattern works for your game.