
Now as I stated earlier, this section is going to be big and full of surprises. Some things are just what you need to do in order to flex Unity in the way we want to use it. Others are real gotchas that can leave you scratching your head and searching for the answer endlessly.
We'll start with the battle state machine, getting the player ready for the battle and then following up with some GUI interaction for the player to use in order to begin his or her assault in the battle. In the next chapter, we'll close the loop in the player's battle process and progress the state machine over to the opponents.
Let's begin!
Starting back in our Battle scene, we need to replace our temporary state machine with a proper one using all of Mecanim's handy features. Although we will still only be using a fraction of the functionality with the RPG sample, I advise you to investigate and read more about its capabilities.
Navigate to AssetsAnimationControllers and create a new Animator Controller called BattleStateMachine, and then we can begin putting together the battle state machine. The following screenshot shows you the states, transitions, and properties that we will need:
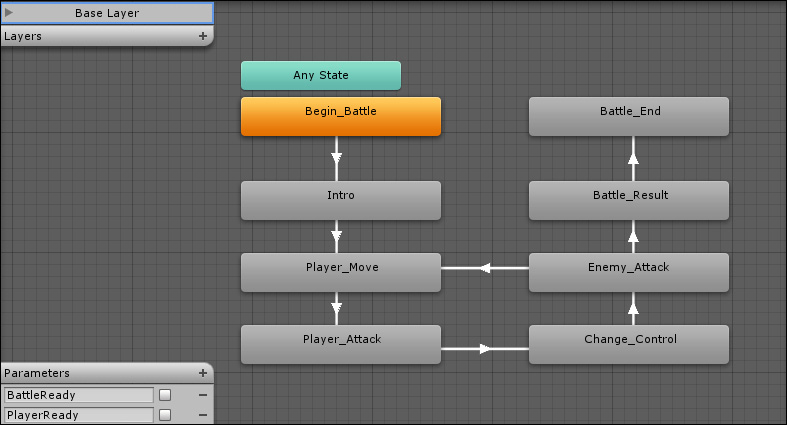
As shown in the preceding screenshot, we have created eight states to control the flow of a battle with two Boolean parameters to control its transition.
The transitions are defined as follows:
- From Begin_Battle to Intro
- BattleReady = true (Transition Duration = 0)
- From Intro to Player_Move
- Exit Time = 0.9 (Transition Duration = 2)
- From Player_Move to Player_Attack
- PlayerReady = true (Transition Duration = 0)
- From Player_Attack to Change_Control
- PlayerReady = false (Transition Duration = 2)
- From Change_Control to Enemy_Attack
- Exit Time = 0.9 (Transition Duration = 2)
- From Enemy_Attack to Player_Move
- BattleReady = true (Transition Duration = 2)
- From Enemy_Attack to Battle_Result
- BattleReady = false (Transition Time = 2)
- From Battle_Result to Battle_End
- Exit Time = 0.9 (Transition Time = 5)
Summing up, what we have built is a steady flow of battle, which can be summarized as follows:
- The battle begins and we show a little intro clip to tell the player about the battle
- Once the player has control, we wait for them to finish their move
- We then perform the player's move and switch the control over to the Enemy AI
- If there are any enemies left, they get to attack the player (if they are not too scared and have not run away)
- If the battle continues, we switch back to the player, otherwise we show the battle result
- We show the result for 5 seconds (or until the player hits a key), then finish the battle and return the player to the world together with whatever loot and experience they have gained
This is just a simple flow, which can be extended as much as you want, and as we continue, you will see all the points where you could expand it.
With our animator state machine created, we now just need to attach it to our battle manager so it will be available when the battle runs; follow the ensuing steps to do this:
- Open up the Battle scene.
- Select the BattleManager game object in the project hierarchy and add an
Animatorcomponent to it. - Now drag the BattleStateMachine animator controller we just created into the
Controllerproperty of theAnimatorcomponent.
The preceding steps attaches our new battle state machine to our battle engine. Now, we just need to be able to reference the BattleStateMachine Mecanim state machine from BattleManager script. To do this, open up the BattleManager script in AssetsScripts and add the following variable to the top of the class:
private Animator battleStateManager;
Then, to capture the configured Animator component in our BattleManager script, we add the following to the Start function:
void Start () {
battleStateManager = GetComponent<Animator>();Now that it's all wired up, let's start using it.
Now that we have our state manager running in Mecanim, we just need to be able to access it from the code. However, at first glance, there is a barrier to achieving this. The reason being that the Mecanim system uses hashes (integer ID keys for objects) not strings to identify states within its engine (still not clear why, but for performance reasons probably). To access the states in Mecanim, Unity provides a hashing algorithm to help you, which is fine for one-off checks but a bit of an overhead when you need per-frame access.
A simple solution to this is to generate and cache all the state hashes when we start and then use the cache to talk to the Mecanim engine.
First, let's remove the placeholder code from Chapter 7, Encountering Enemies and Running Away, for the old enum state machine, so remove the following code from the top of the BattleManager script:
enum BattlePhase
{
  PlayerAttack,
  EnemyAttack
}
private BattlePhase phase;
Also, remove the following line from the Start method:
phase = BattlePhase.PlayerAttack;
There is still a reference in the OnGUI method, but we will replace that shortly; feel free to remove it as well now if you wish.
Now, to begin working with our new state machine, we need a replica of the available states we have defined in our Mecanim state machine. For this, we just need an enumeration using the same names (you can create this either as a new C# script or simply place it in the BattleManager class), as follows:
public enum BattleState
{
  Begin_Battle,
  Intro,
  Player_Move,
  Player_Attack,
  Change_Control,
  Enemy_Attack,
  Battle_Result,
  Battle_End
}
Note
It may seem strange to have a duplicate of your states in the state machine and in the code; however, at the time of writing, it is necessary. Mecanim does not expose the names of the states outside of the engine other than through using hashes. You can either use this approach and make it dynamic, or extract the state hashes and store them in a dictionary for use.
Mecanim makes the managing of state machines very simple under the hood, and it is extremely powerful, much better than trawling through code every time you want to update the state machine.
Next, we need a location to cache the hashes the state machine needs and a property to keep the current state so we don't constantly query the engine for a hash. So, add a new using statement to the beginning of the BattleManager class, as follows:
using System.Collections;
using System.Collections.Generic;
using UnityEngine;
Then, add the following variables to the top of the BattleManager class:
private Dictionary<int, BattleState> battleStateHash = new Dictionary<int, BattleState>();
private BattleState currentBattleState;
Finally, we just need to interrogate the animator state machine we have created. So create a new GetAnimationStates method in the BattleManager class as follows:
void GetAnimationStates()
{
  foreach (BattleState state i (BattleState[])System.Enum.GetValues(typeof(BattleState)))
  {
    battleStateHash.Add(Animator.StringToHash("Base Layer." + state.ToString()), state);
  }
}
This simply generates a hash for the corresponding animation state in Mecanim and stores the resultant hashes in a dictionary that we can use without having to calculate them at runtime when we need to talk to the state machine.
To complete this, we just need to call the new method in the Start function of the BattleManager script by adding the following:
GetAnimationStates();
Now that we have our states, we can use them in our running game to control both the logic that is applied and the GUI elements that are drawn to the screen.
Now add the Update function to the BattleManager class, as follows:
void Update()
{
  currentBattleState = battleStateHash[battleStateManager.GetCurrentAnimatorStateInfo(0).nameHash];

  switch (currentBattleState)
  {
    case BattleState.Intro:
      break;
    case BattleState.Player_Move:
      break;
    case BattleState.Player_Attack:
      break;
    case BattleState.Change_Control:
      break;
    case BattleState.Enemy_Attack:
      break;
    case BattleState.Battle_Result:
      break;
    case BattleState.Battle_End:
      break;
    default:
      break;
  }
}
This code gets the current state from the animator state machine once per frame and then sets up a choice (switch statement) for what can happen based on the current state. (Remember, it is the state machine that decides which state follows which in the Mecanim engine, not nasty nested if statements everywhere in code.)
Next, replace/add the OnGUI function with the same pattern to control which GUI elements would be displayed, as follows:
void OnGUI()
{
  switch (currentBattleState)
  {
    case BattleState.Begin_Battle:
      break;
    case BattleState.Intro:
      break;
    case BattleState.Player_Move:
      break;
    case BattleState.Player_Attack:
      break;
    case BattleState.Change_Control:
      break;
    case BattleState.Enemy_Attack:
      break;
    case BattleState.Battle_Result:
      break;
    default:
      break;
  }
}
Tip
If you need a quick way to generate a switch statement code from an enum state (as shown in the preceding code), there is a simple shortcut to do so using Visual Studio's built-in snippets:
Just type switch and when the snippet prompt appears, tab it twice. Then, type in the property name that has a type of an enum state (the currentBattleState property in this case which is of the type, BattleState). Finally, hit the down arrow key and your case statements will be automatically generated for you!
Neat, eh!
With these in place, we are ready to start adding in some battle logic.
As it stands, the state machine is waiting at the Begin_Battle state for us to kick things off. Obviously, we want to do this when we are ready and all the pieces on the board are in place.
When the current Battle scene we added in Chapter 7, Encountering Enemies and Running Away, starts, we load up the player and randomly spawn in a number of enemies into the fray using a coroutine function called SpawnEnemies. So, only when all the nasty goblins are ready and waiting to be chopped down do we want to kick things off.
To tell the state machine to start the battle, we simple add the following line just after the end of the for loop in the SpawnEnemies IEnumerator coroutine function:
battleStateManager.SetBool("BattleReady", true);Now when everything is in place, the battle will finally begin.
In an ode to the fantastic game Star Command (http://www.starcommandgame.com/), where when a battle starts there is a little introductory animation that introduces the two parties in battle, I added the Intro state sequence, which currently just displays a message about the battle.
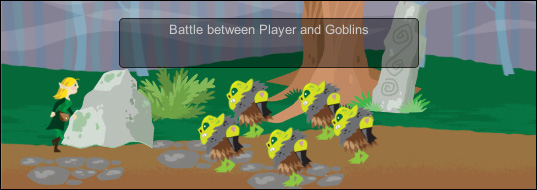
Currently, the state machine pauses at the Intro state for a few seconds, so while it's paused, let's add a simple GUI dialog to tell the player about the impending battle. Simply add the following to the case line of the Intro state in the OnGUI function:
case BattleState.Intro
  GUI.Box(new Rect((Screen.width / 2) - 150 , 50, 300, 50), "Battle between Player and Goblins");
  break;
Now the player is informed that a battle is about to happen whether they like it or not (and now he cannot run away again, yet!).
If you wish, you can also read the Run Away button for the player into the Player_Move state in the OnGUI function as well:
case BattleState.Player_Move:
  if (GUI.Button(new Rect(10, 10, 100, 50), "Run Away"))
  {
    GameState.playerReturningHome = true;
    NavigationManager.NavigateTo("World");
  }
  break;
As the battle is now in progress and the control is being passed to the player, we need some interaction from the user. So let's give them something to click on with a smarter GUI.
Before we can start acting on the state machine, we first need to add something for the player to interact with, namely, the weapons the player possesses to knock those pesky goblins into the middle of the next week.
To do this, we will add a nice 2D graphical command bar with button placements using the 2D system instead of the aging Unity GUI system. The following is a sample of what we will be building:

The system is also flexible and dynamic enough to work in any portion of the screen, with any number of buttons, even with multiple columns and rows if you wish.
CommandBar (the container) manages the placement, and the state of the bar can contain any number of command buttons; each button will display the item it is managing and its input control.
As the command bar and command buttons are codependent, our code won't compile until they are both implemented, so let's start with the CommandBar class and then add the button definition to it.
Note
The command bar and button code was refactored and updated to 2D from an existing open source project; it can be found at github.com/fholm/unityassets/tree/master/ActionBars.
The full 3D implementation also has several other features you might like to implement in the command bar, such as cooldowns, multiselects, and descriptors. So check it out if you wish.
You might also want to check out the rest of Fredrik's other free assets in the repository.
Starting with the command bar manager, create a C# script called CommandBar in AssetsScripts and replace its contents with the following class definition and properties:
using UnityEngine;
using System.Collections;

public class CommandBar : MonoBehaviour {

  private CommandButton [] commandButtons;

  public float buttonSize = 1.28f;
  public float buttonRows = 1;
  public float buttonColumns = 6;
  public float buttonRowSpacing = 0;
  public float buttonColumnSpacing = 0;

  public Sprite DefaultButtonImage;
  public Sprite SelectedButtonImage;

  private float ScreenHeight;
  private float ScreenWidth;
}The properties should speak for themselves: an array for the buttons that the bar is managing, settings related to button's positioning, two images to use for the base button backdrops, and finally a couple of properties to manage the screen's real estate that the command bar will be drawn in.
Next, we need a few controlled properties. These will be accessible in the code but not visible in the editor because they are not marked as [SerializeField]:
public int Layer
{
  get { return gameObject.layer; }
}

float Width
{
  get
  {
    return (buttonSize * buttonColumns) + Mathf.Clamp((buttonColumnSpacing * (buttonColumns - 1)), 0, int.MaxValue);
  }
}

float Height
{
  get
  {
    return (buttonSize * buttonRows) + Mathf.Clamp((buttonColumnSpacing * (buttonRows - 1)), 0, int.MaxValue);
  }
}
Note
For more information about class attributes and editor tags, such as [SerializeField], check out Chapter 12, Deployment and Beyond, and Appendix, Additional Resources.
The preceding code just enables us to discover the layer the command bar is assigned to and ensure any child elements we add can be assigned to the same layer. The remaining expose the calculated width and height for the entire command bar.
If you create a public variable, it will be visible in the code and the editor, for example:
public float myPublicVariable;
If you create a private variable, it will only be visible within the current class in the code, for example:
private float myPrivateVariable;
If you create a variable property with a public property getter (get), it will be visible to any reference in the class but not in the editor, for example:
private float myPrivateVariable;

public float  myPublicProperty
{
  get { return  myPrivateVariable; }
}
The pattern you use is up to you, based on how you need to access/control the property.
You can also customize the visibility of the properties in the editor using the ([SerializeField] and [HideinInspector]} attributes; more information on this will be provided in Chapter 12, Deployment and Beyond, and Appendix, Additional Resources.
To ensure that we can also anchor the command bar to a region on the screen, we will enable it to be placed relative to a fixed position such as top-left and bottom-right. To do this, we will first need a new enum state for all the positions we are going to support. So, create a new script in AssetsScriptsClasses called ScreenPositionAnchorPoint and replace its contents with the following:
public enum ScreenPositionAnchorPoint
{
    TopLeft,
    TopCenter,
    TopRight,
    MiddleLeft,
    MiddleCenter,
    MiddleRight,
    BottomLeft,
    BottomCenter,
    BottomRight
}
Now returning to the CommandBar script, we can add the following variables to the top of the script to track the desired anchor point on the screen using this new enum:
public bool anchor = true;
public Vector2 anchorOffset = Vector2.zero;
public ScreenPositionAnchorPoint  anchorPoint = ScreenPositionAnchorPoint.BottomCenter;
Then, to work out where exactly on the screen the command bar should be based on this anchor point, we just need a simple helper function. So, add the following to the bottom of the CommandBar script:
Vector2 CalculateAnchorScreenPosition()
{
  Vector2 position = Vector2.zero;

  switch (anchorPoint)
  {
    case ScreenPositionAnchorPoint.BottomLeft:
      position.y = -(ScreenHeight / 2) + Height;
      position.x = -(ScreenWidth / 2) + buttonSize;
      break;

    case ScreenPositionAnchorPoint.BottomCenter:
      position.y = -(ScreenHeight / 2) + Height;
      position.x = -(Width / 2);
      break;

    case ScreenPositionAnchorPoint.BottomRight:
      position.y = -(ScreenHeight / 2) + Height;
      position.x = (ScreenWidth / 2) - Width;
      break;

    case ScreenPositionAnchorPoint.MiddleLeft:
      position.y = (Height / 2);
      position.x = -(ScreenWidth / 2) + buttonSize;
      break;

    case ScreenPositionAnchorPoint.MiddleCenter:
      position.y = (Height / 2);
      position.x = -(Width / 2);
      break;

    case ScreenPositionAnchorPoint.MiddleRight:
      position.y = (Height / 2);
      position.x = (ScreenWidth / 2) - Width;
      break;
    case ScreenPositionAnchorPoint.TopLeft:
      position.y = (ScreenHeight / 2) - Height;
      position.x = -(ScreenWidth / 2) + buttonSize;
      break;

    case ScreenPositionAnchorPoint.TopCenter:
      position.y = (ScreenHeight / 2) - Height;
      position.x = -(Width / 2);
      break;

    case ScreenPositionAnchorPoint.TopRight:
      position.y = (ScreenHeight / 2) - Height;
      position.x = (ScreenWidth / 2) - Width;
      break;
  }
  return anchorOffset + position;
}
With all the settings in place for the command bar, we next need to initialize it. So, add an Awake function as follows:
void Awake()
{
  ScreenHeight = Camera.main.orthographicSize * 2;
  ScreenWidth = ScreenHeight * Screen.width / Screen.height;
}
This simply displays the current screen's size, which will be used to scale the command bar to the screen.
Finally, to complete the initialization, we need to set up the available buttons based on the settings for the command bar. This is done in three parts:
First we need to be able to create a button, so add the following function:
CommandButton CreateButton()
{
  // Create our new game object
  GameObject go = new GameObject("CommandButton");

  // Add components
  go.AddComponent<SpriteRenderer>();
  go.AddComponent<BoxCollider2D>();

  go.transform.parent = transform;

  // Init
  CommandButton button = go.AddComponent<CommandButton>();
  button.Init(this);

  return button;
}
This function performs the following:
- Creates a new empty game object (and names it
CommandButton) - Adds two game components (
SpriteRenderer2DandBoxCollider2D) that are required for theCommandButtongame object to function; more on this later - Makes the button a child of the command bar by setting its parent transform
- Creates and assigns the
CommandButtonscript we created earlier to the new button - Calls the
Initfunction of the button (this doesn't exist yet; we will come back to this later) - Once everything is ready, it returns the new
CommandButtongame object to whoever called it
Now we have the ability to create buttons; we will also need the ability to re-position them within the command bar. For this, we will add another function:
void InitButtonPositions()
{
  int i = 0;
  float xPos = 0;
  float yPos = 0;

  for (int r = 0; r < buttonRows; ++r)
  {
    xPos = 0;

    for (int c = 0; c < buttonColumns; ++c)
    {
      commandButtons[i].transform.localScale = new Vector3(buttonSize, buttonSize, 0);
      commandButtons[i].transform.localPosition = new Vector3(xPos, yPos, 0);

      i++;
      xPos += buttonSize + buttonColumnSpacing;
    }

    yPos -= buttonSize + buttonRowSpacing;
  }
}
This function will simply loop through all the buttons assigned to the command bar and then scale and position them accordingly. We then have a set of arranged buttons within the command bar according to the row and column settings we configured.
With all the helper functions defined, we can now actually complete the initialization of the CommandBar class. To do this, add the following function:
void InitCommandButtons()
{
  commandButtons = new CommandButton[(int)buttonRows * (int)buttonColumns];

  for (int i = 0; i < commandButtons.Length; i++)
  {
    var newButton = CreateButton();

    if (i < GameState.currentPlayer.Inventory.Count)
    {
      newButton.AddInventoryItem(GameState.currentPlayer.Inventory[i]);
    }

    commandButtons[i] = newButton;

  }

  InitButtonPositions();
}
Here, we simply set up the button array based on the configured rows and columns, and then added a new empty command bar button to each element using the preceding CreateButton function. Once all the buttons have been created, we then use the InitButtonPositions function to position them correctly within the command bar.
Then, if the player has any weapons in their inventory, it will add that item to the button using a simple helper function (which we'll add in the next section).
All that is left is to ensure that the command bar is positioned correctly on the screen according to the anchor point. To do this, we first need another helper function to set the position:
void SetPosition(float x, float y)
{
  transform.position = new Vector3(x, y, 0);
}
We put this in a separate function so that if we need to apply offsets for the CommandBar class for different platforms, we can do it from this central helper instead of doing it throughout the code.
With the new helper in place, we need to replace/add the Update function that will ensure the bar is drawn to the correct portion of the screen's space:
void Update () {
  Vector2 position = Vector2.zero;

  if (anchor)
  {
    position = CalculateAnchorScreenPosition();
  }
  else
  {
    position = transform.position;
  }
  SetPosition(position.x, position.y);
}With this, each frame simply gets the intended position of the command bar, either from the anchor point or the position set in the editor, and uses our helper function to push it to the correct part of the screen.
Finishing off, we need to call our InitCommandButtons function in the preceding code when the script starts:
void Start () {
  InitCommandButtons();
}We'll start by defining the CommandButton class, but we won't populate it yet; it's just a placeholder for now until the command bar is complete to manage it. So create a new C# script in AssetsScripts called CommandButton and replace its contents with the following:
using UnityEngine;
using System.Collections;

[RequireComponent(typeof(SpriteRenderer))]
[RequireComponent(typeof(BoxCollider2D))]
public class CommandButton : MonoBehaviour
{
  private CommandBar commandBar;
  public InventoryItem Item;
  bool selected;
}We have defined a tight reference for the CommandBar class that the button is a child of so that the button knows what is controlling it and they can communicate accordingly. This enables the button to tell the CommandBar class when it is selected, and the CommandBar class will be able to clear its selection, if need be.
We also have a property for InventoryItem as we are going to use this bar to activate items for use in the battle (the player's sword), and lastly, a flag to track whether the button is selected or not.
Tip
As described, we are using tight coupling between the button and the command bar because of their relationship, as opposed to the loose coupling we did before using messaging. We will still use messaging for some actions, but we will do that later.
It's important to understand when you should tightly couple objects and when you shouldn't using the appropriate pattern as required.
Basically, if a parent needs to manage its children, then you should tightly couple them so they can communicate effectively. If the two objects have no direct relationship, then either of them uses static functions, central state classes, or messaging to route information between them.
Next, we'll add the Init function that we called earlier to the CreateButton function:
public void Init(CommandBar commandBar)
{
  this.commandBar = commandBar;
  gameObject.layer  = commandBar.Layer;

  var collider = gameObject.GetComponent<BoxCollider2D>();
  collider.size = new Vector2(1f, 1f);

  var renderer = gameObject.GetComponent<SpriteRenderer>();
  renderer.sprite = commandBar.DefaultButtonImage;
  renderer.sortingLayerName = "GUI";
  renderer.sortingOrder = 5;
}
When initializing the button's contents, we are setting up all the components this object has assigned to it; they are as follows:
- We define a tight reference for the
CommandBarclass itself because each button is managed by theCommandBarclass. - We set the layer of the new button to be the same as the command bar.
- We get the
BoxCollider2Dgame object and set its size appropriately. (The default is actually the same as we are setting it, but it is worth being prudent and ensuring it is the size we want; don't assume!) - We get
SpriteRenderer, give it the default button image, and set its sorting parameters as required; if this is not the case, you won't see it because it will be drawn behind everything else.
Note
In an odd peculiarity (that can leave you scratching your head for hours), if you try setting up the preceding code in line with where you are using it (in the CommandBar script) instead of within the class script (as in the preceding code), it will not actually work. It will create the new game object, but anything else just gets forgotten when used. Try it for yourself if you wish.
So now we can manage what the InventoryItem button is managing; we'll add another function to do this in a controlled way. This is because there is a fair amount of setup required in order for us to display the item on top of the button:
public void AddInventoryItem(InventoryItem item)
{
  this.Item = item;
  var childGO = new GameObject("InventoryItemDisplayImage");
  var renderer = childGO.AddComponent<SpriteRenderer>();
  renderer.sprite = item.Sprite;
  renderer.sortingLayerName = "GUI";
  renderer.sortingOrder = 10;
  renderer.transform.parent = this.transform;
  renderer.transform.localScale *= 4;
}
So when the CommandBar class requests to put InventoryItem in a button, it creates a new empty game object and adds a sprite renderer to it with the relevant settings for it to display. We also keep a reference for the item being displayed so that we can reuse its properties later (like how much damage our sword would bring about).
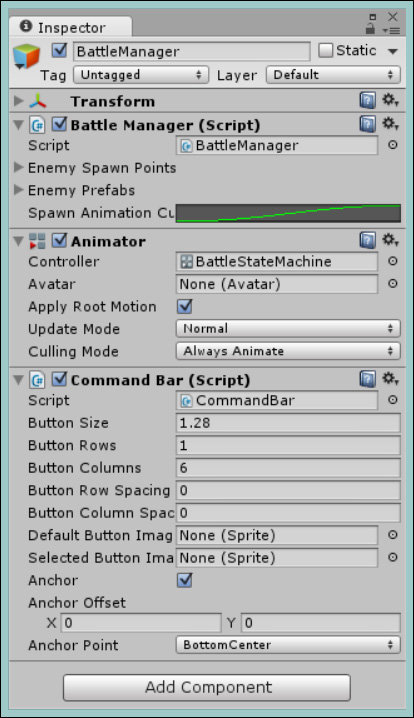
Open up the Battle scene if you haven't done so already so that we can add the new command bar to the Battle scene. The command bar we have built is part of the battle controller, so we will add the new script to the BattleManager game object as a second script.
So, select the BattleManager game object and either drag the CommandBar script to it, or click on Add Component and navigate to Scripts | Command Bar; the inspector should now look as follows:
Next, we'll need the images for our buttons. In the assets that accompany this title, you will find a button1.png spritesheet that contains four button highlights, as shown in the following screenshot:

Add this to the project in the UI folder under AssetsSprites from the assets included with this title, set Sprite Mode to Multiple, and open up Sprite Editor. Next, use the Grid slicing mode and set both the pixel size settings for X and Y to 128; this gives us a nice 2 x 2 split of the sprite with our four button images as shown in the following screenshot:

Now if we return to the CommandBar script we added to our BattleManager script, we can configure it as shown in the following screenshot:
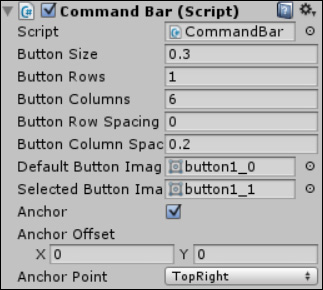
You can play with these settings if you wish to meet your own style and flavor. If you run the project now, six new buttons will appear floating at the top-right corner of our screen.
Tip
Granted, unless you visit the shop first, no weapons will appear in the command bar. What I recommend (unless you want to keep visiting the shop you keep testing) is to add a new property to the CommandBar script so that you can add a debug inventory item, as follows:
public InventoryItem debugItem;
Then, add this item to the players inventory when the script starts, as follows:
  void Awake()
  {
  #if UNITY_EDITOR
    GameState.currentPlayer.AddinventoryItem(debugItem);
  #endif
This way you will always see a weapon while you're testing, and it will only be added to the editor, thanks to the #if UNITY_EDITOR precompiler directive.
For more details on the precompiler directives supported in Unity, see http://docs.unity3d.com/Manual/PlatformDependentCompilation.html.
Now that we have our command bar with a selection of buttons and items to display, it would be good if we could actually use it as well.
The pattern I've opted for with this bar is to only make it single select (clicking on another button will clear any existing selected items). This is just one pattern of course, and you could update/modify the code in this section as you wish. For now, let's see what's involved in managing this selection and also inform the battle manager that something has been selected.
In brief, what we will do is the following:
- Use the
OnMouseDownfunction on a command button to detect a user's click - This will cause a message to be fired to tell the
BattleManagerstate that a button has been clicked - The
BattleManagerstate will then take whichever inventory item has been selected and use it as an active weapon - If the user clicks on another button, this will override the previous selection, even if it is empty
So let's see what's involved in doing that.
To complete the story of the button, we need to add a couple of handlers to let it be clicked; change its selection state, the button's sprite, and a function to safely clear the button's selection state.
First, we'll add the UpdateSelection function to the CommandButton script:
void UpdateSelection()
{
  var renderer = gameObject.GetComponent<SpriteRenderer>();
  renderer.sprite = selected ? commandBar.SelectedButtonImage : commandBar.DefaultButtonImage;
}
Here, we simply get the SpriteRenderer component or the button itself (not its child item) and assign the correct button sprite, either the selected or unselected image configured for the command bar.
Next, we add the ClearSelection function:
public void ClearSelection()
{
  selected = false;
  UpdateSelection();
}
This simply sets the selected state to false and then calls the UpdateSelection function to set the button sprite appropriately.
Finally, we add the OnMouseDown function to react to the BoxCollider2D component we have on the button and receive clicked events:
void OnMouseDown()
{
  if (commandBar.CanSelectButton)
  {
    selected = !selected;
    UpdateSelection();

    commandBar.Selectbutton(selected ? this : null);
  }
}
So now when the user clicks, it will flip the selected state for the button and then call the UpdateSelection function to set the correct button sprite. You will note that this function depends on a property in the CommandBar script that doesn't exist yet. This is there so that if for some reason the command bar is disabled or input is not allowed, then we can ignore any clicks; we'll add this shortly.
Once the user has selected the button, we tell the command bar about it. We then let it manage what happens to the selection after that. We could handle it within the button itself, but this would mean lots of complicated code in this very simple class; it's best to leave it up to the manager. This function doesn't exist yet in the command bar, so let's add it now.
As the command bar manages all the buttons that can be selected and we only want one item to be selected at a time (in the weapon bar at least), we need a way to unselect all the buttons (if the player changes their mind and wants to select another button). The buttons do not know about each other; only the command bar knows about all its children. This might also be used to clear any selections once we move on to a different phase of the battle.
First we need some additional variables and properties to manage what is selected in the command bar, so open up the CommandBar script and add the following variables to the top of the script, just under the existing variables:
private bool canSelectButton = true;
private CommandButton selectedButton;

public bool CanSelectButton
{
  get
  {
    return canSelectButton;
  }
}
Now we can track which button is currently selected.
As we will need a way to clear the current selection (for the enemies turn or the player's next turn) to avoid having to duplicate the code everywhere, we will reuse the ResetSection function to set a new selection if we have one. So let's add the public this function as follows:
public void ResetSelection(CommandButton button)
{
  if (selectedButton != null)
  {
    selectedButton.ClearSelection();
  }
  selectedButton = button;
}
This will simply clear the existing selection if there is one and then track the new selection. If the user has simply cleared their last selection, then this would just be null.
Now we just need to be able to actually select a button, but first we need a few things.
Now that the command bar can select and deselect buttons, we need to be able to tell the BattleManager state that the player has selected a weapon. For this, we'll use messaging as there is no direct relationship between the command bar and the BattleManager state.
First we'll need to beef up the MessagingManager script with a new event we want to publish as we have done previously with the Dialog and UI events.
So, open up the MessagingManager script and add the following:
private List<Action<InventoryItem>> inventorySubscribers = new List<Action<InventoryItem>>();

// Subscribe method for Inventory manager
public void SubscribeInventoryEvent
(Action<InventoryItem> subscriber)
{
  if (inventorySubscribers != null)
  {
    inventorySubscribers.Add(subscriber);
  }
}

// Broadcast method for Inventory manager
public void BroadcastInventoryEvent(InventoryItem itemInUse)
{
  foreach (var subscriber in inventorySubscribers)
  {
    subscriber(itemInUse);
  }
}

// Unsubscribe method for Inventory manager
public void UnSubscribeInventoryEvent(Action<InventoryItem> subscriber)
{
  if (inventorySubscribers != null)
  {
    inventorySubscribers.Remove(subscriber);
  }
}

// Clear subscribers method for Inventory manager
public void ClearAllInventoryEventSubscribers()
{
  if (inventorySubscribers != null)
  {
    inventorySubscribers.Clear();
  }
}
With the message in place, we just need to broadcast this new message when the player selects a button. We will add a new SelectButton method to the CommandBar script to complete the journey, as follows:
public void Selectbutton(CommandButton button)
{
  if (selectedButton != null)
  {
    selectedButton.ClearSelection();
  }
  selectedButton = button;
  if (selectedButton != null)
  {
    MessagingManager.Instance.BroadcastInventoryEvent(selectedButton.Item);
  }
  else
  {
    MessagingManager.Instance.BroadcastInventoryEvent(null);
  }
}
To finish off the CommandBar script while we are updating its messaging, let's also subscribe to the UI event's message and link it to the canSelectbutton variable/property we added earlier.
So, create a new delegate method called SetCanSelectButton:
void SetCanSelectButton(bool state)
{
  canSelectButton = !state;
}
Then, update the Start function in the CommandBar script as follows:
void Start () {
  InitCommandButtons();
  MessagingManager.Instance.SubscribeUIEvent(SetCanSelectButton);
}
Don't forget to unsubscribe the event from it as well when the command bar is destroyed by adding the OnDestroy method:
void OnDestroy()
{
  if (MessagingManager.Instance != null)
  {
    MessagingManager.Instance.UnSubscribeUIEvent(SetCanSelectButton);
  }
}
Now whenever the UI is locked, we ensure that no further button presses are allowed, such as for events when the player has attacked the enemy.
Finally, we return to the BattleManager state and decide what to do with this new weapon the user has selected. First we need a variable to store the selected weapon in, so add the following to the top of the BattleManager script with the rest of the variables:
private InventoryItem selectedWeapon;
Next we need a handler function to store the new selected weapon:
private void InventoryItemSelect(InventoryItem item)
{
  selectedWeapon = item;
}
Then, we have to wire up this function to the event we are broadcasting from the BattleManager state in the Start method:
MessagingManager.Instance.SubscribeInventoryEvent(InventoryItemSelect);
Now we know what the player is fighting with, let's update the UI with some instructions.
So far, when the battle starts in the state machine, an intro is shown and then two seconds later, it is the player's turn; however, at the moment, the player is completely unaware of this, so let's update the OnGUI method in the BattleManager script as follows:
void OnGUI()
{
  switch (currentBattleState)
  {
    case BattleState.Begin_Battle:
      break;
    case BattleState.Intro:
      GUI.Box(new Rect((Screen.width / 2) - 150, 50, 300, 50), "Battle between Player and Goblins");
      break;
    case BattleState.Player_Move:
      if (GUI.Button(new Rect(10, 10, 100, 50), "Run Away"))
      {
        GameState.playerReturningHome = true;
        NavigationManager.NavigateTo("World");
      }

      if (selectedWeapon == null)
      {
        GUI.Box(new Rect((Screen.width / 2) - 50, 10, 100, 50), "Select Weapon");
      }
      break;
    case BattleState.Player_Attack:
      break;
    case BattleState.Change_Control:
      break;
    case BattleState.Enemy_Attack:
      break;
    case BattleState.Battle_Result:
      break;
    default:
      break;
  }
}
In the Intro part, we display a simple message to inform the player about the battle, and when it is the player's turn, we display the Select Weapon message until they have selected one.