
Building a game is one thing, and showing it to your friends and family is another. However, eventually, you are going to want to ship and sell your game in one of the most challenging markets of games.
Your title has to shine—it has to enable features that other titles don't have to stand out and be noticed.
In this chapter, we will take a deep dive into what it takes to try and take advantage of the native platform features and make them available to your game that is running in Unity3D. This could be for notifications support, active or live tiles, location capabilities, or even in-app purchasing (Unity doesn't support in-app purchases currently, and it only supports full purchase).
The following topics will be covered in this chapter:
- Getting to Unity from a native platform
- Giving Unity access to a native platform
- Plugins and what they offer, including building your own
- Building your asset projects (and making a fortune on the asset store)
- Hints and tips for marketing and shipping
Unity does a lot for developers to abstract us from the many platforms you can deploy to. Most of the common functions, such as memory management, audio, controller inputs, purchasing, and so on, are all implemented with a single generic interface with Unity3D. This means you do not need to write a separate code to play an audio file, or draw to the screen for each and every device or platform that you want to support and deploy to. It really is a big time saver (ask anyone who has written their own engine just how much fun they had doing everything multiple times for each platform).
Unity does a lot, but it doesn't do everything. For the following fringe areas, you will have to do the leg work to get these features implemented:
- Social integration (Facebook and so on)
- In-app purchasing
- Alternate physics or networking implementations
The list goes on. In a lot of cases, there are already pre-made assets on the Unity store that have done the hard work to build these implementations. A fair few, you will note, do not support all platforms. In these cases, it will get you most of the way, but you will either have to wait for them to support platform X or write it yourself.
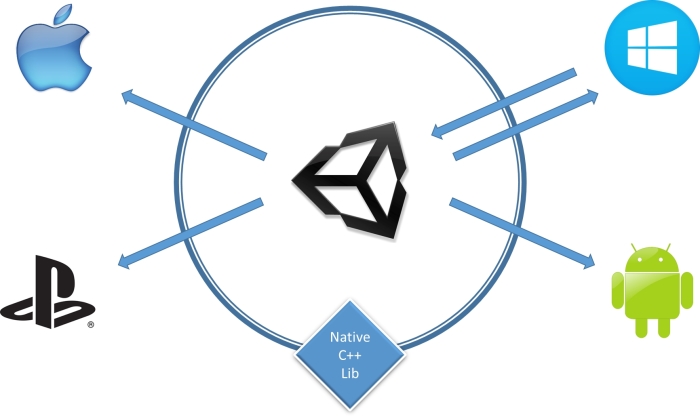
In all cases, assets need to integrate tightly with the underlying platform. They have made use of the interoperability features available in Unity, which this chapter will go through in detail, what each asset has to offer, and what it brings to the table. Some are simple to perform, others not so much. Also, in some cases, you will have to work with the Unity platform build system to push your changes onto the platform (though not absolutely necessary, this will save you from having to repeat every build or if you want to create your assets). The following diagram shows the layout of how Unity works with the platforms it supports:
In general, the patterns you need to support are as follows:
- Using different code paths with directives
- Accessing the native platform from Unity
- Calling the platforms from Unity
- Implementing reusable libraries that are natively compiled to work on all platforms
When you want the code to run in a particular way on one platform and in a different way on another, you can use the precompiler directives to tell Unity to pick one section of code over another (when it builds the project), or to simply ignore the sections of the code. This is also true for the editor, which Unity considers a platform, just like any other. So, we can have the code to run and deploy in the editor, but restrict its execution when it's deployed to another platform. You could say the special editor classes do this, but you may also want to do this with any other code.
The preprocessor directives (or the platform defines) that Unity recognizes are listed in the following table:
Note
It's worth noting that you are not limited to just the Unity preprocessor directives. You can use Visual Studio's directives or even create your own by adding the following class to the top of your #define MyDirective class (no semicolon). Then, you can block out sections of your code by enabling or disabling this line. If a directive does not exist, it will always be skipped.
To use these directives, we will simply declare them with an #if statement to surround the code we want to target. For example, if you recall in Chapter 11, Onward Wary Traveler, we learned that File classes don't work for Windows 8 because the OS does not have the File class or more specifically, the System.IO class (if you build the project for Windows 8 currently, you will get lots of such errors). So, to be able to load the files for Windows 8, you need to use different code.
To walk through the use of preprocessor directives, let's handle one such platform that needs some attention, that is, Windows 8. In Unity's implementation on Windows 8 (due to its asynchronous way of working), they have added some specialized classes because the default implementations of these classes are not available on Windows 8 (in this case, the File class). On Windows 8, you need to use the UnityEngine.Windows.File class instead of the normal UnityEngine.File class.
So, open up the GameState script and update the following code by adding the highlighted snippet:
  public static void SaveState()
  {
    try
    {
      PlayerPrefs.SetString("CurrentLocation", Application.loadedLevelName);
      var playerSerializedState = SerializerHelper.Serialise<PlayerSaveState>
      (currentPlayer.GetPlayerSaveState());
      #if UNITY_METRO
      UnityEngine.Windows.File.WriteAllBytes(saveFilePath, playerSerializedState);
      #else
      using (var file = File.Create(saveFilePath))
      {
        file.Write(playerSerializedState, 0, playerSerializedState.Length);
      }
      #endif
    }
    catch
    {
      Debug.LogError("Saving data failed");
    }
  }
In the preceding code, we have added a preprocessor directive for the UNITY_METRO target (and moved up the playerSerializedState variable as it can be used by all platforms).
Now when you build for Windows 8, it will use the first block of code. For all other platforms, it will use the second block.
We have to perform something similar for the LoadState class as follows:
  public static void LoadState(Action LoadComplete)
  {
    PlayerSaveState LoadedPlayer;
    try
    {
      if (SaveAvailable)
      {
        #if UNITY_METRO
        var playerSerializedState = UnityEngine.Windows.File.ReadAllBytes(saveFilePath);
        LoadedPlayer = SerializerHelper.DeSerialise<PlayerSaveState>
        (playerSerializedState);
        #else
        //Get the file
        using (var stream = File.Open(saveFilePath, FileMode.Open))
        {
          LoadedPlayer = SerializerHelper.DeSerialise<PlayerSaveState>
          (stream);
        }
        #endif
        currentPlayer = LoadedPlayer.LoadPlayerSaveState(currentPlayer);
        }
      }
      catch
      {
      Debug.LogError("Loading data failed, file is corrupt");
    }
    LoadComplete();
  }
Additionally, since the File class on Windows 8 only returns a byte array (byte[]), we need another deserialize function to work with the byte arrays instead of a stream. So, open the SerializationHelper script and add the following method:
public static T DeSerialise<T>(byte[] input)
{
  T output = default(T);
  //Create an XML formatter
  var serializer = new XmlSerializer(typeof(T));
  try
  {
    //Create an in-memory stream with the serialsed data in it
    using (var stream = new MemoryStream(input))
    {
      //Deserialize the data from the stream
      output = (T)serializer.Deserialize(stream);
    }
  }
  catch { }

  //Return the deserialized output
  return output;
}Finally, one last fix. If you build for Windows 8 now, you will still have one error that remains in the SerializationHelper script. This is because the implementation of the MemoryStream class on Windows 8 doesn't have a GetStream method. Now, you can use another preprocessor directive and use a different implementation for Windows 8. However, in this case, if you simply switch to using the ToArray() method, it'll give you the result you want.
Currently, there have been a few inconsistencies among the builds of Unity. In some builds, the project works fine; in others, it crashes when you try to use the singleton classes.
In testing, it seems as though the execution order of singletons is altered, and they are actually destroyed after they are created. This mostly seems to affect the .NET-based builds.
If this happens, you will need to compensate with a minor update to the singleton script in AssetsScriptsClasses and update the OnDestroy method with the following code:
  public void OnDestroy()
  {
    #if !UNITY_METRO
    applicationIsQuitting = true;
    #endif
  }
By specifying !UNITY_METRO, we are stating that this code should be run on all platforms except Windows 8 (in the last tested build 4.5.2, Windows phone was unaffected). If you find this occurring on other platforms, add them to the ignore list. Consider the following instance:
#if !UNITY_METRO && !UNITY_ANDROID
This process doesn't actually destroy the singleton script as it is recreated each time it is used (if it has already been destroyed). However, this flag is there to ensure that it is not recreated when the application is actually shutting down.
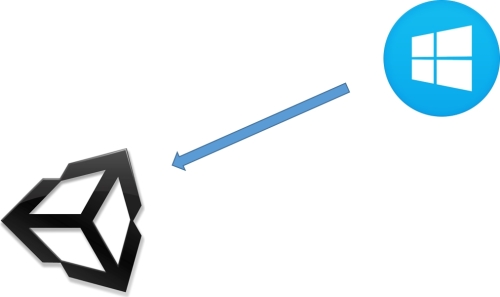
The first and simplest bridge between the platforms is to allow access to your Unity game from a native platform. As you can see in the following diagram, the first challenge is to enable a platform to talk to your Unity package:
On the .NET platforms such as Windows and Windows phone, the following two patterns are used to access the game embedded within the Unity player directly from the host platform:
- The
UnityEnginenamespace from the Unity player - The static classes in your Unity project
Once you have built a project for the .NET platforms, you have a ready-to-run solution.
The player that deploys with the project also gives you indirect access to all the components and game objects within your scenes through the UnityEngine namespace.
For the game objects, you can simply query with the GameObject.Find method, as shown in the following code example:
var _cube = UnityEngine.GameObject.Find("Cube");The preceding code will give you a game object that you can manipulate however you wish to, as if you were in Unity itself.
Alternatively, if you want to access scripts or non-standard content, you will need to cast the objects you search for to use them properly. Refer to the following example:
var mainScript = (MainScript)UnityEngine.GameObject.FindObjectOfType(typeof(MainScript));
This will give you a reference to an instance of a class of the MainScript type in your current scene.
Note
All the functions are not scene aware. So, if you have to access the items in specific scenes, you will need to track that manually through a static property or through events (refer to the next section).
Additionally, if your script is used on several objects in the scene, be sure to perform the search from an instance of an object.
The second method to access your Unity project from .NET platforms (such as Windows) is to expose specific variables outside the confines of your game or app.
To do this, declare a static variable within a class in your project, as shown in the following example:
public class MyExternalCass : MonoBehaviour
{
  public static bool TurnOnAds;
}
Then, from your project, once you have built it, you can access this variable using the following code:
MyExternalClass.TurnOnAds = false;
You will then have the logic in your game to make use of these variables.
If you reverse the previous implementation, there are cases where you need to access a specific behavior on the native platform itself.
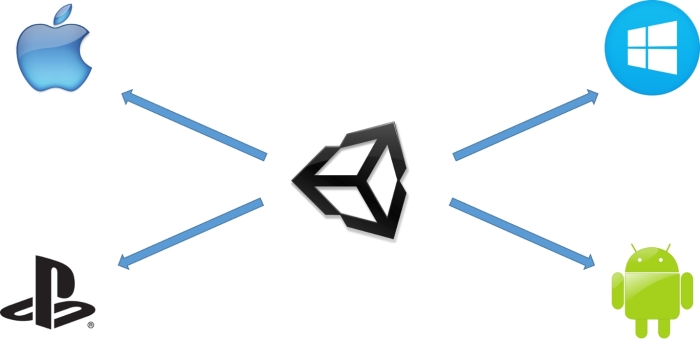
If you need a bit more interactivity from your Unity project, and you wish to enable Unity to communicate directly to the platform, then the following are the two common methods to achieve this:
- Static events (.NET platforms only)
- Plugins
We covered events back in Chapter 5, NPCs and Interactions, to enable a loose coupling between an action and a dependency. We can reuse events to bridge the gap between Unity and the .NET platforms such as Windows and Windows Phone.
We will begin by defining a static event in Unity, which is intended to indicate an action the project needs the native platform to enact:
public static EventHandler PurchaseRequested;
public static void Purchase(string productID)
{
  if (PurchaseRequested != null)
  {
    PurchaseRequested(productID, null);
  }
}
The previous code sets up a delegate that can be used to enact an in-app purchase on the native platform. When requested in code, it tells whatever object is listening that the user wishes to purchase an item in the game.
Then, in the platform project, you will hook up to the delegate to perform the action when the event is raised, for example, on Windows Phone to complete a purchase, you would need to use the following code:
private void Unity_Loaded()
{
  //Hook up the IAP request to platform
  InAppPurchase.PurchaseRequested += PurchaseRequested;
}
private void PurchaseRequested(object sender, EventArgs e)
{
  var ProductId = (string)sender;
  //Purchase requests must be done on UI thread so use dispatcher
  Dispatcher.BeginInvoke(() => PurchaseItem(ProductId));
}

private async void PurchaseItem(string productID)
{
  //Do stuff to purchase the item from the store
}
The code hooks up to the previous PurchaseRequested event in the InAppPurchase class, and when a purchase is requested, it is routed to the UI thread and the item is purchased.
The example is kept simple just to demonstrate one method for your Unity project to communicate with the platform solution.
The only other method to enable the platform features in your Unity project is to create your platform class library and embed that library in your project.
To enable this, Unity has even more special folders in the Assets folders. The root folder of this structure is the Plugins folder, shown as follows:
Plugins(editor plugins)Pluginsx86(Pro only)Pluginsx86_64(Pro only)PluginsAndroidPluginsiOSPluginsBlackBerryPluginsWP8PluginsMetro
Note
On the mobile platforms, Plugins are supported in the free version.
You will need Unity Pro to build plugins for desktop systems (targeted at x86/x64/any CPU).
Plugins are not supported on the current web player for security reasons; there's no information yet whether this will also be true for WebGL in U5.
To enable your plugin to work for each platform, you will need to install it in each of the previous folders per platform.
However, on the .NET platforms, you also need an attritional editor plugin (explained in detail in the next section) that provides the basic interface for your plugin due to the way .NET plugins are compiled.
The editor plugin is just a shell or interface for how your plugin will operate. Unity will use this while in the editor for testing/editing purposes.
The mock interface needs to resemble what your real plugin interface will look like in order for other scripts and code to be able to access the real plugin on each platform.
As a simple example, create a new Class Library project in your code editor (Visual Studio or MonoDevelop), and then create a new C# class (usually, there is a default Class1.cs class created with the class library). You can then define a plugin interface in the new class for the editor that looks like the following code:
namespace MyAwesomePlugin
{
  public class MyPluginClass
  {
    public static string GetPlatform
    {
      get
      {
        return "This is the Editor";
      }
    }
  }
}
This simple class just exposes a static string to return the name of the platform.
For the platform plugin, we will create another Class Library, which targets the level of framework required by the target platform. For example, a Windows 8 (store app) class library for the Windows 8.0 platform.
Then, create a new class (or reuse the default class) and enter the following code:
namespace MyAwesomePlugin
{
  public class MyPluginClass
  {
    public static string GetPlatform
    {
      get
      {
        return "Welcome to Windows 8";
      }
    }
  }
}
As you can see, it has the same namespace, same class name, and same property as our editor class, but now the implementation has changed.
So, we have our editor (mock) and platform (Windows 8) plugins defined; you just need to copy them to your Unity project. Now, perform the following steps:
- Copy the DLL from the Windows 8 class library to
AssetsPluginsMetro. - Copy the DLL from the editor class library in
AssetsPlugins(if required—.NET only).
With your DLLs now in your project, you can access the plugin from anywhere in your Unity project by calling the following code:
string WhatsMyPlatform = MyAwesomePlugin.MyPluginClass.GetPlatform;
When you run the project from the editor, this will return in the following manner:
This is the Editor
However, when you run this on an actual Windows 8 machine, this will return in the following manner:
Welcome to Windows 8
The last integration approach is the one that takes the most effort but can have the most benefit—it also has the advantage of being the most reusable.
If you are running the Pro version of Unity, you can import the native C++ DLLs and their corresponding functionalities into Unity3D. Generally, this is used to access a third-party function library such as Physics and Math or Physics. Some assets on the Asset store also ship with native plugins to enable them to be as fast as possible (and as a by-product, they ensure that you cannot copy their code from a compiled library):
The plugin, once created, should be placed in the Plugins folder mentioned previously, and then called from the code as follows:
[DllImport ("PluginName")]
private static extern float FooPluginFunction ();
This effectively gives you a pointer to the code that will run outside of Unity3D. By calling the previous function, Unity interprets this and passes it on to the external library to process and return from.
The advantage of using the native plugins is mainly speed. You get direct access to a native platform and all the performance boosts it provides. It is by far the most complicated way to enable such features, and deciding on using it would simply come down to if you need that level of power.
In some cases, native plugins are the only way to access the underlying features of a platform, especially if it is a feature that Unity itself does not support.
Additionally, native plugins can be created to be used on all platforms so long as they are not using platform-specific features; in which case, you would still need one plugin per platform.
Tip
One very cool feature with native plugins is that you can even interact with Unity3D's own rendering engine, just in case you feel adventurous and want to spice it up a bit. For more details on this, check out the Unity scripting guide at http://docs.unity3d.com/Documentation/Manual/NativePluginInterface.html.
For more information about the native plugins, refer to the Unity scripting reference guide at http://docs.unity3d.com/Documentation/Manual/Plugins.html.