Usually left as an afterthought or slapped on at the end, menu systems are just as important as your game in most aspects. How the user interacts/starts or walks through all the sections of your game leading to the actual gameplay can radically change how the user feels about your game. There's no point in having a world-beating game if the first thing the user sees on starting your game is a roughly drawn or shabby-looking menu system. The best menu systems I've seen are actually seamlessly built into the game mechanics themselves.
First off, you need to work out the structure of your menu systems in advance; it doesn't need to be heavy, just understand the flow of your game from start to finish and then iterate on that design until it looks impressive and easy to use. The kinds of screens and areas that you need to focus on are covered in the next section.
Splash screens tell the user about you and your brand; it's the first thing they always see. If you animate a splash screen, try to keep it under 3 seconds; a good baseline is to aim for between 1-2 seconds—anything shorter and users won't pay attention, longer and you could just annoy them waiting to start the game.
A big debate I've seen between studios is whether you should allow the user to skip splash screens, and there doesn't seem to be any firm sway either way.
A general piece of advice though is to not allow skipping as it can devalue your brand.
Splash screens can either be separate screens or just fullscreen GUI textures that are drawn using the GUI.DrawTexture function in your menu scripts as follows:
public Texture m_texture;
void OnGUI()
{
    GUI.DrawTexture(new Rect(0, 0, Screen.width, Screen.height),
      m_texture,
      ScaleMode.ScaleToFit,
      true);
}
Either method will work; the direction you take will largely depend on the style of your game.
Plan to have a loading screen in advance. You may not actually use it initially, but when your game runs on lower spec devices, you will find that the loading times will increase, sometimes dramatically. Be prepared!
A good example of a loading scene tutorial can be found at http://chicounity3d.wordpress.com/2014/01/25/loading-screen-tutorial/.
The main menu is the obvious focal point when the player starts your game. Ideally, this should flow in to your game rather than look like a bolt on. Try to use game elements and moving/animated features.
This screen will be the first true impression of your game on the player.
Ensure that the player has a Continue option that returns them to their last point in the game so that they start playing in as few clicks/taps as possible. If you support the saving option, have a Continue button to jump on to the last save. If you use levels, jump on to the next level that they can play.
Don't force the player to wade through mountains of screens just to continue playing. I'm not saying don't have a new button or an option to select levels; just add an additional Continue option so they can jump straight in to the game.
The norm these days is just to have a grid array with masses of numbers plastered across the screen. These aren't bad per se; however, if you want to stand out, think differently. Surprise the player and stylize these screens as much as possible, and animate them and make them exciting/interactive.
Every game usually has an array of settings to control various elements of the game itself. However, don't fall foul of some platform requirements with regards to these.
If you use audio, always have options to control the volume and a quick mute option; you may find you have to set this programmatically on some platforms.
If you use location services, then you must have an option to turn this on or off. It's a mandatory requirement on some platforms. Have a backup plan if the location is not available.
Try and support closed captioning; it is fairly easy to do this, and it means you open up your game to an even wider audience. Then, just have a setting to enable/disable it. Highlight it in your description on the store; you'll get extra credit for this from your users and reviewers.
There are so many games that leave this out. This is not essential by any means, but you can have a page that describes your game studio, the developers, any extra credit for artists, resources, and so on. This screen generally doesn't have to be fancy, but it helps.
In an ever-growing world of security, privacy, and data protection, even if your game doesn't use any online features or store any data about the user, it is still essential to include a privacy policy.
On some platforms, it is becoming mandatory to have your policy stated somewhere in the app/game.
Do not ship your game without some form of privacy policy.
Policies do not have to be extensive, and there are numerous examples of different types of policies out there; a quick search or a good lawyer will put you in good stead.
The following site lists several generators; just pick the one that is right for you to get started:
http://www.applicationprivacy.org/do-tools/privacy-policy-generator/
Like a lot of common screens used throughout your game, from scene to scene, one of the most common panels the player will see is the pause menu.
Whether it is a simple "on hold" screen or a full navigation system, you should take care of how you design it. Some games truly build the pause screen into the game and make it part of the game experience, while others just stop everything and throw up a panel.
Think different and don't just do what is necessary if possible.
Unity provides a delegate that is called when the Unity player receives a Pause event (if the platform supports it), which you can implement in the script as follows:
using UnityEngine;
using System.Collections;

public class ExampleClass : MonoBehaviour {
    public bool paused;
    void OnGUI() {
        if (paused)
            GUI.Label(new Rect(100, 100, 50, 30), "Game paused");

    }
    void OnApplicationPause(bool pauseStatus) {
        paused = pauseStatus;
    }
}
If you are using a state machine (such as in this title), you should then also progress it to a paused state as well.
Generally shown as big lists on screens, these areas are your main way to entice the player to keep playing, whether it's to compete with friends for the highest scores or work toward a number of achievements (for the completionists out there). You should try to make these screens fun and informative. For levels, think about linking it with friends of the player to see how they compete with each other, or offer deals/promotions with what your game has to offer. As per a repeated statement in this chapter, think about what makes your game different and go beyond the norm.
In an ever-increasing social world, games need to react to this and think beyond the boundaries of just the game. Whether you are enabling simple bragging on levels/scores or if you are using social networks to find friends online and suggest games, you have to consider the social link-in with your game to stay competitive.
Not that social integration is the be all and end all, but an ever increasing number of players now actively look for it, so you should consider it at some level.
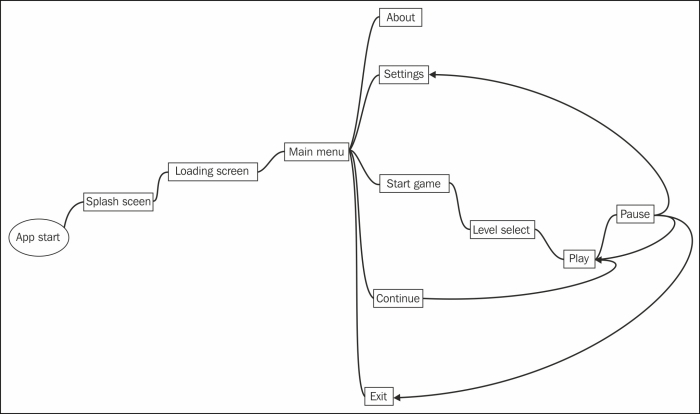
When you have decided on all the screens within your game, the next step is to visualize (before cutting code) how they will all fit together. It doesn't take long and can save you hours of head-scratching later.
You can either grab a piece of paper or download some of the many free tools out there such as Freemind (a Mindmap tool at http://freemind.sourceforge.net/wiki/index.php/Main_Page) and Expression design (now free from MS at http://www.microsoft.com/en-gb/download/details.aspx?id=36180).
In the end, you want to have written down how each screen will connect to each other, what state the game will be in for that transition, and any key information that will need storing to prevent failure (since your game could be closed at any point by the user). At all states (based on how your game is intended to work), the player's current state should be preserved; whether you save it once or progressively will be impacted by how your screens fit together.
The following diagram shows a very simple example in the Mindmap tool of a game screen flow: