
Next up in the fabulous journey of scripting, we will cover the treacherous realm of background tasks. We use the background tasks to start something (in the background) so that it is runs independently of the normal game update and draw cycle.
Note
Coroutines, by default, do not run the same thread as the normal game loop. If you are not careful, they can stop your game from running. (You can dispatch them on to separate threads in Unity Pro to offset the work in order to improve the performance.)
For more information on Coroutines and the default execution order of methods, refer to the article in the Unity docs at https://docs.unity3d.com/Documentation/Manual/ExecutionOrder.html.
The following diagram shows that we can have a second process that runs alongside our main game:
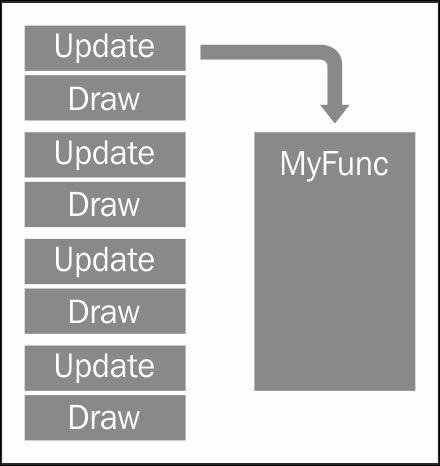
This is usually used for systems that are continually running and not for the main events on the screen, such as AI, a background trading system, or even a continual web-service-gathering data for the game.
Unity also has the ability to synchronize these background threads with a simple function that pauses the operation (or returns the control back to Unity). This is until the next frame of the game is drawn (WaitForEndOfFrame or WaitForFixedUpdate), which gives you a pattern like the following screenshot:
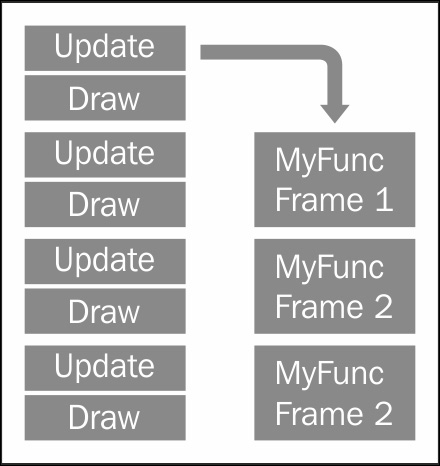
The benefit of this is that you can wait for the last update or draw a cycle to finish before running your process. You might do this if you want to render what is drawn on the screen to an image and either save it to a disk or upload it to a web service or website.
The Unity documents provide a good example of using this behavior; you can find them at https://docs.unity3d.com/Documentation/ScriptReference/WaitForEndOfFrame.html.
The proper way to implement long-running tasks in Unity is through the use of a feature called Coroutines. In simple words, Coroutines are Unity's way of launching code in the background, but they do have a few caveats and features around them though.
At their core, Coroutines are just normal methods, but they are implemented using a particular generic interface named IEnumerator as their return type. This enables Unity to track the method's state through several iterations (runs).
To create a basic Coroutine, you simply need to set up the method as shown in the following code:
IEnumerator MyCoroutine()
{
  //Do something
  //Then return
  yield return null;

}
This would create a simple single-use Coroutine that would perform a single function, and when it's finished, it will die and go away.
A more common pattern is to have a loop of some kind within the function that will not finish until some condition is met; this is done by either using a while or for loop as follows:
IEnumerator MyCoroutine (){
  bool complete = false;
  while (!complete)
  {
    //Do some repetitive task
    //When done set complete to true

    //Then return control after each step
    yield return null;
  }
}
The preceding code will simply run in the background until the condition is met; for example, a timer that is counting down should stop when it reaches 0.
The Coroutines and IEnumerator feature are perfectly valid, but C# added a new operator in Version 2 (Unity now supports V4) called the yield operator. The yield operator suspends the current method on the current instruction line until the operation is complete; however, it also allows the CPU to continue in between each result that is returned by the called method or the instruction. The following example will pause the loop for two seconds in between the iterations while retuning the control back to the process.
Here's an example; say we have a function to print 10 lines:
IEnumerator Print10Lines()
{
  for (int i = 0; i < 10; i++)
  {
    print("Line" + i.ToString());
    yield return new WaitForSeconds(2);
  }
}
When the preceding code runs, it will simply loop 10 times, and each time it will print out the line number. However, before continuing, it will wait for 2 seconds.
There are actually two types of Coroutines (it is best to think of them in that way, even though they are actually the same thing): those that are just launched (fire and forget) and those that can be managed. The difference is just in the way they are called. The fire and forget Coroutine functions are simply called by using the following code:
StartCoroutine(MyCoroutine()); //or
StartCoroutine(MyCoroutine(MyParameter)); //to use parameters
In the preceding code, the MyCoroutine function is started using the delegate method. Once started, it will not finish until either the function ends or StopAllCoroutines() is called. Now, start the Coroutine using the following code:
StartCoroutine("MyCoroutine"); //or
StartCoroutine("MyCoroutine", myParameter); //to use parameters
In the preceding code, you specify the name of your Coroutine function and the method's name using a string. This enables you to stop the Coroutine from running anytime (and from anywhere) using the following code:
StopCoroutine("MyCoroutine");The invocation path is something to be kept in mind. You might ask why not just use the second method all the time. The answer is simple. Unity has to use slower methods to discover the method it needs to track when you provide the Coroutine's name as a string; just passing the method's name is quicker and smoother. The best advice would be to use each type according to its strengths. Only use the string launch method when you need to manage a background task and use the method names when it is a short-lived function that is solely aimed at accomplishing a single task. For everything else, just weigh up the pros and cons of each approach as you implement it.
Coroutines can be powerful additions to the arsenal of your game's framework, but they need to be implemented wisely; too many additions to your game (obviously) will just grind to a halt. If you only ever use the fire and forget Coroutines, you won't be able to stop them without shutting down all the rest as well (including those you started by naming them as a string).
So now that we understand how we call Coroutines, to make the Print10Lines method described earlier, we will call it as follows:
void Example1()
{
  StartCoroutine(Print10Lines());
  print("I started printing lines");
}
As explained, the preceding code will kick off the Print10Lines function and then continue forward while the routing to print the lines continues simultaneously. On the other hand, the following code will print 10 lines, and only after it is finished will it continue and notify you that printing has finished:
IEnumerator Example2()
{
  yield return StartCoroutine(Print10Lines());
  print("I have finished printing lines");
}