
You have a game; it looks good, plays well, and everyone loves it. The only problem is that it is still not a finished project.
In this chapter, we will look at how we can extend Unity to help make the content easier and better, and finally, package up the game and surround it with menus and other features that will make it whole.
As they say, the finishing of a project can take up to 80 percent of the time needed to polish it. Be warned! This is usually right. To wrap up, we will cover the tricky art of persisting the player's data as they play both on the device and on the cloud.
The following topics will be covered in this chapter:
- The editor and how to make the most out of it
- Packaging your game with menus and additional screens
- Saving, loading, and persistence for your game
Everyone who uses Unity knows about the editor. It's the core place where you will spend a great deal of time putting your game together. You will spend the rest of your time in the choice of your code editor, patching things together, adding values, and working around with what most see as limitations of the editor itself. This, however, is not the case.
The people at Unity realized early that they couldn't do everything, since everyone wanted something different or little tweaks here and there; if they had tried to do everything, nothing would have ever left their doors.
So, from the ground up, Unity was designed to be extensible, and they exposed much of what is needed to build your own editor in effect within Unity itself.
If you browse the asset store (https://www.assetstore.unity3d.com/en), you will see a lot of assets that take advantage of this, and they have produced some really snazzy bolt-ons for the editor. These can reduce the need to code and just build things using the editor GUI.
These aren't magical things and don't even require low-level C++ coding to achieve (although some do). You can update your editor to fix your game very easily, and you can do this in any of the languages that Unity supports.
The scripting framework behind the editor is broken up into several distinct layers that can be combined to give you almost any effect you need to build your content.
The editor only has a basic way of looking at the properties in the Inspector pane based on the classes and objects used in your game. If you are using an existing Unity class, such as a string, color, or curve, Unity already has readymade property drawers (or visual handles) to manage these with their own editor windows in some cases (such as the curve editor). The majority of these are also built on the extensible framework that Unity exposes and is available to you as well.
Other classes such as vectors and numbers have a basic implementation, which is usually fine, but sometimes you would just prefer it in a different way.
This is where the property drawers come in. They can either replace the existing property viewer for a single field or for a type of object entirely. If you want a slider to alter a value between two values, add a PropertyDrawer attribute to the property to show a slider instead of just int or float as follows:
[Range (0, 100)]
public float health = 100;
The preceding code example shows a range slider instead of a single float value as you can see here:

Tip
For a more advanced example, check out the post on the Unity blog, which shows several different patterns to use your property drawers and even create them. The post is available at http://blogs.unity3d.com/2012/09/07/property-drawers-in-unity-4/.
While building the property drawers, you will use the EditorGUI controls to draw the elements on the screen. The EditorGUI class provides a rich collection of controls that can be used. For the list of available controls, visit https://docs.unity3d.com/Documentation/ScriptReference/EditorGUI.html.
For more information on property drawers, see the Unity reference guide at https://docs.unity3d.com/Documentation/ScriptReference/PropertyDrawer.html.
Tip
If you want to see some more creative uses of the property drawers, check out the simple little GitHub repository at https://github.com/tenpn/ChestOfPropertyDrawers.
Using the Entity script in AssetsScriptsClasses, let's see the effect of adding some simple property drawers to our NPCs in the Inspector pane (because the NPC class is derived from the Entity class).
Starting simply, we can decorate some of the properties of the Entity class in our game with the Range attribute by adding the following code to the Entity class:
public string Name;
[Range(10, 100)]
public int Age;
public string Faction;
public string Occupation;
[Range(1, 10)]
public int Level;
The preceding code has the following effect on the editor inspector:
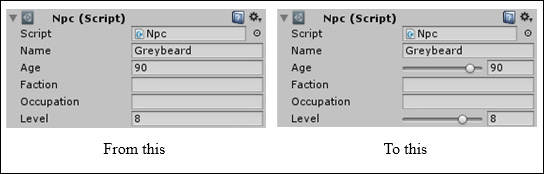
This just makes it easier to manage your settings and makes it a little prettier to look at. Now, let's look at something that is a little more complicated.
Creating your own property drawer is certainly a bit more advanced. However, once you have learned the basics, it is quite easy to build your own.
For this example, we will create a simple pop up that takes an array of values for the possible selection, as shown here:
First, we need a property type or attribute that we want to control. This could be a set of parameters (such as the Range property, which has a beginning and an end), a validation string, or even an enumeration.
So, create a new folder named Properties in AssetsScriptsClasses. Then, create a new C# script named PopupAttribute in the Properties folder and replace its contents with the following code:
using UnityEngine;
public class PopUpAttribute: PropertyAttribute
{
  public string[] value;
  public PopUpAttribute(params string[] input)
  {
    value = input;
  }
}
Note that your property class must be derived from the PropertyAttribute class, and it must have a constructor with the same number of parameters required for your attribute (for example, the Range attribute has two int values).
With the property in place, we can now add our custom property drawer code. Unlike the property we just created, this does have to live in the special Editor folder.
So, create a new folder named PropertyDrawers in AssetsScriptsEditor and create a new script named PopUpCustomPropertyDrawer, replacing its contents with the following code:
using UnityEditor;
using UnityEngine;

[CustomPropertyDrawer(typeof(PopUpAttribute))]
public class PopUpCustomPropertyDrawer : PropertyDrawer {

  PopUpAttribute popUpAttribute {
    get { return ((PopUpAttribute)attribute); } }
}
The preceding code gives us the basic framework for our custom property drawer (the public property I've added isn't mandatory, but provides quick and easy access to the underlying property type we are enabling). Next, we need to add the OnGUI function that will draw our custom property UI using the following code:
public override void OnGUI(Rect position, SerializedProperty prop, GUIContent label)
{
  if (prop.propertyType != SerializedPropertyType.String)
  {
    throw new UnityException("property " + prop + " must be string to use with PopUpAttribute ");
  }

  var popupRect = EditorGUI.PrefixLabel(position, GUIUtility.GetControlID(FocusType.Passive), label);

  var currentItem = prop.stringValue;
  var currentIndex = popUpAttribute.value.Length - 1;
  for (; currentIndex >= 0; currentIndex--)
  {
    if (popUpAttribute.value[currentIndex] == currentItem)
      break;
  }

  int selectedIndex = EditorGUI.Popup(popupRect, currentIndex, popUpAttribute.value);
  prop.stringValue = selectedIndex < 0 ? "" : popUpAttribute.value[selectedIndex];
}
Walking through the preceding script is quite simple; it is described as follows:
- The class is decorated with a
CustomPropertyDrawerattribute and the type of class it is targeted at. - As stated, the class is derived from the
PropertyDrawerclass. - A helper property (
popUpAttribute) gets the correct type of class from the attribute property of thePropertyDrawerbase class (optional). - We override the
OnGUIfunction for the property drawers. - We then check whether the target property (the variable you will attach this to) is of the correct type (in this case, a string). It returns
UnityExceptionif it is not correct. - A
Rectvariable is defined for where we want to draw the output from our property drawer (a requirement to use theEditorGUI.Popupcontrol). - We get the current value for the property we are attached to and compare it with the possible values for the item. We do this only because we have a list of options and need to know which the current one is. For other types, this may not be needed.
- We draw a pop-up control using the
EditorGUI.Popupcontrol. - Lastly, we set the property we are attached to with the value the user has selected.
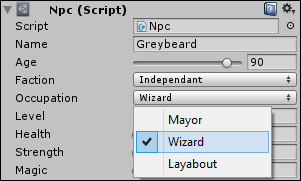
With the property and our custom property drawer in place, we can decorate the variables in our class to achieve the result I pictured earlier, as follows:
public string Name;
[Range(10, 100)]
public int Age;
[PopUp("Imperial", "Independant", "Evil")]
public string Faction;
[PopUp("Mayor", "Wizard", "Layabout")]
public string Occupation;
[Range(1, 10)]
public int Level;
It may seem like a lot of fuss. However, once it's complete, you can tune the Unity editor to work for you more efficiently.
Say you want to control the entire scope of a single class or ScriptableObject; this is where CustomEditor scripts come in.
They can be used against any script that can be attached to a game object to alter how it works in the Unity editor inspector.
As an example of these (the best way to show custom editors is through code), we will add some functionality to a camera to provide us with better control over it in a scene.
First, we'll need a very simple camera script that will point the camera to a specified target, starting at 0, 0 ,0. So, create a new script named CameraLookAt in AssetsScripts and replace its contents with the following code:
using UnityEngine;

public class CameraLookAt : MonoBehaviour
{
  public Vector3 cameraTarget = Vector3.zero;

  void Update()
  {
    transform.LookAt(cameraTarget);
  }
}
We can then define a CustomEditor script that will be run by the editor whenever it detects a game object with the script attached to it.
So, create a new C# script called CameraTargetEditor in AssetsScriptsEditor in your project and replace its contents with the following code:
using UnityEngine;
using UnityEditor;

[CustomEditor(typeof(CameraLookAt))]
public class CameraTargetEditor : Editor
{
    public override void OnInspectorGUI()
    {
        CameraLookAt targetScript = (CameraLookAt)target;

        targetScript.cameraTarget =
          EditorGUILayout.Vector3Field ("Look At Point",
            targetScript.cameraTarget);
        if (GUI.changed)
            EditorUtility.SetDirty(target);
    }
}
This script doesn't do much yet; we now have a Vector3 handle in our script that displays the position of the camera's target (the specific point it is looking at). What is very nice here is that you can edit the values and the camera will automatically transform itself to look at the new point. To demonstrate this, create a new scene named EditorDemos in AssetsScenes and attach the CameraLookAt script to Main Camera. If you then select the Main Camera game object in the hierarchy, you will see the following settings in the Inspector pane:
This is a lot easier than messing with the rotation values of the ordinary camera. Let's continue to add more functionalities that will blow your mind.
To make it even more useful, we can also represent this selection in the scene view as a control handle. To do this, we simply add another function to our CameraTargetEditor CustomEditor script; add the following OnSceneGUI function to the script:
void OnSceneGUI()
{
CameraLookAt targetScript = (CameraLookAt)target;
targetScript.cameraTarget = Handles.PositionHandle(
targetScript.cameraTarget, Quaternion.identity);
if (GUI.changed)
EditorUtility.SetDirty(target);
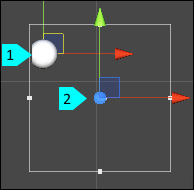
}Just as the OnGUI method draws in to your game, this function will draw in to the editor scene. Using the Handles.PositionHandle control, it will draw a regular handlebars control in the scene at the point you have specified, in this case, the camera's look-at target, as seen here:

Camera Target (1) and Camera Transform (2)
Want more?? You can then alter how the handlebars will look on the screen with the following code:
void OnSceneGUI()
{
    CameraLookAt targetScript = (CameraLookAt)target;

    targetScript.cameraTarget = Handles.PositionHandle(
targetScript.cameraTarget, Quaternion.identity);
    Handles.SphereCap(0, targetScript.cameraTarget,
Quaternion.identity, 2);
    if (GUI.changed)
        EditorUtility.SetDirty(target);
}
As shown in the following screenshot, this simply alters the handlebars we are drawing, decorating them with a sphere. There are several other options as well should you choose to explore them.
(1) Camera Target Sphere, (2) Camera Transform
Tip
For more information about custom editors, see the Unity reference guide at http://docs.unity3d.com/Documentation/ScriptReference/Editor.html.
For more information about handles and what you can do with them, see the Unity reference guide at http://docs.unity3d.com/Documentation/ScriptReference/Handles.html.
Quite simply, Unity editor windows are just separate containers for collections of editor GUI controls. These windows are a more advanced version of the property drawers described previously, and as such use a different set of custom controls.
The Inspector, Game, and Scene windows, and in fact, pretty much every other dockable window in the Unity editor, are editor windows. In fact, they are all built in the same way using the same scripting framework.
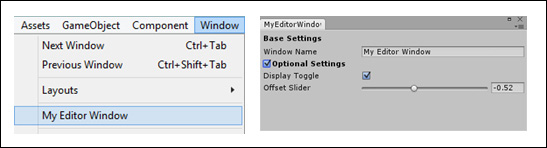
To implement your own editor window, you simply need to create a class that is derived from EditorWindow instead of MonoBehaviour. The script must also live in the special Editor folder within the project structure, so create a new script called MyEditorWindow in AssetsScriptsEditor, as follows:
using UnityEditor;
using UnityEngine;

public class MyEditorWindow : EditorWindow
{
String windowName = "My Editor Window";
bool groupEnabled;
bool DisplayToggle = true;
float Offset = 1.23f;

}
I've added some properties to give some depth to the example.
With your new window in place, you then need to implement a function to display the window when it is called inside the new MyEditorWindow class:
[MenuItem ("Window/My Window")]
public static void ShowWindow ()
{
    EditorWindow.GetWindow(typeof(MyEditorWindow));
}
It doesn't matter what the preceding function is called; it's just an editor reference attribute attached to the function that shows where the option will appear in the Unity editor menu.
If you want more control over the size and position of your editor window, instead of using the preceding GetWindow function, you can use the following GetWindowWithRect function:
[MenuItem ("Window/My Window")]
public static void ShowWindow ()
{
    EditorWindow.GetWindowWithRect(typeof(MyEditorWindow),
      new Rect(0, 0, 400, 150));
}
This will set the position and size of the window to a fixed point on the screen, but as with all other editor windows, it can then be resized and docked like any other window. This method is more useful to display a collection of properties in the scene view to edit nodes or other position-based visual configuration.
Lastly, you need some GUI code. This is pretty much the same as the normal GUI code, but with a few editor extensions because it is being drawn in the editor. This goes in to an OnGUI method, for example:
void OnGUI()
{
    // Your custom Editor Window GUI code
    GUILayout.Label("Base Settings", EditorStyles.boldLabel);
    windowName = EditorGUILayout.TextField("Window Name",
      windowName);

    groupEnabled =
      EditorGUILayout.BeginToggleGroup("Optional Settings",
        groupEnabled);

    DisplayToggle =
      EditorGUILayout.Toggle("Display Toggle", DisplayToggle);

    Offset = EditorGUILayout.Slider("Offset Slider",
      Offset, -3, 3);
    EditorGUILayout.EndToggleGroup();
}
The preceding example will show the following menu window:
When you put GUI elements together in an editor window, you can use either the basic EditorGUI controls or the more advanced EditorGUILayout controls, which implement some additional automatic layout features on top of the basic controls.
Tip
For more details on the controls available with EditorGUILayout, check out the Unity reference at https://docs.unity3d.com/Documentation/ScriptReference/EditorGUILayout.html.
For more information on editor windows, see the Unity reference guide at https://docs.unity3d.com/Documentation/ScriptReference/EditorWindow.html.
With custom editors, you could also have handles to represent a control in the scene view, extending the Inspector features in to the scene.
We also have another way to have class-based features that are only available in the editor through the use of Gizmos.
Gizmos offer a much richer graphical way to add visual elements to the scene to aid the use of a class, unlike custom editors, which are only added to your base class that the editor will then make use of.
For example, we can amend the CameraLookAt script we created earlier and make it draw a Gizmo line from the camera to the target's look-at point by adding the following code to the script:
void OnDrawGizmos()
{
    Gizmos.color = Color.yellow;
    Gizmos.DrawLine(transform.position, cameraTarget);
}
The code produces the result as follows:

Now, when you return to the editor and move the look-at point or the camera, there will be a yellow line drawn between them.
If you don't want the Gizmo drawn all the time, you can also track when the user has the Gizmo selected using the OnDrawGizmosSelected method, as follows:
void OnDrawGizmosSelected()
{
    Gizmos.color = Color.red;
    Gizmos.DrawLine(transform.position, cameraTarget);
}
Now when the game object the script is attached to is selected in the editor, the line will be drawn in red instead of yellow. Alternatively, just use the OnDrawGizmosSelected function on its own to only draw a line when selected.
Tip
For more information on Gizmos, see the Unity reference guide at http://docs.unity3d.com/Documentation/ScriptReference/Gizmos.html.
For fantastic additional resources and tutorials, check out the article on CatLike Coding's blog at http://catlikecoding.com/unity/tutorials/editor/star/.
Or, you can check out the excellent Gimzo-driven design tutorial at http://code.tutsplus.com/tutorials/how-to-add-your-own-tools-to-unitys-editor--active-10047.
Another way of extending in to the editor is to customize it by adding your own menus. We covered little bits of this in previous chapters by adding extra options to create your assets and such, but there is much more to it.
The main way of adding a new menu item is to define a script in AssetsScriptsEditor and append the MenuItem attribute to a static method within it. So, create a new script called MyMenu in this folder and replace its contents with the following code:
using UnityEditor;
using UnityEngine;
public class MyMenu
{
    // Add a menu item named MenuItem1 to a Menu option called
    // MenuName in the menu bar.
    [MenuItem ("MenuName/MenuItem1")]
    static void EnableMyAwesomeFeature ()
    {
        Debug.Log ("I am a leaf on the wind. Watch how I soar.");
    }
}
This code simply creates a new top-level menu option called MenuName with a single item called MenuItem1, as shown here:

From here, you can execute whatever you need to.
We can extend this further by adding a validation logic method to support a MenuItem attribute. This controls whether the menu option is enabled or not.
For this, you need to create a pair of the following items:
- A menu item
- A menu item validator
Note
The menu item and the menu item validator must have the same menu path. So, if the menu item (as declared previously) is [MenuItem ("MenuName/MenuItem1")], the validator must have the same menu definition as follows:
[MenuItem ("MenuName/MenuItem1", true)]Validators do not add menu items. They only extend or validate the existing menu items.
So, using the menu item we just added earlier, we can add a validator menu function. It must have a return type of bool and an additional flag set against the function attribute, as follows:
[MenuItem ("MenuName/MenuItem1", true)]
static bool CheckifaGameObjectisselected() {
    // Return false if no transform is selected.
    return Selection.activeTransform != null;
}
This simple validator just checks whether you have a game object selected in the editor; if not, then MenuItem1 is disabled.
This new validation function is evaluated by the editor whenever it displays the menu item of the same name. By setting the bool flag at the end of the MenuItem attribute, it tells the editor that this function provides the validation logic for a MenuItem attribute of the same name. Then, the editor will enable or disable that MenuItem attribute based on the return of the validator function.
If you add % and a letter to the end of your MenuItem attribute, Unity will also enable a shortcut key for that letter.
So, %g would enable a shortcut of Ctrl + G on Windows and cmd + G on a Mac.
For example, add a new function to our MyMenu script as follows:
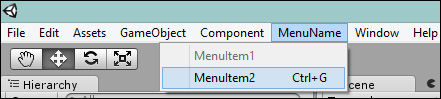
[MenuItem ("MenuName/MenuItem2 %g")]
static void EnableMyOtherAwesomeFeature()
{
    Debug.Log ("Find my key and win the prize - g");
}
This will show us an additional option with the shortcut defined, as you can see here:
The last bit of trickery you can perform is to add menu items to the existing features of Unity, even Inspector.
You do this with a custom name for the MenuItem attribute and a different signature for the function. So, we add the following method to our MyMenu script:
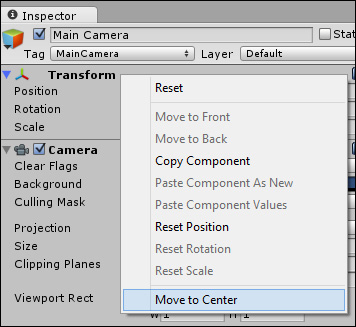
[MenuItem("CONTEXT/Transform/Move to Center")]
static void MoveToCenter(MenuCommand command)
{
    Transform transform = (Transform)command.context;
    transform.position = Vector3.zero;
    Debug.Log("Moved object to " +
      transform.position + " from a Context Menu.");
}
The preceding script attaches itself to any transform component (in this case, the Inspector pane). Then, when it is run, the parameter on the function receives the instance of the object it was run on and lets you interrogate or alter it, resulting in the following screenshot:
The structure of the special MenuItem name is as follows:
Note
You can just add extra dimensions/children to context menus by adding additional "/" characters.
However, if there is an error or the depth of your menus is too deep, Unity won't show the error; it just won't display the menu item (leaving you scratching your head). If this happens, try setting a shorter or different menu name.
Context menus can be added to just about any object/component in the Unity editor, including your own objects.
Tip
For more information on the MenuItem class and its use in Unity Editor, see the Unity scripting reference guide at https://docs.unity3d.com/Documentation/ScriptReference/MenuItem.html.
The last little tidbit you should be aware of surrounds scripts and their execution.
If you put a script in the Editor folder, it will be executed when you are in the editor. However, what about all your other scripts?
Sure you can run the game and see the script running, but that doesn't help you when you are in the editor. What if you want to see the effect of your script while manipulating game objects in your scene? If you are using GUI controls, this becomes even more critical when you are trying to place controls on the screen.
Thankfully, there is a way to force the editor to run your script, and all it takes is yet another attribute called ExecuteInEditMode added to your class. To show this, let's open the CommandBar script under AssetsScripts in our project and add the [ExecuteInEditMode] attribute to that class as follows:
using UnityEngine;
using System.Collections;

[ExecuteInEditMode]
public class CommandBar : MonoBehaviour
{
Now when you open up the Battle scene, CommandBar will always be drawn as shown here:
Note
If you are applying this to the GUI that repositions itself to the scene like with CommandBar, the visual aspect you see in the editor may not be the same as when the game is running. So, things may position differently. You either manage it in the code or live with it in the editor; it's up to you.
If you have portions of your script that rely on other components that may not be active in the editor, be sure to check for null references in your code to avoid nasty errors in the console that may lead you down a dark path.
For example, in the CommandBar script, we need to have null checking on the MessagingManager calls and the SetPosition function, which have been updated in the sample app.
Also, any calls to Static classes in the OnDestroy method may generate errors/warnings when they are run in the editor; so just be aware!
There is always more than one way to cut the cheese as they say, and so too it is with Unity. Some more advanced options to run the scripts in the editor include the following methods.
Another advanced feature with the editor is to make use of the [InitialiseOnLoad] attribute. What this attribute does is run whatever class or script it is attached to when the editor opens or when a build event occurs (such as after you edit a script or run the project). Most developers use this for tracking purposes or to have background processes run whenever something is changed. This is especially useful if you have some level data stored in a custom file and need to regenerate a scene or level based on that configuration.
It is recommended that you combine the use of the [InitialiseOnLoad] attribute together with a static constructor to ensure the script will run before any other scripts in the scene or project.
Tip
If you are loading resources in an [InitialiseOnLoad] class, beware that the filesystem may not be initialized when the script starts. It's recommended you delay it until the first editor update (using the following method). For more details, check out the detailed post at http://bit.ly/InitiliseOnLoadResources.
The editor, like a lot of things in Unity, also comes adorned with several callbacks to mark when things happen. Exposed through the EditorApplication class, you can gain access to the following events:
These events can be added to any class/script in your Editor project folder, so you can hook up a functionality to run when these events occur using the following syntax. For example, let's employ the following methods in an editor script to fire whenever we change the project's hierarchy:
void OnEnable()
{
    // Event / delegate registration, usually put in the OnEnable
    //or other function
    EditorApplication.hierarchyWindowChanged += HierarchyWindowChanged;
}

//callback function for when event occurs
void HierarchyWindowChanged()
{
    //Scan hierarchy for new items
    //If found add something to the editor window
}

void OnDestroy()
{
    // Don't forget to unregister the delegate when it goes out of
    //scope or is not needed
    EditorApplication.hierarchyWindowChanged -= HierarchyWindowChanged;
}
This gives your editor scripts the ability to react to whatever the editor does by attaching to the hierarchyWindowChanged event when the script is enabled (making sure to unattach it when the script is disabled).
In more advanced cases, you can build a framework that combines with the previous approaches effectively to create a complete editor manager. This needs to be implemented in a class with a static constructor so that it is initialized as soon as the editor starts.
To demonstrate this, let's create a simple script that will save the scene for us when we hit the play button. First, create a new script called SaveSceneOnPlay in AssetsScriptsEditor and replace its contents with the following code:
using UnityEditor;
using UnityEngine;
[InitializeOnLoad]
public class SaveSceneOnPlay
{
    // Static class constructor,
    // this is initialized as soon as Unity Starts
    static SaveSceneOnPlay()
    {

    }
}
This gives us the framework for an [InitializeOnLoad] script that will run when Unity starts. Then, we add our static function to do the work of saving the scene:
static void SaveSceneIfPlaying()
{

    if (EditorApplication.isPlayingOrWillChangePlaymode &&
      !EditorApplication.isPlaying)
    {

        Debug.Log("Automaticly saving scene (" +
          EditorApplication.currentScene +
            ") before entering play mode ");

        EditorApplication.SaveAssets();
        EditorApplication.SaveScene();
    }
}
This method checks whether the editor is about to change the play state and is not being played currently; if this is the case, then it saves the current changed assets and the current scene.
Next, we hook up this function with the playmodeStateChanged event delegate in the static constructor as follows:
static SaveSceneOnPlay()
{
    EditorApplication.playmodeStateChanged += SaveSceneIfPlaying;
}
Now, with this script in our project, whenever we hit play, the script will automatically save the project for us.