
So our camera follows our player, but our hero can still walk off the screen and keep going forever, so let us stop that from happening.
As you saw in the preceding section, you can use Unity's camera logic to figure out where things are on the screen. You can also do more complex ray testing to check where things are, but I find these are overly complex unless you depend on that level of interaction.
The simpler answer is just to use the native Box2D physics system to keep things in the scene. This might seem like overkill, but the 2D physics system is very fast and fluid, and it is simple to use.
We already added the physics components, Rigidbody 2D (to apply physics) and a Box Collider 2D (to detect collisions) to the player in Chapter 2, Building a Character. So, we can make use of these components straight away by adding some additional collision objects to stop the player running off.
To do this and to keep things organized, we will add three empty game objects (either by navigating to GameObject | Create Empty, or by pressing Ctrl + Shift +N) to the scene (one parent and two children) to manage these collision points, as shown in the following screenshot:
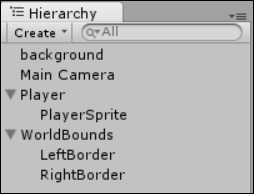
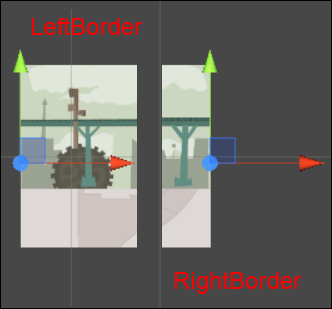
I've named them WorldBounds (parent) and LeftBorder and RightBorder (children) for reference. Next, we will position each of the child game objects to the left- and right-hand side of the screen, as shown in the following screenshot:
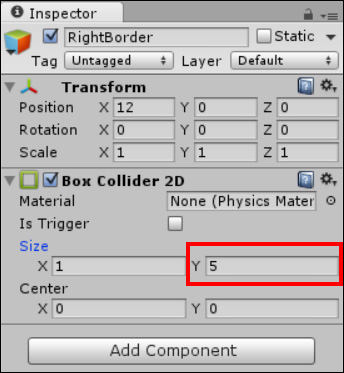
Next, we will add a Box Collider 2D to each border game object and increase its height just to ensure that it works for the entire height of the scene. I've set the Y value to 5 for effect, as shown in the following screenshot:
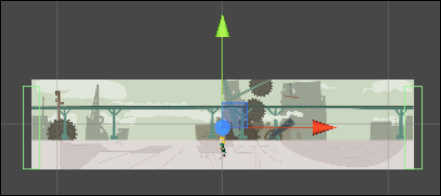
The end result should look like the following screenshot with the two new colliders highlighted in green:
If you run the project now, then our hero can no longer escape this town on his own. However, as we want to let him leave, we can add a script to the new Boundary game object so that when the hero reaches the end of the town, he can leave.
Now that we have collision zones on our town's borders, we can hook into this by using a script to activate when the hero approaches.
Create a new C# script called NavigationPrompt, clear its contents, and populate it with the following code:
using UnityEngine;

public class NavigationPrompt : MonoBehavior {

  bool showDialog;

  void OnCollisionEnter2D(Collision2D col)
  {
    showDialog = true;
  }

  void OnCollisionExit2D(Collision2D col)
  {
    showDialog = false;
  }
}
The preceding code gives us the framework of a collision detection script that sets a flag on and off if the character interacts with what the script is attached to, provided it has a physics collision component. Without it, this script would do nothing and it won't cause an error.
Next, we will do something with the flag and display some GUI when the flag is set. So, add the following extra function to the preceding script:
void OnGUI()
{
if (showDialog)
{
//layout start
GUI.BeginGroup(new Rect(Screen.width / 2 - 150, 50, 300, 250));
//the menu background box
GUI.Box(new Rect(0, 0, 300, 250), "");
// Information text
GUI.Label(new Rect(15, 10, 300, 68), "Do you want to travel?");
//Player wants to leave this location
if (GUI.Button(new Rect(55, 100, 180, 40), "Travel"))
{
showDialog = false;
// The following line is commented out for now
// as we have nowhere to go :D
//Application.LoadLevel(1);}
//Player wants to stay at this location
if (GUI.Button(new Rect(55, 150, 180, 40), "Stay"))
{
showDialog = false;
}
//layout end
GUI.EndGroup();
}
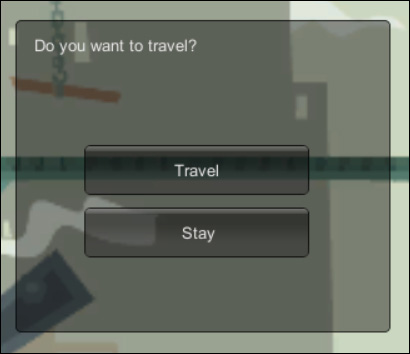
}The function itself is very simple and only activates if the showDialog flag is set to true by the collision detection. Then, we will perform the following steps:
- In the
OnGUImethod, we set up a dialog window region with some text and two buttons. - One button asks if the player wants to travel, which would load the next area (commented out for now as we only have one scene), and close the dialog.
- One button simply closes the dialog if the hero didn't actually want to leave. As we haven't stopped moving the player, the player can also do this by moving away.
If you now add the NavigationPrompt script to the two world border (LeftBorder and RightBorder) game objects, this will result in the following simple UI whenever the player collides with the edges of our world:
We can further enhance this by tagging or naming our borders to indicate a destination. I prefer tagging, as it does not interfere with how my scene looks in the project hierarchy; also, I can control what tags are available and prevent accidental mistyping.
To tag a game object, simply select a Tag using the drop-down list in the Inspector when you select the game object in the scene or project. This is shown in the following screenshot:

If you haven't set up your tags yet or just wish to add a new one, select Add Tag in the drop-down menu; this will open up the Tags and Layers window of Inspector. Alternatively, you can call up this window by navigating to Edit | Project Settings | Tags and layers in the menu. It is shown in the following screenshot:
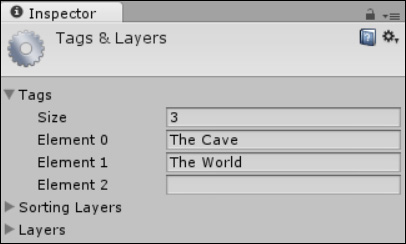
As you can see from the preceding screenshot, I have entered two new tags called The Cave and The World, which are the two main exit points from our town.
Once these are set up, just return to the Inspector for the two borders, and set the right one to The World and the left to The Cave.
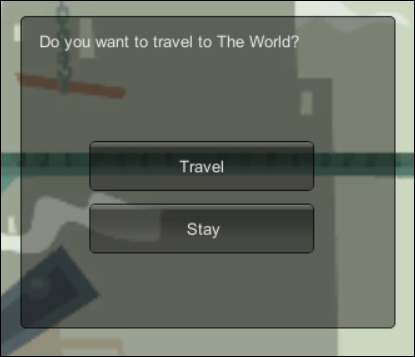
Now, I was quite specific in how I named these tags, as you can now reuse these tags in the script to both aid navigation and also to notify the player where they are going. To do this, simply update the Do you want to travel to line to the following:
//Information text
GUI.Label(new Rect(15, 10, 300, 68), "Do you want to travel to " +   this.tag + "?");
Here, we have simply appended the dialog as it is presented to the user with the name of the destination we set in the tag. Now, we'll get a more personal message, as shown in the following screenshot:
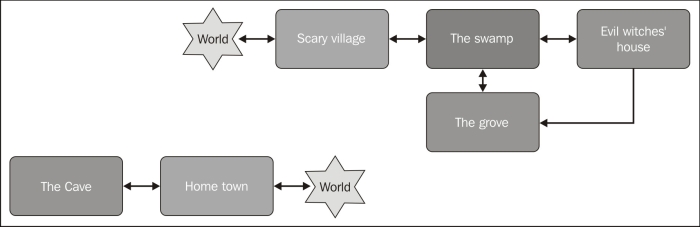
Now for small games, the preceding implementation is fine; however, if you are planning a larger world with a large number of interactions, provide complex decisions to prevent the player continuing unless they are ready.
As the following diagram shows, there are several paths the player can take and in some cases, these is only one way. Now, we could just build up the logic for each of these individually as shown in the screenshot, but it is better if we build a separate navigation system so that we have everything in one place; it's just easier to manage that way.
This separation is a fundamental part of any good game design. Keeping the logic and game functionality separate makes it easier to maintain in the future, especially when you need to take internationalization into account (but we will learn more about that later).
So, by separating out the core decision making functionality out of the prompt script, we can build the core manager for navigation. Its primary job is to maintain where a character can travel and information about that destination.
First, we'll update the tags we created earlier to simpler identities that we can use in our navigation manager (update The Cave to Cave01 and The World to World).
Next, we'll create a new C# script called NavigationManager in AssetsScripts, and then replace its contents with the following lines of code:
public static class NavigationManager
{


  public static Dictionary<string,string> RouteInformation = new Dictionary<string,string>()
  {
    { "World", "The big bad world"},
    { "Cave", "The deep dark cave"},
  };

  public static string GetRouteInfo(string destination)
  {
    return RouteInformation.ContainsKey(destination) ? RouteInformation[destination] : null;
  }

  public static bool CanNavigate(string destination)
  {
    return true;
  }

  public static void NavigateTo(string destination)
  {
    // The following line is commented out for now
    // as we have nowhere to go :D
    //Application.LoadLevel(destination);
  }
}
Note
Notice the ? and : operators in the following statement:
RouteInformation.ContainsKey(destination) ? RouteInformation[destination] : null;
These operators are C# conditional operators. They are effectively the shorthand of the following:
if(RouteInformation.ContainsKey(destination))
{
  return RouteInformation[destination];
}
else
{
  return null;
}
Shorter, neater, and much nicer, don't you think?
For more information, see the MSDN C# page at http://bit.ly/csharpconditionaloperator.
The script is very basic for now, but contains several following key elements that can be expanded to meet the design goals of your game:
RouteInformation: This is a list of all the possible destinations in the game in a dictionary.- A static list of possible destinations in the game, and it is a core part of the manager as it knows everywhere you can travel in the game in one place.
GetRouteInfo: This is a basic information extraction function.- A simple controlled function to interrogate the destination list. In this example, we just return the text to be displayed in the prompt, which allows for more detailed descriptions that we could use in tags. You could use this to provide alternate prompts depending on what the player is carrying and whether they have a lit torch, for example.
CanNavigate: This is a test to see if navigation is possible.- If you are going to limit a player's travel, you need a way to test if they can move, allowing logic in your game to make alternate choices if the player cannot. You could use a different system for this by placing some sort of block in front of a destination to limit choice (as used in the likes of Zelda), such as an NPC or rock. As this is only an example, we can always travel and add logic to control it if you wish.
NavigateTo: This is a function to instigate navigation.- Once a player can travel, you can control exactly what happens in the game: does navigation cause the next scene to load straight away (as in the script currently), or does the current scene fade out and then a traveling screen is shown before fading the next level in? Granted, this does nothing at present as we have nowhere to travel to.
The script you will notice is different to the other scripts used so far, as it is a static class. This means it sits in the background, only exists once in the game, and is accessible from anywhere. This pattern is useful for fixed information that isn't attached to anything; it just sits in the background waiting to be queried.
With this class in place, we just need to update our previous script (and the tags) to make use of this new manager. Update the NavigationPrompt script as follows:
- Update the
collisionfunction to only show the prompt if we can travel. The code is as follows:void OnCollisionEnter2D(Collision2D col) { //Only allow the player to travel if allowed if (NavigationManager.CanNavigate(this.tag)) { showDialog = true; } } - When the dialog shows, display the more detailed destination text provided by the manager for the intended destination. The code is as follows:
//Dialog detail - updated to get better detail
GUI.Label(new Rect(15, 10, 300, 68), "Do you want to travel to " + NavigationManager.GetRouteInfo(this.tag) + "?");
- If the player wants to travel, let the manager start the travel process. The code is as follows:
//Player wants to leave this location
if (GUI.Button(new Rect(55, 100, 180, 40), "Travel"))
{
  showDialog = false;
  NavigationManager.NavigateTo(this.tag);
}