
As part of this chapter, we start to go in depth with some advanced programming techniques. These enable us to structure our code better and add management to our game project instead of just adding game objects to the scene.
Any project of a sufficient size and complexity is going to run into issues related to managing your game objects as and when they are added and removed from a scene. If you don't get your design right from the start, you are setting yourself up for a world of mess later. A common way to handle this is to use one of the three patterns, single instance managers, singletons, or a dependency system, to manage these controllers for you.
There are two main ways through which you can implement the singleton pattern in Unity. The first way is to use a public static parameter within a class to maintain the runtime class. This also allows any other script to access it from anywhere in the game and is useful if you want other events to cause the manager to do something, for example, things related to conversation systems or traps. You can also use an empty game object in the scene and attach a singleton pattern script to it. However, you could cause conflicts if you add more than one pattern.
Managers, on the other hand, are just central scripts that are particular to an individual scene to control and maintain the flow of the scene for one or many items.
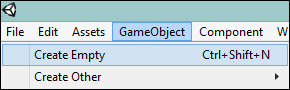
Whereas singletons are game wide, there is often a cause for just a scene-based manager. Implementing this using an empty game object is very easy. Simply use Create Empty from the GameObject menu or the keyboard shortcut, as shown in the following screenshot. The placement of the new game object is up to you. If your controller's position is important (like with an enemy spawner), place it where you want the objects to spawn from. If not, it doesn't matter; it just needs to be in the scene somewhere. As it's an empty game object, it will not be drawn.
Then, create your manager script in the normal way. For example, the following script simply spawns the configurable enemy objects from a collection according to a simple repeating interval:
public class EnemySpawnManager : MonoBehaviour
{
public float spawnTime = 5f;
//The amount of time between each spawn.
public float spawnDelay = 3f;
//The amount of time before spawning starts.
public GameObject[] enemies;
//Array of enemy prefabs.
void Start ()
{
//Start calling the Spawn function repeatedly after a delay.
InvokeRepeating("Spawn", spawnDelay, spawnTime);
}
void Spawn ()
{
//Instantiate a random enemy.
int enemyIndex = Random.Range(0, enemies.Length);
Instantiate(enemies[enemyIndex],
transform.position, transform.rotation);
}
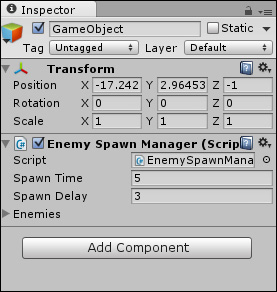
}Then, simply attach your script to the new empty game object. For it to function, you will need to assign the prefabs of the types of enemies you want to appear in the scene by attaching them to the Enemies property, as shown in the following screenshot:
You could also extend the manager to keep track of the game objects it creates; additionally, instead of creating new objects each time, you can just allocate an object from a pool, thereby removing the need to create and destroy objects over time.
The manager approach is fine in most cases, but you have to control each instance of the controller where it is placed. Moreover, you cannot interact with it or trigger it without more configurations added to the manager class, and then either binding the manager to other objects or using the dreaded Find function.
If you need a true manager, a better approach is to employ the singleton pattern for a manager class; refer to the following example:
public class MySingletonManager : MonoBehaviour {

  //Static singleton property
  public static MySingletonManager Instance {
    get; private set;
  }

  //public property for manager
  public string MyTestProperty = "Hello World";

  void Awake()
  {
    //Save our current singleton instance
    Instance = this;
  }

  //public method for manager
  public void DoSomethingAwesome()
  { }
}
The preceding code is just a very basic singleton implementation, which you can attach this to any game object in the scene.
Then, you can access the properties and functions within the singleton script by simply calling the following method from anywhere within your project:
//Set the public property of the singleton
MySingletonManager.Instance.MyTestProperty = "World Hello";

//Run the public method from the singleton
MySingletonManager.Instance.DoSomethingAwesome();
The class can run like any other class with updates, fixed updates, and so on. It can also be expanded very quickly.
One of the other common uses of this pattern is the use of global variables for your project. However, if you intend to use your singleton class across the scenes, you will also need to ensure that it is not destroyed when the scene unloads with a simple update. This is done by calling DontDestroyOnLoad when you initialize the class, as shown in the following code:
public class MySingletonManager : MonoBehaviour {

  //static singleton property
  public static MySingletonManager Instance { get; private set; }

  //public property for manager
  public string MyTestProperty = "Hello World";

  void Awake()
  {
    //First we check if there are any other instances conflicting
    if (Instance != null && Instance != this)
    {
      //Destroy other instances if they are not the same
      Destroy(gameObject);
    }

    //Save our current singleton instance
    Instance = this;

    //Make sure that the instance is not destroyed
    //between scenes (this is optional)
    DontDestroyOnLoad(gameObject);
  }

  //public method for manager
  public void DoSomethingAwesome()
  {    }
}
There are more complicated setups for singletons. If you so wish, you can read them at http://wiki.unity3d.com/index.php/Singleton.
Note
There is another pattern named Dependency Injection. A more robust way to handle the need of manager– or factory–type requirements in any project is to implement an Inversion of Control (IoC) pattern, such as Dependency Injection.
Dependency Injection is a large subject, so we won't cover it in this book. The goal here is to make you aware of all the options when architecting your project. If you would like more detailed information on Dependency Injection, I'd recommend the post at http://blog.sebaslab.com/ioc-container-for-unity3d-part-2/ to start with, and then you can work up from there.
Dependency Injection is a very powerful tool when employed correctly and can make your project a lot easier, so it is worth looking at it if you are serious. However, care is needed in its use, and it should not be used everywhere; it should only be used where it solves a particular problem.
A good Unity-based IoC framework is StrangeIOC, which can be found at http://strangeioc.github.io/strangeioc/TheBigStrangeHowTo.html.