Right, after all of that "brain input", let's start applying it to our game. In this chapter, we are aiming to add an NPC or two, give them something to talk about, and maybe add some special reactions.
If you haven't done so already, import the other character sprites and set up their animations as well. You can either add them to the scene or just create some prefabs in your Project view:
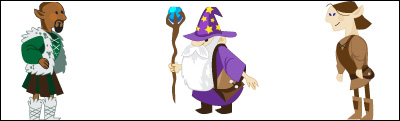
I've added the following characters (shown in the preceding screenshot):
- Greandal (left): This character is the local barkeeper and mayor of our lone village
- Olaf (right): This character is your hero's best friend and an all-round troublemaker
- Greybeard (center): This character is the strange wizard from the east
With these characters in place, we need to start adding some characters to our NPCs as well as add our hero. In Chapter 2, Building a Character, we outlined some classes to describe and manage the entities in the game, so let's bring them in now.
We could also do with a little tidying up of our scripts folder since we are generating a lot more content now. To do this, perform the following steps:
- Under
AssetsScripts, create four new folders:Classes,Examples,Messaging, andNavigation(theExamplesfolder isn't actually needed, but if you want to keep the code that is generated thus far in this chapter, we will place them here). - Copy the
EntityandPlayerscripts to the newClassesfolder or create them if you haven't already. - Copy the scripts from this chapter (
Delegates,Events,Coroutines,ScriptingObject) to theExamplesfolder, or just delete them as they are not for the game itself. If you didn't create them, just ignore this step. - Move the
Messagingscripts to theMessagingfolder, and likewise, theNavigationscripts to theNavigationfolder.
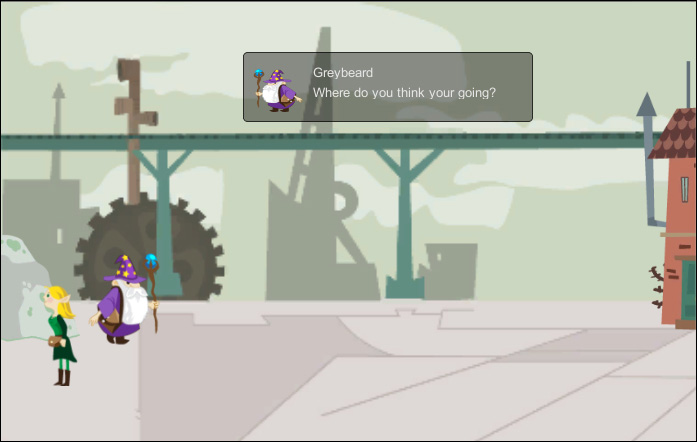
Starting with Greybeard, add him on the left-hand side of the scene, next to the cave. This is because in the next section, he is going to stop our hero from entering the cave, as it is just too dangerous for such an impetuous youth.
To do this (using the lessons we have learned already), perform the following steps:
- Create a new game object and name it
Greybeard. - If you haven't done so already, import the
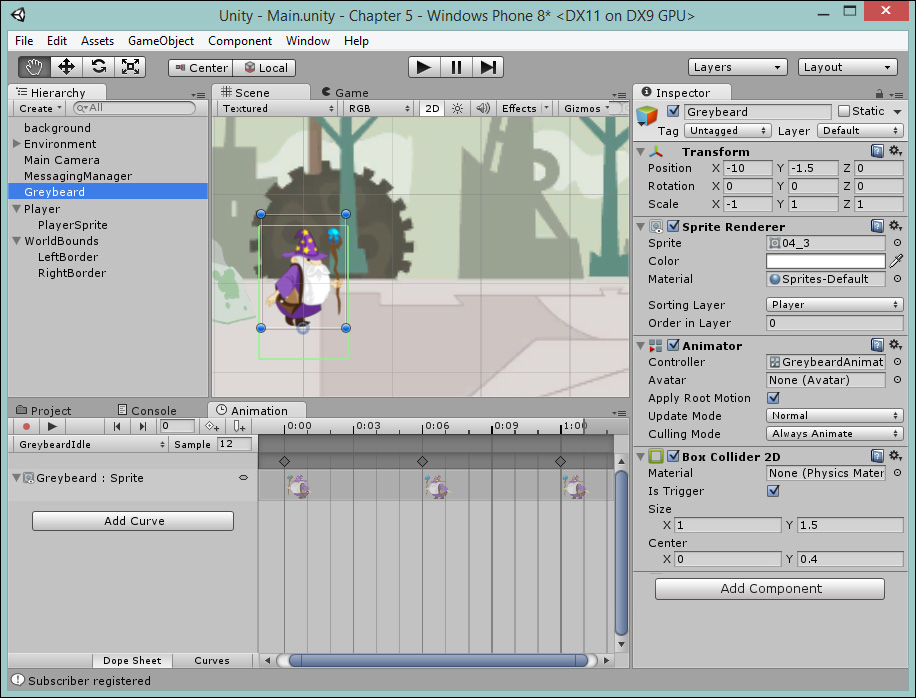
04.pngcharacter spritesheet and use Sprite Editor to slice it up. - Give it a Sprite Renderer component using the 04_3 sprite from the 04 wizard's spritesheet.
- Create an idle animation for Greybeard using the 04_03 and 04_06 sprites so it appears that Greybeard is fidgeting (optional); then, add it to a new Animator component and add that to the Greybeard's game object.
- Finally, add a Box Collider 2D component with the settings shown in the following screenshot. This is so that the collider is of the same width as that of Greybeard himself but with a larger height so that the player can collide with it. Also, set the Is Trigger property to true/checked.
The final result should look something like the following screenshot:
I added an animation that shows he is fidgeting on the spot. This is just because most old wizards are very crotchety, especially when they have to guard a cave full of dangerous monsters.
A few things to note while adding Greybeard are as follows:
- If you put Greybeard on the Character layer as I have done, the player will appear behind him. As this is not what we expect, set the sorting order for the player to
10so he appears in front. - While running the game, if the hero bumps into Greybeard, he can fall backwards. If this happens, it is just because the Player object does not have the Fixed Angle parameter checked in the Rigid Body 2D component.
- NPC colliders should be set to Triggers. We want to be able to control whether the NPC should stop the player or not through the script instead of the physics system. So, on Greybeard's Box Collider 2D, check Is Trigger.
With this done, start building up the rest of your town using the skills you have learned so far. The following screenshot is what I came up with:
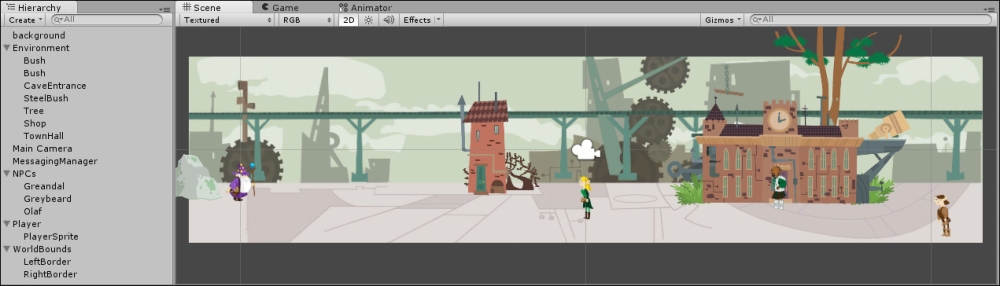
A few things to note are as follows:
- Organize your game hierarchy in a sensible manner so you can quickly find the things you need to manage. In the preceding screenshot, I created empty game objects for Environment items, such as houses and bushes. I also created an empty game object container for NPCs.
- Put the items on a layer that makes sense and then order the sprites on that layer appropriately.
- I went to town on Greandal, the mayors' animation, to give him a pacing action just to show how worried he is about the state of affairs in the town and the troubles outside. Be sure to check the Curves tab when things don't go right.
Don't spend too long crafting the animation (unless you want to); all in all, the scene in the preceding screenshot took about 10 minutes to put together.
So far in this chapter, we have our populated town with characters, buildings, and so on. Therefore, let's give our hero something to talk about.
While building a conversation system for any game, there are many factors to consider, which are as follows:
- How long a conversation is going to be (we don't want the player to get bored with miles of text)?
- How many parties are likely to be involved in any discussion?
- Is this a flat one-sided conversation (such as a cutscene) or will the player be allowed to make decisions?
- Are there going to be branches in the conversation so that the conversation will change based on the player's response?
- How much content do you expect to be used in conversations (only text, video, cutscenes, animation, and so on)? All of this content will decide just how extensible your system needs to be.
- Will the conversation need to support any outbound triggers or states? Will the conclusion of a conversation unlock a door or grant the player with some experience or items?
There are lots of other factors that will affect both the design and implementation of a robust conversation for your game, so think about it carefully before touching the code.
When we want to start talking in the game, we first need to decide what you want to include in that conversation. You can include the following things:
- The name of the character who is speaking
- The text of the conversation
- An image of the character talking
- Choices
- The position of chat
The more you look at it, the more you can dream about what you want to include. You just need to remember the KISS principle (Keep it simple, stupid), that is, start small and then build on it.
So, create a new C# script, name it ConversationEntry in ScriptsClasses, and populate it with the following code:
using UnityEngine;

[System.Serializable]
public class ConversationEntry {
  public string SpeakingCharacterName;
  public string ConversationText;
  public Sprite DisplayPic;
}
This gives us just the basics for our conversation system with regards to who's speaking, an optional picture that can be displayed in the conversation, and most importantly, the conversation text to be displayed.
We also tag this class with the System.Serializable code attribute so that the Unity serializer knows what to do with it.
With our core conversation entry object generated, we can start to store the conversations in the .asset files for use in our game and also make it possible to create the conversations outside of Unity if you wish.
As a conversation is (usually) more than just an opening line, we need a management object that will support several lines/entries of the conversation and a couple of switches to denote whether the conversation has already been played. This way, if you have multiple conversations configured for a character, it will simply play the next conversation and not repeat itself. You could just track this on the object where you attach the conversations to, but this is cleaner.
Tip
As a rule of thumb, you should always keep flags, settings, or properties for a thing with another thing. If you start having variables to track the state of a thing elsewhere, it can get very messy. The only time this is not true is when a thing is meant to be shared across multiple objects.
Also note that the ScriptableObject entities are a fickle beast. They let us attach them to the game objects, and they can be automatically serialized and saved as part of the project. However, they are fixed assets that should only be edited in the editor. If you need to alter them as part of the game, you will need to save and store that change of state separately.
This is just a simple note to remember when architecting such things.
So, create another C# class in ScriptsClasses named Conversation and populate it with the following code:
using UnityEngine;

public class Conversation : ScriptableObject {

  public ConversationEntry[] ConversationLines;
}
Now the first thing you will note is that this class is derived from a scriptable object class. As described earlier, this is what enables us to use Unity's serialization methods and store them as a .asset file.
We are not done yet as we need that final hook to enable us to create these (at least initially) in the editor.
Earlier, I showed you all of the code needed to create the asset for serialization, but this is rather a lot of code to be generated all the time. So, it's better to place that logic in a separate helper class that we can reuse rather than repeat ourselves all the time.
Earlier, with the PositionManager example, we created assets in the editor and reused them. You can reuse that code if you wish, but to simplify things, I added a little helper script to the example project in AssetsScriptsClasses. The CustomAssetUtility class does all the work that the preceding code does. It also uses the C# generics so that it can be reused for any type of SerializableObject you want to throw at it. You don't have to use the class I provided; you can just use the code earlier instead if you wish, just replace the code where the helper function is used.
Note
The C# generics is a fairly advanced C# topic, which we won't go into in this book. If you want to know more, check out http://msdn.microsoft.com/en-us/library/ms379564(v=vs.80).aspx; alternatively, it will be better to try The C# Programming Yellow Book, Rob Miles, Department of Computer Science, The University of Hull, which is a fantastic C# primer book available at http://www.robmiles.com/c-yellow-book/.
To show how we use this, let's create our editor script, which will create the conversation assets for us. Create a new folder in AssetsScripts named Editor. In this folder, create a new script named ConversationAssetCreator in the Editor folder under AssetsScripts and then replace its contents with the following code:
using UnityEditor;
using UnityEngine;

public class ConversationAssetCreator : MonoBehaviour {

  [MenuItem("Assets/Create/Conversation")]
  public static void CreateAsset()
  {
    CustomAssetUtility.CreateAsset<Conversation>();
  }
}
So, by using the helper function, instead of all the tangle of code to first generate our asset and then save it, we simply call our utility, tell it the type of asset we want to create (in angle brackets), and away it goes. I have crated the utility as well so that it can also take a string parameter if you want to force the folder you want to create the asset in; otherwise, it will take whatever is currently selected in the editor.
To test this out, create a new folder in the Asset folder named Resources (so we can call assets directly from the code if we so wish) and then create another folder in Resources named Conversations. This just keeps all our conversations in one place and doesn't clutter up the hierarchy. If you so wish, you could create further subfolders to identify characters, places, or whatever else you fancy. It won't have an impact on the running of the game; it will just keep it tidy.
With the Conversation folder under AssetsResources selected, click on Create in the Project menu and you should see a new option named Conversation (as you can see in the script earlier, this is what we named it as). When you click on it, a new Conversation asset should appear, as shown in the following screenshot, which is ready for you to start configuring:

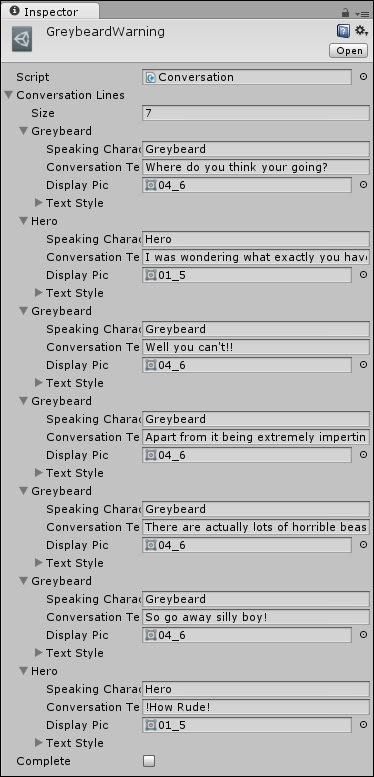
Feel free to set up your new conversation in whichever way you like or check the sample in the project I've created for Greybeard. Name the conversation GreybeardWarning and give it the lines shown in the following screenshot:
The last thing we need is a simple component to be able to attach conversations to a character or other game object in keeping with the Unity-component-based way of building games.
So, create a new class in the Classes folder under AssetsScripts named ConversationComponent and replace its contents with the following code:
using UnityEngine;

public class ConversationComponent : MonoBehaviour {

  public Conversation[] Conversations;

}
Nothing's complicated for now; the preceding code just holds an array of the possible conversations that the game object can have. Ideally, you would want to expand on this for a fuller conversation system, such as a pointer to the next conversation, or a way to track how many conversations have taken place, and so on.
In order for our conversation assets to be of any use, we need a mechanism to play these conversations on the screen and have the user interact with them (if that's how your game rolls). For this, we need another manager that will take in conversations from characters and display them on the screen. If we had any logic, branching, or decisions in our conversations, it will handle those too.
Now, there are two basic approaches that we could take with the conversation system: one being reactive (where we use a messaging system to notify the manager that a conversation needs to take place) and one being just a utility (where scripts can request for a conversation to take place). Both are valid approaches, and it really comes down to personal preference as to which one you want to implement. To keep things simple, let's create the basic utility first and then point out where it can be enhanced.
If we create our conversation manager as we did before with the messaging manager, we start with the simple singleton framework. However, we will lean on one of the great examples from Unity Wiki as our base.
In the sample project under AssetsScriptsClasses, you will find a Singleton class that was sourced from http://wiki.unity3d.com/index.php/Singleton. This simply saves us time and code while creating singleton objects for use in our games and ensures they always have the same consistency.
With this in place, we can define our Conversation manager quite simply. Create a new C# script in AssetsScripts named ConversationManager and replace its contents with the following code:
using System.Collections;
using UnityEngine;

public class ConversationManager : Singleton<ConversationManager >
{
  //Guarantee this will always be a singleton only –
  //can't use the constructor!
  protected ConversationManager () {}

}
Now that we have our manager, we can start adding functionalities to it.
We want it to take a conversation item we have and do something with it because we have a manager. So, create a new function as follows:
public void StartConversation(Conversation conversation)
{}
This enables us to start a new conversation anywhere in the code by using the following code:
ConversationManager.Instance.StartConversation(conversation);
The manager is in place and we have a method to start a conversation, but it's not doing much right now. So, let's add some simple logic to display the text of the conversation on the screen. We will keep it simple since we are going to look into more complex GUI-related functionalities in Chapter 8, Shopping for Weapons.
Starting things off, we need some new properties in ConversationManager to control what needs to be displayed. So, open up the ConversationManager script and add the following properties to it:
//Is there a conversation going on
bool talking = false;

//The current line of text being displayed
ConversationEntry currentConversationLine;

//Estimated width of characters in the font
int fontSpacing = 7;

//How wide does the dialog window need to be
int conversationTextWidth;

//How high does the dialog window need to be
int dialogHeight = 70;
Each property explains its use, but everything will become clear as we add the rest of the functionality. Next, we'll add a Coroutine that will take a Conversation object and loop through all the lines to be displayed. Add the following function to the ConversationManager script:
IEnumerator DisplayConversation(Conversation conversation)
{
  talking = true;
  foreach (var conversationLine in conversation.ConversationLines)
  {
    currentConversationLine = conversationLine;
    conversationTextWidth = currentConversationLine.ConversationText.Length * fontSpacing;
    yield return new WaitForSeconds(3);
  }
  talking = false;
}
This simple Coroutine takes the conversation passed to it and loops through each of the individual lines of the conversation's text. Before we start, we set the talking flag to denote that a conversation is in progress; then, for each conversation line, we perform the following tasks:
- Set a pointer to the current conversation item in the list with the
currentConversationLineproperty - Figure out how long the text is to gauge how big our display area needs to be
- Wait for three seconds before moving on to the next conversation item
- When we run out of conversation lines, we set the
talkingflag tofalseto show that we have finished
So, we have a Coroutine looping through the text. The next thing to do is to use this information to display it on the screen. For this, we need an OnGUI method in our script as follows:
void OnGUI()
{
  if (talking)
  {
    //Layout start
    GUI.BeginGroup(new Rect(Screen.width / 2 - conversationTextWidth / 2, 50, conversationTextWidth + 10, dialogHeight));

    //The background box
    GUI.Box(new Rect(0, 0, conversationTextWidth + 10, dialogHeight), "");

    //The character name
    GUI.Label(new Rect(10, 10, conversationTextWidth + 30, 20), currentConversationLine.SpeakingCharacterName);

    //The conversation text
    GUI.Label(new Rect(10, 30, conversationTextWidth + 30, 20), currentConversationLine.ConversationText);

    //Layout end
    GUI.EndGroup();
  }
}
Like the navigation prompt in the previous chapter, we simply draw a GUI region, give it a background texture with the box using the default style, and then show two labels: one for the character who is speaking and one for the text of the conversation.
So, when the talking flag is set, Unity will know that it has to start drawing our conversation GUI on the screen.
To finish this off, we need to call the Coroutine from our public method, which other scripts can use to start a conversation:
public void StartConversation(Conversation conversation)
{
  //Start displaying the supplied conversation
  if (!talking)
  {
    StartCoroutine(DisplayConversation(conversation));
  }
}There are two simple areas where we can take this further. We can use the sprite image and the style that we specified in the conversation item.
Adding the image is fairly simple; we just need to create enough space to display the image and then draw it.
Sadly, one of the areas that the new sprite system has not been merged with is the existing GUI system. It still relies on textures and not sprites. We can still work with it, but it means we have to select the sprite's texture from the spritesheet manually while drawing images. To do this, we use the DrawTextureWithTexCoords GUI function.
Tip
A word of warning though: the DrawTextureWithTexCoords function uses scaled coordinates while picking the section of the image you want to display. This usually trips up developers as it is not very well documented. The coordinates in the Sprite object are not scaled, so you have to convert them manually.
First, add a couple of properties to display the image using the following code:
//Offset space needed for character image
public int displayTextureOffset = 70;

//Scaled image rectangle for displaying character image
Rect scaledTextureRect;
The offset is to create space within our display region for the image, whereas the other property is to hold the scaling information to indicate that we need to pick our sprite from the spritesheet since the Unity system doesn't handle sprites.
Next, we need to calculate the scaling factor for the image for each conversation line, just in case we are using different sizes of textures for each character in the conversation. So, update the DisplayConversation Coroutine method with the following code:
IEnumerator DisplayConversation(Conversation conversation)
{
  talking = true;
  foreach (var conversationLine in conversation.ConversationLines)
  {
    currentConversationLine = conversationLine;
    conversationTextWidth = currentConversationLine.ConversationText.Length * fontSpacing;

    scalledTextureRect = new Rect( currentConversationLine.DisplayPic.textureRect.x / currentConversationLine.DisplayPic.texture.width,

      currentConversationLine.DisplayPic.textureRect.y / currentConversationLine.DisplayPic.texture.height,

      currentConversationLine.DisplayPic.textureRect.width / currentConversationLine.DisplayPic.texture.width,

      currentConversationLine.DisplayPic.textureRect.height / currentConversationLine.DisplayPic.texture.height);

    yield return new WaitForSeconds(3);
  }
  talking = false;
  yield return null;
}
Lastly, we just need to update the OnGUI method to make space for the image using the offset method and then add it to the draw list as follows:
void OnGUI()
{
  if (talking)
  {
    //Layout start
    GUI.BeginGroup(new Rect(Screen.width / 2 - conversationTextWidth / 2, 50, conversationTextWidth + displayTextureOffset + 10,dialogHeight));

    //The background box
    GUI.Box(new Rect(0, 0, conversationTextWidth + displayTextureOffset + 10,dialogHeight), "");

    //The character name
    GUI.Label(new Rect(displayTextureOffset, 10, conversationTextWidth + 30, 20), currentConversationLine.SpeakingCharacterName);

    //The conversation text
    GUI.Label(new Rect(displayTextureOffset, 30, conversationTextWidth + 30, 20), currentConversationLine.ConversationText);

    //The character image
    GUI.DrawTextureWithTexCoords(new Rect(10, 10, 50, 50), currentConversationLine.DisplayPic.texture, scalledTextureRect);

    //Layout end
    GUI.EndGroup();
  }
}
Note that the use of the DrawTextureWithTexCoords function and not the standard DrawTexture function is normally preferred in GUI drawing. This is because we are selecting the texture to be drawn from our spritesheet and we have to use scaled coordinates to pick the image as that is what the function uses. The Rect coordinates used in the Sprite object's textureRect property (the picking coordinates) are unscaled.
So now that we have something to talk about, we just need to be able to attach it to the characters and then start displaying it on the screen for the player to interact with.
Note
This book will cover the GUI system in more depth in Chapter 8, Shopping for Weapons, so it will just include some basics here. You can come back and update your styles here later if you wish.
First, we need an empty class for our NPCs, which is derived from the Entity object. So, create a new C# script named Npc in the Classes folder under AssetsScripts and replace its contents with the following code:
using UnityEngine;
public class Npc : Entity
{

}
Tip
It might seem a bit redundant to just create an empty script for our NPCs as we are not adding anything to them yet; you could just attach the Entity script to them instead. Remember that as soon as we want to add something for NPCs to use or make use of, we will have to go round and change all of them later. Always plan for expansion; it costs nothing in the beginning but a potential fortune later.
With that created, add the script to our three NPCs in our scene. (Don't forget to name your characters in the Inspector pane as well.)
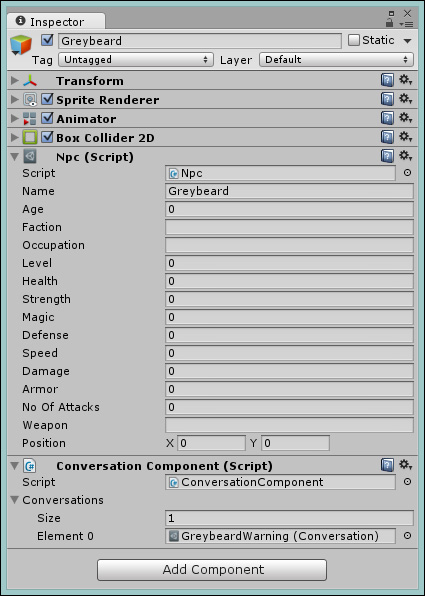
Next, add the Conversation Component to the Greybeard's NPC and then drag the conversation we just built to that character in the Conversations array.
The Inspector pane should now look like the following screenshot:
Note
To make the Inspector pane look a bit prettier, be sure to check out the editor extensions in Chapter 10, The Battle Begins.
So now that our character has a script and that we have the ConversationManager set up, we just need to trigger the conversation when the hero tries to enter the dark cave.
At the moment, the NavigationManager script that we used will let the player go anywhere. So first let's update that and add a bit more flexibility and configuration for the routes that the player can follow.
Open up the NavigationManager script in the Navigation folder under AssetsScripts and create a new struct method as follows:
public struct Route
{
  public string RouteDescription;
  public bool CanTravel;
}
The preceding code now enables us to have a simple mechanism to say whether a route is traversable or not. (In real scenarios, this should be serialized or it should have a manager for the player to remember where the player has traveled; otherwise, it is never going to get unlocked.)
Next, we need to update the RouteInformation variable to use this new struct method and update the information for the two destinations that we have already configured in our manager. This should enable us to state that you can travel to the big bad world but not to the cave as follows:
public static Dictionary<string, Route> RouteInformation = new Dictionary<string, Route>() {
  { "World", new Route { RouteDescription = "The big bad world", CanTravel = true}
  },
  { "Cave01", new Route { RouteDescription = "The deep dark cave", CanTravel = false}
  },
};
As we are now using a struct method for our destination information, we also need to update the GetRouteInfo method to access the dictionary correctly and return the routes' description if found; we do this using the following code:
public static string GetRouteInfo(string destination)
{
  return RouteInformation.ContainsKey(destination) ?
    RouteInformation[destination].RouteDescription :
    null;
}
With that in place, all we need to do is check whether the CanTravel flag is true when the system requests, and if you're allowed to travel, update the CanNavigate method with the following code:
public static bool CanNavigate(string destination)
{
  return RouteInformation.ContainsKey(destination) ?
    RouteInformation[destination].CanTravel :
    false;
}
Here, we simply look at the destination from our route information and return with information on whether the player is allowed to travel there or not.
Now, when you try to go to the cave, you won't get the prompt from NavigationManager whether you want to travel to it or not.
To finish off, we just need to get the Greybeard NPC to listen for the message that the player will leave and then start his most troublesome conversation. So, remove the MessagingClientReceiver script (that was created in the Messaging section) from the left border (the cave) that you set up earlier and add it to the Greybeard NPC game object.
Now, Greybeard is subscribing to and receiving the messages for the player leaving. Next, update the MessagingClientReceiver script (in the Messaging folder under AssetsScripts) and update the ThePlayerIsTryingToLeave method with the following code:
void ThePlayerIsTryingToLeave()
{
  var dialog = GetComponent<ConversationComponent>();
  if (dialog != null)
  {
    if (dialog.Conversations != null && dialog.Conversations.Length > 0)
    {
      var conversation = dialog.Conversations[0];
      if (conversation != null)
      {
        ConversationManager.Instance.StartConversation (conversation);
      }
    }
  }
}
Here, we now look to see if a ConversationComponent script is on the game object it is attached to. If it is, we see if there are any conversations defined for this NPC; if yes, we call the ConversationManager script and ask it to start the first conversation.
Note
Granted that this is a simple example and should be extended in a full system to track conversations that are played or conditions that need to be met for a conversation to be played.
At the moment, the conversation system will keep on going even after you have left the vicinity of the character you are talking with.
Now, if you run the project and try to enter the cave, the grumpy old Greybeard will pipe up and harass you. , as shown in the following screenshot: