
As with other areas in this book, we will just keep things simple when implementing the sample project. You can always extend or replace it later if you wish.
We will also look at two slightly different approaches: using a scene for the shop and a layer system for the inventory.
For the shop, we'll just create a new scene to keep things simple as we expect to enter a shop and leave it when we are done.
As I couldn't find anything I liked, I created a simple shop interface for use in the scene, as shown in the following screenshot:
These are just enough features for what we need to implement in the shop. For items to show in the shop, I turned back to the Web and found a fantastic site, http://ccrgeek.wordpress.com/, where there are an astounding amount of free icon spritesheets to choose from. I picked one of the Weapon Icons 1.png weapon spritesheet from the amazing Icons to Characters RTP set found at http://ccrgeek.wordpress.com/2012/05/29/more-converted-graphics/.
Here is what it looks like:
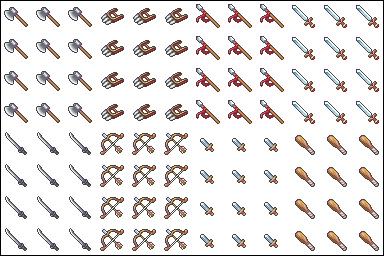
This gives us a nice array of weapons to choose from. For our character, you can always use the other icon sets for equipments, tools, food, and so on, if you wish.
Lastly, on the image front, we also need some buttons (included in the supporting assets with this title), so I created a Back button, as shown in the following screenshot:
I also created a Buy button as shown here:
To make the best use of the new 2D system, we can create a new scene to place the shopping interface for the player to use; so we'll create a new scene named Shop.
With this in place, just copy the assets from the sample assets pack accompanying this title for the shop interface into your project's Assets folder (ShopScreen images for the environment and BackButton, BuyButton, and Weapon Icons 1 images for props). Then, drag the ShopScreen image on to the new scene and check that the new game object is called ShopScreen. Additionally, ensure that the sprite-sorting layer for each of the sprite renderers is appropriate so that they get drawn in front; to do this, set all of them to the foreground layer.
As we are using the 2D system for the shop screen, we have greater flexibility to design the screen without using Unity's native GUI system.
Note
Unity is soon going to release a new GUI system in Version 4.6, which could be used to replace what we are building here; however, currently it is not available. Nevertheless, this section is written so that it will be easily translatable and you'd not need to replace the code of the current GUI framework.
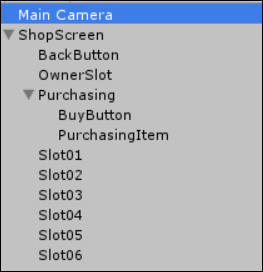
So first, we need to create some empty game objects to place all the UI elements we need on the screen, adding the following assets as children of the ShopScreen game object:
- BackButton: This object will capture when the user wants to exit the screen
- OwnerSlot: This object is a place to display the sprite of the shop's owner
- Slot01 and Slot06: These objects are the available shop inventory slots
- PurchasingSection: This object is an empty grouping game object; it is used so that we will be able to enable/disable all the purchasing options together
- BuyButton: This object captures when the user wants to purchase an item; it is attached to the PurchasingSection object
- PurchasingItem: This object is a place to display the object that the user has currently selected to buy; it is attached to the PurchasingSection object
When you have put all the game objects into the scene, you should have something like the following screenshot:
You can just assign appropriate sprites to the Buy and Back buttons. The rest of the object images are dynamic and are assigned at runtime. They will also need to be able to render sprites, so add a Sprite Renderer component to each of them.
Next, arrange each of the items appropriately on the screen according to what the item is. You should end up with something like the following screenshot:
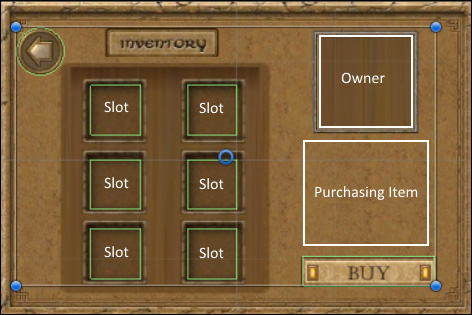
Lastly, for the layout, we need to add 2D colliders to all the objects that we intend the user to be able to click on; so, add an appropriate 2D collider to the following objects:
- Slot: For this object, add a Box Collider 2D component, scaling the collider's size to fit the graphics on the screen. For example, for a 32 x 32 image, scale the collider by
0.32for both the X and Y position. - Buy: For this object, add a Box Collider 2D component. It should scale automatically, but it's good practice to check.
- Back: For this object, add a circle collider 2D component.
With the layout in place, we need something for the screen to use. So, let's add some items.
Like with conversation items we created in Chapter 4, The Game World, we want to be able to simply manage items that can be used or bought in our game.
First, we need a scriptable object to describe our inventory items. So, create a new script in AssetsScriptsClasses named InventoryItem and populate it with the following structure:
using UnityEngine;

public class InventoryItem : ScriptableObject
{
  public Sprite Sprite;
  public Vector3 Scale;
  public string ItemName;
  public int Cost;
  public int Strength;
  public int Defense;
}Now that we have our scriptable object, we need an editor script to create our inventory items. So, create another script in AssetsScriptsEditor named InventoryItemAssetCreator and populate it with the following structure (note that we are again using our generic utility class to make this very easy to implement):
using UnityEngine;
using UnityEditor;

public class InventoryItemAssetCreator : MonoBehaviour {

  [MenuItem("Assets/Create/Inventory Item")]
  public static void CreateAsset()
  {
    CustomAssetUtility.CreateAsset<InventoryItem>();
  }
}
With this in place, we can now create some inventory items. Create a new folder in AssetsResources named Inventory Items, navigate to that folder, and create a new InventoryItem class from the Create menu (right-click on Create or use the Project folder window's Create menu option).
With the new InventoryItem asset created, we can configure our first weapon. Rename the asset to Lv0_Sword and then configure its properties as shown in the following screenshot:

You can configure the properties using the following settings:
- Set the Sprite property to a sword sprite image from the weapon icons spritesheet (Weapon Icons 1_11)
- Scale the image up as by default it is quite small (X 2, Y 2, Z 0)
- Give it a name via the Item Name field
- Set Cost to
0to denote it's a free item - Set Strength to
5and Defense to0so the weapon at least has some effect
Save the sword image and then create another weapon or two in the same manner. I also created an axe with the same values.
Now that we have our shop interface and some stock we can put in it, it's time to bring them together.
First, we need to set up a shop manager who looks after the day-to-day running of the shop, then we will add the shelves to the shop to manage where we can put the stock.
First, we need the shop manager itself. To keep things neat, create a new folder in the project's Assets folder named Shop, then create a new script in the Shop folder named ShopManager. This just ensures that any script related to shopping is stored here if you want to expand it later. The manager is only used in this one scene, so we don't need to make it a singleton.
To start off, we will just add some parameters so we can control the shop we are creating and set it up as follows:
using UnityEngine;

public class ShopManager : MonoBehaviour {

  public Sprite ShopOwnerSprite;
  public Vector3 ShopOwnerScale;
  public GameObject ShopOwnerLocation;
  public GameObject PurchasingSection;
  public SpriteRenderer PurchaseItemDisplay;
  public ShopSlot[] ItemSlots;
  public InventoryItem[] ShopItems;
  private static ShopSlot SelectedShopSlot;

  private int nextSlotIndex = 0;
}
When the player enters the shop's screen, we want to be able to display the current shop owner and a selection of their wares. So, when ShopManager starts, we need to configure those items as follows:
void Start () {
  var OwnerSpriteRenderer = ShopOwnerLocation.GetComponent<SpriteRenderer>();

  OwnerSpriteRenderer.sprite = ShopOwnerSprite;
  OwnerSpriteRenderer.transform.localScale = ShopOwnerScale;

  if (ItemSlots.Length > 0 && ShopItems.Length > 0)
  {
    for (int i = 0; i < ShopItems.Length; i++)
    {
      if (nextSlotIndex > ItemSlots.Length) break;
      ItemSlots[nextSlotIndex].AddShopItem(ShopItems[i]);
      ItemSlots[nextSlotIndex].Manager = this;
      nextSlotIndex++;
    }
  }
}
Here, we just took the configured sprite for the shop owner, assigned it to SpriteRenderer, scaled for the relevant game object, and then looped through all the available slots in the shop and picked out items from its inventory to place in them, ensuring we only stock as many items as the shop can handle.
You will notice that the last function actually has an error. This is because we did not add the actions/behaviors for the ShopSlot folder. We will fix that shortly.
Next, we need some helper functions that represent the actions/behaviors that the shop is capable of performing; first, we add the ability to select an item for purchase using the following function:
public void SetShopSelectedItem(ShopSlot slot)
{
  SelectedShopSlot = slot;
  PurchaseItemDisplay.sprite = slot.Item.Sprite;
  PurchasingSection.SetActive(true);
}
Then, we add the ability to clear the selected item from the shop using the following function:
public void ClearSelectedItem()
{
  Debug.Log("Clearing Shop Purchase area");
  SelectedShopSlot = null;
  PurchaseItemDisplay.sprite = null;
  PurchasingSection.SetActive(false);
}
Finally, we add the ability to purchase the currently selected shop item using the following function:
public static void PurchaseSelectedItem()
{
  SelectedShopSlot.PurchaseItem();
}
Each of the preceding functions is self-contained and controls each of the steps necessary to perform each action. They do so by enabling or disabling the screen elements, such as PurchasingSection, to perform actions on dependent objects such as the shop slots.
You will note that this last function is also set as static. This is to enable it to be accessed from anywhere in the code without referencing it or performing GetComponent for the ShopManager script.
As stated in the previous sections, it might seem like you could make everything static and avoid using GetComponent altogether. However, using statics has certain overheads and can lead to a messy and hard-to-diagnose code; it should not be overly used. If in doubt, don't use it, unless necessary.
With the ShopManager set up, we can now create the missing definition for ShopSlot. This will define the slots in the shop that remember what is being stored on the shelf. Create a new script in AssetsScriptsShop and name it ShopSlot replacing its contents with the following code:
using UnityEngine;

public class ShopSlot : MonoBehaviour {

  public InventoryItem Item;
  public ShopManager Manager;
}
Now, to add other functions for the shop slots that will be used by the manager, add the following functions to the ShopSlot script:
public void AddShopItem(InventoryItem item)
{
  var spriteRenderer = GetComponent<SpriteRenderer>();
  spriteRenderer.sprite = item.Sprite;
  spriteRenderer.transform.localScale = item.Scale;
  Item = item;
}

public void PurchaseItem()
{
  GameState.currentPlayer.Inventory.Add(Item);
  Item = null;
  var spriteRenderer = GetComponent<SpriteRenderer>();
  spriteRenderer.sprite = null;
  Manager.ClearSelectedItem();
}
The first function enables the ability to add an inventory item to the current slot and display it, and the second function controls how an item is purchased. Again, each function is distinct, and is just related to the task that it is to perform. Wherever possible, you should follow this pattern as it will make maintaining or extending your game much easier later.
Finally, we need to add one last piece of code in order to enable the player to click on the items in the shop slots; so, add the following function to the ShopSlots script:
void OnMouseDown()
{
  if (Item != null)
  {
    Manager.SetShopSelectedItem(this);
  }
}
The preceding code simply uses the interaction between the Box Collider 2D on the input OnMouseDown event, and as long as there is an item in the slot, it tells the ShopManager script that you have selected it.
Now that we can stock our shop and purchase items from it, we just need the ability for users to buy items when selected, so create a new script named BuyButton and place it in AssetsScriptsShop with the following contents:
using UnityEngine;

public class BuyButton : MonoBehaviour {

  void OnMouseDown()
  {
    ShopManager.PurchaseSelectedItem();
  }
}
The preceding code simply calls the static Purchasing function we created in the ShopManager script earlier to buy an item on any game object that has a 2D collider placed on it, as we did with the ShopSlot script.
Now that we have a definition for InventoryItem folders, we can update the Player class so that the player can carry the correct item. So, open the Player class under AssetsScriptsClasses and update the following line to use the new InventoryItem class instead of a string:
using System.Collections.Generic;
public class Player : Entity
{
  public List<InventoryItem> Inventory = new System.Collections.Generic.List<InventoryItem>();
  public string[] Skills;
  public int Money;
}With all our scripts in place, let us return to the shop scene, start applying them, and finally get some stock displayed on the shelves.
So first, let's attach the following scripts:
- Attach the
ShopManagerscript to theShopScreengame object - Attach the
BuyButtonscript to theBuyButtongame object - Attach the
ShopSlotscript to each of the slots in the shop
Now, our shop is ready to receive its owner and some inventory items to stock. So, select the ShopScreen game object; once you do this, you should see the following configuration options in the Inspector pane:
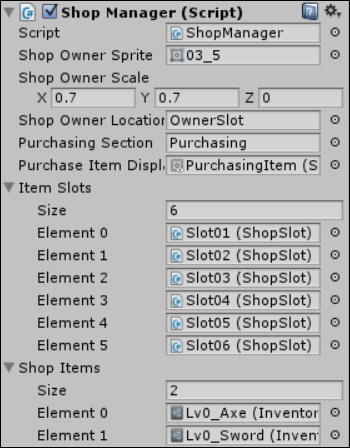
I've preconfigured Shop Manager as an example. So, let us walk through what is available:
- We have the sprite and scale for the shop owner. I selected one of Greandal's poses and scaled him appropriately. (The mayor is multitalented and also owns almost everything in town, including the shop.)
- I then attached the Purchasing Section and Purchase Item Display item to the scene. We could have discovered these in the scene by the name or tag if you so wished. There are often many ways of doing the same thing.
- Next, I set the Item Slots pane's Size to
6and attached each of the available slots in the shop by dragging them from the Project hierarchy on to the Inspector pane. You can also achieve this by using the dot icon next to each element and finding the slots in the scene. - Finally, I set the Shop Items pane's Size to
2and dragged the twoInventory Itemswe created earlier inAssetsResourcesInventoryItemson to each element of the Shop Items array.
If you now run the scene at this point, you should see the following output:
- The owner along with your shop items are displayed.
- Clicking on an item connects the mouse or touches the box collider on the slot and tells the shop manager to select the item in that slot.
- When an item is selected, the Buy button and the selected item appears. Clicking on the Buy button adds the item to the player's inventory, clears the selection, and removes the item from the slot.
The player can purchase items from the shop (actually, they can buy anything as it's all free at the moment), but they are stuck in the shop, the doors and windows are barred, and the owner has a very stern face.
As the shop could be used from anywhere in the game, it would not make much sense to navigate through all the scenes of the game in a cycle to go back to the earlier scene. So, we need to add the ability to go back to the previous location the player was in, the place where his shop is located.
To implement this, we need to make a minor modification to the navigation manager to remember the last place where it was. Open the NavigationManager script from AssetsScriptsNavigation and first add a new using statement to the beginning of the class, as follows:
using System.Collections.Generic;
using UnityEngine;
This will quickly enable us to discover what the current scene is. Next, add the following static property:
private static string PreviousLocation;
Then, in the NavigateTo method, we need to store the scene the player is travelling from before we change it; to do this, add the following line:
public static void NavigateTo(string destination)
{
  PreviousLocation = Application.loadedLevelName;
  if (destination == "Home")
  {
    GameState.playerReturningHome = false;
  }
  FadeInOutManager.FadeToLevel(destination);
}
Finally, we need to add a function to enable the scenes to tell the navigation manager to go back to the previous scene; this can be done using the following lines of code:
public static void GoBack()
{
  var backlocation = PreviousLocation;
  PreviousLocation = Application.loadedLevelName;
  FadeInOutManager.FadeToLevel(backlocation);
}
All this function does is that it gets the previous location to a separate variable, sets the current scene as the previous location (so if you go back again, you will return to the scene you just went back from), and then transitions to the previous scene.
Now that our navigation manager has the ability to go back, we can return to our shop scene to enable the user to leave the shop and go back to the real world.
Next, create another script named BackButton and place it in AssetsScriptsShop with the following contents, which just calls the new Navigation method:
using UnityEngine;

public class BackButton : MonoBehaviour {

  void OnMouseDown()
  {
    NavigationManager.GoBack();
  }
}
Attach the preceding script to the BackButton game object in the shop scene. Now, the player can click on the back button and leave the shop. Granted that this can only work once you enter the shop from another location, so let's look at how to get into the shop now.
We can buy items from the shop and we can leave the shop, but how do we get into the shop in the first place? As we did in Chapter 6, The Big Wild World, we just need to add trigger colliders where the user can enter the shop if they wish with the caveat that they can only enter when they are in front of the shop and have pressed a key (the up arrow button in this case).
To enable this, we need a very similar script to the NavigationPrompt script that we used in Chapter 4, The Game World, (always reuse) but with a few differences.
Create a new script named ShopEntry in AssetsScriptsNavigation, then replace its contents to add a variable to control whether we can enter the shop or not; we do this using the following code:
using UnityEngine;

public class ShopEntry : MonoBehaviour {

  bool canEnterShop;
}
As with the Navigation script, we handle the changing of the state of this flag with a single function. So, if we need to change anything else, we can do so using the following code:
void DialogVisible(bool visibility)
{
  canEnterShop = visibility;
  MessagingManager.Instance.BroadcastUIEvent(visibility);
}
Next, we need trigger handlers to detect when the player is in front of a shop; refer to the following code that tells you how to add trigger handlers:
void OnTriggerEnter2D(Collider2D col)
{
  DialogVisible(true);
}

void OnTriggerExit2D(Collider2D col)
{
  DialogVisible(false);
}
Now that we can tell when the player is in front of the shop, we just need to capture whether they have pressed the up arrow button to enter the shop. We do that in the Update method as follows:
void Update()
{
  if (canEnterShop && Input.GetKeyDown(KeyCode.UpArrow))
  {
    if (NavigationManager.CanNavigate(this.tag))
    {
      NavigationManager.NavigateTo(this.tag);
    }
  }
}
Finally, we add a little GUI touch as follows to let the player know that they can enter the shop when they are in front of it:
void OnGUI()
{
  if (canEnterShop)
  {
    //layout start
    GUI.BeginGroup(
      new Rect(
        Screen.width / 2 - 150,
        50,
        300,
    50));

    //the menu background box
    GUI.Box(new Rect(0, 0, 300, 250), "");

    //Dialog detail—updated to get better detail
    GUI.Label(
      new Rect(15, 10, 300, 68),
    "Do you want to Enter the Shop?    (Press up)");

    //layout end
    GUI.EndGroup();
  }
}
Trying to enter the shop isn't going to get us very far if the game doesn't know it exists, so add this logic to the Build Settings project and also update the NavigationManager script to include a new Route asset for the shop, as follows:
public static Dictionary<string, Route> RouteInformation = new Dictionary<string, Route>() {
  {"Battle", new Route {CanTravel = true}},
  {"World", new Route {RouteDescription = "The big bad world", CanTravel = true}},
  {"Cave", new Route {RouteDescription = "The deep dark cave", CanTravel = false}},
  {"Home", new Route {RouteDescription = "Home sweet home", CanTravel = true}},
  {"Kirkidw", new Route {RouteDescription = "The grand city of Kirkidw", CanTravel = true}},
  {"Shop", new Route {CanTravel = true}},
};
With the scripts in place, we now need to add them to the player's home in front of the shop. Open the Home scene and add a new empty game object named Shop as a child of the WorldBounds grouper game object (because it takes us out of the scene), attach the ShopEntry script, and add a Box Collider 2D component (set as a trigger), as shown in the following screenshot:
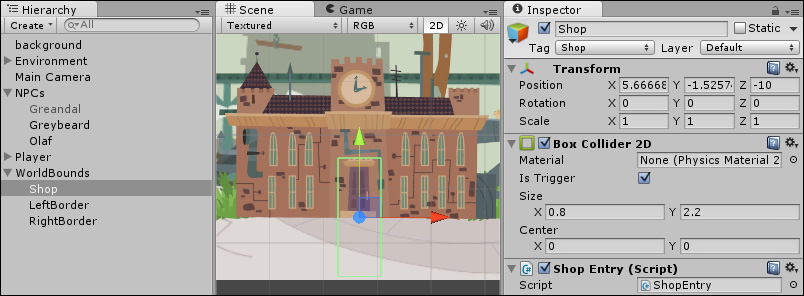
The collider just needs to be shaped or scaled enough so that our 2D character will collide with it when he passes in front of the shop.
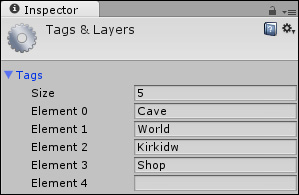
Finally, to ensure that we navigate to the new Shop scene, we need to add a new tag named Shop and assign it to the new Shop game object, as shown in the following screenshot:
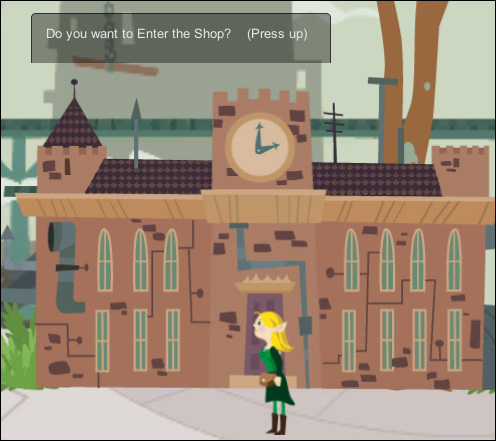
Now, when you run the Home scene and the player runs in front of the shop, you should get a nice new prompt in front of the shop; tapping the up arrow key will help you enter the shop and navigate inside it, as shown in the following screenshot:
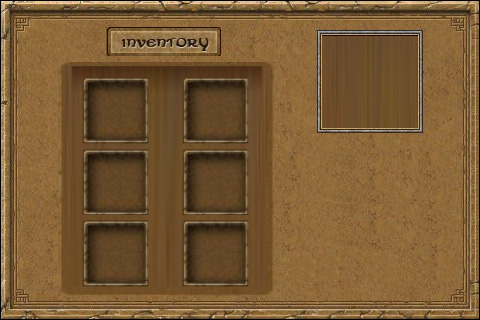
Now that you have got to grips with building a GUI with a 2D system as it stands, what about the existing GUI framework that Unity has? Well, as a comparison, let's put in a small player inventory viewer for the player and cover off the difficulties of using 2D with the GUI framework.
To start off, create a new script named PlayerInventoryDisplay in the Scripts root folder, AssetsScripts, and replace its contents with the following code, adding some basic variables:
using UnityEngine;

public class PlayerInventoryDisplay : MonoBehaviour
{
  bool displayInventory = false;
  Rect inventoryWindowRect;
  private Vector2 inventoryWindowSize = new Vector2(150, 150);
  Vector2 inventoryItemIconSize = new Vector2(130, 32);

  float offsetX = 6;
  float offsetY = 6;
}
The names of each property should be fairly self-explanatory:
- A flag to confirm whether the inventory window is displayed or not
- Some sizes for the window and the inventory content sizes
- Offsets to space things out in the window
Next, we add an Awake function to set up the display of the inventory window as follows. Based on the size of the screen, it will be displayed on different devices (we don't want it to take up the whole screen):
void Awake()
{
  inventoryWindowRect = new Rect(
    Screen.width - inventoryWindowSize.x,
    Screen.height - 40 - inventoryWindowSize.y,
    inventoryWindowSize.x,
  inventoryWindowSize.y);
}
Then, in an OnGUI function, we will draw a button to open the inventory (this could instead be mapped to a key if you wish or both), and if the inventory is to be displayed, we will draw a custom window using the following code:
void OnGUI()
{
  if (GUI.Button(
    new Rect(
      Screen.width - 40,
      Screen.height - 40,
      40,
      40),
  "INV"))
  {
    displayInventory = !displayInventory;
  }
  if (displayInventory)
  {
    inventoryWindowRect = GUI.Window(
      0,
      inventoryWindowRect,
      DisplayInventoryWindow,
    "Inventory");

    inventoryWindowSize = new Vector2(
      inventoryWindowRect.width,
    inventoryWindowRect.height);
  }
}
For the main inventory window, we will use the custom ability of the Unity3D GUI to draw the window's contents (as opposed to the manual way, we applied it with the navigation prompt with BeginGroup and EndGroup). We implement this with a new function as follows, and this is where we but heads between the Unity3D GUI system and the new Unity3D 2D system:
void DisplayInventoryWindow(int windowID)
{
  var currentX = 0 + offsetX;
  var currentY = 18 + offsetY;
  foreach (var item in GameState.currentPlayer.Inventory)
  {
    Rect texcoords = item.Sprite.textureRect;

    texcoords.x /= item.Sprite.texture.width;
    texcoords.y /= item.Sprite.texture.height;
    texcoords.width /= item.Sprite.texture.width;
    texcoords.height /= item.Sprite.texture.height;

    GUI.DrawTextureWithTexCoords(new Rect(
      currentX,
      currentY,
      item.Sprite.textureRect.width,
      item.Sprite.textureRect.height),
      item.Sprite.texture,
    texcoords);


    currentX += inventoryItemIconSize.x;
    if (currentX + inventoryItemIconSize.x + offsetX > inventoryWindowSize.x)
    {
      currentX = offsetX;
      currentY += inventoryItemIconSize.y;
      if (currentY + inventoryItemIconSize.y + offsetY > inventoryWindowSize.y)
      {
        return;
      }
    }
  }
}
In this window, we loop through all the items in the player inventory (if there are any) and display them as buttons. You could then wire up these buttons to actions, if the item has any, such as potions to be drank or bombs to be dropped.
Now, one thing to note is that the existing GUI system does not natively support sprites; we have to use the GUI Texture2D drawing function to pick up the specific sprite out of the spritesheet manually.
So, we have to use the GUI.DrawTextureWithTexCoords function to grab the specific image region from the spritesheet. You should also note that we have to scale the region to the size of the full image because the coordinates given for the specific sprite are unscaled.
One warning is that if you try to read the pixels from the sprite's texture, you will get an Access denied message because of the way sprites are imported.
Alternatively, if you want, you can use separate sprites (losing some of the performance you get from spritesheets) for buttons, which makes the GUI implementation easier; alternatively, you can have separate textures for things you want to draw with the GUI system (just alter the import settings from Sprite to Texture and click on Apply).
With the script in place, just add it to the Player game object in the Home scene so the player can rummage through their pockets.
Now that we are done with the whole inventory saga, we need to ensure that when the player buys a weapon, they are able to use it and defend themselves when attacked.
There are a couple of ways of doing this as follows:
- Updating the player's statistics on acquiring the equipment
- Having assigned slots that affect the player's statistics
- All items in the inventory affect the statistics and are queried during the battle
The first step is the simplest as it requires no additional UI, which we will implement in the next code.
Open up the Player script under AssetsScriptsClasses and add the following additional function:
public void AddinventoryItem(InventoryItem item)
{
  this.Strength += item.Strength;
  this.Defense += item.Defense;
  Inventory.Add(item);
}
The preceding code gives us a single point to control how the player's statistics are affected when we grant them a new inventory item in the game.
Now that we have our helper function to control a player's Inventory property, we just need to update the ShopSlot script we created earlier to use the following new function:
public void PurchaseItem()
{
  GameState.currentPlayer.AddinventoryItem(Item);
  Item = null;
  var spriteRenderer = GetComponent<SpriteRenderer>();
  spriteRenderer.sprite = null;
  Manager.ClearSelectedItem();
}
Now, when the player receives a new weapon, their statistics will be improved. Our budding player is ready to return to the big bad world to take on those horrible goblins that block his way.