
Following on from the previous chapter, we will continue on our journey of the battle and kick off with some target practice.
As we prepare to attack our foe, we recognize that the player can only target one Goblin at a time with his trusty sword or axe (there could be some splash damage or knock - on attack later, but let's focus on our player's attack first). So, we'll add some variables to BattleManager to manage this.
We will also add some other elements to spruce up the battle, such as a selection circle or a target identifier, and add a variable to set a prefab for this.
So, open the BattleManager script and add the following variables to the top of the class:
private string selectedTargetName;
private EnemyController selectedTarget;
public GameObject selectionCircle;
private bool canSelectEnemy;

bool attacking = false;

public bool CanSelectEnemy
{
  get
  {
    return canSelectEnemy;
  }
}

public int EnemyCount
{
  get
  {
    return enemyCount;
  }
}So, we have added properties to hold the selected target as we did with the selected weapon, a flag, and a property to track whether we can actually select an enemy (as the player needs to select a weapon first); additionally, we've added a variable to maintain a record of just how many enemies are left in the battle, which the enemy AI will use to decide how chicken they are or not.
Tip
Instantiating prefabs in the code requires the prefab to be in the Resources folder, because they are associated with the asset-bundling features. With Unity Pro, you can also download the asset bundles from the Web and include them in your project at runtime. With the free version, however, you can only use what is in your project already.
For single objects, it's easier to attach a prefab to the editor and use it from there (either on an existing class or a static editor class).
At the moment, Goblin is just a sprite drawn on the screen with an AI system that just sits idle in the background. So, let's expand on this and give our Goblins some muscle power. Player, be warned!
As stated previously, to keep the player engaged, you need to have a varied amount of enemies in the battle, and they need to be challenging enough to make the player think and apply tactics.
First, we'll create a new profile for the enemies, starting off with a new enumeration for the enemy class. Create a new C# script named EnemyClass in AssetsScriptsClasses and replace its contents with the following code:
public enum EnemyClass
{
  Goblin,
  Ork,
  NastyPeiceOfWork
}
I've used just a couple of examples, as we will only be using the Goblin for now. Next, create a new Enemy C# script in the same folder, as follows:
public class Enemy : Entity
{

  public EnemyClass Class;
}
The preceding code just extends the base Entity class for our enemies and adds the EnemyClass enumeration we just created.
Now that we have a profile for the enemy, we need a controller to make the enemy perform actions in a controlled way. So, create another C# script named EnemyController in AssetsScripts, starting with the following variables:
using System.Collections;
using UnityEngine;

public class EnemyController : MonoBehaviour {

  private BattleManager battleManager;
  public Enemy EnemyProfile;
  Animator enemyAI;

  public BattleManager BattleManager
  {
    get
      {
        return battleManager;
      }
      set
      {
        battleManager = value;
      }
  }
}
The preceding code gives us the missing EnemyController class that we used in the BattleManager script with the following properties:
- A tight reference to the
BattleManagerscript, which is needed because the enemies are directly affected by the battle as it is ensued - The enemy profile
- A reference to the AI animator controller we created in Chapter 7, Encountering Enemies and Running Away
As the AI needs information about the battle, we need to ensure that it has kept each frame up to date. So, for this, we add an UpdateAI method and call it from the Update method to keep the AI up to date, as follows:
void Update()
{
  UpdateAI();
}

public void UpdateAI()
{
  if (enemyAI != null && EnemyProfile != null)
  {
    enemyAI.SetInteger("EnemyHealth", EnemyProfile.Health);
    enemyAI.SetInteger("PlayerHealth", GameState.currentPlayer.Health);
    enemyAI.SetInteger("EnemiesInBattle", battleManager.EnemyCount);
  }
}
The preceding code just sets the properties of the AI to the current values. As the values change, the AI will react based on the transitions that are defined. For example, if the Goblin's health drops below 2 and the player's heath is greater than 2, it will transition to Run Away. Granted we are not doing anything with the states yet, but we will come on to that later.
Next, we need to grab the reference to the AI that is currently configured against the game object that will be used by the previous UpdateAI function in the Awake method:
void Awake()
{
  enemyAI = GetComponent<Animator>();
  if (enemyAI == null)
  {
    Debug.LogError("No AI System Found");
  }
}
There are several logging options in Unity, from the basic Log to the more detailed LogWarning and LogError. These logging options provide us with more detail while debugging our project, so use them wisely.
Tip
To save sanity when you are adding more content to the game, it is worthwhile to add Debug comments, surrounding them with important components or scripts required by an object. Using them this way does not affect the performance and can save you hours of searching for the reason for a crash because you forgot to add something.
However, as stated before, do not use Debug.Log extensively or in the normal operation of your game. This is because it kills the performance!
Another approach is to write your own utility function to perform logging, which can be controlled by a single flag. So, instead of Debug.Log, you will call DebugUtility.Log or DebugUtility.LogWarning, which will then call Debug.Log if it was enabled. This allows you to place the logging code throughout your project and have a single place where you can turn it all on or off.
Nice tip from our reviewer, Fredrik Kellerman!
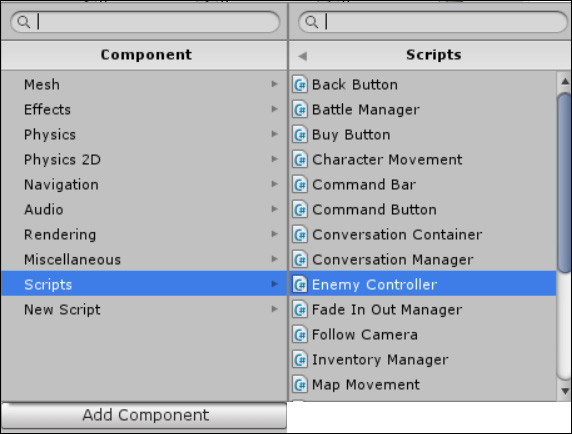
The Goblin prefab we created earlier now needs this new EnemyController class attached to it. Select the Goblin prefab from AssetsPrefabsCharacters, click on the Add Component button in the Inspector window, and navigate to Scripts | EnemyController, as shown in the following screenshot:
Once added, the updated Goblin will look like the following screenshot in the Inspector window:
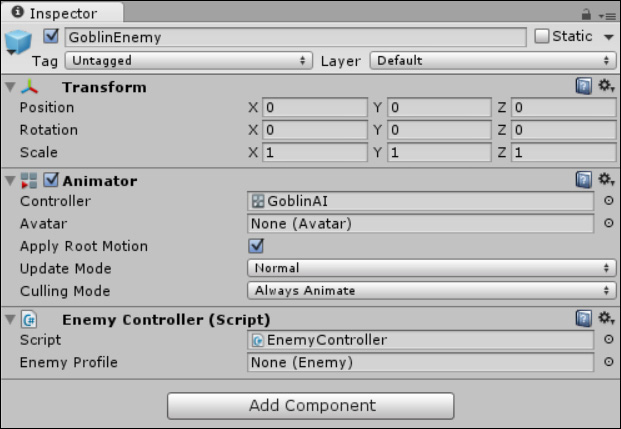
As you can see, we cannot currently edit the Enemy Profile tab from the editor (as this requires a custom inspector, which will be covered in Chapter 11, Onward Wary Traveler). Hence, we are doing it through the code. You can use a scriptable object asset and assign it to the tab, and I've already shown you how to do this. Feel free to change it later if you wish.
Returning back to the BattleManager script, the area where we push our Goblins into action is in the SpawnEnemies coroutine. Now, instead of just throwing sprites at the screen, we can add some real danger to the mix for our humble player and his itty-bitty sword using the following code:
IEnumerator SpawnEnemies()
{
  //Spawn enemies in over time
  for (int i = 0; i < enemyCount; i++)
  {
    var newEnemy = (GameObject)Instantiate(EnemyPrefabs[0]);
    newEnemy.transform.position = new Vector3(10, -1, 0);
    yield return StartCoroutine(
    MoveCharacterToPoint(EnemySpawnPoints[i], newEnemy));
    newEnemy.transform.parent = EnemySpawnPoints[i].transform;

    var controller = newEnemy.GetComponent<EnemyController>();

    controller.BattleManager = this;

    var EnemyProfile = ScriptableObject.CreateInstance<Enemy>();
    EnemyProfile.Class = EnemyClass.Goblin;
    EnemyProfile.Level = 1;
    EnemyProfile.Damage = 1;
    EnemyProfile.Health = 2;
    EnemyProfile.Name = EnemyProfile.Class + " " + i.ToString();

    controller.EnemyProfile = EnemyProfile;
  }
  BattleStateManager.SetBool("BattleReady", true);
}
Now, as we loop through the number of enemies being added to the battle, we grab the EnemyController class attached to the Goblin prefab, create a new EnemyProfile class, give it some values, and finally initialize the controller with the new EnemyProfile class.
Ideally, you should change this generation to something that is a bit more structured instead of just initializing it this way, but you should get the picture.
Now that we have a stronger opponent, let's select it and start with the attack.
Like with CommandBar, the player needs some visual representation to confirm whether their actions actually have an effect in the game. To this end, let's add some selection logic for our enemies and a nice visual effect in 2D. First, we'll create the prefab for this with a little animation and then get ready to attach our BattleManager script using the variable we added earlier.
First off, I created the following selection circle with my graphics skills:
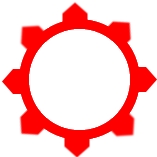
This is nothing fancy, but it will look better once we get it in the game. So, add SelectionCircle.png to your project from the assets that accompany this title to AssetsSpritesProps.
Next, we'll create a prefab of this sprite in our scene for later use. This simply sets up how we want to use it visually, and since we are going to use it several times over in the scene, using prefabs means that there will only be one instance with many copies.
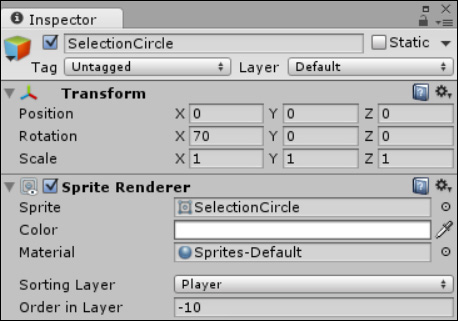
Now, drag the SelectionCircle image on to the scene (if it doesn't work, you are looking at the game view, which means that you need to switch to the Scene tab) and set the properties as shown in the following screenshot:
Finally, drag the object from the Scene hierarchy into AssetsPrefabsProps to create the prefab, ensuring its name is SelectionCircle. Then, delete the object from the scene as we no longer need it.
Now, in the Battle scene, in the editor, select the BattleManager game object in the Project hierarchy; once you do this, drag the SelectionCircle prefab on to the Selection Circle property for the BattleManager script to attach it to the BattleManager game object.
With everything set up in the
BattleManager game object, we can now return to the EnemyController script and repeat the process we used with CommandButton so the player can click on the Goblins to highlight them.
First, we need a couple of properties in the EnemyController script to keep a reference to our SelectionCircle prefab and determine whether the current enemy is selected or not. So, add the following to the top of the EnemyController class:
  private bool selected;
  GameObject selectionCircle;
Now, to liven the selection process a bit, let's add some spin to the selection circle when it is on the screen. To do this, we'll add a simple coroutine to constantly update the selection circles' rotation transform (simple and effective). We could have used the 2D animation system to do the same thing, but it's a bit too much for a simple rotation (unless you want to do more fancy things with the selection circle, such as add particles, have the circle jump up and down while spinning, and so on).
So, in the EnemyController script, add the following coroutine function:
IEnumerator SpinObject(GameObject target)
{
  while (true)
  {
    target.transform.Rotate(0, 0, 180 * Time.deltaTime);
    yield return null;
  }
}
Nothing fancy; you just need to rotate the object on its z axis over time.
If you want the circle to spin faster or slower, just alter the amount of z axis rotation you apply. Here, I have it set to spin 180 degrees every second, one full spin every 2 seconds.
Next, when the player clicks, we use the combination of the BoxCollider2D and OnMouseDown functions to select the Goblin and display the selection circle.
Add a new BoxCollider2D component to the Goblin prefab and then add the following function to the EnemyController script:
void OnMouseDown()
{
  if (battleManager.CanSelectEnemy)
  {
    var selection = !selected;
    battleManager.ClearSelectedEnemy();
    selected = selection;
    if (selected)
    {
      selectionCircle = (GameObject)GameObject.Instantiate(battleManager.selectionCircle);
      selectionCircle.transform.parent = transform;

      selectionCircle.transform.localPosition = Vector3.zero;
      StartCoroutine("SpinObject", selectionCircle);
      battleManager.SelectEnemy(this, EnemyProfile.Name);
    }
  }
}
Here, we store what the current state of the selected Goblin is (if we click on the same one twice, unselect it); make sure there are no other Goblins selected (you may want to change this behavior if you have weapons that can target more than one enemy). If it is a new selection, perform the following steps:
- Create a clone of the
SelectionCircleprefab. - Set its transform and position local to the selected Goblin.
- Start
SelectionCircle, spinning with its coroutine. - Tell the BattleManager game object that we have selected a target to destroy.
Like with CommandButtons, we need a final function to clear the selection state of this enemy if required, so add the ClearSelection method to the EnemyController script, as follows:
public void ClearSelection()
{
  if (selected)
  {
    selected = false;
    if (selectionCircle != null)
    DestroyObject(selectionCircle);
    StopCoroutine("SpinObject");
  }
}
We are done with the EnemyController script now.
To finish off the selection logic, let's return to the BattleManager script and add the two missing functions as follows:
public void SelectEnemy(EnemyController enemy, string name)
{
  selectedTarget = enemy;
  selectedTargetName = name;
}

public void ClearSelectedEnemy()
{
  if (selectedTarget != null)
  {
    var enemyController = selectedTarget.GetComponent<EnemyController>();
    enemyController.ClearSelection();
    selectedTarget = null;
    selectedTargetName = string.Empty;
  }
}
Both the functions are very simple. They either set the two variables we created earlier for the selectedTarget and the selectedTargetName variables, or clear these values, get the EnemyController component for the selected target, and use the ClearSelection function we just added.
However, we still can't select the enemy to attack yet, as our BattleManager script does not let us do it. Since we want to control the flow of what the player does, we do not enable this until they have first selected a weapon; if there is no selected weapon, there is no enemy selection.
To enable you to select an enemy and then progress on to the battle, we need to update our OnGUI method again for the additional actions. So, alter the case BattleState.Player_Move section of the OnGUI method as follows:
case BattleState.Player_Move:
if (GUI.Button(new Rect(10, 10, 100, 50), "Run Away"))
{
  GameState.playerReturningHome = true;
  NavigationManager.NavigateTo("World");
}
if (selectedWeapon == null)
{
  GUI.Box(new Rect((Screen.width / 2) - 50,10,100,50),"Select Weapon");
}
else if (selectedTarget == null)
{
  GUI.Box(new Rect((Screen.width / 2) - 50, 10, 100, 50), "Select Target");
  canSelectEnemy = true;
}
else
{
  if (GUI.Button(new Rect((Screen.width / 2) - 50, 10, 100, 50), "Attack " + selectedTargetName))
  {
    canSelectEnemy = false;
    battleStateManager.SetBool("PlayerReady", true);
    MessagingManager.Instance.BroadcastUIEvent(true);
  }
}
break;
Now the battle can ensue. The player selects a weapon and a target, and they have a nice (well, a nice GUI) button to tap to say they are happy with their choice. So, let the battle commence.
We also inform anyone listening to the GUI events that the GUI is now locked, and the player cannot do anything until it is their turn again.
Now, when you run the project, the flow of the battle will be as follows:
- The battle begins.
- The introduction is played, informing the player about the impending doom.
- The player is asked to select a weapon.
- The selected weapon is highlighted.
- The player is asked to select a target.
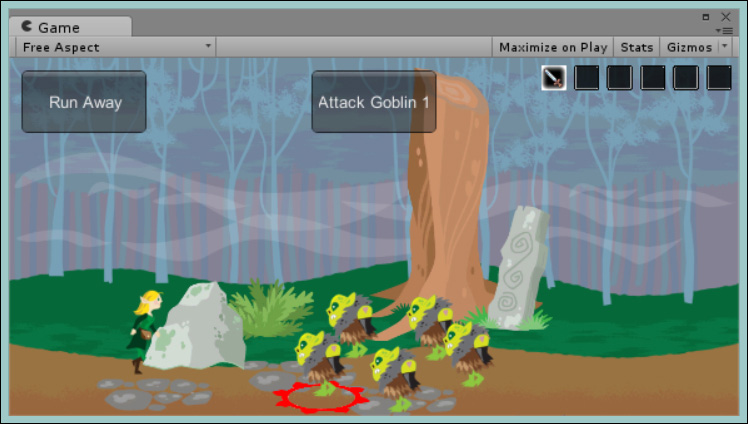
- The selected enemy gets the red ring of death circling their feet, and they probably get a sense of foreboding.
- The
Battlestate manager gets informed that the player has completed their move and that they are ready by setting thePlayerReadyproperty in the state machine totrue.
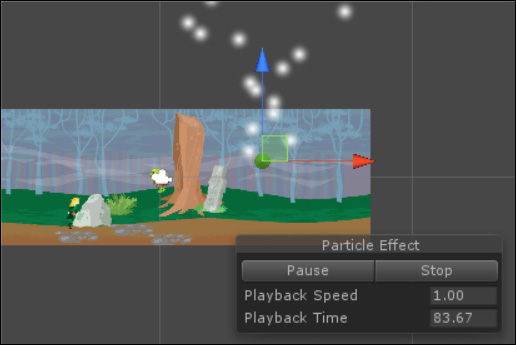
So, when you run the project, your scene should look like this:
Now that the player has committed themselves into the fray, we can play through their selected action. For now, this is just a single action, but if you have more characters/moves, then this could be extended further.
As the attack is a loop that is played until the player (or his party) runs out of attacks, we use a simple coroutine to perform the attack itself. So, let's add the following function to the BattleManager script:
IEnumerator AttackTarget()
{
  int Attacks = 0;
  attacking = true;
  bool attackComplete = false;
  while (!attackComplete)
  {
    GameState.currentPlayer.Attack(selectedTarget.EnemyProfile);
    selectedTarget.UpdateAI();
    Attacks++;
    if (selectedTarget.EnemyProfile.Health < 1 || Attacks > GameState.currentPlayer.NoOfAttacks)
    {
      attackComplete = true;
    }
    yield return new WaitForSeconds(1);
  }
}
The following is what the previous code is doing:
- It sets the initial states for the battle. It tells us how many attacks have been performed, the fact that we are attacking (disable non-attacking code such as the GUI), and that the attack has not yet finished.
- Then, until we are finished, we keep attacking:
- We call the
Attackfunction for the player against the selected enemy (this was defined in theEntityclass; all the attacks are standard, so if you want to modify them, ensure they are done correctly in the class so that all the attacks are the same) - We update the AI state for the selected enemy (let them have access to bad news, if any)
- We call the
- If the enemy is dead or the player has run out of attacks, mark the battle as complete.
- Wait for the end of the frame to attack again or end the loop.
It's all very neat logic and central in one place. If you are unsure about what is happening in a battle, then you only have one place to check (unless it's about damage).
All that is left is to call this function now when the player clicks on the Attack button in the Update method of the BattleManager game object. So, update the case BattleState.Player_Attack section as follows:
case BattleState.Player_Attack:
  if (!attacking)
  {
    StartCoroutine(AttackTarget());
  }
  break;
Now that the attack has commenced and no doubt some Goblins were at least hurt in the ensuing battle, let us provide the player with some visual feedback.
The player has made his or her move, and the Goblin has been affected in some way; it would be nice to see what happened.
In this case, the player's sword (or axe, if you added the axe) has a damage level of 5 and the player's strength is only 1; however, this will still give him a total attack damage of 6. The lazy Goblin didn't get any armor today while he was out pillaging in the woods with his pals (unless he's alone and they ditched him), and his default health is of 1. The formula for this is as follows:
Health 1 – Attack Strength 6 = dead
So, the poor Goblin has to go and meet his maker in the worst way possible. This brings us to one of the last troublesome issues with the new 2D system, that is, particles. To make the death animation nice, we are going to add a particle effect when the Goblin is killed along with some other animation.
Now, as all of the 2D rendering in Unity is actually performed in 3D with some nice jazzy helpers to make it look seamless, it is possible to add 3D objects to your 2D scenes. This is possible, provided you still follow the normal pattern to balance the performance in your scene; a large 2D scene that performs well is still going to have its performance slaughtered if you throw lots of complex 3D models in the background. It is no different than 3D in that respect.
However, what you do have to be content with is the drawing order (a good old z buffer fighting for its return) of 3D elements in the scene as if they were 2D. The area that is most impacted by this are particle effects.
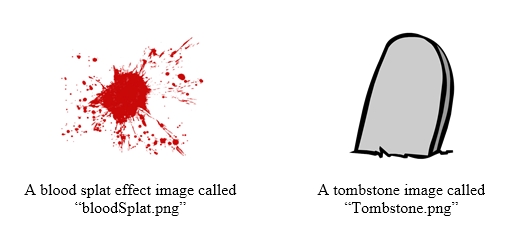
Like other 3D elements, particle effects will work fine in a 2D scene, provided you set them up correctly. To show this, we are going to define a new particle effect to use in our Goblin's death scene. We will also add a new sprite to mark the Goblin's demise and leave its mark on the world.
In the Sample assets folder, you will find the following two sprites:
Now perform the following steps:
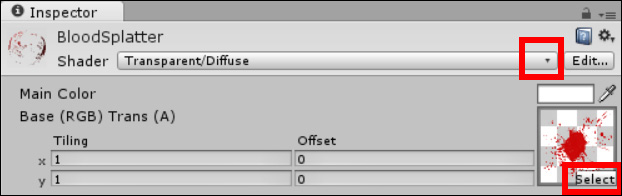
For particle effects to work, they need a material defined, not just the raw texture/sprite itself. So, navigate to AssetsMaterials (create it if you haven't done so already) and right-click on it to create a new material and name it BloodSplatter.
Next, click on the Select button on the material properties in the Inspector window for the new BloodSplatter material and select the bloodSplat.png image we just imported.
Lastly, change the shader the material uses to the Transparent/Diffuse shader by clicking on the dropdown next to the Shader property of the BloodSplatter material, and then navigate to Transparent | Diffuse.
Your material should now look like the following screenshot:
Now, because of the way the 2D animation system works, animating child objects from a parent is fine; animating the child of child objects does not work, and also animating both the parent and the child does not work as well. Basically, the transforms and parentage do not play nice together.
This isn't a big issue; it just means you need to plan ahead more when you create objects that will have multiple sprites or supporting objects that will all interact on the same animation.
To start off, perform the following steps:
- Create a new and empty game object in the scene called
GoblinEnemy. - Drag the existing Goblin prefab from
AssetsPrefabsCharacterson to the scene as a child of the new and empty game object (so we can reuse it); be sure to reset the transform on the new child. - Delete the old prefab; we don't need it any more.
- Remove the
Animator,EnemyController, andBox Collider 2Dscripts from the old Goblin prefab and add them on to the new and empty game object calledGoblinEnemy, setting them up as before. There are some components you can drag between game objects; then, there are others that you need to remove and re-add manually. It's trial and error to see which components support this behavior. In this instance, theEnemyControllerscript can be dragged over. Now, you should be left with just the sprite renderer on the Goblin game object. - Check that
Box Collider 2Don the GoblinEnemy game object is positioned over the Goblin, adjusting the Center X & Y values. - Drag the Tombstone sprite from
AssetsSpritesPropson to theGoblinEnemygame object. Set its position transform to 0 for all the values, set Scale transform where X is 0.2 and Y is 0.2, and set Sorting Layer toplayer. - Set the color of the Tombstone SpriteRenderer where A (alpha) is 0 (click on the color box and reduce the A scale to 0); we don't want to see it by default.
- Create another empty game object and call it
BloodParticles, then drag it to theGoblinEnemygame object as a child. Make sure to also set its position transform to 0 for all the values.
This gives a nice new framework for the life cycle of the Goblin's enemy; it also allows you to use the same layout but switch out the particles you use in death scenes or the marker that they leave behind in death.
Now on to the crux of this section. Select the BloodParticles game object and add a new particle system by clicking on Add Component and selecting Particle System under Effects.
Straightaway, we can see a problem.
When the particles render, by default, they are always rendered behind the 2D view, and no setting in the editor, by default, can change that for 3D renderers. It is only available for a 2D sprite renderer.
To resolve this, we need to apply a script to either the particle system itself or when we play the particle system in the code. For simplicity's sake, I've implemented it as a script on the particle system; this way, it is always in effect, and I do not need to worry about configuring it.
So, create a new script called ParticleSortingLayer in AssetsScripts and replace its contents with the following:
using UnityEngine;

[ExecuteInEditMode]
public class ParticleSortingLayer : MonoBehaviour
{

  void Awake()
  {
    var particleRenderer = GetComponent<Renderer>();
    particleRenderer.sortingLayerName = "GUI";
  }
}
Here, the script simply sets the sorting layer on the underlying renderer for the particle system; in this case, I've hardcoded it to the GUI sprite layer.
Note
The [ExecuteinEditMode] attribute just enables you to see the effect in the editor as well. More on editor functionality is covered in Chapter 11, Onward Wary Traveler.
Script libraries, such as the awesome UnityToolbag by Nick Gravelyn, also provide the previous functionality and are worked into a more reusable script; it's well worth checking it out at https://github.com/nickgravelyn/UnityToolbag.
Tip
Another one of these libraries will also expose the hidden SortingLayer properties for 3D renderers in the editor. For more information, you can read about it at https://github.com/nickgravelyn/UnityToolbag/tree/master/SortingLayer.
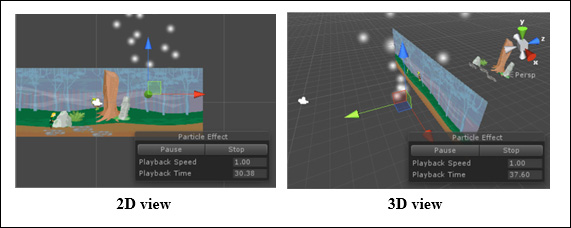
Now just attach this script to the particle system and it will be transformed into what is shown in the following screenshot, with the particles now in front of the background:
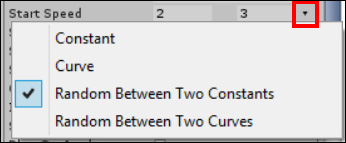
Now that we have our particle system working and rendering, we can configure it for the game. The following are all the settings we need to change:
- Name:
BloodParticles - Rotation:
X: -90 - Duration:
1.00 - Looping:
false(unchecked) - Start lifetime:
0.5 - Speed:
2 / 3(random between two constants) - Start Rotation:
10 / 50(random between two constants) - Gravity Multiplier:
0.5 - Inherit Velocity:
200 - Play On Awake:
false(unchecked) - Shape:
Radius: 0.2 - Color Over Lifetime:
Gradient – Alpha (v) 255 -> 0 - Size over Lifetime:
progressive curve - Renderer:
Material: BloodSplatter material
The curve editor appears at the bottom of the particle editor inspector.
Now that we have all the parts constructed for our live Goblin and some extra bits for his death, let's create a new GoblinDeath animation and add it to our Goblin's AI.
With our new GoblinEnemy structure in the Project hierarchy, select it and bring up the Animation tab (Window | Animation in the menu). Then, click on the Clip dropdown and select [Create New Clip]. When prompted, save the new animation in AssetsAnimationClips and call it GoblinDeath.
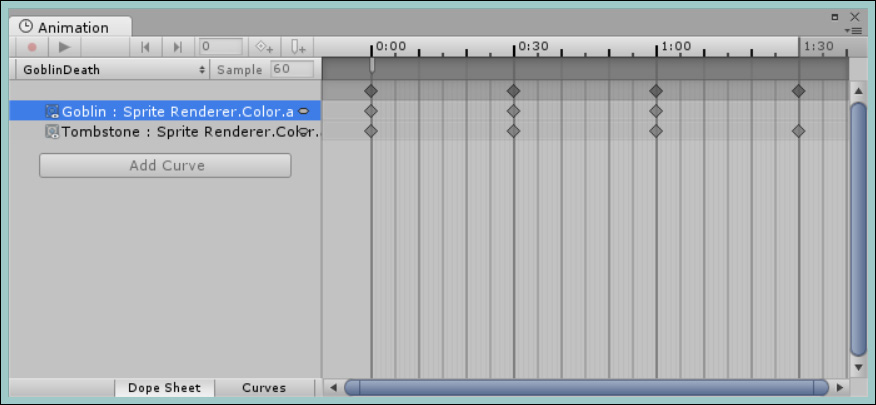
The following is what we are aiming for in the animation, a simple alpha transition to fade the Goblin out and then fade the tombstone in:
To recreate this, perform the following steps:
- Click on 0:00 on the timeframe to select the start point.
- Make sure the record button is enabled.
- Select the Goblin game object in the hierarchy.
- Open the Color editor for the SpriteRenderer (by clicking on the color box) and alter the A (alpha) value; it doesn't matter to what. This just adds the property to the animation curve.
- At position 0:00, set the value of Goblin : Sprite Renderer.Color.a to 1.
- At position 0:30, set the value of Goblin : Sprite Renderer.Color.a to 0.5.
- At position 1:00, set the value of Goblin : Sprite Renderer.Color.a to 0.
- Select the position 0:00 in the timeframe.
- Select the Tombstone game object in the hierarchy.
- Open the Color editor for the SpriteRender and alter the A (alpha) value.
- At position 0:00, set the value of Tombstone: Sprite Renderer.Color.a to 0.
- At position 0:30, set the value of Tombstone: Sprite Renderer.Color.a to 0 (you might have to set it to 1 first and then reset it back to 0 to stick).
- At position 1:00, set the value of Tombstone: Sprite Renderer.Color.a to 0.5.
- At position 1:30, set the value of Tombstone: Sprite Renderer.Color.a to 1.
This gives us the positions we want; however, if you look at the curve for the Tombstone fade - in animation, it will not look quite right, as shown here:
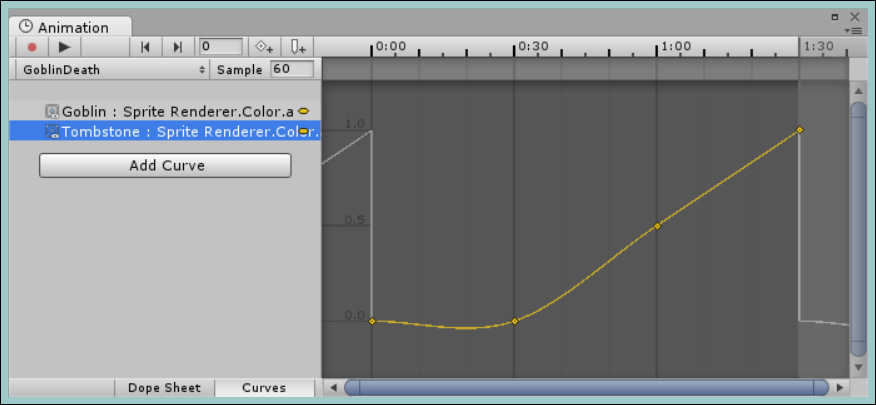
This is just because the curve system is doing its best to figure out what you want based on your recordings. To give us a flatter line at the beginning of our animation and a more linear line while the tombstone fades in, we just need to override the default behavior for the first two animation keys. To do this, we set the tangents for each animation key appropriately, as follows:
- Switch to the Curves view by clicking on the Curves button; then, right-click on the animation key (a small diamond in the view) for Tombstone: Sprite Renderer.Color.a at the position 0:00 and select Right Tangent | Constant.
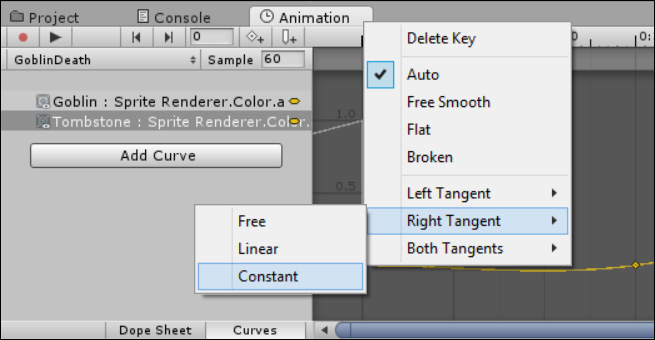
- Right-click on the key of Tombstone: Sprite Renderer.Color.a at the position 0:30 and select Left Tangent | Linear.

This gives us a nice overlapping transition between the Goblin and the Tombstone. The Goblin fades out, and halfway through this, the Tombstone fades in and our curve now looks better, as it appears in the following screenshot:

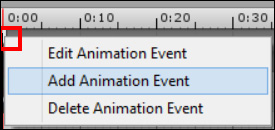
So that the particles are played at the beginning of the animation, we need to add an Animation event to the timeline. When the event is fired, it will call a custom function against the object it is attached to.
Sadly, we still cannot call particle systems directly from the Animator Dope sheet, so we have to work around this with these Animation events.
Before we can add the event, we first need to add the function and its corresponding code of the particle system to the EnemyController script that the animator is working from.
First, add a new variable to the top of the class to store a reference to the particle system:
private ParticleSystem bloodsplatterParticles;
Next, we will grab the reference to the particle system from the component added to the game object the script is attached to in the Awake function:
void Awake()
{
  bloodsplatterParticles = GetComponentInChildren<ParticleSystem>();
  if (bloodsplatterParticles == null)
  {
    Debug.LogError("No Particle System Found");
  }
  enemyAI = GetComponent<Animator>();
  if (enemyAI == null)
  {
    Debug.LogError("No AI System Found");
  }
}
Finally, we will add the following function that will cause the particle system to play (and also clear the selected enemy from BattleManager):
void ShowBloodSplatter()
{
  bloodsplatterParticles.Play();
  ClearSelection();
  if (battleManager != null)
  {
    battleManager.ClearSelectedEnemy();
  }
  else
  {
    Debug.LogError("No BattleManager");
  }
}
With these in place, we return to the Animation view, right-click on 0:00 in the dark gray bar of the timeline, and select Add Animation Event, as shown in the following screenshot:
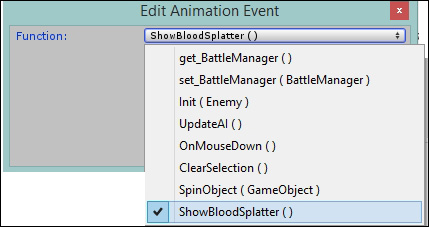
This will bring up the Edit Animation Event window, shown in the following screenshot, where you can select the function we just created:
Now, when the animation begins, it will also trigger the particle effect to start spawning and explode the blood particles in a very tastily manner.
If you now select the GoblinEnemy game object in the Hierarchy window and open the Animator tab (Window | Animator in the menu), you will see the new animation clip as a new state in the GoblinAI animator sheet.
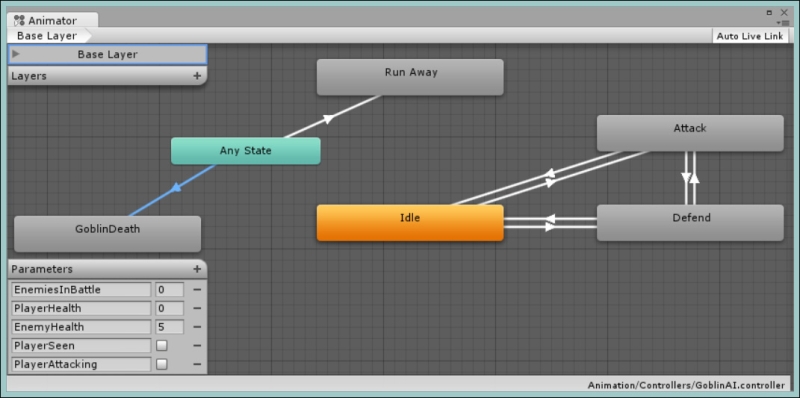
However, it is not connected to anything just yet, as we want to play the animation when the Goblin dies. We just need to hook this up to the Any state for when the Goblin's health drops to 0 or below.
So, right-click on the Any state, create a new transition, and connect it to the new GoblinDeath state. Then, set the condition for this transition so that EnemyHealth is less than 1.
To tidy things up, we also need to fix the transition from the Idle state to the Any state because we only want the Any state to be used when the Goblin is leaving the scene (either in a box or as fast as his little legs will take him). This is because the Idle state is the default state and it will begin there, so we only need control when the Goblin goes into a defense mode or attacks the player. To do this, we need to perform the following:
This closes the loop a bit more cleanly between the action and exit states (it also stops a bug where the state machine could hop directly from Idle to Death).
The final Goblin AI Animator view should now look like this:
Now that we have the new base for the Goblin, drag the GoblinEnemy game object to AssetsPrefabsCharacters (delete the old one if you haven't already). When it's created, delete the original GameObject from the Project hierarchy as we will only use the prefab from now on.
Check over all the game objects in the prefab to ensure all the position transforms are set to 0, 0, 0. This will avoid too much head-scratching when they don't draw in the correct place.
Return to the BattleManager game object and add the new prefab to the EnemyPrefabs property of the
BattleManager script. We need to replace the one we just deleted.
Despite our best laid-out plans, we actually have problems now; if you run the project at this point, you will notice two very annoying bugs:
- The Goblins spawn into the battle horrendously and die instantly
- Their death isn't finite as they keep dying repeatedly
Now, this isn't truly a problem for our budding adventurer and is arguably fun to watch, but this isn't what we were really going for; there should at least be some challenge.
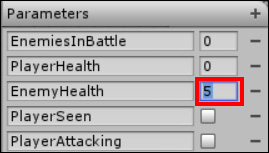
The answer to the first problem is simple enough: it takes time for EnemyController to update the EnemyAI state machine for the first time (several frames actually, just a Unity thing). As the AI isn't updated, the initial state of EnemyHealth is 0. So, when the state machine starts, the initial condition for the transition to GoblinDeath is met because EnemyHealth is less than 2. To resolve this, simply set the default state machine's value for EnemyHealth to something more than the default condition, as shown in the following screenshot (for example, I set the default value to 5):
The second issue is a bit more conventional and just requires a bit more knowledge about the new animation system, as by default, all the animations will loop forever.
To stop an animation from looping, you would normally just transition it to another animation state in the Mecanim animator view when it is complete (the condition Exit Time = 0.9). However, in this case, our animation is the final resting state, and as stated, with nowhere to go, the animation state will just loop forever.
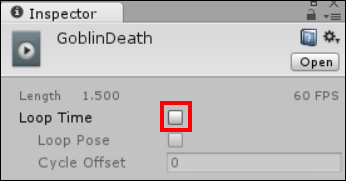
To change this, we simply need to alter the animation clip's import settings to denote it is a static animation and not a looping one (by turning off looping).
So, navigate to AssetsAnimationClips and select the GoblinDeath animation clip. Then, in the Inspector window, uncheck the Loop Time option as shown in the following screenshot:
There are several other import properties for animation clips, but these are mainly for 3D models.
Running the project now in the battle scene won't get you very far unfortunately; you will need to switch back to the home scene and play through from there. You can perform the following actions in your game:
- Beginning at home.
- Going to the shop and buying a weapon.
- Leaving the shop and going to the big bad world.
- Wandering until you encounter a battle.
- Selecting a weapon to attack with.
- Selecting a Goblin enemy.
- Clicking on Attack.
Once this is done, only then will you be able to see how the full effect of the battle animation will unfold.