
Microsoft is working well to make the .NET CLI experience better for developers to create, build, and run projects through the command line interface. You can install the .NET CLI using native installers or use the installation shell script.
Once this is installed, we can go to the command prompt and run commands like new to create a new project, restore to restore NuGet packages defined in your project, run to run the application, build to build the application and so on. With this, we don't need the Visual Studio IDE to create, build, or run our project, and we can use Visual Studio Code or any other editor to build our application.
Microsoft has recently introduced and is working on a newer version of .NET CLI, and in the RC3 version a lot of improvements and templates have been made available for you to choose and create projects from. To create custom templates we need to have at least version RC3 or above installed on our machine. To install the latest build, please refer to the following link:
https://github.com/dotnet/templating.
The latest build uses the dotnet new3 command to create projects. Once this is installed, you can type dotnet new3 on the command prompt and it will show you the number of templates installed.
Creating a template is far easier than creating a new extension. It only requires a .template.config folder to be created at the root of the solution or project folder, depending on how many files or folders you want to port, and a template.json file that will define some metadata about the template.
Suppose we have an enterprise application architecture ready and we have customized it to bring OWASP security practices, design patterns, and other framework-related code and we need to reuse that project as a template for future projects. We can do that by creating a .template.config folder at the root of our solution folder, as follows:
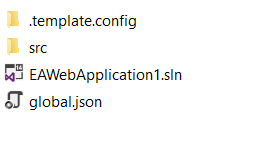
Then, we will create a template.json file inside the .template.config folder, whose markup will be as follows:
    {
      "author": "Ovais Mehboob (OvaisMehboob.com)",
      "classifications": [ "Web", "WebAPI" ], // Tags used to
         search for the template.
      "name": "EA Boilerplate ASP.NET Web API",
      "identity": "EA.Boilerplate.WebApp", // A unique ID for
        the project template.
      "shortName": "eawebapi", // You can create the project
       using this short name instead of the one above.
      "tags": {
        "language": "C#" // Specify that this template is in C#.
      },
      "sourceName": "EAWebApplication", // Name of the csproj
        file and namespace that will be replaced.
      "guids": [ // Guids used in the project that will be
        replaced by new ones.
        "8FBE597A-CFF6-4865-B97A-FCE69005F098",
      ]
    }
Next, we can use the following command to install this template in the .NET CLI tool:
dotnet -i "Path of your project"
We can then create a new project by executing the following command:
dotnet new3 eawebapi