In the old days of programming, you had to write code to create your user interface and then create your actual program. With Xcode, you can create your user interface without writing any code at all. However, to make your program do something, you'll still need to write code. Although you can theoretically use any programming language to create a Mac program, the language used most often (even by Apple's programmers themselves) for this task is Objective-C.
When learning any programming language, you must first learn the syntax, which defines how to write commands in a particular programming language. Then you need to learn how to do common tasks used to create a typical program.
If you're already familiar with another programming language, you can skim through this chapter to get acquainted with the way Objective-C works. However, if you've never used any programming language at all, then this chapter will explain the basics of programming the Mac using Objective-C.
There's a big difference between writing a program in traditional Objective-C and writing a program in Objective-C for the Mac. When you write an ordinary Objective-C program, you have to write a main program that looks something like this:
int main( int argc, const char *argv[] ) {
    printf( "Hello, world!");
    return 0;
}
Every Objective-C program consists of a main program (identified by the keyword main). To make your program work, you have to write and store instructions in this main program.
In this example, there are only two instructions. One displays the message "Hello, world!" on the screen, and the second returns a 0, which essentially tells the operating system that the program ran successfully. In a more complex Objective-C program, you might have thousands of instructions stored in this main program or stored in multiple subprograms, which are called or run from within this main program.
A Mac Objective-C program also has a main program, but Xcode creates this main program for you automatically. Normally, you never even have to peek at this main program, let alone modify it. To examine this main program, open the Other Sources folder, and click the main.m file to view the code, as shown in Figure 5-1. This Mac Objective-C main programs looks like this:
int main(int argc, char *argv[])
{
    return NSApplicationMain(argc,  (const char **) argv);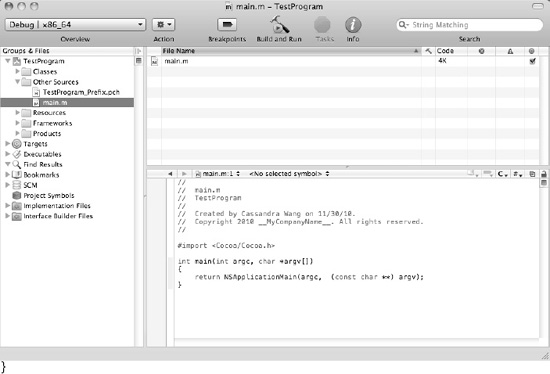
Essentially, the main program consists of a single line of code, which loads the main user interface file (typically called MainMenu.xib). When the main program runs, it also runs any instructions stored inside a method called applicationDidFinishLaunching, which appears in the AppDelegate.m file inside the Classes folder, as shown in Figure 5-2.
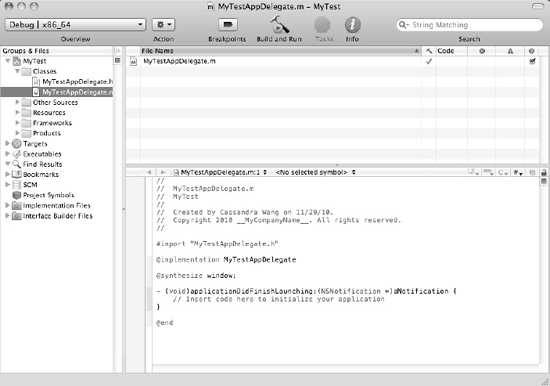
When you need to write code to do something right away, you need to store this code in this AppDelegate.m file's applicationDidFinishLaunching method:
- (void)applicationDidFinishLaunching:(NSNotification *)aNotification {
    NSLog (@"Hello, world!");
}
In a traditional Objective-C program, you have to write a main program and fill it with instructions written in Objective-C. In a Mac Objective-C program, Xcode creates your main program automatically, so you just need to write instructions in other files, such as the AppDelegate files (created automatically by Xcode) or any additional files you create.
In comparing a traditional Objective-C program with a Mac Objective-C program, you may notice the different commands in printing "Hello, world!" on the screen. In a traditional C program, you might use the printf command. In a Mac Objective-C program, you can use printf, but you'll more commonly use NSLog.
The printf command normally prints to the screen, but with a Mac program, you actually need to print to the user interface or to the Log or Console window, which is what the NSLog command does.
The second difference is that the printf command prints any data that appears inside quotation marks. The NSLog command does that as well but requires that the @ symbol appears in front of the data inside the quotation marks:
NSLog (@"This prints a message.");
When writing Mac Objective-C programs, you'll see this @ symbol often, which identifies commands that are unique to Objective-C and not found in traditional C programs.
Rather than just print text using the NSLog command, you may need to print different types of data. To do this, you'll have to use the % symbol followed by a single letter that identifies the type of data to print. The three most common types of data you can print are as follows:
%i: Prints integer values such as34, 192, and5%f: Prints floating-point values such as54.903and2.14%@: Prints objects such as strings like@"Hello, world"
When printing data with the NSLog command, you need to specify the type of data to print along with the actual data:
NSLog (@"Print an integer = %i", 34);
This command would simply print this:
Print an integer = 34
Some other symbols you'll often see in an Objective-C program include the semicolon (;), curly brackets ({ }), number sign (#), double slash (//), asterisk (*), and square brackets ([ ]). Although such symbols may look cryptic, they all serve a specific purpose. By understanding what these different symbols do, you can better decipher Objective-C code and understand how it works, even if you don't know exactly what the code does.
Every program consists of instructions or code. A simple program might haveonly one line of code, but most programs have hundreds, if not thousands or even millions, of lines of code. To help the compiler understand where each line of code ends, you have to use a semicolon:
NSLog (@"Hello, world!");
NSLog (@"Good-bye!");
The most common mistake programmers make is omitting this all-important semicolon. Omitting the semicolon from the first line, in the previous example, makes the computer think you actually wrote something like this:
NSLog (@"Hello, world!")NSLog (@"Good-bye!");
This line won't work because the computer doesn't know when the first NSLog command that prints "Hello, world!" actually ends. Semicolons may look trivial, but they're extremely important and used whenever you write Objective-C code.
Besides the semicolon, the second most common symbols you'll see are the left and right curly brackets: { and }. Since you'll often need to write multiple lines of code that work together to perform a specific function, curly brackets define the beginning and end of those lines of code:
{
   NSLog (@"Hello, world!")
   NSLog (@"Good-bye!");
}
You always use curly brackets in a method (subprogram) to define all the lines of code stored in that method. When using curly brackets, the ending right curly bracket typically appears on a separate line. However, the beginning left curly bracket can appear at the end of a line:
- (void)applicationDidFinishLaunching:(NSNotification *)aNotification {
    NSLog (@"Hello, world!");
    NSLog (@"Good-bye!");
}
Or the left curly bracket can appear on a separate line:
- (void)applicationDidFinishLaunching:(NSNotification *)aNotification
{
    NSLog (@"Hello, world!");
    NSLog (@"Good-bye!");
}
To the computer, both approaches are equivalent, so it's more a matter of personal style which method you prefer. You can actually mix both styles in the same program, but it's usually best to stick to one style for consistency.
You may also see nested pairs of curly brackets where one pair of left/right curly brackets appears inside another pair of left/right curly brackets:
- (void)applicationDidFinishLaunching:(NSNotification *)aNotification
{
    if (response == "true")
    {
       NSLog (@"Hello, world!");
       NSLog (@"Good-bye!");
    }
}
Each left curly bracket must pair up with a matching right curly bracket. By using indentation (which the compiler completely ignores), you can vertically align each matching left/right curly bracket pair. Since the compiler ignores indentation, the Xcode compiler treats the previous code as if it actually looked like this:
- (void)applicationDidFinishLaunching:(NSNotification *)aNotification
{
if (response == "true")
{
NSLog (@"Hello, world!");
NSLog (@"Good-bye!");
}
}
Since this code can be harder to read, it's always best to use indentation to make it visually clear where one chunk of code begins and ends. When writing your own Objective-C code, always strive to make it as readable and understandable as possible.
When you run a program, the Xcode compiler examines your code, line by line. However, sometimes you may need to give the compiler special instructions. To do this, you have to put the # symbol in front of these special instructions called compiler directives. The most common compiler directive appears in front of the import keyword:
#import "MyProgramAppDelegate.h"
This #import command tells the Xcode compiler to take any code stored in a specific file (such as the MyProgramAppDelegate.h file) and add or import that code into the current file. From the compiler's point of view, it's as if you crammed all your code from a separate file into the currently displayed file. However, from a programmer's point of view, your program remains divided into different files, which makes editing and modifying these separate files far easier than trying to edit and modify one massive file.
The #import command is one that you'll see and use often since it allows you to access all of Apple's prewritten and tested code without physically copying that code into your own programs.
When writing code, you may need to jot down a note to yourself (or to another programmer) that explains what a particular chunk of code does or what assumptions you've made in writing your code. Rather than jot down these notes on a separate piece of paper (and risk losing or misplacing them), it's easier to write notes directly in your code.
To keep the Xcode compiler from mistaking your notes as code, you need to use special symbols. For identifying a single line as a note or comment, you can use the // characters:
{
   NSLog (@"Hello, world!");
   // This line is a comment
}
Xcode treats anything that appears after the // characters as if it doesn't exist, so the previous code looks like this to the compiler:
{
   NSLog (@"Hello, world!");
}
Comments can appear on a separate line or at the end of a line of code:
{
   NSLog (@"Hello, world!") ;  // This line is also a comment
   // This line is a comment
}
Comments are useful for writing short explanations on how your code works or for identifying the date and name of the last programmer who changed the code. If you need to write comments on multiple lines, you could use the // symbols at the beginning of each line:
{
   NSLog (@"Hello, world!")
   // The line above prints to the log window
   // Last modified on April 1, 2012 by Bob Smith
}
However, typing multiple // symbols in front of each comment can get tedious. For a faster method of turning multiple lines into comments, you can use matching pairs of the slash and asterisk symbols:
{
   NSLog (@"Hello, world!")
   /* These two lines are comments
        Last modified on April 1, 2012 by Bob Smith */
}
The /* and */ symbols tell Xcode that anything in between those matching symbols are a comment that the compiler can ignore. You can use both the // and /* and */ symbols to create comments in your code.
Many times your code will use single-word commands, such as NSLog, to tell the computer to do something. However, one benefit of Objective-C is that you can divide a large program into objects, so instead of just using the built-in commands of Objective-C, you can define your own commands and store them in objects of your own creation.
To identify when you're working with objects in Objective-C, you'll need to use square brackets in a form such as the following:
[object message];
The square brackets identify a single object and the message you're sending to that object. Typically that message sendseither an object data or an instruction:
[textField setStringValue:@"Hello, world!"];
[personalData release];
The first line of code sends the message setStringValue using the data "Hello, world!" to an object called textField. The second line of code sends the message release to an object called personalData. Although you may not understand what these two lines of code actually do at this point, the square brackets identify that you're working with objects.
Just like with pairs of curly brackets, you may also see nested pairs of square brackets:
[[NSObject alloc] init];
Like nested pairs of curly brackets, nested pairs of square brackets must match. For every left square bracket, you need a matching right square bracket. Although square brackets can look unusual, especially if you're used to other programming languages, just remember that square brackets always identify when you're working with objects.
You can use the asterisk symbol in several ways. First, it can represent a multiplication symbol such as 54 * 11. Second, it can identify the beginning and end of a comment:
/* This is a comment */
Third, the asterisk can identify a pointer. When storing data, computers carve out a chunk of memory to hold the data. Each time you need to store more data, your program needs to use more memory.
If you need to store identical data, you could store that data in three separate chunks of memory. However, a more efficient way to use memory is to store that data once and then create pointers to that single copy of data, as shown in Figure 5-3.
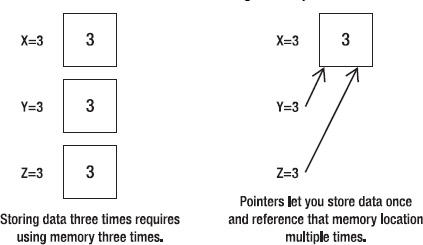
In most programming languages, including Objective-C, you can store data in a variable such as assigning 48 to a variable named myAge. When you store data in a variable, that data gets stored in a specific part of the computer's memory, called a memory address. Each time you want to store data, your data gobbles up another chunk of memory.
As an alternative to creating a new chunk of memory, pointers work by referencing or pointing to, a memory address that already stores data. The power of a pointer is that it's much easier and faster to reference or point to a new memory address quickly. The drawback is that if your pointers point to the wrong memory address, your program could physically foul up the computer's memory.
When working with Objective-C and objects, you'll need to use pointers. In Objective-C, a pointer is represented by the asterisk. Since pointers are used with objects and Objective-C programming heavily relies on objects, you'll be using pointers in almost every nontrivial Mac program.
Typically you'll use the asterisk symbol (*) to declare a pointer to an object:
Object *pointer;
Oftentimes you'll see the asterisk symbol (*) used with square brackets:
NSObject *myObject = [[NSObject alloc] init];
Whenever you see asterisks and square brackets, chances are good that the code is working with pointers and objects.
All programs need to store data. In any programming language, you can store data in something called a variable. A variable is nothing more than a unique name that acts like a box for holding data. Variables get their name because they can store various data. One moment a variable might hold 45, and the next moment that same variable might hold 740.
To avoid mixing data up, every variable needs a unique name where each variable can hold only one chunk of data at a time. The moment you store data in a variable, any new data wipes out any data currently stored in that variable.
Before you can use a variable, you must create or declare that variable. Declaring a variable simply tells the Xcode compiler that the variable is now available for storing data. There are two parts to declaring a variable.
First, you must define a unique name for your variable. Second, you must define the type of data that the variable can hold.
The name you give a variable is completely arbitrary, although most programmers use a descriptive name. For example, if a variable is meant to hold someone's salary, it's logical to name that variable something like Salary rather than something generic and nondescriptive like X.
Although you can name variables as short as X or as long as Thisisavariablenamethatistoolong, it's common in Mac programming to create variable names that consist of two or more words combined using something called camel case.
With camel case, the first word of the variable appears in lowercase, but the first letter of the second and any additional words appear in uppercase:
variableName
numberHolder
lengthInMeters
After you choose a descriptive name for your variable, the second part in declaring a variable involves defining what type of data it can hold. The most common types of data are numbers, and the two most common types of numbers are integers and floating-point or real numbers.
An integer variable can hold only whole numbers such as 102, 5, or 649. A floating-point variable can holdonly real numbers such as 3.125, 10.24, or 90.08.
To declare an integer variable, you need to use the int keyword followed by the variable name:
int myAge;
int dogsInHouse;
int peopleOnBoard;
To declare a floating-point variable, you need to use the float keyword followed by the variable name:
float stockPrice;
float averageAge;
float medicineQuantity;
Note
There are actually variations of int and float data types. If you want to define only positive numbers, you can declare a variable as unsigned such as unsigned int myAge;. If you want to make it clear that a variable can hold both positive or negative, you can declare a signed variable such as signed int myDebt;. If you need to declare extremely large floating-point numbers, you can use the double keyword such as double myExtremeValue;. While you're learning to program the Mac, you'll probably only need to use the int and float keywords to declare your variables.
Besides declaring variables as int or float data types, a third commonly used data type is the Boolean data type. A Boolean variable can holdonly one of two values, either 1 (YES) or 0 (NO). Boolean data types are often used to help the computer make a decision, and based on the value of a Boolean variable, the computer may follow one set of instructions or another set of instructions.
To declare a Boolean variable, you just need to use the BOOL keyword followed by your variable name:
BOOL doorOpen;
BOOL onTarget;
BOOL windowOpenAndDoorShut;
When you first declare a variable, the value of that variable is unknown. If you try to use a variable right after you declare it, the unknown value of that variable will likely crash your program or make it behave erratically. As soon as you declare a variable, it's a good idea to assign a value to that variable right away.
Assigning a value to a variable simply means using the equal sign (=):
Variable = value;
There are two ways to declare a variable and assign a value to it. The first way involves two separate lines of code:
int myAge;
myAge = 49;
A second way to assign a value to a variable is to combine the variable declaration and the assignment to a value in a single line:
int myAge = 49;
To ensure that a variable never contains an unknown value, it's usually best to use the second method of declaring and assigning a variable in a single line, but as long as you can remember to always assign a value to a variable before using it, you can use whichever method you like.
When you declare a variable, you also declare the scope of that variable. The scope defines which part of your program can access and use that variable. In most cases, you'll declare a variable inside a method so the scope of that variable is visible only to code stored in that same method. For example, suppose you had two methods like this:
- (void)applicationDidFinishLaunching:(NSNotification *)aNotification
{
    int myCats = 4;
   // More code goes here
}

- (void)countBoxes;
{
    int numberOfBoxes = 75;
   // More code goes here
}
Any code stored in the applicationDidFinishLaunching method could access and use the myCats variable because the myCats variable is declared inside that method. Likewise, any code stored in the countBoxes method could access and use the numberOfBoxes variable because the numberOfBoxes variable is declared inside that method.
The scope of a variable typically lasts from the variable declaration line to the end of the code block where the variable was declared. Since each variable was declared inside the code block that makes up each method, each variable's scope is validonly in that particular subprogram or method.
What happens if you try to access a variable declared in another method like the following?
- (void)applicationDidFinishLaunching:(NSNotification *)aNotification
{
    int myCats = 4;
   numberOfBoxes = 120;
}

- (void)countBoxes;
{
    int numberOfBoxes = 75;
   myCats = 1;
}
In both cases, each method is trying to use a variable that was declared in a different method. In the first method, the numberOfBoxes variable is considered undeclared. In the second method, the myCats variable is considered undeclared.
Since the scope of a variable typically extends only within the method where it was declared, it's possible to do the following:
- (void)applicationDidFinishLaunching:(NSNotification *)aNotification
{
    int happyPeople = 2;
}

- (void)countBoxes;
{
    int happyPeople = 75;
}
In this example, both methods declare a variable with the same name. Although this may look confusing, it's perfectly valid because the scope of each variable extendsonly to the method that it was declared in. Although this is valid, it's not a good idea to use identical variable names in different parts of your program because the potential for confusion is so high.
As a general rule, any variable you declare will likely be accessible only inside a block of code defined by the curly brackets: { and }.
To get practice declaring and assigning values to variables, this sample program shows how to use the NSLog command to print data stored in two different variables. To create this sample program and see how to declare and use variables, follow these steps:
Start Xcode, and create a new project such as by choosing File

Click the Cocoa Applications icon, and click the Next button. A dialog box appears, asking you to choose a name for your project.
Type a name such as VariableTest, and click the Next button. A Save As dialog box appears.
Select a drive and folder to store your project, and click the Save button.
Click the disclosure triangle (the gray arrow) that appears to the left of the Classes folder in the left pane of the Xcode window. A list of two files appears. If you named your project VariableTest, these two files will be named
VariableTestAppDelegate.handVariableTestAppDelegate.m.Click the
.mfile, such as theVariableTestAppDelegate.mfile. The code for that file appears in the middle pane of the Xcode window.Modify the
applicationDidFinishLaunchingmethod so that it appears as follows:- (void)applicationDidFinishLaunching:(NSNotification *)aNotification {int myAge = 49;float myPaycheck = 5120.75;NSLog (@"This is my age: %i", myAge);NSLog (@"This is my paycheck amount: %f", myPaycheck);}Choose File
Click the Build and Run button, or choose Build
Quit the program, such as clicking the Stop button or choosing Product
Choose Run
2010-08-24 22:39:14.358 VariableTest[1001:a0f] This is my age: 49
2010-08-24 22:39:14.362 VariableTest[1001:a0f] This is my paycheck amount: 5120.750000
You may notice that when printing out a floating-point number, the NSLog command printed a bunch of extra zeroes. If you want to define how many numbers you want to appear to the right of the decimal point, you need to specify the number of digits:
NSLog (@"This is my paycheck amount: %.2f", myPaycheck);
This code tells the computer to print the floating-point number with two digits to the right of the decimal point:
2010-08-24 22:39:14.362 VariableTest[1001:a0f] This is my paycheck amount: 5120.75
Note
If your floating-point number has more digits than you've specified, your number will be rounded. For example, suppose you have a floating-point number of 3.79 and you specify just one digit to the right of the decimal point like %.1. Then your number will be rounded from 3.79 to 3.8.
Variables are handy for storing data that may vary. For example, you might create a variable called yourAge where one person might type in a value of 43 and another person might type in a value of 82.
However, sometimes you may need to create a fixed value. The most common use for a fixed value, or constant, is when you need a specific value that represents something that will never change within your program such as defining the number of letters in the alphabet or defining a retirement age like 70.
To declare a constant, you need to use the #define command followed by the constant name and its assigned value:
#define CONSTANTNAME Value
Note
When defining a constant, you do not need a semicolon at the end of the line.
The #define command tells the Xcode compiler that you're creating a constant name with a fixed value. Constant names can appear as a combination of uppercase and lowercase characters:
#define constantName Value
#define CONSTANTName Value
Some programmers like to use all uppercase since uppercase letters are easy to spot. Others prefer to use camel case that smashes together two or more words where the first letter is lowercase but the first letter of each new word is uppercase:
#define myConstantName Value
For another way to clearly identify constants, some programmers begin every constant name with a lowercase k:
#define kConstantName Value
Since there is no single "best" way to name constants, choose a method that makes sense to you, and use it consistently.
The value you define for a constant can be any number or even a string:
#define iLoop 5
#define errorMessage @"Bad memory"
To see how you can use constants, modify the program you created in the previous section (named VariableTest) by following these steps:
Click the
VariableTestAppDelegate.mfile stored inside the Classes folder. The code for that file appears in the middle pane of the Xcode window.Modify the code in the
VariableTestAppDelegate.mfile as follows:#import "VariableTestAppDelegate.h"
#define kLoopCounter 5@implementation VariableTestAppDelegate @synthesize window; - (void)applicationDidFinishLaunching:(NSNotification *)aNotification {int counter;int myAge = 49; float myPaycheck = 5120.75;for (counter = 0; counter < kLoopCounter; counter++){NSLog (@"This is my age: %i", myAge); NSLog (@"This is my paycheck amount: %.2f", myPaycheck);}} @endChoose File
Click the Build and Run button or choose Build
Quit the program, such as clicking the Stop button or choosing Product
Choose Run
2010-08-25 10:44:31.099 VariableTest[1702:a0f] This is my age: 49
2010-08-25 10:44:31.102 VariableTest[1702:a0f] This is my paycheck amount: 5120.75
2010-08-25 10:44:31.103 VariableTest[1702:a0f] This is my age: 49
2010-08-25 10:44:31.103 VariableTest[1702:a0f] This is my paycheck amount: 5120.75
2010-08-25 10:44:31.104 VariableTest[1702:a0f] This is my age: 49
2010-08-25 10:44:31.104 VariableTest[1702:a0f] This is my paycheck amount: 5120.75
2010-08-25 10:44:31.105 VariableTest[1702:a0f] This is my age: 49
2010-08-25 10:44:31.105 VariableTest[1702:a0f] This is my paycheck amount: 5120.75
2010-08-25 10:44:31.106 VariableTest[1702:a0f] This is my age: 49
2010-08-25 10:44:31.106 VariableTest[1702:a0f] This is my paycheck amount: 5120.75
In this example, you defined a constant to hold a value of 5. Then you used this constant in a loop to tell the computer to repeat a block of code five times. To modify the number of times your loop runs, you can simply modify the constant value (kLoopCounter) to a new value such as 3 or 300.
This example used a single constant value in a loop just once, but imagine if you needed to use the same constant value in 100 different places in your program. If you just typed a number rather than use a constant value, you would have to change this number in 100 different places, increasing the chance of error.
By using a constant, you need to define the actual number only once, and then you'll automatically change the 100 other places in your program that relies on that constant value. Constants simply help you use a fixed value repetitively throughout your program.
Variables can store data, but every program needs to manipulate data somehow. For numbers, the most common way to manipulate data involves mathematical operators, as shown in Table 5-1.
Table 5-1. Mathematical Operators
Operator | What It Does | Example |
|---|---|---|
| Adds |
|
| Subtracts |
|
| Multiplies |
|
| Divides |
|
| Modulo (divides two integers and returns the remainder) |
|
All of these mathematical operators can work with either integer or floating-point numbers, except the modulo operator, which can work only with integers. The simplest way to use mathematical operators is to use one per line:
85 + 6 = 91
91 * 7 = 637
Of course, you can also cram multiple mathematical operators on a single line, but you have to make sure that the computer calculates numbers in the right order. For example, what happens if you do the following?
85 + 6 * 7 = ???
Instead of getting 637, the computer would calculate 127. The reason for this is something called precedence.
Normally the computer would just calculate results from left to right, but precedence tells the computer which mathematical operators to calculate first. In a line that contains two or more mathematical operators, Objective-C first calculates multiplication (*), division (/), and modulo (%) first. Then it calculates addition (+) and subtraction (-).
In the previous example, the computer would first multiply 6 * 7 to get 42. Then it would add 42 to 85 to get 127. In case you want the computer to add 85 to 6 first, you have to surround those numbers in parentheses like this:
(85 + 6) * 7
This would cause the computer to add 85 to 6 and get 91, which would make the line look like this:
91 * 7 = 637
If you have two or more mathematical operators that have equal precedence, the computer simply calculates them from left to right. Consider the following:
12 + 9 - 7 + 3 - 45
First the computer would calculate 12 + 9 and get 21 like this:
21 - 7 + 3 - 45
Then it would calculate 21 - 7 and get 14 like this:
14 + 3 - 45
Adding 14 to 3 would get 17:
17 - 45
Finally, it would calculate the remaining mathematical operator and get −18.
As a general rule, always use parentheses when using multiple mathematical operators on the same line. Parentheses clarify which mathematical operators the computer calculates first.
Besides numbers, the second most common type of data that programs often need to store and manipulate are strings, which are typically letters but can also include symbols and even numbers. Some examples of a string include the following:
"Hello, world!"
"The RX-25 is defective, sir."
"45% of people spend $5.00 or more for lunch 90% of the time."
Unlike integer or floating-point numbers that have a built-in data type defined by the Objective-C programming language, strings are treated as an object called NSString.
Note
To identify objects that have already been created by Apple, the object names will usually begin with the NS prefix such as NSString. NS stands for NeXTSTEP, which is the operating system that Apple used as a foundation to create Mac OS X.
Declaring a string variable is similar to declaring an integer or floating-point variable. The main difference is that when you declare an NSString variable, you're working with the NSString object, so instead of declaring a variable, you're actually declaring a pointer. So, declaring an NSString variable looks like this:
NSString *pointerName;
Like all variables, you can assign a value to a variable at the same time you declare it:
NSString *myName = @"John Smith";
When using strings with NSString variables, you must always put the @ symbol in front of the string, which is enclosed in double quotation marks.
Rather than assign a value to an NSString variable when you declare it, you can just declare the variable and then assign a value to that variable on a different line:
NSString *myName;
myName = @"John Smith";
One key point to notice is that when you declare an NSString variable, you must use the asterisk (*) symbol since it's a pointer. However, when you assign a value to an NSString variable, you omit the asterisk symbol.
To see how to use NSString variables, modify the VariableTest project by following these steps:
Open the VariableTest project from the previous section.
Click the
VariableTestAppDelegate.mfile stored in the Classes folder. The code for that file appears in the middle pane of the Xcode window.Modify the code in the
VariableTestAppDelegate.mfile as follows:- (void)applicationDidFinishLaunching:(NSNotification *)aNotification {NSString *myName;myName = @"John Smith";int counter; int myAge = 49; float myPaycheck = 5120.75; for (counter = 0; counter < kLoopCounter; counter++) { NSLog (@"This is my age: %i", myAge); NSLog (@"This is my paycheck amount: %.2f", myPaycheck); }NSLog (@"This is my name: %@", myName);}Click the Build and Run button, or choose Build
Quit the program, such as by clicking the Stop button or choosing Product
Choose Run
2010-08-25 20:07:05.948 VariableTest[2781:a0f] This is my age: 49
2010-08-25 20:07:05.952 VariableTest[2781:a0f] This is my paycheck amount: 5120.75
2010-08-25 20:07:05.955 VariableTest[2781:a0f] This is my age: 49
2010-08-25 20:07:05.956 VariableTest[2781:a0f] This is my paycheck amount: 5120.75
2010-08-25 20:07:05.956 VariableTest[2781:a0f] This is my age: 49
2010-08-25 20:07:05.957 VariableTest[2781:a0f] This is my paycheck amount: 5120.75
2010-08-25 20:07:05.957 VariableTest[2781:a0f] This is my age: 49
2010-08-25 20:07:05.958 VariableTest[2781:a0f] This is my paycheck amount: 5120.75
2010-08-25 20:07:05.958 VariableTest[2781:a0f] This is my age: 49
2010-08-25 20:07:05.961 VariableTest[2781:a0f] This is my paycheck amount: 5120.75
2010-08-25 20:07:05.962 VariableTest[2781:a0f] This is my name: John Smith
Programming a Mac is similar to programming other types of computers in many ways yet also is different in ways designed to make programming easier. One major difference is that traditional programming forces you to create a single main program and fill it with code. Xcode automatically creates a main program for you, which you'll never need to modify or even look at. Instead of filling your main program with code, Xcode lets you store your code in separate files, which can run when a certain event occurs.
Like all programming languages, Objective-C uses a combination of symbols and commands that look like complete words. To define the end of each line of code, you must use a semicolon. To define a block of code, you use curly brackets. To give special instructions to the Xcode compiler, you need to use the # symbol. For leaving comments directly in your code, you use the // and /* and */ symbols for multiple lines.
Since Objective-C focuses on dividing a large program into objects, you'll need to use square brackets like [ and ] to identify when you're working with objects. Typically when you're working with objects, you'll need to use pointers, which are identified by the asterisk (*) symbol.
The main purpose of any program is to store and manipulate data. Every program needs to store data in a variable, which can be a number (integer or floating point), Boolean value (YES or NO), or strings (defined by the predefined object NSString). When you need to define a fixed value, you can create a constant using the #define command.
Once you understand the basics to using Xcode to create simple programs that can use constants and different types of variables, you'll be ready to start tackling more complicated programs. Learning to program the Mac involves a combination of learning Objective-C, learning Xcode, and learning the basic principles of object-oriented programming. In the next chapter, you'll learn more about making more complicated types of programs that can make decisions or repeat one or more lines of code, which can give your program more flexibility and versatility.