Radio buttons, check boxes, and pop-up buttons let the user choose from a fixed list of choices. However, many times a program may need to request data that won't fit easily into a limited number of choices, such as asking for the user's name.
To accept data, a program needs to let the user type in data. To display data, a program can use a text field or a label. A label basically can display only text, but a text field can display text or allow the user to type in text. With a text field, users can type in any type of data such as text or numbers.
For even greater flexibility, you can use a combo box, which lets the user type in data or select from a list of choices, just like a pop-up button. By using a text field, label, or combo box, your user interface can display information and accept data to use.
A label serves two purposes. First, it can display static information to the user, such as listing short instructions explaining the purpose of other user interface objects. For example, if your program displays a text field, the user may have no idea what type of information your program expects to receive in that text field. However, if you put a label next to that text field and display the word "Name" in that label, it becomes clear what type of information the user needs to type into that text field.
Labels can also be used to display information to the user, such as a warning. For example, if the user types in an incorrect password, a label can display a message telling the user what happened. When you need to display static or changing information, you can use a label.
A label is useful for displaying text on the user interface, such as instructions to the user or brief descriptions of what other controls might do, such as a label that identifies a slider for adjusting the volume. To create a label, follow these steps:
Double-click the
.xibuser interface file that contains the window to which you want to add a label. Interface Builder appears.Choose Tools

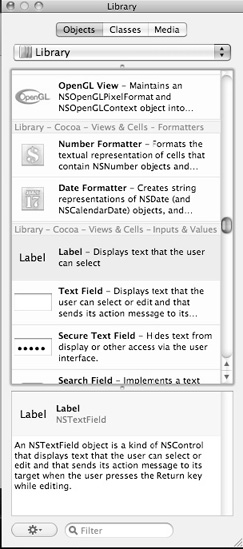
Scroll through the Object Library and look for the Label object, as shown in Figure 18-1.
Drag the Label object from the Object Library and drop it on your user interface.
When you first place a label on the user interface, it displays the generic text Label, which probably isn't what you want. To display custom text in a label, you have three options:
Double-click the label and type or edit text
Click the label, choose Tools
Assign a string to the label's
stringValueproperty using Objective-C code:labelStatic.stringValue = @"Type a name:";
The first two options let you modify a Label's text at design time when you're creating your program, but the text remains static once your program runs. The last option that uses Objective-C code to change a label's text lets you change the label's text while your program is running, which lets you create dynamic text that can change based on the user's actions.
To see how to use a label to display static text and dynamic text, follow these steps:
Open the MyTest program that you modified in Chapter 17.
Double-click the
MainMenu.xibfile stored in the Resources folder. Interface Builder appears and displays your user interface window.Click any items currently displayed on the user interface and press Delete to remove them.
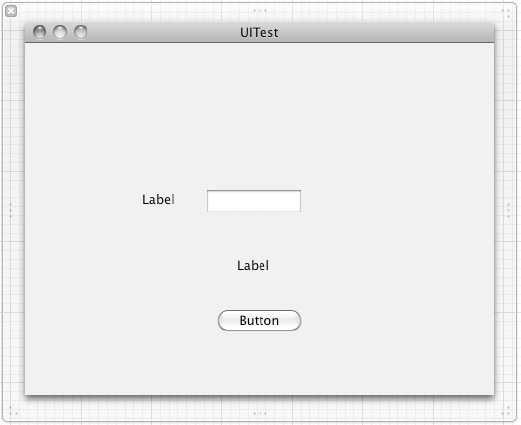
Add two Label objects, one Text Field object, and one Push Button object so that your user interface looks like Figure 18-2.
Resize both labels so they are at least 125 in width. To resize a label, click on it so handles appear and drag a handle to the left or right.
Choose File
Click the
MyTestAppDelegate.hfile and modify the code as follows:#import <Cocoa/Cocoa.h> @interface MyTestAppDelegate : NSObject <NSApplicationDelegate> { NSWindow *window;NSTextField *labelStatic;NSTextField *labelDynamic;NSTextField *textInput;} @property (retain) IBOutlet NSWindow *window;@property (retain) IBOutlet NSTextField *labelStatic;@property (retain) IBOutlet NSTextField *labelDynamic;@property (retain) IBOutlet NSTextField *textInput;-(IBAction)displayMessage:(id)sender;@endChoose File
Click the
MyTestAppDelegate.mfile and modify the code as follows:#import "MyTestAppDelegate.h" @implementation MyTestAppDelegate @synthesize window;
@synthesize labelStatic;@synthesize labelDynamic;@synthesize textInput;- (void)applicationDidFinishLaunching:(NSNotification *)aNotification { // Insert code here to initialize your applicationlabelStatic.stringValue = @"Type a name:";} - (void)dealloc { [window release]; [super dealloc]; }-(IBAction)displayMessage:(id)sender{NSMutableString *greeting;greeting = [NSMutableString stringWithString: @"Hello, "];[greeting appendString: textInput.stringValue];labelDynamic.stringValue = greeting;}@endChoose File
Double-click the
MainMenu.xibfile stored in the Resources folder. Interface Builder appears and displays your user interface window.Right-click the My Test App Delegate icon. A heads-up window appears.
Move the mouse pointer over the circle that appears to the right of
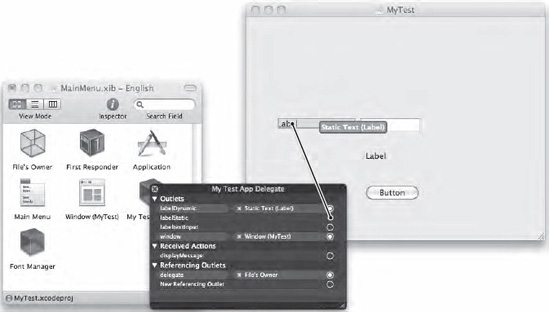
labelDynamic, which appears under the Outlets heading. Click and drag the mouse pointer over the label on your user interface and release the mouse button to connect the label to thelabelDynamicproperty, as shown in Figure 18-3.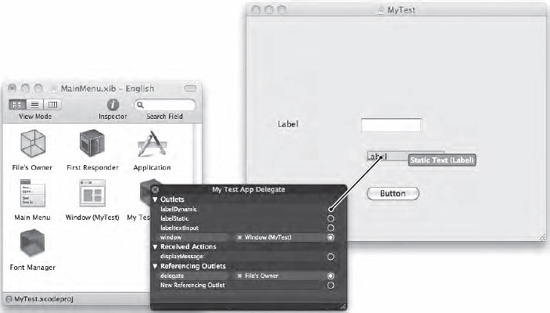
Figure 18-3. Dragging and dropping connects the
labelDynamic IBOutletto your label on the user interface.Note
As an alternative to step 13, you can right-click the label on the user interface to display a heads-up window. Then click and drag the circle to the right of New Referencing Outlet under the Referencing Outlets category and drop it over the class file icon that contains the
IBOutletyou want to use.Move the mouse pointer over the circle that appears to the right of
labelStatic, which appears under the Outlets heading. Click and drag the mouse pointer over the label on your user interface and release the mouse button to connect the label to thelabelStaticproperty, as shown in Figure 18-4.Move the mouse pointer over the circle that appears to the right of
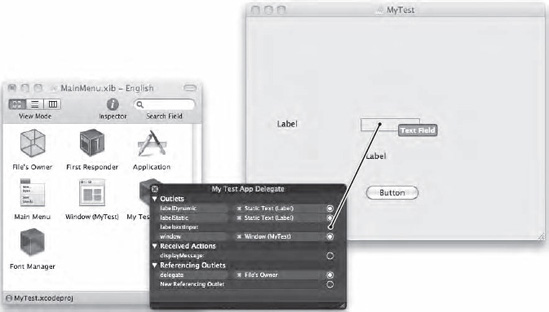
labelTextInput, which appears under the Outlets heading. Click and drag the mouse pointer over the text field on your user interface and release the mouse button to connect the text field to theLabeltextInputproperty, as shown in Figure 18-5.Move the mouse pointer over the circle that appears to the right of
displayMessage, which appears under the Received Actions heading. Click and drag the mouse pointer over the push button on your user interface and release the mouse button to connect the push button to thedisplayMessagemethod, as shown in Figure 18-6.Choose File
Switch to Xcode and click the Build and Run button or choose Build
Click in the text field and type a name, such as Joe or Mary.
Click the push button. The label underneath displays the message with the name you typed into the text field, such as "Hello, Joe."
Quit your program by choosing MyTest

Although the program you just created is fairly simple, it demonstrates how to change a label's text using by using Objective-C code and the label's stringValue property. To change a label's text with Objective-C code, you also need to connect your label objects to variables.
Changing a label's text using Objective-C code isn't as straightforward as changing a label's text when you're designing your user interface, but using Objective-C lets you create dynamic text that changes based on the user's actions.
A text field can display text or let the user type in new text. As a result, a text field can get data from the user and display information for the user to see and edit, which isn't possible with a label. If you just need to display information, use a label. If you need to accept data and allow editing, use a text field.
To create a text field on your user interface, follow these steps:
Double-click the
.xibuser interface file that contains the window to which you want to add a text field. Interface Builder appears.Choose Tools
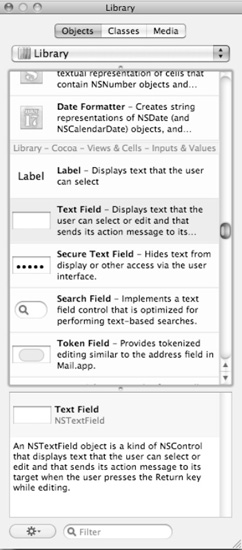
Scroll through the Object Library and look for the Text Field object, as shown in Figure 18-7.
Drag the Text Field object from the Object Library and drop it on your user interface.
When you first place a text field on the user interface, it will be empty. To display custom text in a text field, you have three options:
Double-click the text field and type or edit text
Click the text field, choose Tools
Assign a string to the text field's
stringValueproperty using Objective-C code
When creating a text field on a user interface, you can customize two types of text in the text field. First, you can type text into the Title field, which displays text that the user can then edit or delete. Second, you can define something called placeholder text in the Placeholder field, as shown in Figure 18-8.
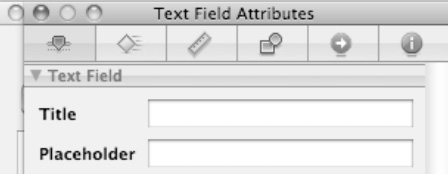
Any text that you type in the Placeholder field appears inside your text field faintly dimmed when the text field is empty. The purpose of such placeholder text is to provide a brief description or instruction to help a user understand what to type inside a particular text field.
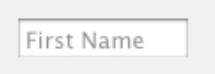
For example, if you wanted a user to type a name into a text field, you could type First Name in the Placeholder field. This text will appear dimmed in the text field, as shown in Figure 18-9, but as soon as the user clicks in that text field, the placeholder text completely vanishes.
Part of the usefulness of a text field is that it allows someone to type something into the text field that your program can then retrieve. To enable your program to retrieve the data a user types into a text field, you need to declare an NSTextField variable, which is what holds the data displayed or typed into a text field. Declaring an NSTextField variable in the header (.h) file might look like this:
@interface UITestAppDelegate : NSObject <NSApplicationDelegate> {
    NSWindow *window;
    NSTextField *textInput;
}

@property (retain) IBOutlet NSWindow *window;
@property (retain) IBOutlet NSTextField *textInput;
After creating a variable to represent the NSTextField, you need to use the @synthesize command in the implementation (.m) file:
@synthesize textInput;
Finally, you need to connect the textInput variable to your actual text field on your user interface window. Now when the user types something in the text field, that data will get stored in the textInput variable, which you can retrieve through the stringValue property:
textInput.stringValue
With a text field, users have the option of typing in new data. However, what if you want to give users the option of either typing in data or selecting from a list of choices? You could use a text field along with a bunch of radio buttons or a single pop-up button. As a simpler solution, you can use a combo box, which combines the features of a text field and a pop-up button in a single object.
To create a combo box on your user interface, follow these steps:
Double-click the
.xibuser interface file that contains the window to which you want to add a combo box. Interface Builder appears.Choose Tools
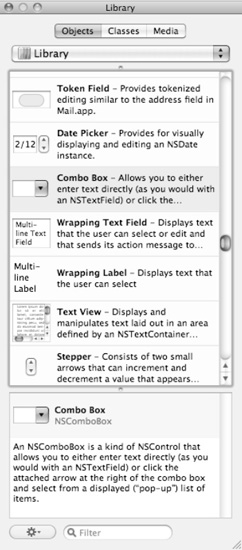
Scroll through the Object Library and look for the Combo Box object, as shown in Figure 18-10.
Drag the Combo Box object from the Object Library and drop it on your user interface.
Now that the combo box is in place, you can create a list for it.
A combo box, like a pop-up button, can store multiple choices that the user can view and select. To fill a combo box with choices, you just need to use the addItemsWithObjectValues method:
NSString *object1 = @"Electric trains";
    NSString *object2 = @"Bicycles";
    NSString *object3 = @"Video games";
    NSString *object4 = @"Skateboards";
    NSMutableArray *myArray;
    myArray= [NSMutableArray arrayWithObjects: object1, object2, object3, object4, nil];

    [myCombo addItemsWithObjectValues: myArray];
The first four lines simply define four different string objects. The fifth line declares myArray as an NSMutableArray. Then the next line stuffs the four string objects into myArray.
The last line assumes that you have created a myCombo variable to represent the NSComboBox. This last line uses the addItemsWithObjectValues method to store the myArray list in the myCombo variable.
Note
After storing data into a variable, the final step to make this data appear in a combo box is to connect the myCombo variable to the actual combo box on your user interface.
Whether the user types in data or selects from a combo box's list of choices, you can retrieve that data through the combo box's stringValue property. A combo box is an object created from the NSComboBox class. However, the portion of the combo box that holds the data typed in or selected is the NSComboBoxCell class, which is derived from the NSTextField class.
To retrieve data from a combo box, you must first declare an IBOutlet variable as an NSComboBox in a header (.h) file:
@interface MyTestAppDelegate : NSObject <NSApplicationDelegate> {
    NSWindow *window;
    NSComboBox *myCombo;
 }

@property (retain) IBOutlet NSComboBox *myCombo;
@end
Next, in the implementation (.m) file, you need to use the @synthesize command:
@synthesize myCombo;
Finally, you need to connect the variable (myCombo) to your actual combo box on the user interface. Now whatever value appears in the combo box will get stored in the myCombo stringValue property.
To see how to fill a combo box with data and retrieve the user's selection (or typed in data), follow these steps:
Open the MyTest program that you modified in the previous section.
Double-click the
MainMenu.xibfile stored in the Resources folder. Interface Builder appears and displays your user interface window.Click any items currently displayed on the user interface and press Delete to remove them.
Drag and drop one Combo Box object on your user interface window.
Click the
MyTestAppDelegate.hfile stored in the Classes folder and modify the code as follows:#import <Cocoa/Cocoa.h> @interface MyTestAppDelegate : NSObject <NSApplicationDelegate> { NSWindow *window;NSComboBox *myCombo;} @property (retain) IBOutlet NSWindow *window;@property (retain) IBOutlet NSComboBox *myCombo;-(IBAction)displayMessage:(id)sender;@endChoose File
Click the
MyTestAppDelegate.mfile stored in the Classes folder and modify the code as follows:#import "MyTestAppDelegate.h" @implementation MyTestAppDelegate @synthesize window;
@synthesize myCombo;- (void)applicationDidFinishLaunching:(NSNotification *)aNotification { // Insert code here to initialize your applicationNSString *object1 = @"Electric trains";NSString *object2 = @"Bicycles";NSString *object3 = @"Video games";NSString *object4 = @"Skateboards";NSMutableArray *myArray;myArray= [NSMutableArray arrayWithObjects: object1, object2, object3, object4, nil];[myCombo addItemsWithObjectValues: myArray];} - (void)dealloc {[myCombo release];[window release]; [super dealloc]; }-(IBAction)displayMessage:(id)sender{NSLog (@"Selected item = %@", myCombo.stringValue);}@endChoose File
Double-click the
MainMenu.xibfile stored in the Resources folder. Interface Builder appears and displays your user interface window.Right-click the My Test App Delegate icon. A heads-up window appears.
Click the circle that appears to the right of
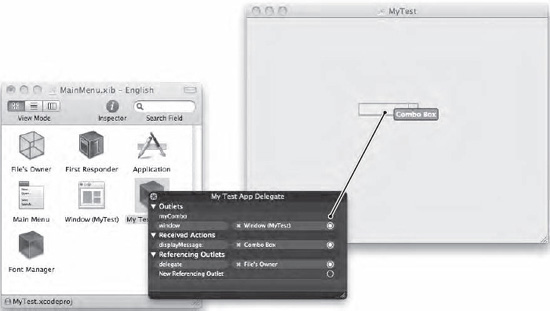
myCombounder the Outlets heading and drag and drop it over the combo box on the user interface, as shown in Figure 18-11.Connect
displayMessage(under Received Actions) to the combo box on the user interface.Choose File
Switch to Xcode and click the Build and Run button or choose Build
Click the combo box and select an option such as
Electric trains.Click the combo box a second time and type some text, such as Teddy bear, and press Return.
Quit your program by choosing MyTest
Choose Run
2010-09-22 14:22:44.802 UITest[4027:a0f] Selected item = Electric trains
2010-09-22 14:22:53.758 UITest[4027:a0f] Selected item = Teddy bear
This program shows how to retrieve data from a combo box whether the user selects a choice from the combo box's menu or types in new data. By giving users the ability to select a choice from a pull-down menu or type something else instead, a combo box combines the flexibility of a text field with a pop-up button's list of fixed choices in a menu.
Text fields and labels typically display a single line of text. If you want to display multiple lines, you need to use a Wrapping Label object or Wrapping Text Field object, either of which lets you resize its height to handle multiple lines of text. The Wrapping Label and Wrapping Text Field objects appear next to each other in the Object Library, as shown in Figure 18-12.

To display text on either a wrapping label or wrapping text field, you can double-click that object directly in Interface Builder and then type whatever text you want to appear in the wrapping label or wrapping text field.
If you want to change the text in a wrapping label or wrapping text field through Objective-C code, you need to define an NSTextField property variable in a header (.h) file:
#import <Cocoa/Cocoa.h>

@interface MyTestAppDelegate : NSObject <NSApplicationDelegate> {
    NSWindow *window;
    NSTextField *bigText;
    NSTextField *labelText;
}

@property (retain) IBOutlet NSWindow *window;
@property (retain) IBOutlet NSTextField *bigText;
@property (retain) IBOutlet NSTextField *labelText;

@end
Then add the @synthesize command in the implementation (.m) file like this:
@synthesize bigText;
@synthesize labelText;
After you connect these NSTextField properties to a wrapping label and wrapping text field on your user interface, you'll be able to put text into either object using its stringValue property:
labelText.stringValue = @"This text can appear inside a Wrapping Label";
bigText.stringValue = @"This text can appear in a Wrapping Text Field";
You can just as easily retrieve the text stored in a wrapping label or a wrapping text field by using the stringValue property again:
NSLog (@"Wrapping Label text = %@", labelText.stringValue);
NSLog (@"Wrapping Text Field contents = %@", bigText.stringValue);
Labels are handy for displaying text to identify parts of your user interface or just to provide instructions or information for the user to read. Text fields are designed to allow the user to type in text so that your program can retrieve and manipulate that data.
If you need to display multiple lines of text, you can use a Wrapping Label object or a Wrapping Text Field object. With both labels and text fields, you can double-click the object directly on your user interface and type text that you want to appear on that label or text field; you can modify the Title property of each item via the Attributes Inspector; or you can assign a string to the label's stringValue property using Objective-C code.
Double-clicking and typing directly on the label or text field may be the simplest method, but using the Object Attributes window for a text field lets you define placeholder text, which appears dimmed to display a brief description of what type of information the user needs to type into that text field.
A combo box combines the features of a text field with a pop-up button, allowing users to either select from a list of choices or type in their own option. With the combo box, labels, and text fields, you must always connect your IBOutlet variables to the actual user interface item.
Labels, text fields, and combo boxes provide different ways to display information to the user and (for text fields and combo boxes) accept data from the user.