Up until this point in the book, you've been learning the basic principles of programming. First, you learned about the three basic building blocks of programming (sequential instructions, branches, and loops). Next, you learned about Boolean expressions, mathematical operators, variables, and constants.
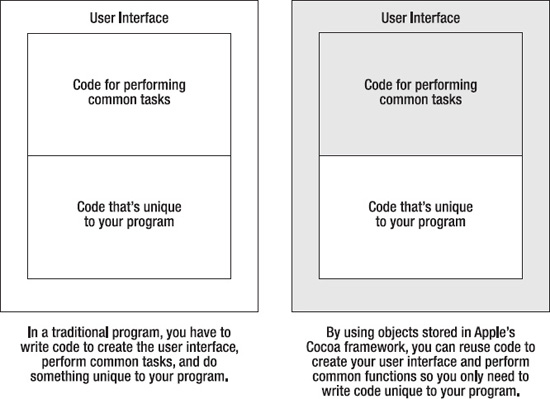
While it's perfectly possible to create a program using what you've learned so far, programming for the Mac is much harder because you have to write code to create and display your user interface, code to perform common functions, and code to make your program do something unique.
To make Mac programming easier, Apple provides a library of prewritten and tested code, organized in something called the Cocoa framework. This library of code uses the features of object-oriented programming (which you'll learn more about in Chapter 9) to store useful code to create your user interface or manipulate or store data. By using these Cocoa framework files (called classes in object-oriented programming) provided by Apple, you can reduce the amount of code you need to write so you can create programs faster that are more reliable.
In traditional programming, you would need to write three sets of code to create your user interface, perform common functions, and do something unique to your program. By relying on the Cocoa framework, you can just focus on writing code that makes your program unique, which essentially cuts the amount of code you need to write by one-third, as shown in Figure 8-1.
To use the Cocoa framework, you need to understand how object-oriented programming works, which is the focus of this chapter. Once you understand the basic principles behind object-oriented programming, you'll understand better how to take advantage of Apple's Cocoa framework. As a general rule, always check the Cocoa framework for code before you try to write your own code. In many cases, you'll find that you can reuse the code you need, or at least write less of it yourself, to create a fully functional program.
Before getting into the details of using object-oriented programming in your own programs, you need to understand how object-oriented programming works in general. Once you understand what you're doing, you'll better understand the actual details of writing Objective-C code using objects.
To use an object-oriented programming language like Objective-C, you must first write code that defines a class. A class determines what types of data (called properties) the class can hold and the subprograms (called methods) that the class provides to do something such as manipulate the data stored in its properties.
Although you'll likely need to create your own classes, Apple provides an entire library of classes for you to use, stored in the Cocoa framework. By using the classes of the Cocoa framework, you can write a simple program without ever writing your own classes at all.
A class file by itself simply groups related properties and methods in one location. To actually use a class in your program, you must create (or instantiate) an object from that class. Each time you create an object from a class, you can then use that object to store data in its properties and manipulate that object somehow using its methods.
Objects are arbitrary ways to group related data and the subprograms that manipulate that data. Just as there are a million different ways to write a program that works identically, there are also a million different ways to organize data and subprograms into objects.
A single program typically consists of multiple objects that often represent a different physical part of a problem. For example, if you're writing a program to control a train, one object might represent the engine, another object might represent the wheels, and a third object might represent the brakes.
Ideally, when you divide a large program into multiple objects, those objects act like isolated islands. To make a program work, your multiple objects need to cooperate with one another, which they do by passing information (or messages) to each other.
Messages typically tell another object to run one of its methods to do something. For example, an object that represents the brakes of a train might pass a message to the object that represents the train wheels to tell it to stop spinning. By passing messages to each other, objects can work together. Each object knows how to do something useful, and whenever an object needs to do something that's beyond its control, it needs to contact another object and pass it a message to tell that other object what to do.
Note
Chapter 12 explains the details of creating classes in Objective-C. Right now, you just need to get a rough understanding of how object-oriented programming works without getting bogged down in the technical details of using a particular programming language.
Objects provide two distinct advantages over traditional programming. First, objects help reduce errors or bugs in a program. Second, objects encourage reusing code to make programming faster and more reliable.
The main idea behind objects is to isolate or encapsulate data and the subprograms that manipulate that data. By grouping in one place all subprograms that manipulate the same data, you can reduce errors.
Traditional programs behave like a single refrigerator in an apartment where five different people store their food. No matter how careful each person might be, chances are good that they'll accidentally move or take something that belongs to someone else. If all five people live in separate apartments with their own refrigerators (like dividing a program into objects), none of these problems could happen.
By isolating data and the subprograms that manipulate that data, objects reduce the chance that errors or bugs in other parts of your program will interfere with important data used by a different part of the program.
In the past, programmers wrote subprograms and stored them in separate files. If one programmer wanted to modify a subprogram to fix a problem or add a new feature, that programmer had a choice of either creating a duplicate copy of that subprogram and modifying that duplicate, or modifying the original subprogram.
Modifying the original subprogram could cause problems if another part of that program depends on that subprogram. That means any modifications could prevent another part of the program from working.
Duplicating a subprogram and then modifying that duplicate is a safer option, but it creates separate copies of nearly identical subprograms. If you discover a problem with the original subprogram, you have to fix it and fix every modified copy of that subprogram. If you made ten copies of a subprogram, you have to fix ten separate copies of that modified subprogram and hope that your modifications don't accidentally wreck that subprogram and keep it from working.
Objects eliminate this problem by keeping the original subprogram untouched. Instead of making a physical duplicate of a subprogram, you simply create an object based on a class. Your object then has access to the code stored in that class, but you never need to physically copy that code. The result is that your programs can be smaller and easier to understand, and can include a wide variety of features without requiring you to write additional code to make those features work.
To create an object, you must go through two steps. First, you must create a class using Objective-C code, which defines the properties (data) and methods (subprograms) that manipulate the class's properties. Second, you must declare an arbitrary name that represents an instance of your class, which represents your object.
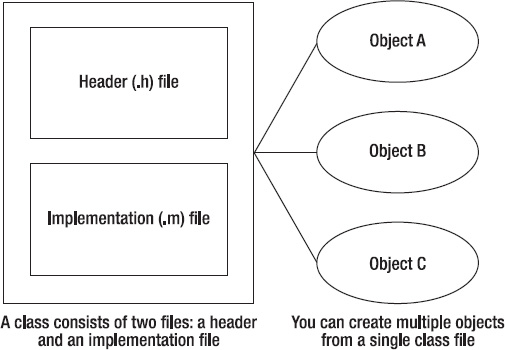
To create a class, you need to write Objective-C code and store that code in two files that work together, as shown in Figure 8-2. The first file is called a header file and ends with the .h file extension. The second file is called an implementation file and ends with the .m file extension.
The header (.h) file contains information that other parts of your program may need to know about. For example, if you want other parts of your program to store data in a property, you must specify that property name (a variable) in the header file. Storing any properties or methods in the header file makes those properties or methods visible and accessible to the rest of your program.
The implementation file (.m) contains two types of information. First, the implementation file contains data that you do not want other parts of your program to access. Second, the implementation file contains the actual Objective-C code that makes your methods actually work.
When writing Mac programs, you'll probably write your own classes, but you'll also likely use classes that Apple has already created for you, which make up the Cocoa framework. By using the hundreds of different classes stored in the Cocoa framework, you can add features to your program without ever looking at, or needing to understand, the Objective-C code that actually makes those features work.
Once you understand how classes work, you need to understand the details of how to create an object using Objective-C. Creating objects is similar to declaring a variable. When declaring variables, you have to specify an arbitrary variable name plus the data type that the variable represents:
intmyNumber;
The first command, int, tells the computer that you're creating a variable that can hold only integers. The second command, myNumber, is the arbitrary variable name chosen to store an integer.
To create an object, you follow the same convention. Instead of defining a data type, you define a class. Then you define an arbitrary variable name to represent your object:
NSString *myName;
The NSString portion tells the computer that you're creating an NSString object. The NS prefix tells you that it's an object from Apple's Cocoa framework that has already been written for you. (When you start defining your own classes in Objective-C code, you can name your classes anything you want, without the NS prefix. Many Apple-created class begins with the NS prefix.)
The second part, *myName, is the arbitrary name chosen that defines your object. Notice that when creating an object, you must use a pointer, which is the asterisk (*) symbol in front of the name.
Just as multiple variables can be of the same data type, you can create multiple objects of the same class:
NSString *myName;
NSString *yourName;
Again, while you can create your own classes by writing Objective-C code, you'll also be using classes that Apple provides for you in its Cocoa framework. The following are two of the most common types of classes available from the Cocoa framework:
NSNumber: Stores any type of number (integer or floating point)NSString: Stores text
After you create an object, you can use that class's methods to store and manipulate its properties that contain data. The simplest way to store data in an NSString object is to assign it a string of text:
NSString *myName;
myName = @"John Doe";
If you want, you can declare and assign a value to an NSString object like this:
NSString *myName = @"John Doe";
Note
When assigning a string to an NSString type of object, always remember to put the @ symbol in front of the string, such as @"This is a string." Omitting the @ symbol when working with NSString object types is a common cause of errors.
Storing data in an NSNumber object isn't as straightforward as storing data in an NSString object. Since you can store both integer and floating-point numbers in an NSNumber object, you need to use special methods that are built into the NSNumber class. When working with most classes, such as NSNumber, you'll use its built-in methods for manipulating its data.
For NSNumber, the two most common methods you'll use are the following:
numberWithInt: Creates an object that stores an integer valuenumberWithFloat: Creates an object that stores a floating-point number
To store an integer in an NSNumber object, you need to define the object you want to manipulate and the method you want to use. Always use square brackets to define the object and the method to run:
[object method];
To store a value in an NSNumber object, you must identify the NSNumber class by name followed by the method to run:
NSNumber *storeMe;
storeMe = [NSNumber numberWithInt:34];
The first line of code defines an object (called storeMe) based on an NSNumber class. The second line assigns a value to the storeMe object using the numberWithInt method. In this case, the numberWithInt method takes the number 34 and stores it in the storeMe object.
You can also declare an object and assign it a value in a single line like this:
NSNumber *storeMe = [NSNumber numberWithInt:34];
If you replace the numberWithInt method and use another one, such as numberWithFloat, you can store a floating-point number in the NSNumber object:
NSNumber *storeMe = [NSNumber numberWithFloat:4.18];
To store data in most objects, you often have to use a particular method. To find this method name, you'll need to browse through the class reference for that object in the Developer Documentation available online at the Apple Developer site.
To see how to declare an object, store data in that object, and print that data, follow these steps:
Open the VariableTest project from the previous chapter.
Click the
VariableTestAppDelegate.mfile stored inside the Classes folder. The code for that file appears in the middle pane of the Xcode window.Modify the code in the
VariableTestAppDelegate.mfile as follows:- (void)applicationDidFinishLaunching:(NSNotification *)aNotification { NSNumber *myNumber; myNumber = [NSNumber numberWithFloat:3.47]; NSLog (@"The value in NSNumber = %@", myNumber); }Choose File

Click the Build and Run button or choose Build
Quit your program by clicking the Stop button or choosing Product
Choose Run
2010-09-01 21:08:33.614 VariableTest[21366:a0f] The value in NSNumber = 3.47
The main part of this sample program is that you used the NSNumber class to declare an object named myNumber. Then you stored data into that myNumber object using the numberWithFloat method. Next you used the NSLog command to print the contents of that myNumber object.
In the example of storing data in an NSNumber object, you may have wondered how anyone could possibly know that you can use the two methods numberWithInt and numberWithFloat for storing data in an NSNumber object, or the stringValue property for retrieving data as a string. The answer is that you have to look up method and property names for classes in the Developer Documentation.
Note
Properties hold data, and methods are subprograms that do something useful such as manipulate the properties stored in that object.
Any time you create an object based on one of Apple's existing classes (typically identified by the NS prefix, such as NSString), you can find all the method and property names for that class by browsing through the Developer Documentation within Xcode:
From within Xcode, choose Help
Click the Search field in the upper-right corner of the window.
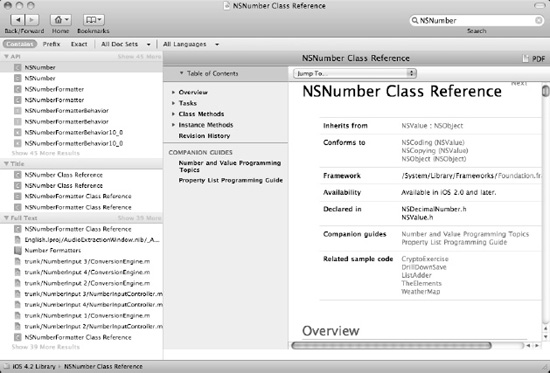
Type a class name such as NSNumber. Then press Return. The right pane displays the
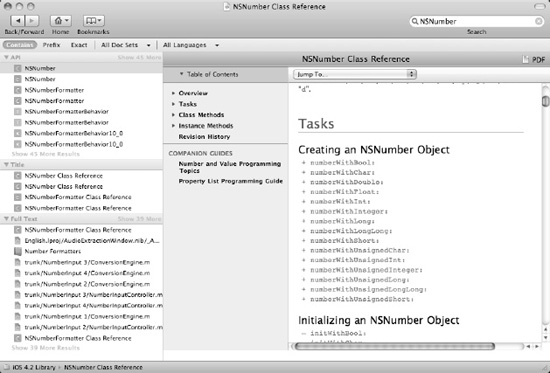
NSNumberclass reference, as shown in Figure 8-4.Scroll down the right pane until you see the list of methods or properties available for your chosen class, as shown in Figure 8-5.
Click a method or property name that you want to read about. Detailed information about your chosen method appears as shown in Figure 8-6.

At any time, you can click the Back (or Forward) button to view a previously viewed screen. When you're done, click the close button in the upper-left corner of the Organizer window to make it go away.
Objects make Mac programming easier in several ways. The most obvious way is that you can use objects written by Apple in your own programs.. These prewritten classes form Apple's Cocoa framework, which provides tested and reliable code for performing common types of tasks. Using the Cocoa framework saves you time so that you can focus on writing the code that's unique to your particular program.
To create an object, you have to start with a class, which consists of two separate files that work together, a header (.h) file and an implementation (.m) file. Creating an object is much like declaring a variable. First you need to define a class. Then you can use a single class file to create multiple objects.
When you create your own class files, you'll need to write Objective-C code that defines the properties and methods. However, when you use classes stored in Apple's Cocoa framework, you don't have to write any code at all.
To determine what properties and methods are available in an object created from the Cocoa framework, you'll need to search through the Developer Documentation, which you can access through the Xcode Help menu.
Object-oriented programming is nothing more than an arbitrary way to divide a large program into smaller, more manageable parts. Objects help reduce the number of errors or bugs by eliminating the possibility that data can be modified by mistake from another part of your program.
Objects also act as building blocks that you can use to create a program without having to know how they work. All you need to know is how to use them. When creating your own Mac programs, the objects based on Apple's Cocoa framework let you create the user interface and code for performing common tasks without having to write any code yourself. All you need to do is write code for making your program actually do something useful.