Up until now, the sample programs you've created have simply printed data to the Log window using the NSLog command. Although this can be fine for testing your program, it's definitely not how you want users to interact with your program.
If you're creating a Mac program, users expect your program to behave just like a regular Mac program by displaying pull-down menus at the top of the screen with familiar menu titles such as File, Edit, View, and Help. Users also expect to interact with your program through windows and dialog boxes that you can move, resize, and shrink from the middle of the screen.
Within each window and dialog box, users expect to see buttons, check boxes, text fields, sliders, and radio buttons that allow them to input data to your program and display some sort of output in return.
In this chapter, you'll learn about the basics behind a user interface and how to use the various tools to create your own user interface.
The portion of Xcode that lets you visually design your user interface is called Interface Builder. In the old days, you had to write code to make your program work and then write additional code to create your user interface. You can still do that if you want, but it's far simpler and more reliable to use Interface Builder to create your user interface.
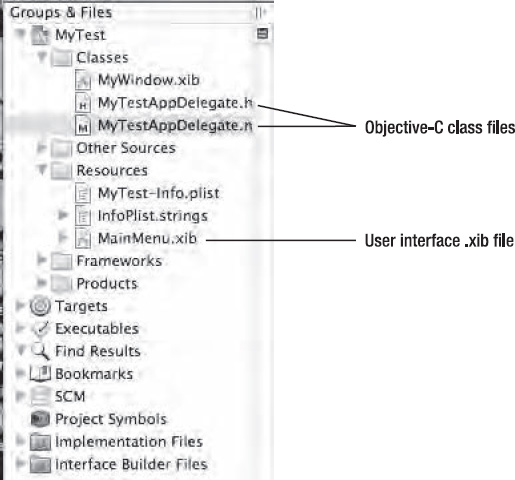
When you write Objective-C code, you store it in class files that have the .h and .m file extensions, which are usually stored in the Classes folder. When you create a user interface, you store it in a file that has the .xib file extension, often called nib files because they were once called NeXTSTEP Interface Builder files. Xcode typically stores your user interface .xib files in the Resources folder, as shown in Figure 14-1.
Simple programs may have only one user interface, typically stored in the Resources folder as the MainMenu.xib file. If your program needs to display different types of interfaces, such as a video game that may need to display an actual game along with various control panels for customizing the game, your program may need two or more .xib files.
The basic idea behind using Interface Builder is to create and design your user interface, which includes a window along with common user interface items such as buttons, check boxes, and sliders.
When you create a new project, your project will likely create a MainMenu.xib file automatically. If you created a project where this file doesn't exist or if you need to add additional user interface .xib files, follow these steps:
Choose File

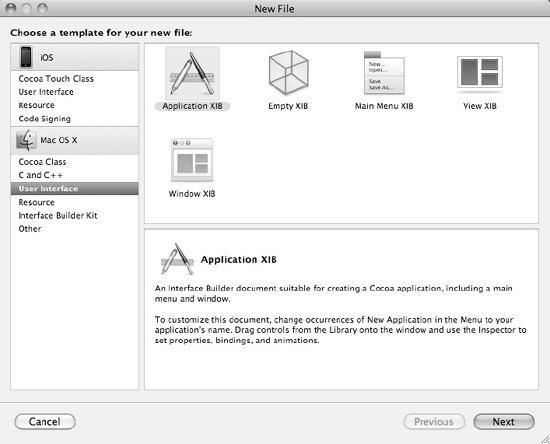
Click User Interface under the Mac OS X category in the left pane. Different types of user interface files appear in the right pane, as shown in Figure 14-2.
Click an icon that represents the type of user interface file you want to create. The five choices are as follows:
Application: Creates a complete user interface that provides pull-down menus and a window
Main Menu XIB: Creates a new pull-down menu bar
Window XIB: Creates a new window
View XIB: Creates a custom window for displaying items
Empty XIB: Creates a bare-bones user interface
Click the Next button. A Save As dialog box appears, letting you choose a name for your user interface file.
Type a descriptive name for your user interface
.xibfile.Click the Finish button. Your new user interface files appears. You may want to drag and drop this
.xibfile to another folder.
When you create a typical Mac program, Xcode automatically creates a MainMenu.xib file that contains the bulk of your program's user interface, which is represented as icons that appear in the Interface Builder window, as shown in Figure 14-3.
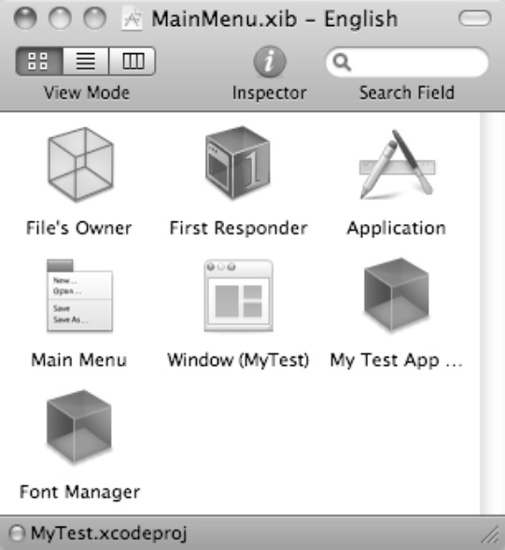
In Figure 14-3, a horizontal line divides the icons into two groups. The icons above the horizontal line are known as placeholder objects. The icons underneath the vertical line are known as interface objects.
Placeholder objects represent items stored outside your user interface .xib file, which work as a link between your Objective-C code and your user interface. The three common placeholder objects include the following:
File's Owner: The File's Owner icon defines which class file links to the
.xibuser interface file. You can pair up only one class file at a time to each.xibuser interface file.First Responder: The First Responder icon defines how to handle any actions that the user takes upon viewing the user interface displayed by the
.xibfile.Application: The Application icon defines how your program behaves. If you don't customize the Application icon, your program will behave by default like a regular Mac program.
When you're learning to program using Xcode, you'll probably never need to change the options available in the File Owner's, First Responder, or Application icon.
Interface objects represent the different parts of the user interface stored in a specific .xib file. The four common interface objects include the following:
Main Menu: The Main Menu icon represents the pull-down menu that appears at the top of the screen.
Window: The Window icon represents the window that appears on the screen.
App Delegate: The App Delegate icon defines the class file that contains the Objective-C code to respond to different types of events. The App Delegate icon normally defines the
ProgramNameAppDelegatefile, whereProgramNameis your actual program name.Font Manager: The Font Manager icon defines the class that controls the displayed fonts on the user interface. By default, this class is the
NSFontManagerclass.
In most cases, you'll need only one Main Menu, App Delegate, and Font Manager icon. However, you might have more than one Window icon. In addition, you can define additional objects to interact with your user interface.
The Main Menu icon will let you edit the pull-down menus of your user interface. The Window icon displays the window of your user interface, which is where you'll drag and drop different user interface objects such as buttons, text fields, and check boxes.
Out of all the placeholder and interface object icons displayed, you'll spend most of your time only using the Main Menu and Window icons and accepting the default values of the rest of the other icons.
By default, your placeholder and interface object icons appear as icons (see Figure 14-3). However, you can switch to a different view (List, Icons, or Columns) by choosing the View menu or by clicking the View Mode icon, as shown in Figure 14-4.
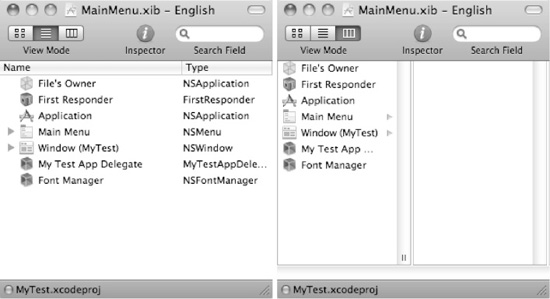
Figure 14-4. The Toggle icon lets you expand or shrink the appearance of placeholder and interface objects.
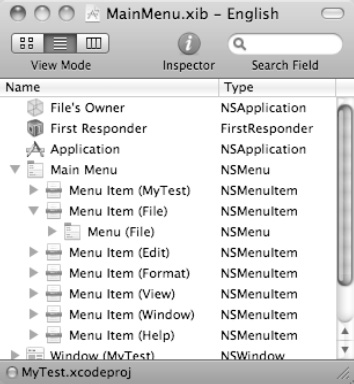
Besides displaying each icon with its descriptive name, the List and Columns view lets you view the parts that make up each icon, such as the individual menus that make up the Main Menu icon. Just click the gray disclosure triangle that appears to the left of an icon to view its additional parts, as shown in Figure 14-5.
The design of your user interface typically appears through the Window icon, which displays the actual window where you can place various user interface objects such as buttons, text fields, and pictures.
The basic idea behind designing a user interface is to pick a user interface object and drag it on the window of your .xib file. Then you may need to customize this object, such as changing its position or size. Finally, you'll need to link or connect some (but not all) of your user interface objects to your Objective-C code, so that way your user interface can respond to certain actions, such as the user clicking a button, and display information on the screen.
To see how create a simple user interface, follow these steps:
Choose File
Choose File
Click Application under Mac OS X in the left pane.
Click the Cocoa Application icon in the right pane, and click the Next button. Another dialog box appears, asking for the name of your project.
Type any name, such as MyTest, and click the Next button. A Save As dialog box appears.
Choose a folder to store your project, and click the Save button.
Click the disclosure triangle to the left of the Resources folder. The
MainMenu.xibfile appears.Click the
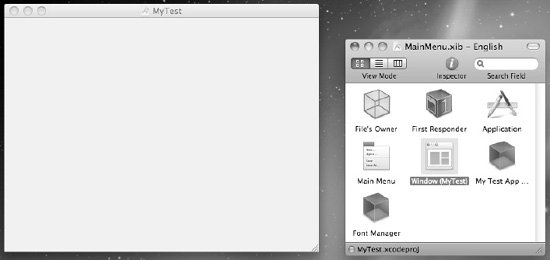
MainMenu.xibfile. The Interface Builder window appears.Click the Window icon. Your user interface's window appears on the screen, as shown in Figure 14-6.
Choose Tools
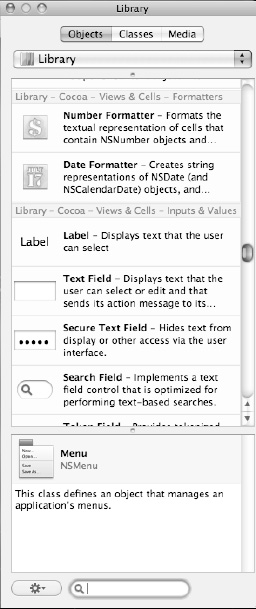
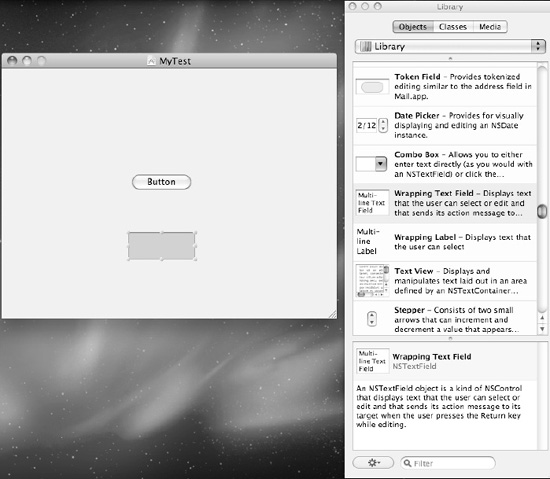
Click the Objects tab near the top of the Library window, as shown in Figure 14-7.
Scroll down through the Object Library until you find the Push Button icon.
Drag and drop the Push Button object anywhere over your open window, as shown in Figure 14-8.
Scroll through the Object Library until you find a Wrapping Text Field icon.
Drag and drop the Wrapping Text Field object on the window, as shown in Figure 14-9.
Choose File
Switch to Xcode; click the Build and Run button, or choose Build
Click in the Wrapping Text Field, and type bbrown (deliberately misspelling brown.
Right-click the misspelled word to display a pop-up menu, and choose Spelling and Grammar
Quit the program by clicking the Stop button or choosing Product

By dragging and dropping objects on your user interface, you can design your program's appearance without writing a single line of code. However, placing objects on your user interface is just a start since you'll need to further customize each user interface object to give it a descriptive name or to resize or precisely position objects. Customizing the appearance of your user interface can make your program look nice for your user.
When you drag and drop objects on your user interface, chances are good that those objects won't be the exact size and position you need them. To fix this, you may need to move objects or resize them.
The simplest way to move an object is to drag it on the screen, and the simplest way to resize an object is to click it to display handles around its edges and then drag one of its handles. Although this can be fast and easy, it can also be imprecise.
To help you position an object in relation to any existing objects on the user interface, Interface Builder displays guidelines that show you when objects appear aligned, as shown in Figure 14-10.
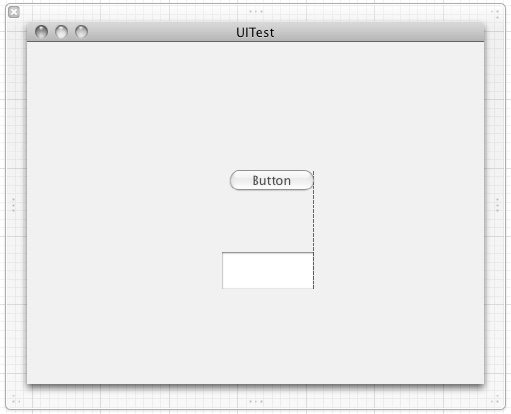
Figure 14-10. Interface Builder displays guidelines to help you align objects on your user interface.
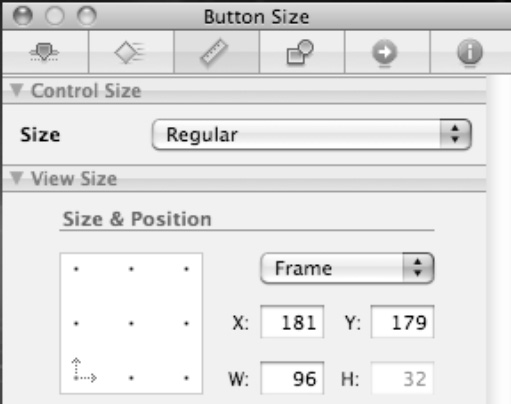
If you need to precisely align objects, you can specify the object's position in relation to the bottom-left corner of the user interface window. You can also precisely define an object's width and height.
To see how to move and resize an object, follow these steps:
Click the object you want to move or resize.
Choose Tools
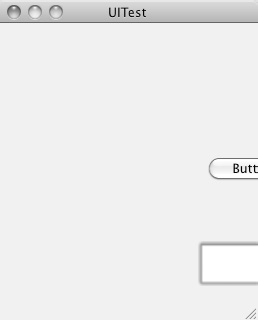
When you place an object on a user interface, it may look perfect—until the user actually runs your program and resizes the window. Suddenly buttons and text fields can get skewered out of proportion to one another or appear cut off, as shown in Figure 14-12.
One option is to prevent the user from resizing the user interface window. However, a better solution is to anchor and autosize your user interface objects so they adjust no matter how the user resizes the user interface window.
Autosizing means that the object shrinks or grows in height and/or width as the window shrinks or grows. Anchoring means that an edge of the object remains a fixed distance from the side of the user interface window no matter how much the user may resize that window. The combination of anchoring and autoresizing can make your user interface adjust to any size that the user makes the user interface window.
To anchor and autosize an object, follow these steps:
Click the object you want to anchor to one or more sides of the user interface window or autoresize.
Choose Tools
Click the vertical and/or horizontal autoresize arrow (inside the box) to define whether the object can expand in height or width if the user resizes the user interface window.
Click one or more anchor arrows (outside the box) to force the object to always stay within a fixed distance from the top, bottom, left, or right edges of the user interface window.
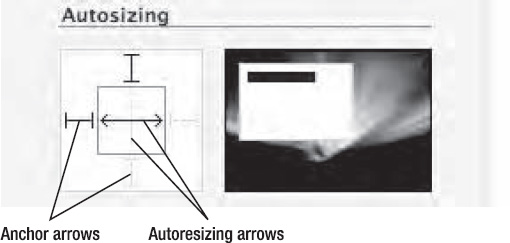
After you click the different anchor or autoresize arrows, the Example graphic to the right visually shows you how your choices will make your object behave if the user resizes the user interface window as long as you keep the mouse pointer over the Autosizing box.
To create a user interface, you have to use Interface Builder, which lets you visually drag and drop objects to create a user interface. A typical user interface consists of a single .xib file that contains pull-down menus and a window. However, you can add as many additional .xib files as necessary to create your program's user interface.
After you drag and drop objects on your user interface, you need to customize the appearance of each object by moving or resizing it. You can use the mouse to drag an object to the right position on the window or to resize its height or width. For more precision, you can choose View
To make sure your user interface remains consistent no matter how the user resizes the user interface window, you can anchor and autoresize each user interface object. Anchoring forces an object to maintain a fixed distance from one or more edges of a window. Autoresizing lets an object expand or shrink its height and/or width depending on how the user expands or shrinks the user interface window.
The basic idea behind designing a user interface is to drag and drop objects on a window, customize those user interface objects, and then connect them to your Objective-C code, which is what you'll learn to do in the next chapters in this part of the book.