To write a program, you need at least two tools: an editor and a compiler. An editor acts like a word processor and lets you write instructions using a programming language such as Objective-C. A compiler converts your instructions (called code) and compiles (or translates) them into a language that computers can understand, which is called machine code. When you buy a program, that program is stored in a file that contains nothing but machine code.
Every time you run a program on your computer, whether it's a word processor or a web browser, you're using a program that someone wrote in an editor using a programming language and converted into machine code using a compiler.
To create a program, you'll need to write, save, and edit instructions (your code) using a programming language such as Objective-C. In the early days of programming, an editor (also called a text editor) looked and behaved like a word processor, but without the need for fancy formatting commands. After you edited and saved a program in an editor, you had to exit the editor and run a compiler to test whether your program worked.
If your program didn't work, you had to load your editor again, open the file that you saved your instructions in, make any changes, and save the file once more. Then you had to run the compiler once again.
This process of constantly loading and exiting from the editor and compiler wasted time. The more time you wasted switching back and forth between your editor and your compiler, the less time you had to work on your program.
To fix this problem, computer scientists created a special program called an integrated development environment (IDE). The idea behind an IDE is that you need to load a single programming tool only once. You can write, edit, and save your program in the IDE and then compile it without having to exit the editor and load the compiler since everything is integrated in a single program.
Besides making programming faster and easier, IDEs had a second benefit. If you ran a compiler separately from the editor and your program had an error or bug in it, the compiler could identify the line in your program only where the error occurred. To fix this problem, you had to load your editor again, open your program, and move the cursor to the line where the error occurred so you could fix it. Once again, this process wasted time.
Since an IDE never forces you to quit and load a separate program, the moment the compiler discovers a bug in your program, it can highlight that error in the editor so you can fix it right away. An IDE simply combines the features of multiple tools into a single program.
To write programs for the Mac, you'll be using two free tools provided by Apple called Xcode and Interface Builder. Xcode combines the features of an editor and a compiler (along with other tools) so you'll be able to create and edit programs written in Objective-C. Interface Builder lets you visually design your program's user interface. By using both Xcode and Interface Builder, you'll be able to design your user interface and connect it to your Objective-C code to make the whole thing work.
To write Mac programs, you have to use Xcode, which you can download for free from the Apple Developer Center site (http://developer.apple.com). The first time you see Xcode, it might look intimidating because of all the menu commands, windows, and icons that appear everywhere. The idea of trying to master every feature of Xcode can be as intimidating as learning to fly for the first time by stepping in the cockpit of a 747 jumbo jet.
Note
Interface Builder is a program bundled with Xcode, so when you download Xcode from Apple's developer's site, you get both Interface Builder and Xcode in the same file.
Don't worry. Although Xcode provides hundreds of options and features, you don't have to learn them all right away, or even at all. To write a Mac program, you only need to learn how to use a handful of features. Later as you get more experienced with Mac programming, you can take advantage of Xcode's other features, but only when you're ready.
The three basic uses for Xcode are as follows:
Creating and editing Objective-C code
Creating and modifying your program's user interface
Running and testing your program
Before you can start writing Mac programs, you need to understand how to use Xcode. The first task is to learn and understand the Xcode user interface. The second task is to learn how and when to use different features of Xcode when writing your own program.
Unlike other types of programs you may have used before, such as a word processor or web browser, Xcode lets you customize the user interface to display only the information you want at any given time. This makes Xcode flexible enough for everyone but also means that one copy of Xcode can look wildly different than another copy of Xcode.
The part of Xcode that always remains the same is its pull-down menus, which consists of the following:
File: Commands for creating, opening, saving, and printing your programs
Edit: Commands for copying, deleting, and moving items when writing code in Objective-C or when designing your program's user interface
View: Commands for hiding or displaying icons or windows that display additional information
Product: Commands for compiling and testing your program
Build: Commands for compiling your programs
Run: Commands for testing and debugging your program
Window: Commands for manipulating Xcode's windows that may display additional commands
Help: Commands for getting help using Xcode or writing Objective-C code
In addition to commands stored on pull-down menus, Xcode also offers numerous icons that display different types of information. Since these icons are small and not always intuitive as to what they do, most icons duplicate commands already available through the pull-down menus. The idea is that once you get used to using different commands regularly, you may find it faster to click an icon that performs the same function, rather than constantly going through the pull-down menus over and over again.
The main part of Xcode consists of multiple windows that appear stacked or side by side. Windows display different information about your program, so by moving, closing, or resizing a different window, you can change what type of information you want to see.
These three parts of Xcode (pull-down menus, icons, and panes) provide you with the tools you need to create, edit, and run your programs, as shown in Figure 2-1.

When you install most programs on your Mac, such as Microsoft Word or iTunes, that program appears in the Applications folder. However, when you install Xcode on your computer, it usually appears in a special Developer folder.
To locate Xcodeon your Mac, follow these steps:
Click your hard disk icon (usually called Macintosh HD) located under the DEVICES category.
Choose View

Click the gray arrow that appears to the left of the Developer folder. A list of files and folders inside this Developer folder appears.
Click the gray arrow that appears to the left of the Applications folder. The Xcode icon appears as one of many files stored in the Applications folder, as shown in Figure 2-2.

Note
To make finding and running Xcode easier in the future, you may want to drag the Xcode icon onto the Dock. This will give you one-click access to starting Xcode whenever you need it.
In the early days of programming, most programs were fairly small so they could easily fit into a single file. As programs grew larger and more complicated, programmers started to store different parts of a program in separate files. Each file represented a different part of a program, and all the files taken as a whole were called a project. A project file simply keeps track of all the files needed to create a single program.
To create a new Mac program, you have to create a new project. There are two ways to create a new project. First, when you start Xcode, a dialog box appears, letting you open an existing project or create a new product, as shown in Figure 2-3.
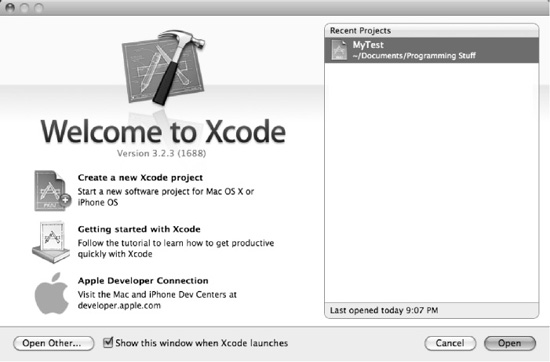
Figure 2-3. The opening Xcode dialog box lets you choose between creating a new project or opening an existing one.
If you've already started Xcode, a second way to create a new project is to choose File
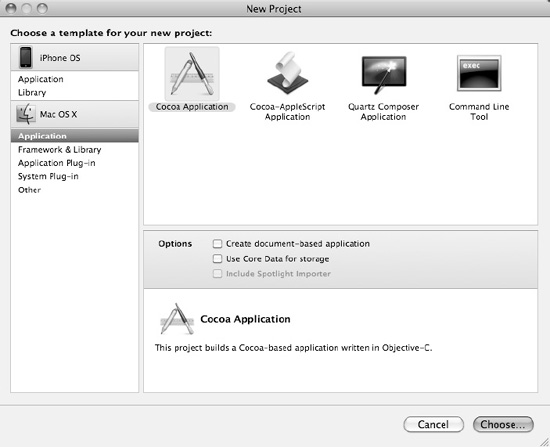
If you want to create an iPhone/iPad app, you'd choose a template under the iPhone OS category. If you want to create a Mac program, you'd choose a template under the Mac OS X category, which displays different types of templates, as shown in Figure 2-4:
Application: Creates a Mac OS X program, which is the template you'll use most often.
Framework & Library: Creates your own framework of useful code that you can reuse in different programs. (This option is for advanced Mac programmers.)
Application Plug-In: Creates small programs designed to work with existing applications such as the Address Book. (This option is for advanced Mac programmers.)
System Plug-In: Creates small programs designed to work with the Mac OS X operating system. (This option is for advanced Mac programmers.)
Other: Creates a completely blank file so you'll have to create everything from scratch. (This option is for advanced Mac programmers.)
When you select the Application template, Xcode gives you the option of creating four types of applications:
Cocoa Application: Creates the most common type of Mac OS X applications.
Cocoa-Applescript Application: Creates an application based on the AppleScript programming language. (This option is for advanced Mac programmers.)
Quartz Composer Application: Uses a visual programming language for processing and rendering graphical data. (This option is for advanced Mac programmers.)
Command Line Tool: Creates an application without the standard Mac OS X user interface. (This option is for advanced Mac programmers.)
In this book, you'll only be using the Application template to create Cocoa applications, which creates typical Mac OS X programs. When you create a Mac OS X program, you'll also have the option of selecting a "Create document-based application" or "Use Core Data for storage" check box. The "Create document-based application" option lets you open multiple windows to display different files, such as a word processor displaying multiple documents. The "Use Core Data for storage" option lets you use a special data management framework for storing data. For the purposes of this book, you can ignore these two options since they're designed for creating more sophisticated programs.
Note
Cocoa is the name of Apple's framework to help you create Mac OS X programs. An older version of Apple's frameworks is called Carbon, which was designed to help programmers transition their programs from OS 9 to Mac OS X. Most new Mac programs rely on the Cocoa framework rather than the Carbon framework. If you hear people talking about Cocoa programming, they're just talking about Mac OS X programming using the Cocoa framework.
After you choose the Cocoa Application template, Xcode will ask for the name of your project. Type a descriptive name for your project, and click the Next button.
A Save dialog box appears, letting you name your project and choose the drive and folder to store your Xcode project. Select a folder, type a name (such as Test), and click the Save button. The Xcode window appears.
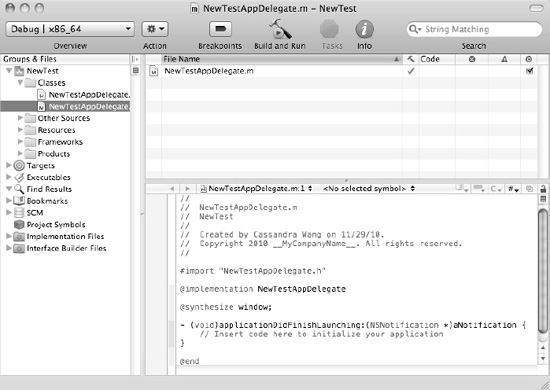
When you choose a program template, Xcode creates a bare-bones, working program for you. To view the Objective-C code that your template already contains, you can click the list of folders displayed in the left pane of the Xcode window, as shown in Figure 2-5.
You can actually put any file in any folder, regardless of the folder's name. However, it's a good idea to keep files stored in specific folders based on their purpose, which are as follows:
Classes: Holds the files that contain Objective-C code.
Other Sources: Holds Objective-C files necessary for creating your program, but you'll almost never need to look at, let alone edit, any of the files stored in this folder.
Resources: Holds files containing information about your program as well as files (named xib files) that define your user interface.
Frameworks: Lists all the frameworks that your program uses when it runs.
Products: Holds the actual program file that you can give to others.
To view the contents of any folder, click the gray arrow (called a disclosure triangle) that appears to the left of that folder. To hide the contents of any folder, click the gray downward-pointing arrow to the left of that folder.
The two folders you'll open and add files to most often are the Classes and Resources folders. The Classes folder holds all your Objective-C code, while the Resources folder holds all your user interface files.
Each time you select a file within a folder, Xcode displays the contents of that file in the middle window. If you open the Classes folder and click a file stored in that folder, you'll see a file containing Objective-C code.
If you now open the Resources folder and click the MainMenu.xib file, you'll see the user interface for your program, which will initially be blank.
Note
User interface files have the file extension of .xib, which stands for Xcode Interface Builder. User interface files are also called nib files, which stands for NeXT Interface Builder. NeXT stands for NeXTSTEP, which is the operating system that Apple used to create Mac OS X. Apple simply improved the NeXT Interface Builder program and renamed it Interface Builder.
When you create a new Xcode project and choose a template such as the Cocoa Applications template, Xcode creates a skeleton program. Without writing a single Objective-C command, your Xcode project already contains enough code to create a bare-bones user interface that consists of pull-down menus and windows that you can move, resize, close, or open.
To compile and run an Xcode project, you need to choose the Build and Run command, which you can choose by doing one of the following:
Click the Build and Run icon.
Choose Build
Press

If you choose the Build and Run command to compile and run a program, based on the Cocoa Applications template, you'll see that program's pull-down menus plus a window on the screen, as shown in Figure 2-6.
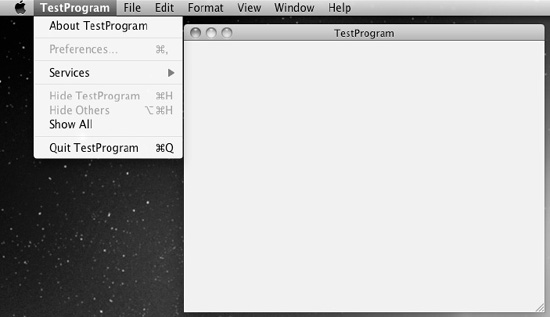
Click any of the pull-down menus, and move or resize the window. Notice that your program behaves like a typical Mac OS X program, and you haven't even written a single line of Objective-C code yet. When you chose to use a Cocoa Applications template, Xcode created a skeleton Mac OS X program that already knows how to work. All you have to do is provide the custom instructions to make the program solve your specific task. When you're done toying with your Mac OS X program, choose the Quit command just as you would do in any Mac OS X program.
By using program templates, you can create a working program without writing a single line of code whatsoever. This is one of the ways that Xcode makes Mac programming easy for you.
To write Mac programs, you'll be spending most of your time using Xcode. With Xcode, you can write and edit Objective-C code, design a user interface, and run your program to make sure it works or fix problems if it doesn't work.
Just remember that you don't need to learn every feature in Xcode to start using it. Just as staring at all the instruments crammed into the cockpit of a 747 jumbo jet might seem intimidating, so might Xcode's initial appearance frighten you with its apparent complexity. Just focus on the features you'll need and use the most, and ignore those features you don't need until you eventually understand and want to use them.
Xcode is your primary tool for creating Mac programs, so you'll be spending a lot of time using this program. The more you use Xcode, the more comfortable and familiar the program will get. Pretty soon you'll find yourself spending more of your time using Xcode and less of your time trying to figure out how to do something useful with it.
This chapter is meant as an introduction to Xcode so you know what you're looking at and the purpose of each feature. In the next chapter, you'll actually use Xcode to create small programs that can give you a taste of what Mac programming is really all about.