Buttons let the user choose a single command. However, many times, you may need to present the user with several options. You could display multiple buttons, where each button represents a single option, but this could look cluttered and messy. A more compact solution is to use radio buttons and check boxes.
Both options let you display choices to the user and provide visual feedback so the user knows which options they have selected. Radio buttons and check boxes act as a way to input data into the computer and also offer a limited way to display information back to the user.
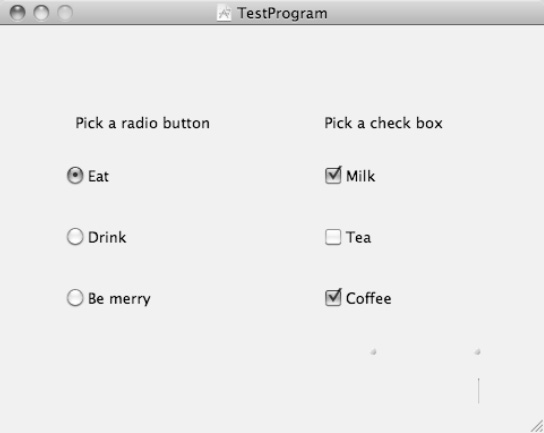
The main difference between the two is that when a program displays a group of radio buttons, the user can select only one radio button in that group at a time, whereas when a program displays check boxes, the user can select multiple check boxes, as shown in Figure 16-1.
Most car radios have buttons that let you assign a different station to each button. By pressing a button, you can quickly select your favorite radio station. Computer radio buttons work the same way, displaying multiple options but allowing the user to select only one option at a time. The moment the user chooses a different option, the previously selected option is no longer selected.
Interface Builder treats radio buttons as cells in a table of rows and columns. To create a group of radio buttons, you just need to drag the Radio Group object from the Object Library and drop it on your user interface, as shown in Figure 16-2.

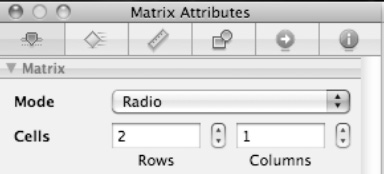
By default, the Radio Group object creates a matrix of two radio buttons. To add more radio buttons, you can add additional rows or columns.
To add (or remove) additional radio buttons to (from) a radio group, follow these steps:
Click the Radio Group you want to modify. Handles appear around the edges of your Radio Group.
Choose Tools

Click the up or down arrow next to the Rows text box or Columns text box, shown in Figure 16-3. Each time you click the up arrow, you add another row or column of radio buttons. Each time you click the down arrow, you remove a row or column of radio buttons.
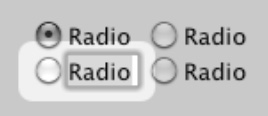
When you add new rows or columns to a Radio Group, you may wind up with an equal number of radio buttons in adjacent columns, such as three radio buttons in one column and three more radio buttons in an adjacent column.
If you need to display an odd number of radio buttons, such as three radio buttons in one column and two radio buttons in an adjacent column, you need to make one or more radio buttons transparent so they don't appear.
To make a radio button transparent so it doesn't appear on the user interface, follow these steps:
Double-click the radio button that you want to hide. Your selected radio button appears highlighted, as shown in Figure 16-4.
Choose Tools
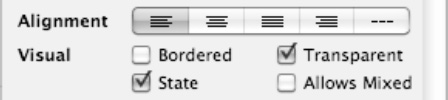
Select the Transparent check box, as shown in Figure 16-5.
Click a different radio button. The radio button you designated to be transparent should disappear. To make the radio button visible again, just repeat these steps except clear the Transparent check box in step 3.
Every radio button usually needs a title that represents an option for the user to choose. There are two ways to create a title on a radio button. First, you can double-click the radio button directly and, when the button's title appears highlighted, type any text that you want to appear on the radio button. A second way is to open the Attributes Inspector window, which lets you type text into the Title field to display text on a button.
A radio button can be in one of two states: On or Off. When On, the radio button appears selected. When Off, the radio button appears clear. Normally, only one radio button in a Radio Group can appear selected at a time.
To set a radio button's state, follow these steps:
Double-click the radio button that you want to modify.
Choose Tools
Select (or clear) the State check box.
After you've created a Radio Group, you may need to identify which radio button the user selected. To get this information, you first need to realize that the entire Radio Group is based on a class called NSMatrix, and each radio button within that Radio Group is based on the NSButtonCell class. To determine which radio button the user clicked, you can use either of two properties of the NSButtonCell class: title or tag.
The title property identifies the actual text of the radio button that the user clicked. The tag property identifies an arbitrary numeric value assigned to each radio button. With either property, you must make sure that radio buttons have different title or tag values.
To see how to identify a radio button using the title property, follow these steps:
Open the MyTest program you created in the previous chapter.
Double-click the
MainMenu.xibfile stored in the Resources folder. Interface Builder appears, displaying your user interface window.Choose Tools
Drag and drop the Radio Group anywhere on your user interface window. Two radio buttons initially appear.
Double-click the top radio button. The radio button's title appears highlighted.
Type Top and press Return.
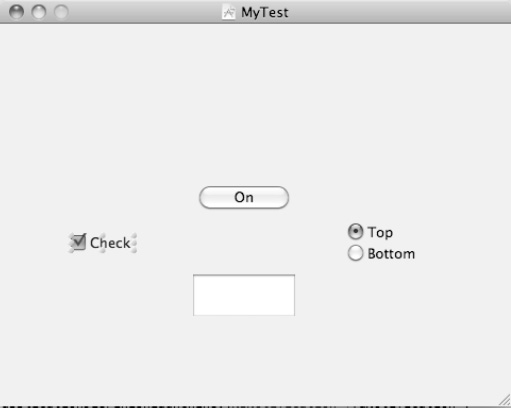
Double-click the bottom radio button. When the radio button's title appears highlighted, type Bottom and press Return. (You may need to drag the side handle of the Radio Group so the radio button titles don't appear cut off.) Your user interface should display two radio buttons, similar to Figure 16-6.
Choose File
Switch to Xcode, click the
MyTestAppDelegate.hfile stored in the Classes folder, and modify the code as follows:#import <Cocoa/Cocoa.h> @interface MyTestAppDelegate : NSObject <NSApplicationDelegate> {NSWindow *window; } @property (retain) IBOutlet NSWindow *window;
-(IBAction)findSelectedButton:(id)sender;@endChoose File
Click the
MyTestAppDelegate.mfile stored in the Classes folder and modify the code as follows:#import "MyTestAppDelegate.h" @implementation MyTestAppDelegate @synthesize window; - (void)applicationDidFinishLaunching:(NSNotification *)aNotification { // Insert code here to initialize your application } - (void)dealloc { [window release]; [super dealloc]; }-(IBAction)findSelectedButton:(id)sender {NSButtonCell *selCell = [sender selectedCell];//NSLog (@"Title cell is %@", [selCell title]);NSLog (@"Title cell is %@", selCell.title);} @endIn the
findSelectedButtonmethod, you have a choice of how you want to access the radio button'stitleproperty. You can use the square bracket method like this:[selCell title];
Or you can use the dot notation method like this:
selCel.title
Both methods are equivalent, but the dot notation method is preferred because it's simpler to understand.
Choose File
Double-click the
MainMenu.xibfile in the Resources folder. Interface Builder appears, displaying your user interface window with its two radio buttons.Right-click the Radio Group. A heads-up window appears.
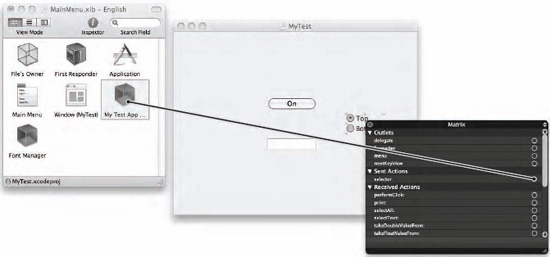
Move the mouse pointer over the circle that appears to the right of
selector, under the Sent Actions category, and drag the mouse to the MyTest App Delegate icon, as shown in Figure 16-7.Release the mouse button while the mouse pointer is over the My Test App Delegate icon. A pop-up window appears, listing all the
IBActionmethods available in that class file.Choose the
findSelectedButtonmethod.Choose File
Switch to Xcode and click the Build and Run button or choose Build
Click the radio button named Bottom. Nothing will happen because the radio button is using the
NSLogcommand to write to the log window.Click the radio button named Top.
Quit your program by choosing MyTest
Choose Run
2010-09-18 12:15:39.772 UITest[22255:a0f] Title cell is Bottom
2010-09-18 12:15:40.927 UITest[22255:a0f] Title cell is Top

If you want to identify radio buttons using the tag property, you must first give each radio button a unique tag value by following these steps:
Double-click the radio button that you want to modify.
Choose Tools
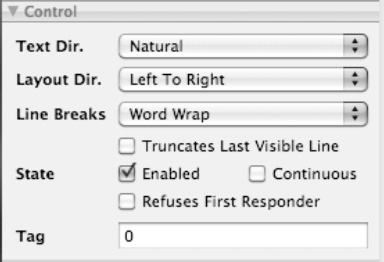
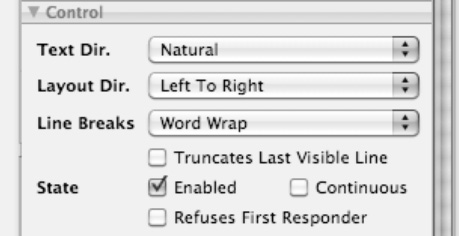
Scroll down the Attributes Inspector window until you see the tag field under the Control category, as shown in Figure 16-8.
Click in the tag field and type a number.
Repeat steps 1 to 4 for each radio button in the Radio Group. Be sure to give each radio button a unique tag value.
To use the tag property to identify which radio button the user clicked, you just have to look for the tag property:
-(IBAction)findSelectedButton:(id)sender {
    NSButtonCell *selCell = [sender selectedCell];
    NSLog(@"Tag value of the cell is %d", selCell.tag);
    // NSLog(@"Tag value of the cell is %d", [selCell tag]);
}
Just as with the title property, you can access the tag property using the square brackets method or the dot notation method.
Radio buttons typically display multiple options but let the user choose only one option at a time. Check boxes also display multiple options, but the user can select zero or more options at the same time. When choices aren't mutually exclusive, use check boxes.
To create a check box, just drag a Check Box object from the Object Library and drop it on your user interface, as shown in Figure 16-9.
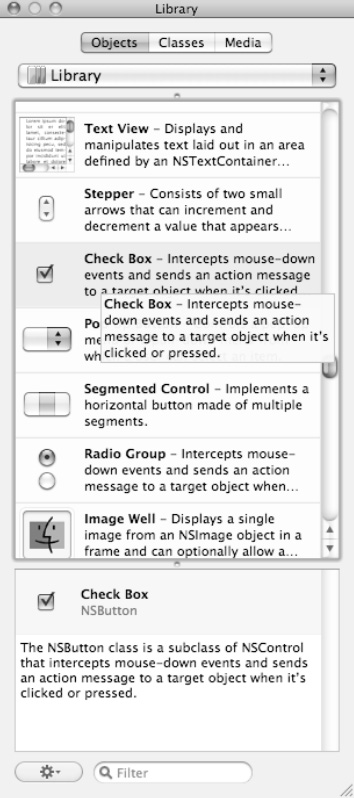
Dragging and dropping a Check Box object creates only a single check box at a time. You'll need to drag and drop additional Check Box objects if you need more check boxes.
The title of a check box displays the option that the check box represents. The state defines whether the check box is selected or cleared.
There are two ways to create a title on a check box. First, you can double-click the check box directly and, when the check box's title appears highlighted, type any text that you want to appear.
Second, you can click a check box, choose Tools
The Attributes Inspector window is also where you can define the check box's State property, using the check boxes that appear next to State under the Control category, as shown in Figure 16-10.
To determine the state property of a check box, you need to check if the state property is equal to NSOnState or NSOffState. To see how to identify a check box, follow these steps:
Open the MyTest program you modified in the previous section.
Double-click the
MainMenu.xibfile stored in the Resources folder. Interface Builder appears and displays your user interface window.Choose Tools
Drag and drop a Check Box object anywhere on your user interface window so that it looks similar to Figure 16-11.
Click the
MyTestAppDelegate.hfile stored in the Classes folder and modify the code as follows:#import <Cocoa/Cocoa.h> @interface MyTestAppDelegate : NSObject <NSApplicationDelegate> { NSWindow *window; } @property (retain) IBOutlet NSWindow *window;-(IBAction)checkBox:(id)sender;@endChoose File
Click the
MyTestAppDelegate.mfile stored in the Classes folder and modify the code as follows:#import "MyTestAppDelegate.h" @implementation MyTestAppDelegate @synthesize window; - (void)applicationDidFinishLaunching:(NSNotification *)aNotification { // Insert code here to initialize your application }- (void)dealloc { [window release]; [super dealloc]; }-(IBAction)checkBox:(id)sender{NSButton *check = sender;NSLog (@"Title = %@", check.title);switch ([check state]){case NSOnState:NSLog (@"Check box is On");break;case NSOffState:NSLog (@"Check box is Off");break;}NSLog (@"*****");}@endChoose File
Double-click the
MainMenu.xibfile in the Resources folder. Interface Builder appears, displaying your user interface window.Right-click the check box. A heads-up window appears.
Move the mouse pointer over the circle that appears to the right of
selector, under the Sent Actions category, and click and drag the mouse to the My Test App Delegate icon.Release the mouse button while the mouse pointer is over the My Test App Delegate icon. A pop-up window appears, listing all the
IBActionmethods available in that class file.Choose the
checkBoxmethod.Choose File
Switch to Xcode and click the Build and Run button or choose Build
Click the check box two times to see each state of the check box.
Quit your program by choosing MyTest
Choose Run
2010-09-18 21:45:28.606 UITest[23899:a0f] Title = Check
2010-09-18 21:45:28.613 UITest[23899:a0f] Check box is Off
2010-09-18 21:45:28.614 UITest[23899:a0f] *****
2010-09-18 21:45:29.742 UITest[23899:a0f] Title = Check
2010-09-18 21:45:29.744 UITest[23899:a0f] Check box is On
2010-09-18 21:45:29.744 UITest[23899:a0f] *****
When you need to display multiple options to the user, use radio buttons or check boxes. Radio buttons let you display mutually exclusive choices, while check boxes let the user select zero or more options.
When you create a Radio Group, you're initially creating two radio buttons that work together, although you can add more radio buttons by adding rows or columns. In a Radio Group, only one radio button can be selected at any given time.
When you create a check box object, you create only a single check box at a time. You need to add additional check boxes manually.
To identify which radio button or check box the user clicked, you can use the Title property. To identify the state of a check box, you need to examine the State property to see if it equals NSOnState or NSOffState.
Radio buttons and check boxes are handy when you need to display a small number of options for the user to select. The more options you need to display, the more cluttered your user interface can look with multiple radio buttons or check boxes.