Radio buttons and check boxes let users select from multiple options. Unfortunately, each time you need to display another option, you also need to display another radio button or check box, which takes up space. The more radio buttons or check boxes displayed, the more cluttered and confusing your user interface will look.
To avoid this problem, you can also display options to the user through pop-up buttons. A pop-up button takes up a minimal amount of space, but when the user clicks it, a list of options appears that can be far more numerous than the limited number of choices you could display through multiple radio buttons or check boxes.
When you need to display a large number of options and need to conserve space on your user interface, use a pop-up button in place of multiple radio buttons or check boxes. The drawback is that all the available options won't be visible to the user at all times. The advantage is that hiding all the available options prevents your program from overwhelming the user with too many choices.
Like radio buttons, a pop-up button lets the user select only from a predefined list of options. Unlike radio buttons, a pop-up button always takes up a fixed amount of space no matter how many options you want to display to the user.
A pop-up button displays the currently selected option as a wide but short button. As soon as the user clicks the button, the pop-up menu expands to show a list of options, as shown in Figure 17-1. From this expanded list, the user can click one of the many available options.
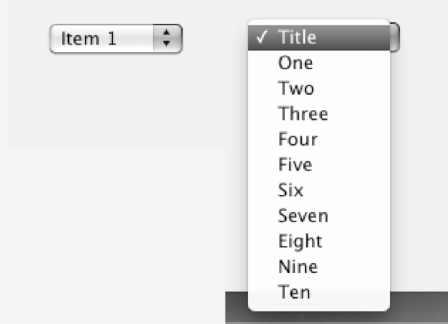
Figure 17-1. A pop-up button takes up minimal amount of space, but can provide a list of choices when clicked.
To create a pop-up button, just open the Library window in Interface Builder by choosing Tools
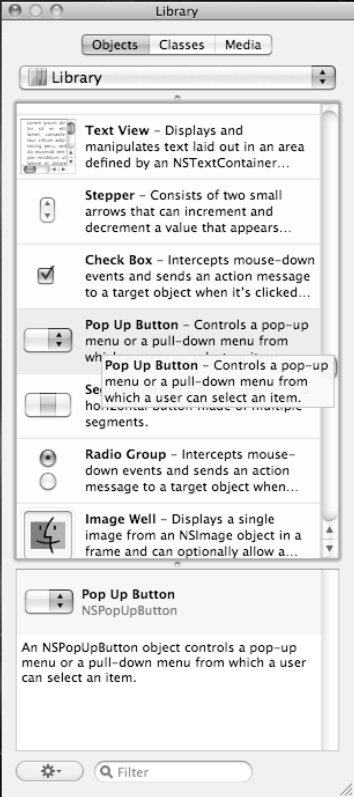
After you've placed a Pop Up Button object on your user interface window, the next step is to fill its list with different choices. There are two ways to create and edit a pop-up button list:
In Interface Builder
Using Objective-C code
Using Interface Builder is simple since you just need to type or edit a list of options. However, once your program starts running, your pop-up button list remains fixed. Using Objective-C code to create a pop-up button list is much harder, but it gives you the flexibility of changing the list as your program runs.
You can use either method separately or both in combination. For example, you might create your initial pop-up button list in Interface Builder, and then modify it using Objective-C code as your program runs. Let's see how to do so now.
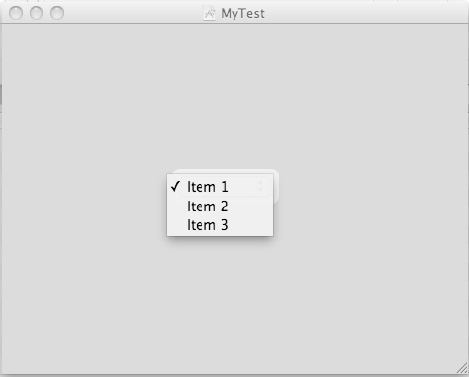
By default, every pop-up button comes with three items, labeled Item 1, Item 2, and Item 3. To create your own list of choices, you have to rename these existing default choices and add or delete additional items, depending on how many choices you want to offer. To create a pop-up button and edit its existing three items, follow these steps:
Open the MyTest program that you modified in Chapter 16.
Double-click on the MainMenu.xib file in the Resources folder to open Interface Builder. Your user interface appears.
Choose Tools

Drag a Pop Up Button object from the Object Library and drop it on your user interface window.
Double-click the pop-up button. A list of three items appears, as shown in Figure 17-3.
Double-click each item in the menu (such as Item 1) and type a new word or phrase. Repeat for each item that you want to change.
By default, a pop-up button lists only three menu items. Chances are good you'll need more (or less) than exactly three menu items, so you can add or delete menu items at any time. To add new items to a pop-up button's list, make sure that the pop-up button appears on your user interface in Interface Builder and then follow these steps:
Open the MyTest program that you modified in the previous section (If it isn't already open).
Double-click the
MainMenu.xibfile located in the Resources folder. Interface Builder appears and displays your user interface.Double-click the pop-up button you want to modify. A list of currently stored menu items appears, as shown in Figure 17-3.
(Optional) Click the menu item that you want to delete and press Delete or Backspace. Your selected menu item disappears.
Choose Tools
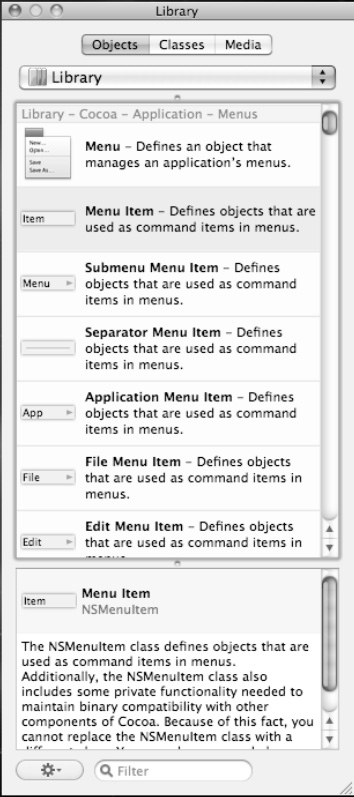
Scroll down the Library window until you see the Menu Item object, as shown in Figure 17-4.
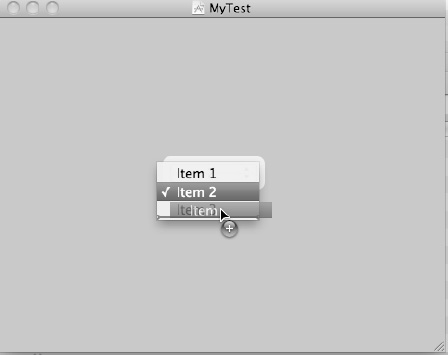
Drag the Menu Item object over the pop-up button's menu until you see a white plus sign inside a green circle, as shown in Figure 17-5.
Release the mouse button. Your newly added menu item appears in the pop-up button's menu. Repeat this step for each additional menu itemyou want to add.
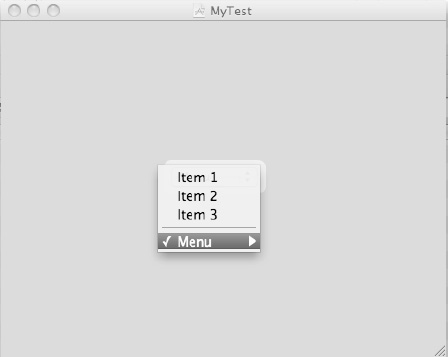
(Optional) Drag a Separator Menu Item object or Submenu Menu Item object to your pop-up button's menu. The Separator Menu Item object displays a line to group related menu items together. The Submenu Menu Item object lets you create an additional submenu that you can fill with additional menu items. Both are shown in action in Figure 17-6.
After adding or deleting items in a pop-up button's list, you need to rename the items so they don't display a generic title like Item 2 or Item 3. There are two ways to rename an item, as shown in Figure 17-7:
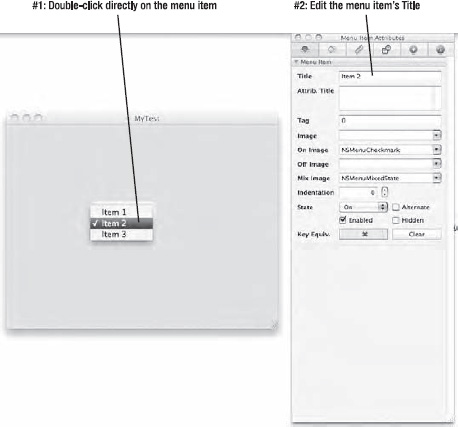
Double-click the pop-up button directly on your user interface to display its list of choices. Then double-click the item that you want to rename and type new text.
Double-click the pop-up button directly on your user interface to display its list of choices. Then click the item in the list that you want to rename. Choose Tools
Another way to modify a pop-up button's list of choices is to create an array and then load that array of data into the pop-up button's list. This option requires writing Objective-C code and connecting your code to the pop-up button on your user interface.
To connect your Objective-C code to a user interface object, you must create something called an IBOutlet. Basically, any variable declared as an IBOutlet can display data to a user interface object, such as a pop-up button.
Next, you need to create an array and fill it with data. Then you need to store this array of data in your IBOutlet variable that's connected to your pop-up button, which will display your data on the screen.
To see how to create an array and connect this data to a pop-up menu button, follow these steps:
Open the MyTest program from earlier in the chapter.
Click the
MyTestAppDelegate.hfile located in the Classes folder and type the following bold text in the existing Objective-C code:#import<Cocoa/Cocoa.h> @interfaceMyTestAppDelegate : NSObject<NSApplicationDelegate> { NSWindow *window;NSPopUpButton *myPopUp;} @property (retain) IBOutletNSWindow *window;@property (retain) IBOutletNSPopUpButton *myPopUp;@endThe
myPopUppointer name is arbitrary, but this will represent your pop-up button.Choose File
Click the
MyTestAppDelegate.mfile and type the following bold text in the existing Objective-C code:#import "UITestAppDelegate.h" @implementationMyTestAppDelegate @synthesize window;
@synthesizemyPopUp;- (void)applicationDidFinishLaunching:(NSNotification *)aNotification {// Insert code here to initialize your applicationNSString *object1 = @"Electric trains";NSString *object2 = @"Bicycles";NSString *object3 = @"Video games";NSString *object4 = @"Skateboards";NSMutableArray *myArray;myArray= [NSMutableArrayarrayWithObjects: object1, object2, object3, object4, nil];[myPopUpremoveAllItems];[myPopUpaddItemsWithTitles: myArray];}- (void)dealloc {[myPopup release];[window release]; [superdealloc]; } @endThis
applicationDidFinishLaunchingmethod creates four string objects, declares anNSMutableArray, stuffs the four string objects into this array, uses theremoveAllItemsmethod to get rid of the three default items normally stored in the pop-up button, and finally adds the array item to the pop-up button using theaddItemsWithTitlesmethod and the array itself.Choose File
Double-click the
MainMenu.xibfile located in the Resources folder. Interface Builder appears and displays your user interface window.Right-click the My Test App Delegate icon. A heads-up window appears.
Move the mouse pointer over the circle that appears to the right of
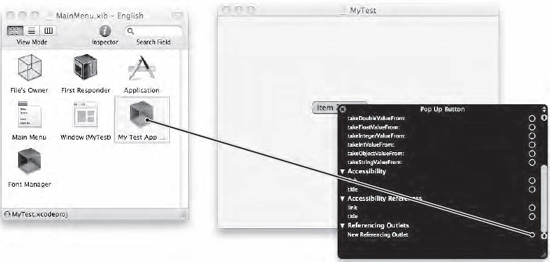
myPopUp, which appears under the Outlets category. Click and drag the mouse pointer over the pop-up button on your user interface and release the mouse button to connect the user interface object to themyPopUppointer, as shown in Figure 17-8.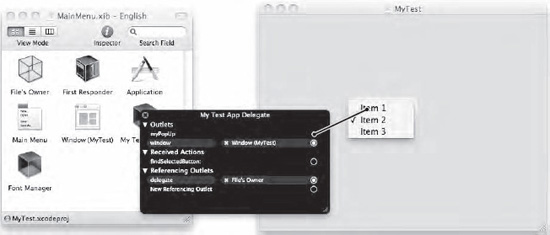
Figure 17-8. Dragging and dropping connects the
myPopUpIBOutletto your actual pop-up button object on the user interface.As an alternative to step 8, you can right-click the pop-up button on the user interface to display a heads-up window. Then click and drag the circle to the right of New Referencing Outlet under the Referencing Outlets category and drop it over the class file icon that contains the
IBOutletyou want to use, as shown in Figure 17-9.Choose File
Switch back to Xcode and click the Build and Run button or choose Build
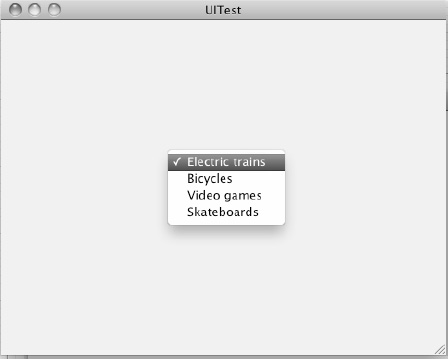
Click the pop-up button and you'll see the contents of your array displayed in the pop-up button's list, as shown in Figure 17-10.
Quit your program by choosing MyTest
If you define your pop-up button's list of choices through Interface Builder, you can identify each choice by the title or tag property. If you create your pop-up button's list of choices with an array using Objective-C code, you can identify what the user selected through the text of that item or the index position of the selected item.
The Title property identifies the actual text of the option that the user clicked. The Tag property identifies an arbitrary numeric value assigned to each option through the Object Attributes window. With either property, you must make sure that all your pop-up button's options have different Title or Tag values.
The problem with identifying menu items through the Title value is that you must identify the text exactly. If the menu item is "Open File" and your Objective-C code searches for "open file" instead, the code won't work since the text isn't exactly the same. For that reason, you may prefer to identify a selected menu item by using its index position.
The first (top) menu item is considered at index position 0, the second at index position 1, and so on. By searching for index position, you don't have to worry about the actual text displayed by each menu item.
To retrieve the index position of an item in a menu, you need to retrieve the value of the index item, stored in the indexOfSelectedItem property. After you retrieve this index value, you need to store it in a variable such as:
-(IBAction)findSelectedButton:(id)sender;
    {
         NSInteger index = [sender indexOfSelectedItem];
         NSLog(@"Selected item index is %i", index);
    }
If the preceding method were connected to a pop-up button, the sender would retrieve the item that the user selected in the pop-up button, and the indexOfSelectedItem property would retrieve that selected item's index position.
To see how to identify a selected item chosen from a pop-up button by its displayed text (Title property) or its index position, follow these steps:
Open the MyTest program you modified in the previous section.
Click the
MyTestAppDelegate.hfile located in the Classes folder and modify its code as follows:#import<Cocoa/Cocoa.h> @interfaceMyTestAppDelegate : NSObject<NSApplicationDelegate> { NSWindow *window; NSPopUpButton *myPopUp; }@property (retain) IBOutletNSWindow *window; @property (retain) IBOutletNSPopUpButton *myPopUp;
-(IBAction)findSelectedButton:(id)sender;@endChoose File
Click the
MyTestAppDelegate.mfile located in the Classes folder and modify the code as follows:#import "MyTestAppDelegate.h" @implementationMyTestAppDelegate @synthesize window; @synthesizemyPopUp; - (void)applicationDidFinishLaunching:(NSNotification *)aNotification { // Insert code here to initialize your application NSString *object1 = @"Electric trains"; NSString *object2 = @"Bicycles"; NSString *object3 = @"Video games"; NSString *object4 = @"Skateboards"; NSMutableArray *myArray; myArray= [NSMutableArrayarrayWithObjects: object1, object2, object3, object4, nil]; [myPopUpremoveAllItems]; [myPopUpaddItemsWithTitles: myArray]; } - (void)dealloc { [myPopUp release]; [window release]; [superdealloc]; }-(IBAction)findSelectedButton:(id)sender {NSPopUpButtonCell *selCell = [sender selectedCell];//NSLog(@"Selected cell is %d", [selCell tag]);NSLog (@"Selected cell is %d", selCell.tag);//NSLog (@"Title cell is %@", [selCell title]);NSLog (@"Title cell is %@", selCell.title);NSInteger index = [sender indexOfSelectedItem];NSLog(@"Selected item index is %i", index);}@endIn the
findSelectedButtonmethod, you have a choice of how you want to access the Title property; you can use square brackets like this,[selCell title];
or you can use the dot notation method like this:
selCel.title
Both methods are equivalent and you can choose whichever method you prefer, although the dot notation method is now considered the preferred method to use.
Choose File
Double-click the
MainMenu.xibfile located in the Resources folder. Interface Builder appears and displays your user interface window.Right-click the pop-up button on the user interface. A heads-up window appears.
Move the mouse pointer over the circle that appears to the right of
selector, under the Sent Actions category, and click and drag the mouse to the Test App Delegate icon.Release the mouse button while the mouse pointer is over the Test App Delegate icon. A pop-up window appears, listing all the
IBActionmethods available in that class file.Choose the
findSelectedButtonmethod.Choose File
Switch to Xcode and click the Build and Run button or choose Build
Click the pop-up button. A list of options appears.
Click an option such as
Bicycles.Click the pop-up button again and click a different option such as
Skateboards.Quit your program by choosing MyTest
Choose Run
2010-12-06 09:36:11.435 NewTest[15438:a0f] Selected cell is 0
2010-12-06 09:36:11.439 NewTest[15438:a0f] Title cell is Bicycles
2010-12-06 09:36:11.443 NewTest[15438:a0f] Selected item index is 1
2010-12-06 09:36:14.222 NewTest[15438:a0f] Selected cell is 0
2010-12-06 09:36:14.222 NewTest[15438:a0f] Title cell is Skateboards
2010-12-06 09:36:14.223 NewTest[15438:a0f] Selected item index is 3
Notice that the Tag property of both items is 0 because you didn't define this value. If you created your pop-up button's list of options through Interface Builder, you could set this Tag property of each item through the Object Attributes window.
Think of pop-up buttons as an alternative to radio buttons. Whenever your number of options starts to get too numerous to display as multiple radio buttons, switch to a pop-up button that can take up a minimal amount of space and still display a huge list of options for the user to select. The only drawback is that, whereas radio buttons make the options clearly visible at all times, a pop-up button requires that the user click it to see the list of choices.
The simplest and most straightforward way to create a list of options to display on a pop-up button is to expand the icon view that appears between the left and middle pane of the Xcode window. Then you can add, delete, or rename items that you want to appear as choices in your pop-up button list.
If you just want to rename the list of items in the pop-up button, you can either double-click the pop-up button directly to view and edit its list of choices, or you can double-click the pop-up button directly, click each item in the list, and open its Object Attributes window to edit the Title text and add a distinct value to each item's Tag property.
If you need to change the list of items displayed in a pop-up button, you can create its list of choices using Objective-C code. First, you need to create an IBOutlet variable to connect with your pop-up menu. Then, you need to connect your pop-up button on the user interface to the IBOutlet variable. Finally, you need to create an array of your pop-up button options, and then store this array in the IBOutlet variable that represents your pop-up button. Linking this IBOutlet variable to your pop-up button on the user interface allows the array data to appear as the pop-up button's list of choices.
Whenever you need to display a large number of choices in a small amount of space, use a pop-up button. By filling a pop-up button's list using an array and Objective-C code, you can even change the pop-up button's list of choices while your program runs.