When you need to let the user choose from a limited list of options, radio buttons, check boxes, and pop-up buttons will work just fine. When you need to let the user type in data, a text field or combo box will be a better choice. However, if you want the user to select a numeric value, a predefined list of options may be too limited and clumsy, and forcing the user to type in a number might not work if you want to restrict the number to a specific range. In this case, you may want to use a horizontal, vertical, or circular slider.
A slider lets you define a minimum and maximum value so the user can choose any number in between by moving the slider up and down or left and right. Sliders also let you define increments, such as allowing the user to select only even numbers or only numbers in increments of 0.5.
Another way to let the user input numeric values is to use a stepper, which looks like a tiny up and down arrow. Like a slider, a stepper lets you define a minimum and maximum value along with an increment value, so you could make the stepper count by ones, threes, fives, or any number you want.
Sliders and steppers can help users input a numeric value, but sometimes you may need the user to input a date. You could let the user type that information into a text field, but then you'll have the problem of enforcing a specific format, such as August 10, 2012 or 8/10/12. If the user misspells a month or uses dashes instead of slashes (8-10-12), your program might get confused if it doesn't expect anyone to type in a data using dashes.
To avoid this problem, you can use an object called a date picker. Instead of forcing users to type a date, a date picker displays a calendar so users can pick a date without typing. A date picker makes choosing dates convenient for the user while also simplifying receiving dates for your program.
The main purpose of all these controls is to prevent the user from giving your program invalid information, such as typing "Twelve" instead of using the number 12. By preventing the user from entering invalid data, your user interface can protect your program from crashing due to unexpected data, which increases the reliability of your program.
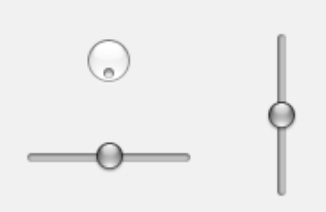
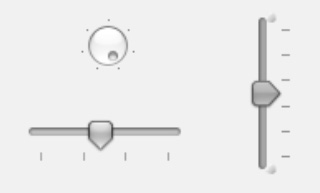
The main purpose of a slider is to let the user drag it to select a value. The following are the three types of sliders, as shown in Figure 19-1:
Horizontal
Vertical
Circular
To create a slider, follow these steps:
Choose Tools

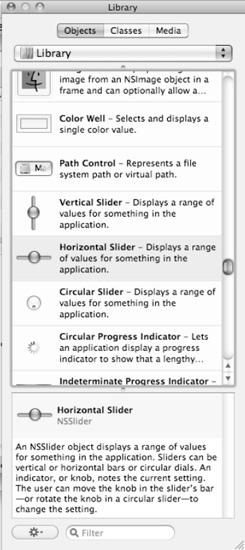
Drag the Horizontal Slider object, Vertical Slider object, or Circular Slider object from the Object Library (as shown in Figure 19-2) and drop it on your user interface window.
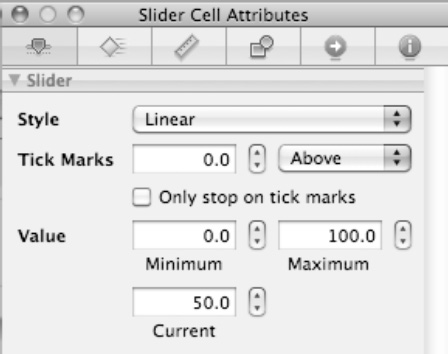
For every slider, you can define a Minimum, Maximum, and Current value. The Minimum value represents the lowest value the slider (left on a horizontal slider or bottom on a vertical slider) can return. The Maximum value represents the highest value the slider (right on a horizontal slider or top on a vertical slider) can return.
The Current value defines the value displayed on the slider. By modifying this value, you can set the slider's position. You can set all three values in the slider's Attributes Inspector window, shown in Figure 19-3, which you can open by clicking a slider and then choosing Tools
Tick marks can appear above or below a horizontal slider, on the left or right side of a vertical slider, or around the edges of a circular slider, as shown in Figure 19-4.
When displaying tick marks, you can choose in which position (above/below, left/right, around) you want the tick marks to appear for a slider, the number of tick marks to display, and whether you want to restrain the slider to move only in increments defined by the tick marks. To define the appearance of tick marks, you need to modify the following in the slider's Attributes Inspector window (see Figure 19-3):
When the user manipulates a slider, the slider constantly changes its current value. However, you won't be able to see this change in value unless you display that value in another object such as a label.
To use a label to display a slider's current value, you need to follow these steps:
Double-click on the MainMenu.xib file in the Resources file to open Interface Builder.
Choose Tools
Drag one Label object and one Slider object from the Object Library and drop them on the user interface window.
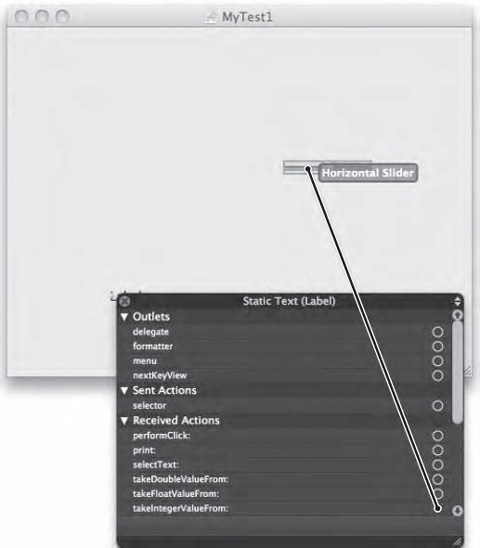
Right-click the Label object to display a heads-up window.
Click the circle that appears to the right of
takeIntegerValueFromunder the Received Actions category and drag and drop it on the slider object, as shown in Figure 19-5. (If you wanted the label to display decimal numbers, you would drag thetakeFloatValueFromcircle to the slider instead.)Choose File
Switch to Xcode and click the Build and Run button or choose Build
Drag the slider. Notice that the current value of the slider now appears inside your label.
Quit your program.such as pressing ! Q.
Note
A circular slider works identically to how a horizontal or vertical slider works, except that the user must spin the slider around to change its value.
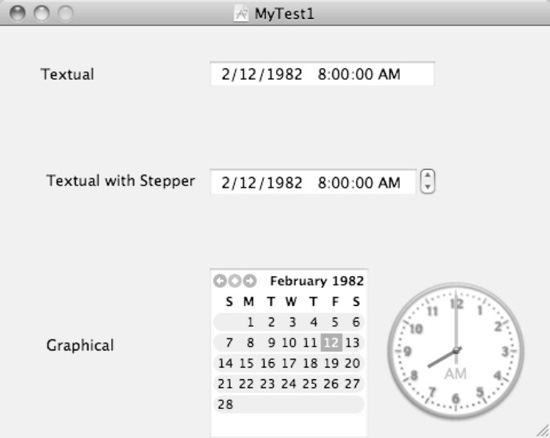
A date picker lets the user enter a date and time by clicking a choice instead of typing the whole date or time in. There are three ways to display a date picker, as shown in Figure 19-6:
Textual: Displays a text field that automatically formats dates and times
Textual with Stepper: Displays dates and times that allow you to increase/decrease the month, day, and year using the stepper (up/down arrows)
Graphical: Displays a monthly calendar and a clock
To create a date picker, follow these steps:
Open a
.xibuser interface file in Interface Builder.Choose Tools
Drag the Date Picker object from the Object Library (as shown in Figure 19-7) and drop it on your user interface window.

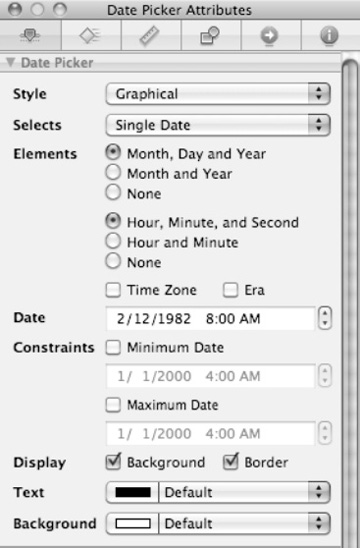
After you create a date picker, you can modify one or more of the following by clicking the Date Picker object and opening its Attributes Inspector window (by choosing Tools
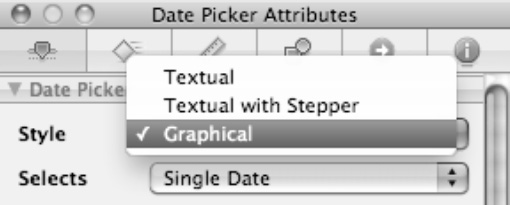
Style: Defines how to display the date picker (Textual, Textual with Stepper, or Graphical)
Selects: Defines whether the user can select only a single date or a range of dates
Elements: Defines whether to include the month, day, and year along with hours, minutes, and seconds
Date: Determines the currently displayed date
Minimum Date: Defines the earliest valid date
Maximum Date: Defines the latest possible valid date
Display: Defines whether a background color and/or border appears around the calendar
Text: Defines the color of text displayed on the date picker
Background: Defines the background color of the date picker
To retrieve a date from a date picker, you need to declare an NSDatePicker variable in a header (.h) file:
NSDatePicker *myDate;

@property (retain) IBOutlet NSDatePicker *myDate;
Then, use the @synthesize command in the implementation (.m) file:
@synthesize myDate;
You need to connect this myDate variable to the actual date picker on your user interface. Now if you want to retrieve the value from the date picker, you just need to use the dateValue property:
myDate.dateValue
To see how to use a date picker, follow these steps:
Open the MyTest program that you modified in the previous chapter.
Double-click the
MainMenu.xibfile stored in the Resources folder. Interface Builder appears and displays your user interface window.Click any items currently displayed on the user interface and press Delete to remove them.
Drag and drop one Push Button object and one Date Picker object on your user interface window.
Click the Date Picker object and choose Tools
Click the Style pop-up button and choose Graphical, as shown in Figure 19-9.
Click the Selects pop-up button and choose Single Date.
Under the Elements category, select the Month, Day, and Year radio button and the Hour, Minute, and Second radio button.
Click the
MyTestAppDelegate.hfile stored in the Classes folder and modify the code as follows:#import <Cocoa/Cocoa.h> @interface MyTestAppDelegate : NSObject <NSApplicationDelegate> { NSWindow *window;NSDatePicker *myDate;}@property (retain) IBOutlet NSWindow *window;@property (retain) IBOutlet NSDatePicker *myDate;-(IBAction) displayDate:(id)sender;@endChoose File
Click the
MyTestAppDelegate.mfile stored in the Classes folder and modify the code as follows:#import "MyTestAppDelegate.h" @implementation MyTestAppDelegate @synthesize window;
@synthesize myDate;- (void)applicationDidFinishLaunching:(NSNotification *)aNotification { // Insert code here to initialize your application } - (void)dealloc {[myDate release];[window release]; [super dealloc]; }-(IBAction) displayDate:(id)sender{NSLog (@"Date = %@", myDate.dateValue);}@endChoose File
Double-click the
MainMenu.xibfile stored in the Resources folder. Interface Builder appears and displays your user interface window.Right-click the My Test App Delegate icon in the MainMenu.xib window. A heads-up window appears.
Click the circle that appears to the right of
myDateunder the Outlets heading and drag and drop it over the date picker on the user interface.Click the circle that appears to the right of
displayDate(under Received Actions) and drag and drop it over the push button on the user interface.Choose File
Switch to Xcode and click the Build and Run button or choose Build
Click a date displayed by the date picker.
Click a time displayed by the date picker.
Click the push button.
Quit your program.
Choose Run
2010-09-24 16:32:36.299 UITest[13123:a0f] Date = 2011-02-01 08:00:00-0800
A stepper lets the user increment a value by a fixed amount, such as 1. A stepper lets the user select from a range of valid values but takes up less space than a slider.
To create a stepper, follow these steps:
Open a
.xibuser interface file in Interface Builder.Choose Tools
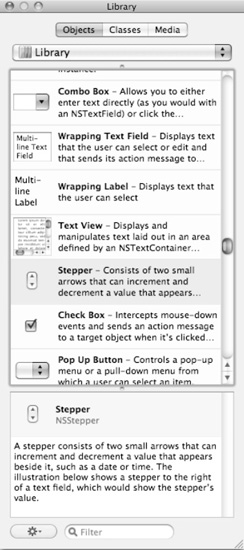
Drag the Stepper object from the Object Library (as shown in Figure 19-10) and drop it on your user interface window.
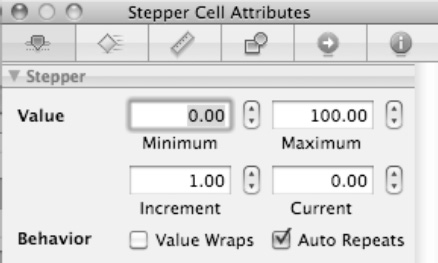
After you create a stepper, you can modify one or more of the following, as shown in Figure 19-11:
Value Wraps: Defines whether the stepper stops when its minimum or maximum value is reached (unchecked) or "wraps around" and allows the stepper to jump from the minimum value to the maximum value and vice versa (checked)
Auto Repeats: Defines whether the user can hold down the stepper's up or down arrow to keep incrementing (checked) or must click the stepper up/down arrow each time to increment/decrement the value (unchecked)
Minimum: Defines the minimum value
Maximum: Defines the maximum value
Increment: Defines the increment by which the stepper increases/decreases its value each time the user clicks the up/down arrow
Current: Determines the current value stored in the stepper
One problem with the stepper is that as you click to change its value, you can't see your changes. To display your changes, you can link a Label objectto the Stepper object so that the value always appears in the Label.
In case you need to retrieve the value from the stepper, you can use the doubleValue property:
myStepper.doubleValue
To see how to use a stepper, follow these steps:
Open the MyTest program that you modified in the previous section.
Double-click the
MainMenu.xibfile stored in the Resources folder. Interface Builder appears and displays your user interface window.Click any items currently displayed on the user interface and press Delete to remove them.
Drag one Push Button object, one Label object, and one Stepper object and drop them on your user interface window.
Click the Stepper object and choose Tools
Click to select the Value Wraps check box. (If the Auto Repeats check box is clear, click to select it.)
Click in the Maximum text field, type 5, and press Return.
Click the
MyTestAppDelegate.hfile stored in the Classes folder and modify the code as follows:#import <Cocoa/Cocoa.h> @interface MyTestAppDelegate : NSObject <NSApplicationDelegate> { NSWindow *window;NSStepper *myValue;} @property (retain) IBOutlet NSWindow *window;@property (retain) IBOutlet NSStepper *myValue;-(IBAction) displayValue:(id)sender;@endChoose File
Click the
MyTestAppDelegate.mfile stored in the Classes folder and modify the code as follows:#import "MyTestAppDelegate.h" @implementation MyTestAppDelegate @synthesize window;
@synthesize myValue;- (void)applicationDidFinishLaunching:(NSNotification *)aNotification { // Insert code here to initialize your application } - (void)dealloc {[myValue release];[window release]; [super dealloc]; }-(IBAction) displayValue:(id)sender{NSLog (@" Value = %f", myValue.doubleValue);}@endChoose File
Double-click the
MainMenu.xibfile stored in the Resources folder. Interface Builder appears and displays your user interface window.Right-click the My Test App Delegate icon in the MainMenu.xib window. A heads-up window appears.
Click the circle that appears to the right of
myValueunder the Outlets heading and drag and drop it over the stepper on the user interface.Click the circle that appears to the right of
displayValue(under Received Actions) and drag and drop it over the push button on the user interface.Right-click the label on your user interface window. A heads-up window appears.
Click the circle that appears to the right of
takeDoubleValueFromand drag and drop it over the stepper on the user interface. This links the label to the value of the stepper.Choose File
Switch to Xcode and click the Build and Run button or choose Build
Click the up or down arrow on the stepper. Notice that the value appears in the label.
Click the push button.
Quit your program.
Choose Run
2010-09-24 18:50:59.519 UITest[13551:a0f] Value = 4.000000
Sliders and steppers let the user select a numeric value that falls within a fixed range. To display the value of a slider or stepper, you may need to link a label to the slider or stepper so that the value always appears on the label, making it visible to the user.
The date picker lets the user select a date by either typing in an actual numeric value or clicking a displayed date. Sliders, steppers, and date pickers are just a few of the ways to provide a limited number of valid choices that the user can select.