The two basic steps needed to create a Mac program involve designing your user interface and writing Objective-C code to make your program actually do something. Although you can design your user interface first and then write your Objective-C code (or vice versa), it's more likely that you'll switch between both tasks as you gradually add features to your program. Before you start writing a program, the most important first step is to decide what you want your program to do and how you want it to look. Take a moment, sit down with a pencil and paper, and decide exactly what you want your program to do.
Once you know what you want your program to do, you'll know what type of data it needs and how it needs to manipulate that data to create the desired result. After you know this crucial information, you can sketch out the user interface to accept data and display a useful result to the user.
These are the four basic steps needed to create any program:
Design the user interface.
Write code to make your program do something.
Connect your user interface to your code so your user interface can control your code and your code can display information to the user interface.
Test and debug your program until it finally works.
In this chapter, we'll focus on the first three, with an emphasis on connecting your user interface to your code in a succeeding version of a sample program. Just remember that there is no best way to create any program. Throughout this book you'll see sample programs, but these programs could have been written a million different ways. The purpose of these sample programs is to show you the basic principles of how different features of Mac programming work. Once you understand these principles, you'll be able to use them to write your own programs.
To learn any programming languages, most programmers start by creating a simple "Hello, world!" program, which displays the message "Hello, world!" on the screen. So, we'll start with one such example before addressing the basic steps. The purpose of such a simple program is to show how a complete (but short) program works in a particular programming language and how that specific language uses different methods to display data to the user.
Creating a typical "Hello, world!" program can show you three important parts about Mac programming.
Note
Chapter 5 will go into more detail about writing Objective-C code. For right now, the Objective-C code you'll create in this chapter will be simple enough that you'll be able to type them without necessarily understanding how they work, although you'll be able to figure out what they do.
First, you'll learn how to use Objective-C to display a message. Second, you'll learn how a Mac program can run commands based on an event that occurs. Finally, you'll start getting familiar with the basic steps and commands needed to create a program using Xcode.
To create your first real Mac program, follow these steps:
Create a new project in Xcode. If you start up Xcode, a dialog box appears where you can choose to create a new project (see Figure 2-3 in the previous chapter). Otherwise, if Xcode is already running, choose File

Click Application under the Mac OS X category in the left pane of the dialog box.
Click Cocoa Application in the right pane of the dialog box, and then click the Next button. A new dialog box appears, asking for the product name.
Type any name, such as TestProgram, and click the Next button. A Save As dialog box appears.
Choose the drive and folder to store your Xcode project, and click the Save button. Xcode saves your new project.
Click the gray arrow (called a disclosure triangle) that appears to the left of the Classes folder in the left pane of the Xcode window. Two files appear named
TestProgramAppDelegate.handTestProgramAppDelegate.m. (If you named your project something other thanTestProgram, your chosen name will appear as part of the file name instead.)Click the
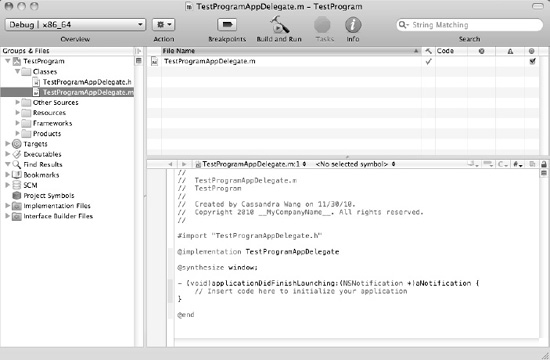
TestProgramAppDelegate.mfile. The Objective-C code in that file appears as shown in Figure 3-1.Move the cursor in front of the two slashes that appear to the left of the text that reads "Insert code here to initialize your application."
Type the following (make sure you type it exactly with the same uppercase and lowercase characters):
NSLog (@"Hello, world!");
What you're doing is adding a line of code to a subprogram named
applicationDidFinishLoading. This subprogram runs only when a certain event occurs. In this case, this subprogram runs when your program (or application) successfully starts.The keyword
NSLogis an Objective-C command that displays a string of characters—in this case, "Hello, world!" The entire subprogram should look like this:- (void)applicationDidFinishLaunching:(NSNotification *)aNotification { NSLog (@"Hello, world!"); // Insert code here to initialize your application }To help identify different parts of your Objective-C code, Xcode highlights different commands in colors. Although there are more symbols, commands, and characters that may not make sense to you at this time, the main point to learn is just that this is a subprogram that runs when your program first starts.
Choose File
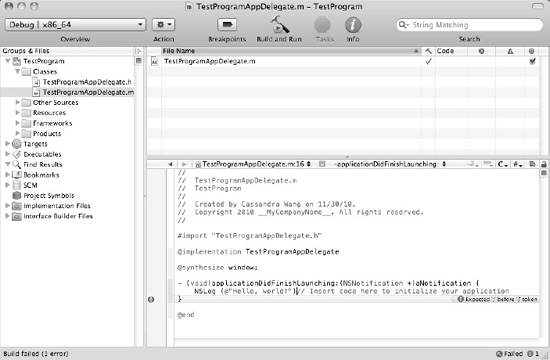
If you mistyped something or forgot a punctuation mark, such as the semicolon, Xcode will display an error message, as shown in Figure 3-2.
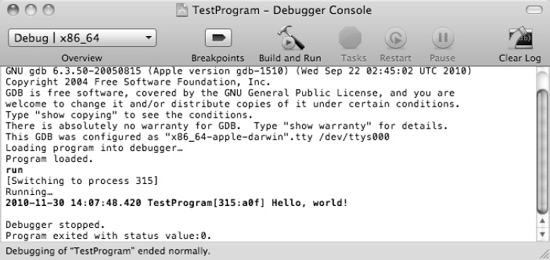
If you did type everything correctly, Xcode will compile and run your program, displaying a window with pull-down menus at the top of the screen. In case you're wondering why you can't see the "Hello, world!" message, it's because the command you wrote prints to a special screen called the Log or Console, which does not appear on the Mac user interface. To view the log, you need to do the following:
Quit the currently running test program.
Click the Xcode icon on the Dock to make the Xcode window appear.
Choose Run
There are four lessons you should learn from this brief exercise. First, you must type Objective-C code exactly right using both uppercase and lowercase characters. If you mistype a command and use the wrong case (such as uppercase instead of lowercase, or vice versa), your program will not work. That's because Objective-C considers uppercase and lowercase characters to be completely different, so a lowercase a is as different from an uppercase A as the letter Z is completely different from the letter T. Typing Objective-C commands incorrectly is the most common source of errors.
Second, to define the end of each Objective-C line, you must use a semicolon. If you forget this semicolon, your program will not work correctly. Omitting the semicolon is another common source of errors.
Third, the NSLog command displays text to the Debugger Console window, but not to the Mac screen. The Debugger Console window often displays messages that explain what your program has done, which can be useful later when you're testing your program to make sure it's working.
Fourth, a Mac program is typically divided into subprograms that respond to different types of events. In this example, you wrote a command inside a subprogram that ran only when a certain event occurred. In this case, the event is when your program first loads and runs.
Although this may seem like a simple example, it's already taught you much about how Mac programming works using Xcode.
By using the NSLog command, you can verify that certain parts of your program are actually running. In a normal program, you would delete these NSLog commands before giving your program to others.
Of course, displaying messages to the Debugger Console window is meant for the programmer to see, not for the user of your program to see. In today's world of computers, nearly every program displays and accepts information through a graphical user interface (GUI) consisting of pull-down menus, windows, and buttons. In this exercise, you'll display "Hello, world!" on your program's user interface by modifying the project you created in the previous section of this chapter.
Close or hide the Debugger Console window so you can see the Xcode window displaying your list of files and folders that make up your program.
Click the gray arrow (disclosure triangle) that appears to the left of the Resources folder. A list of files appears including one named
MainMenu.xib, which is the file that contains your program's user interface. (Programs can contain more than one.xibfile to create multiple user interfaces, but this simple program needs only one user interface and hence only one.xibfile.)Double-click the
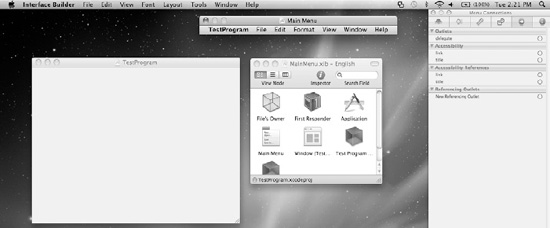
MainMenu.xibicon. The Interface Builder window appears, as shown in Figure 3-4.Choose Tools
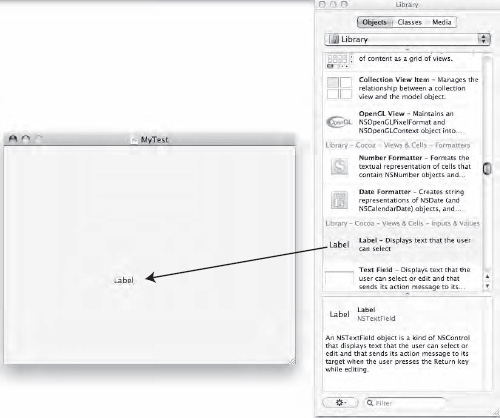
Scroll through the Object Library window until you find an object called Label.
Drag the Label object from the Library window to the inside of the window that appears in the middle pane of the Xcode window, as shown in Figure 3-6.
Double-click the Label object you just placed on your user interface. Xcode highlights the text inside the label.
Type Hello, world! and press Return. The words "Hello, world!" now appear in the label.
Choose File
Switch back to the Xcode, and click the Build and Run button or choose Build
Quit the program to return to the Xcode window.
In this short example, you learned that Xcode stores your user interface as a .xib file, stored inside the Resources folder. To view and modify your user interface, you have to open the .xib file. Large programs may have multiple .xib files, but a simple program needs only one .xib file since it needs only one user interface.
Your user interface consists of multiple parts such as a window (for displaying information) and pull-down menus. In this example, you only modified the window portion of the user interface by clicking the Window icon that appears among other icons.
To customize your user interface, you had to open the Library window and choose to view the Object Library, which contains common user interface items such as buttons and text fields. In this example, you dragged a Label object onto the user interface window and then customized the text inside that label to display "Hello, world!"
Using a label on the user interface to display text might work, but it's a static, fixed solution. To change the text displayed, you have to modify the label on the user interface. A more flexible solution is to allow the user interface to accept and display different types of text without having to edit the user interface directly.
In this example, you'll customize the same program you edited from the previous section in this chapter, but you'll add a button that users can click. When the user clicks the button, the text in the label will change.
Click the gray arrow (disclosure triangle) that appears to the left of the Resources folder in the Xcode window. (You may be able to skip this step if a list of files already appears.)
Click the
MainMenu.xibicon. The Interface Builder screen appears (shown in Figure 3-4).Choose Tools
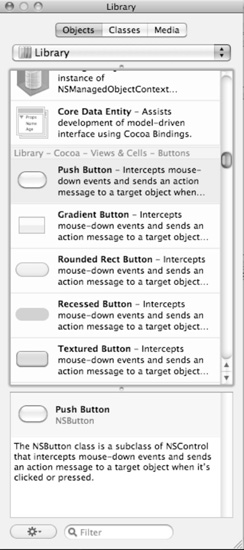
Scroll through the Object Library list until you find the Push Button object.
Drag the Push Button object and place it anywhere on your program's window near the label object.
Double-click the text that appears on the Push Button object and type Good-bye. Then press Return.
Choose File
At this point, you've created a push button on your user interface, but it won't do anything. To make the push button work, you need to complete two additional tasks. First, you need to write a subprogram filled with instructions or code that tells the computer what to do if the user clicks that push button. In Objective-C, subprograms are called methods, so in technical terms, you have to create a push button method.
Second, you need to "connect" your method to the actual push button on your user interface. Connecting your method to your user interface push button tells Xcode to run the connected method whenever the user clicks that particular push button.
The goal is to make the push button change the currently displayed text in the label. To do this, you need to write two types of Objective-C code called Actions and Outlets. An Action responds to something from the user interface, such as the user clicking a push button. An Outlet connects to a user interface item such as displaying text in a label object.
To define an Action, you'll need to write a method and fill it with Objective-C code that tells the computer what to do if the user does something. In this case, you'll be creating a method to respond when the user clicks the push button.
To make your user interface display information through an Outlet, you need to declare a variable as an Outlet. Then you'll have to define which part of your user interface is connected to that particular variable.
There are three steps to creating an Action method:
Declare the name of your method.
Write the code that makes your method work.
Connect your Objective-C method to your user interface object, such as a push button.
If you peek into the Classes folder of your project, you'll see two identically named files (such as TestProgramAppDelegate.h and TestProgramAppDelegate.m). The .h file is known as a header file, and the .m file is known as the implementation file.
The header (.h) file defines all the methods and variables (called properties) that other parts of the program need to know about.
The implementation (.m) file defines all the details of your methods, which is actually hidden from the rest of your program.
So to write a method, you'll need to first declare just that method name in the header (.h) file, and then you have to write the actual method code in the implementation (.m) file.
After you've done this, you'll be ready for the third and final step of connecting your method to your user interface object, such as a push button.
To create the Action method for the push button on your user interface, follow these steps:
Switch to the Xcode window, and click the
TestProgramAppDelegate.hfile stored in the Classes folder. The Objective-C code for this file appears.Type the following bold text in the existing Objective-C code:
@interfaceTestProgramAppDelegate : NSObject<NSApplicationDelegate> { NSWindow *window;NSTextField *message;} @property (assign) IBOutletNSWindow *window;@property (assign) IBOutletNSTextField *message;-(IBAction)goodBye:(id)sender;@end
NSTextField *message: This declares a variable calledmessage, which can display data in the Label user interface object. (The Label user interface object is based on another object calledNSTextField.)@property (assign) IBOutletNSTextField *message;: This defines the variablemessageas a property that other parts of your program can use to retrieve information out of themessagevariable or store information into themessagevariable. Note the keywordIBOutlet, which lets you know that the variable is meant for displaying information as an Outlet to a user interface object.-(IBAction)goodBye:(id)sender;: This declares your Action method for the push button on your user interface. The namegoodByeis the name of the method and is completely arbitrary; feel free to use a name of your own choosing.
After typing these three lines of Objective-C code into the header (.h) file, you need to save this file by choosing File
Click the
TestProgramAppDelegate.mfile stored in the Classes folder. The Objective-C code for this file appears in the middle pane of the Xcode window.Type the following bold text in the existing Objective-C code:
#import "TestProgramAppDelegate.h" @implementation TestProgramAppDelegate @synthesize window;
@synthesize message;- (void)applicationDidFinishLaunching:(NSNotification *)aNotification { NSLog (@"Hello, world!"); // Insert code here to initialize your application } - (void)dealloc { [window release]; [super dealloc]; }-(IBAction)goodBye:(id)sender{message.stringValue = @"Good-bye";}@end
The @synthesize message; line lets your program read and save data in the message variable.
Note
In other object-oriented programming languages, you often have to write two additional methods called a setter and a getter. The setter method lets you store data in the variable, and the getter method lets you read data from the variable. To avoid making you write these two separate methods yourself, Xcode lets you use the @synthesize command, which duplicates the features of the setter and getter methods without making you write out the ugly details.
-(IBAction)goodBye:(id)sender
{
     message.stringValue = @"Good-bye";
}
This Action method (defined by the IBAction keyword) holds only a single line of code between the curly brackets. This line of code simply stores the string "Good-bye" in a message variable. The message variable is an Outlet to a user interface object, so it holds the actual string in a property called the stringValue.
Save this file by choosing File
At this point, all you've done is write Objective-C code in the header (.h) and implementation (.m) files. However, your user interface has no idea that all of this newly added Objective-C code even exists. To fix this problem, you'll need to "connect" your Outlets and Actions.
Connecting an Outlet to a user interface means selecting a variable name and dragging the mouse to connect a line between the variable name and a user interface object to display the data.
Connecting an Action to a user interface means selecting the name of an Action method and dragging the mouse to connect a line between the Action method name and a user interface object, such as a push button object.
To connect Actions and Outlets to your user interface, you need to follow these steps:
Double-click the
MainMenu.xibfile stored in the Resources folder in the Xcode window. The Interface Builder windows appear.Right-click the Test Program App Delegate blue cube icon inside the
MainMenu.xibwindow. A heads-up display window appears, as shown in Figure 3-7.Move the mouse pointer over the little circle that appears to the right of the message (under the Outlets heading) at the top of the window. Drag the mouse over the Label object on the user interface, and release the mouse button, as shown in Figure 3-8.
Move the mouse pointer over the little circle that appears to the right of the
goodByemethod name (under the Received Actions heading). Drag the mouse over the push button object on the user interface, and release the mouse button, as shown in Figure 3-9.
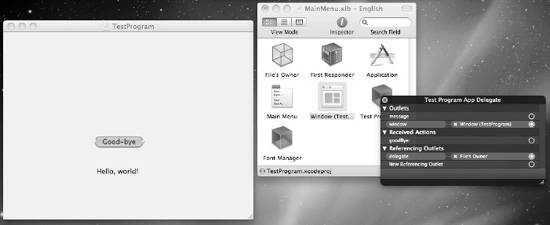
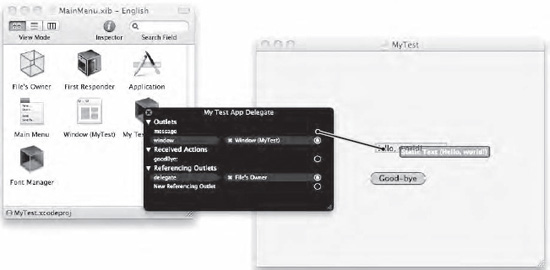
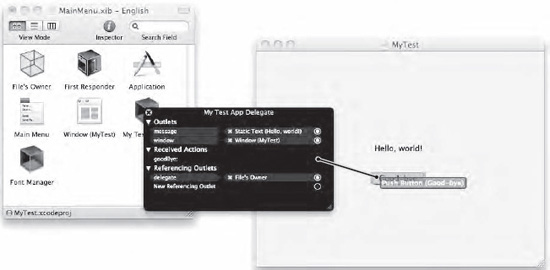
Figure 3-9. Dragging from the Actions circle to the user interface connects the Action method to the push button object.
After you have connected your user interface to your Objective-C code (Outlets and Actions), save your program by choosing File
Then switch back to Xcode, and click the Build and Run button or choose Build
The previous sample program showed how to respond to an Action (the user clicking the push button) and how to display data through an Outlet (displaying text inside the label object). The next step in designing a user interfaces is to learn how to retrieve information from the user.
Displaying the message "Good-bye" in the label every time you click the push button isn't very flexible. Whenever you write code that has data written directly in its instructions, that's referred to as hard-coding, which means the code can only do the same thing over and over again until you change the code.
Hard-coding isn't necessarily bad, but it limits the versatility of your program. A better solution is to make your code work with any type of data. In this example, you'll be adding a text field to your user interface. When the user clicks the push button, the text from the text field will appear in the label (instead of repetitively displaying "good-bye" in the label each time).
You can complete this next sample program in several ways. First, you can draw a text field on your user interface, go back and define an Outlet for that text field in Objective-C, and then go back to your user interface and connect the text field on the user interface to the Outlet you defined in Objective-C code. Constantly switching back and forth between your user interface and your Objective-C code might seem cumbersome, so a second way is to focus on one task at a time by planning ahead.
Any time you need to either display or retrieve data, you need an Outlet so you can declare an Outlet in your Objective-C code. Then you can view your user interface, add a text field, and connect the text field to your newly created Outlet.
Either method works; it all depends on how you like to work. The three basic steps are as follows:
Draw a text field on the user interface.
Declare an Outlet to hold the data in the text field.
Connect the Outlet to the text field on the user interface.
To create an Outlet, you need to edit the Objective-C code by following these steps:
Switch to Xcode, and click the
TestProgramAppDelegate.hfile in the Classes folder. The Objective-C code for that file appears.Type the following bold text in the existing Objective-C code:
@interfaceTestProgramAppDelegate : NSObject<NSApplicationDelegate> { NSWindow *window; NSTextField *message;NSTextField *inputData;} @property (assign) IBOutletNSWindow *window; @property (assign) IBOutletNSTextField *message;@property (assign) IBOutletNSTextField *inputData;-(IBAction)goodBye:(id)sender; @endChoose File
Click the
TestProgramAppDelegate.mfile in the Classes folder. The Objective-C code for that file appears.Type the following bold text in the existing Objective-C code:
@implementationTestProgramAppDelegate

@synthesize window;
@synthesize message;
@synthesizeinputData;- (void)applicationDidFinishLaunching:(NSNotification *)aNotification { NSLog (@"Hello, world!"); // Insert code here to initialize your application } -(IBAction)goodBye:(id)sender {message.stringValue = inputData.stringValue;} @endInside the
goodByeAction method, you'll need to delete this line:message.stringValue = @"Good-bye";
Choose File
After you declared your Outlet in both the header (.h) and implementation (.m) files, you'll need to modify your user interface.
Note
When switching between Xcode to edit your Objective-C code and Interface Builder to design your user interface, always make sure to save all changes in one program before switching to the other. So if you edit your Objective-C code, save your changes before switching to Interface Builder (and vice versa). If you fail to save your changes, Xcode may not notice any changes you made in Interface Builder and Interface Builder may not notice any changes you made in Xcode. The result is that you could make a change, and then run your program but your program doesn't reflect any changes you made, which can give the illusion that your changes aren't working.
Double-click the
MainMenu.xibfile stored in the Resources folder.Scroll through the Object Library window, and drag a Text Field object to your user interface. If the Object Library window isn't visible, choose Tools
Right-click the Test Program App Delegate icon. A pop-up window appears.
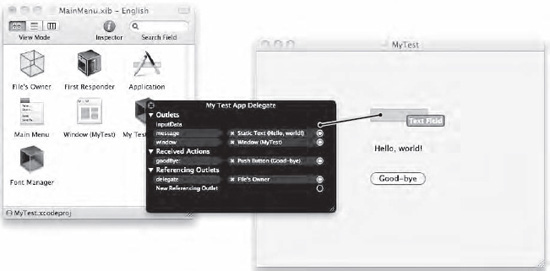
Move the mouse pointer over the little circle to the right of the
inputDataOutlet, and drag the mouse over the text field you just placed on the user interface, as shown in Figure 3-10.Choose File
After you have connected the text field on the user interface to your Objective-C code and saved your program, switch back to Xcode, click the Build and Run button, or choose Build
In this chapter, you learned how to create a simple "Hello, world!" program that displays text. Initially, you learned how to use the NSLog command to display text, although the NSLog command merely sends data to a special Debugger Console window, not to the program's user interface. Although you won't be using the NSLog command to interact with the user, you can use the NSLog command to help test your program.
With each succeeding version of the sample program, you gradually learned how to create and display data on your program's user interface. First, your program's user interface gets stored as a .xib file in the Resources folder. Larger, more complicated programs may have several .xib files to create a more sophisticated user interface, but this sample program just uses a single .xib file because it only needs a simple user interface.
Your user interface consists of pull-down menus and windows. To design the items that appear on the window, you need to click the Window icon to view the window in the Xcode window.
Next, you need to open the Object Library window and drag objects (such as labels, buttons, or text fields) onto the window of your user interface. Later, you'll learn how to precisely align user interface objects, but for now, you just need to know how to drag items from the Object Library window and place them on the user interface window.
To customize the appearance of some user interface objects, you can double-click the text they display. This lets you edit the existing text or replace it with new text altogether.
After designing your user interface, the last step is to link your user interface to your Objective-C code. For each object on your user interface that needs to either display data or retrieve data that the user typed in, you'll need to create an Outlet variable. For each Outlet variable, you'll need to write Objective-C code in the header (.h) file and the implementation (.m) file.
In the header (.h) file, you'll need to declare a variable and then declare a variable as an Outlet property. In the implementation (.m) file, you'll need to use the @synthesize command to allow other parts of your program to store and retrieve data from that variable.
For each user interface object that provides a command to the user, you'll need to create an Action method that contains one or more instructions that tell your program what to do when the user gives a command, such as clicking a push button. You need to declare the name of your Action method in the header (.h) file and then write the actual method code in the implementation (.m) file.
Finally, you'll need to right-click the icon that represents the files where you wrote and stored your Outlet and Action code. This displays a window that lets you drag to a user interface object and connect the user interface object to a specific Outlet or Action.
Although you created only a simple program and modified it, you can already see the basic steps needed to create any Mac program using Xcode. Mac programming is a combination of writing Objective-C code and designing your user interface.