In the previous chapters when you were working with strings (NSString), arrays (NSArray), dictionaries (NSDictionary), and sets (NSSet), you were working with predefined classes that Apple's programmers have already created. Although it's entirely possible to write fairly sophisticated programs using the predefined classes stored in the Cocoa framework, chances are good you'll need to create custom classes for your own programs, which means you need to know how to create your own classes.
A class defines the properties (data) and subprograms (methods) that work together in isolation from the rest of your program. The basic idea behind a class is to act as a modular building block to create a larger program. Ideally, each class should be completely self-contained, so you can easily yank it out and replace it with a new class without affecting the rest of your program.
Classes can be specific to a program that you're working on, or they can be more general, allowing you to reuse those classes in other programs. For example, you might create a special mathematical class that performs scientific or financial calculations. Once you create a class that works, you can plug it into another program, allowing you to create other programs faster than writing each program from scratch every time.
To create your own classes, you'll need to write Objective-C code. After you define a class, you can use that class file to create multiple objects within your program. Ideally, your class should be general enough so you can create multiple objects from it, but it's perfectly possible to create a class and just create a single object from it.
The two main features of every class are its properties and its methods. Properties let your objects store data. Methods let your objects manipulate data or perform a specific action. Although a class can exist without properties or methods, most classes include one or more properties and one or more methods.
Creating properties and methods involves writing Objective-C code, so this chapter will show you how to define properties and methods and where to define them in your class files.
Every class gets stored as a separate pair of files called the header (.h) and implementation (.m). For convenience's sake, you can store your class files inside the Classes folder, or you can create and name your own folders to store your classes. Xcode ignores the names of your folders since these folder names are for your convenience in organizing all the files that make up your project.
When you create a class, your new class will be based on an existing class, so it automatically inherits the properties and methods of that existing class. Although there are different types of classes you can base your class on, you'll most likely use the NSObject class to create custom classes for your own program.
Note
Some other common types of classes include specialized features for representing data in a window (NSDocument), controlling the basic drawing and printing functions of a program (NSView), controlling a user interface (NSViewController), or controlling a single window in a user interface (NSWindowController).
To create a class file, follow these steps:
Choose File

Note
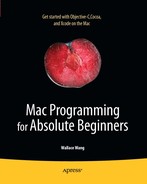
You can also right-click a folder, in the left pane of the Xcode window, where you want to add a file. When a pop-up menu appears, choose New File to display the templates dialog box (see Figure 12-1).
Click Cocoa Class under the Mac OS X category in the left pane of the template dialog box.
Click the Objective-C class icon.
(Optional) Click the Subclass of pop-up menu, and choose the type of class you want to base your class on, such as
NSDocument. In most cases, you'll use the default class ofNSObject.Click the Next button. A Save As dialog box appears, letting you choose a name for your class.
Type a descriptive name for your class. Names must not use spaces or special characters. In general, use descriptive names for your classes, and capitalize the first letter of words such as a class named
MyClassorRobotMovementUnit.Click the Finish button. Your new class files appear in the Classes folder, as shown in Figure 12-2.
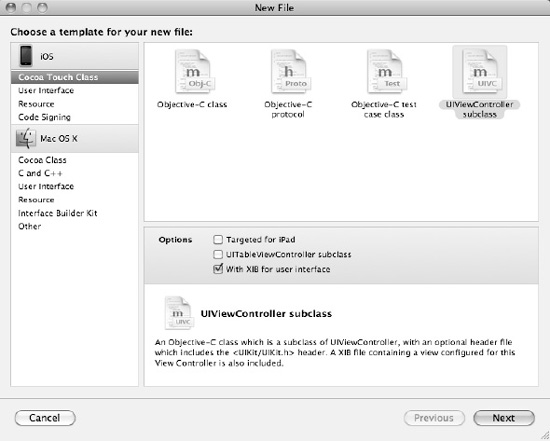
When you create a class, Xcode creates a header (.h) and an implementation (.m) file. The header file contains the following basic code:
#import <Cocoa/Cocoa.h>

@interface Class : NSObject {
@private

}

@end
The basic idea behind the header file is to list all the properties and methods that other parts of your program can use. Here's what each line in the header file does:
#import <Cocoa/Cocoa.h>: Includes all the Cocoa framework interfaces for creating a basic Macintosh program. Without this, you would have to write a lot of additional code yourself to handle basic chores such as displaying windows and pull-down menus.@interface Class: NSObject {: Identifies your class name (which isClassin this example) and shows which class it's based on, which isNSObject.@private: Identifies any variables that are used in the class but not accessible to other parts of the program. You can also replace or add@publicto identify variables that are accessible to other parts of the program.@end: Defines the end of the interface for your class file.
The header file typically defines the properties and methods available in a class. The implementation file is where you'll write most of your Objective-C code. Initially, the implementation file of a class file looks like this:
#import "MyClass.h"

@implementation Class

- (id)init {
    if ((self = [super init])) {
        // Initialization code here.
    }

    return self;
}
- (void)dealloc {
// Clean-up code here.
[super dealloc];
}
@endHere's what each part of the implementation file does:
#import "Class.h": Includes the class's header file.@implementation Class: Defines the beginning of your implementation file and identifies the name of your class (in this example it's simplyClass).-(id)init: This block of code defines the initialization method, which is where you'll write Objective-C that needs to run first.-(void)dealloc {: This block of code defines the dealloc method, which is the last method to run when your object is no longer needed. This is where you'll write Objective-C code to handle any cleanup issues with your class.
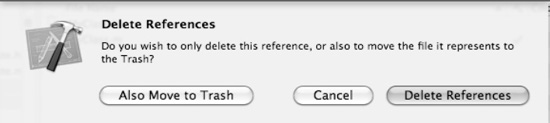
If you've created class files, you can always delete them at any time. When you delete class files, you'll have two options. One is to physically delete the class files and remove them from your project. The second is to remove the references to those class files from your project but keep them physically on your hard disk. That way, if you no longer need a class in your program but think you might use that class in another project, you can keep it for future use.
To delete class files, follow these steps:
Note
When you delete class files, you can't undo this action, so make sure you really want to delete any selected class files.
Working with classes involves several steps. First, you must create a class. Second, you must make that class accessible to another part of your program using the #import directive. Third, you must create an instance of that class using an object. Fourth, you can finally use the object to access the methods and properties defined by the class.
If this sounds long and complicated, it's not, but it will become clearer as you go through the basic steps for creating and using a class:
Open the VariableTest project from the previous chapter.
Follow steps 1–8 in the "Creating a Class" section. In step 6 of these steps, name your class
MyClass.Click the
MyClass.mfile stored in the Classes folder. The code for that file appears in the middle pane of the Xcode window.Modify the
initmethod code in theMyClass.mfile by adding the bold line as follows:- (id)init { if ((self = [super init])) { // Initialization code here.NSLog (@"Hello, world!");} return self; }At this point, all you've done is added an
NSLogcommand inside theMyClass initmethod. Thisinitmethod will always run as soon as you create an instance of your class. If you ran your program now, you wouldn't see this "Hello, world!" message because nowhere in your code have you created an instance ofMyClass.
In the next steps, you'll create an instance of MyClass within the VariableTestAppDelegate.m file as follows:
Click the
VariableTestAppDelegate.mfile in the Classes folder. The middle pane of the Xcode window displays yourVariableTestAppDelegate.mcode.Add the line
#import "MyClass.h" underneath the#import "VariableTestAppDelegate.h"line like this:#import "VariableTestAppDelegate.h" #import "MyClass.h"
This
#import "MyClass.h" file tells the computer to make all the code in theMyClassfiles accessible inside thisVariableTestAppDelegate.mfile.Modify the
applicationDidFinishLaunchingmethod as follows:- (void)applicationDidFinishLaunching:(NSNotification *)aNotification { MyClass *testObject = [[MyClass alloc] init]; [testObject release]; }The
applicationDidFinishLaunchingmethod runs as soon as your program starts running. The first line inside this method creates an instance ofMyClassby creating a pointer called*testObject. When creating an instance of a class that you've created, you also need to allocate memory for this object (using theallocmethod) and run theinitmethod of theMyClassobject (using theinitmethod).The second line inside the
applicationDidFinishLaunchingmethod runs the release method. When you allocate memory for an object (using theallocmethod), you should eventually release that memory for that object when you no longer need that object any more.Note
Keeping track of your program's memory usage is one of the biggest nuisances of writing Objective-C programs and also the cause of the most common types of errors. If your program keeps allocating memory without ever releasing it, you could run into a problem called a memory leak, which can cause your program to crash or interfere with other running programs. When writing Mac OS X programs, Xcode can use something called garbage collection, which means the computer takes care of its memory to eliminate or reduce problems that involve memory usage by your program.
Choose File
Click the Build and Run button, or choose Build
Quit the program by clicking the Stop button or choosing Product
Choose Run
2010-09-09 18:26:48.345 VariableTest[5059:a0f] Hello, world!
When you ran your program, these are the basic steps that occurred:
Your program ran and immediately launched the
applicationDidFinishLaunchingmethod inside theVariableTestAppDelegate.mfile.The first line inside the
applicationDidFinishLaunchingmethod created an instance ofMyClass, allocated memory for that instance (testObject), and ran theinitmethod ofMyClass.The
initmethod insideMyClassran theNSLogcommand that printed "Hello, world!" in the log window.The second line inside the
applicationDidFinishLaunchingmethod releases the memory allocated fortestObject.
When you quit the program, you could peek inside the Log window and see the "Hello, world!" message that the NSLog command, inside the init method, printed out.
In the previous example, you simply added an NSLog command inside the existing init method of MyClass. In most cases when you're creating your own classes, you'll need to create additional methods and make them run from another part of your program.
The basic steps to creating a method are as follows:
Declare the method name in your class's header (
.h) file.Write the actual code for the method in the class's implementation (
.m) file.Call the method from another part of your program.
A typical method declaration looks like this:
-(data type)methodName: parameters;
The data type determines the type of value the method calculates, such as an integer or floating-point number. If you wanted your method to calculate an integer, your method declaration would look like this:
-(int)methodName: parameters;
In many cases, you simply want the method to run its code and not return a value at all. When a method does not return any value, its data type is declared as void like this:
-(void)methodName: parameters;
The method name can be any descriptive name that you want. Typically, a method name uses camel case where the first letter appears lowercase, but the first letter of subsequent words appear in uppercase:
-(void) shootRockets: parameters;
-(float) predictStockPrice: parameters;
-(BOOL) trustMeBecauseYouLikeMe: parameters;
The parameters represent data that the method may need to work. If your method doesn't require any outside data to work, you can drop the parameter altogether:
-(void)methodName;
If your method requires an integer value, the method declaration might look like this with an integer parameter:
-(void)methodName: (int)inputData;
To see how create a method in a class, follow these steps:
Open the VariableTest project from the previous section.
Click the
MyClass.hfile inside the Classes folder, and modify the code by adding the bold text as follows:#import <Cocoa/Cocoa.h> @interface MyClass : NSObject { @private }-(void)displayMessage;@endNote
A method declaration in a header (
.h) file always ends with a semicolon.Click the
MyClass.mfile inside the Classes folder, and add thedisplayMessagemethod as follows:#import "MyClass.h" @implementation MyClass - (id)init { if ((self = [super init])) { // Initialization code here. NSLog (@"Hello, world!"); } return self; } - (void)dealloc {// Clean-up code here. [super dealloc]; }-(void)displayMessage{NSLog (@"Good-bye!");}@endClick the
VariableTestAppDelegate.mfile stored in the Classes folder, and modify the code in theVariableTestAppDelegate.mfile as follows:#import "VariableTestAppDelegate.h" #import "MyClass.h" @implementation VariableTestAppDelegate @synthesize window; - (void)applicationDidFinishLaunching:(NSNotification *)aNotification { MyClass *testObject = [[MyClass alloc] init];[testObject displayMessage];[testObject release]; } @endChoose File
Click the Build and Run button, or choose Build
Quit the program by clicking the Stop button or choosing Product
Choose Run
2010-09-09 21:55:52.492 VariableTest[5314:a0f] Hello, world!
2010-09-09 21:55:52.494 VariableTest[5314:a0f] Good-bye!
The "Good-bye!" message comes from this line:
[testObject displayMessage];
This line tells the computer to run the displayMessage method stored in testObject. Since testObject is an instance of the class MyClass, you have to peek inside the MyClass implementation (.m) file to see the actual displayMessage method, which contains the NSLog command that prints "Good-bye!"
A method can simply run its code in the same way every time it's called from another part of a program. However, a more flexible method might accept outside data and modify its behavior based on that outside data. To accept data, a method needs to accept to define a parameter list. The parameter list defines a data type and variable name for each chunk of outside data it accepts:
-(void)methodName: (data type) variable name;
If you wanted a method to accept an integer value, your parameter list might look like this:
-(void)methodName: (int) myAge;
To call this method and make it run, you would use code like this:
[objectName methodName: value];
Notice that if a method defines a parameter, then calling that method must also include a value to pass as a parameter to the function. To see how parameters work with methods, follow these steps:
Open the VariableTest project from the previous section.
Click the
MyClass.hfile inside the Classes folder, and modify the code as follows:#import <Cocoa/Cocoa.h> @interface MyClass : NSObject { @private }-(void)displayMessage: (int)myLoop;@endChoose File
Click the
MyClass.mfile inside the Classes folder, and add thedisplayMessagemethod as follows:#import "MyClass.h" @implementation MyClass - (id)init { if ((self = [super init])) { // Initialization code here. NSLog (@"Hello, world!"); }return self; } - (void)dealloc { // Clean-up code here. [super dealloc]; }-(void)displayMessage: (int)myLoop{NSLog (@"The loop will repeat %i times", myLoop);int i;for (i = 0; i < myLoop; i++){NSLog (@"The value of i = %i", i);}}@endClick the
VariableTestAppDelegate.mfile stored in the Classes folder, and modify the code in theVariableTestAppDelegate.mfile as follows:#import "VariableTestAppDelegate.h" #import "MyClass.h" @implementation VariableTestAppDelegate @synthesize window; - (void)applicationDidFinishLaunching:(NSNotification *)aNotification { MyClass *testObject = [[MyClass alloc] init];[testObject displayMessage:5];[testObject release]; } @endChoose File
Click the Build and Run button, or choose Build
Quit the program by clicking the Stop button or choosing Product
Choose Run
2010-09-10 13:18:06.994 VariableTest[622:a0f] Hello, world!
2010-09-10 13:18:06.997 VariableTest[622:a0f] The loop will repeat 5 times
2010-09-10 13:18:06.998 VariableTest[622:a0f] The value of i = 0
2010-09-10 13:18:06.999 VariableTest[622:a0f] The value of i = 1
2010-09-10 13:18:07.000 VariableTest[622:a0f] The value of i = 2
2010-09-10 13:18:07.000 VariableTest[622:a0f] The value of i = 3
2010-09-10 13:18:07.004 VariableTest[622:a0f] The value of i = 4
When the [testObject displayMessage:5]; line runs, it passes the value of 5, which gets stored in the myLoop variable. The displayMessage method uses this myLoop variable to determine how many times to run a loop. In this example, you're passing the value of 5 to the displayMessage method, but if you change this value to another number, such as 12, you would make the displayMessage run its loop 12 times.
In the previous example, you created a method that accepted a single parameter, an integer value named myLoop. A method can actually accept multiple parameters if you want. For each parameter that you want a function to accept, you just need to separate them with a colon (:) like this:
-(void)methodName;    // Zero parameters
-(void)methodName: (data type) variable1;    // One parameter
-(void)methodName: (data type) variable1 name: (data type) variable2;         // Two
parameters
To call and run a method, you must make sure you supply the method with the proper type and number of parameters it expects:
[objectName methodName];    // Zero parameters
[objectName methodName: value];    // One parameter
[objectName methodName: value1 name: value2];         // Two parameters
Suppose you created a method that expects two parameters:
-(void)methodName: (int) aNumber name: (BOOL) aFlag;
To call and run this method, you must make sure you include an integer and a Boolean value with the function name. First, you must list the integer value, and second you must list the Boolean value:
[objectType methodName: 4 name: YES;    // Valid
[objectType methodName: YES name: 4;    // Invalid!!!
[objectType methodName: 4;    // Invalid!!!
The second line is invalid because the method expects an integer first and a Boolean value second. The third line is invalid because the method expects two parameters, but the third line passes it only one parameter, a single integer.
When you pass data types such as numbers (int or float) or Boolean (BOOL) values as a parameter, you need to create a variable to hold that data:
-(void)displayMessage: (int)myLoop;
However, many times you may need to pass an object, such as an NSString string. When working with objects, you need a pointer, which you can identify using the asterisk symbol:
-(void)displayMessage: (NSString *) myName;
This parameter tells the computer that the method expects an NSString object and to use the myName variable as a pointer to that object.
To see how to use both multiple parameters and objects as parameters passed to a method, follow these steps:
Open the VariableTest project from the previous section.
Click the
MyClass.hfile inside the Classes folder, and modify the code as follows:#import <Cocoa/Cocoa.h> @interface MyClass : NSObject { @private }-(void)displayMessage: (NSString *) myName count:(int)myLoop;@endNote
If you have multiple parameters, you may not want to list them on a single line. Instead, you can use a separate line for each parameter to make it more readable like this:
-(void)displayMessage: (NSString *) myName
               count:(int)myLoop;
Choose File
Click the
MyClass.mfile inside the Classes folder, and add thedisplayMessagemethod as follows:#import "MyClass.h" @implementation MyClass - (id)init { if ((self = [super init])) { // Initialization code here. NSLog (@"Hello, world!"); } return self; } - (void)dealloc { // Clean-up code here. [super dealloc]; }-(void)displayMessage: (NSString *) myName count:(int)myLoop;{NSLog (@"Hello, %@", myName);NSLog (@"The loop will repeat %i times", myLoop);int i;for (i = 0; i < myLoop; i++){NSLog (@"The value of i = %i", i);}}@endChoose File
Click the
VariableTestAppDelegate.mfile stored in the Classes folder, and modify the code in theVariableTestAppDelegate.mfile as follows:#import "VariableTestAppDelegate.h" #import "MyClass.h" @implementation VariableTestAppDelegate @synthesize window; - (void)applicationDidFinishLaunching:(NSNotification *)aNotification { MyClass *testObject = [[MyClass alloc] init];[testObject displayMessage:@"John Doe" count:5];[testObject release]; } @endChoose File
Click the Build and Run button, or choose Build
Quit the program by clicking the Stop button or choosing Product
Choose Run
2010-09-10 13:30:17.648 VariableTest[707:a0f] Hello, world!
2010-09-10 13:30:17.656 VariableTest[707:a0f] Hello, John Doe
2010-09-10 13:30:17.664 VariableTest[707:a0f] The loop will repeat 5 times
2010-09-10 13:30:17.665 VariableTest[707:a0f] The value of i = 0
2010-09-10 13:30:17.665 VariableTest[707:a0f] The value of i = 1
2010-09-10 13:30:17.666 VariableTest[707:a0f] The value of i = 2
2010-09-10 13:30:17.667 VariableTest[707:a0f] The value of i = 3
2010-09-10 13:30:17.668 VariableTest[707:a0f] The value of i = 4
Practice changing the number (5) and string (@"John Doe") passed as a parameter to the displayMessage method to see how to change the displayMessage's output.
A method can accept zero or more parameters to do something useful. In many cases, the method simply runs its code, but sometimes you may need a method to calculate and return a single value. When a method does not return a value, its data type is void:
-(void)displayMessage;
When that method returns a value, you need to identify the data type of that value:
-(int)displayMessage;
-(float)displayMessage;
-(NSString *)displayMessage;
A typical method that returns a value looks like this:
-(data type)methodName
{
   return value;
}
The data type defines what type of data the method returns, and the return command specifies the exact value to return. When using a method that returns a value, your code can simply treat that method as a value like this:
int myCounter;
myCounter = 2 + [objectName methodName];
To see how to create a simple method that returns a value, follow these steps:
Open the VariableTest project from the previous section.
Click the
MyClass.hfile inside the Classes folder, and modify the code as follows:#import <Cocoa/Cocoa.h> @interface MyClass : NSObject { @private } -(void)displayMessage: (NSString *) myName count:(int)myLoop;-(int)calculateValue;@endClick the
MyClass.mfile inside the Classes folder, and add thedisplayMessagemethod as follows:#import "MyClass.h" @implementation MyClass - (id)init { if ((self = [super init])) { // Initialization code here. NSLog (@"Hello, world!");} return self; } - (void)dealloc { // Clean-up code here. [super dealloc]; } -(void)displayMessage: (NSString *) myName count:(int)myLoop { NSLog (@"Hello, %@", myName); NSLog (@"The loop will repeat %i times", myLoop); int i; for (i = 0; i < myLoop; i++) { NSLog (@"The value of i = %i", i); } }-(int)calculateValue{return 4;}@endChoose File
Click the
VariableTestAppDelegate.mfile stored in the Classes folder, and modify the code in theVariableTestAppDelegate.mfile as follows:#import "VariableTestAppDelegate.h" #import "MyClass.h" @implementation VariableTestAppDelegate @synthesize window; - (void)applicationDidFinishLaunching:(NSNotification *)aNotification { MyClass *testObject = [[MyClass alloc] init];int tempVar;tempVar = [testObject calculateValue];[testObject displayMessage:@"John Doe" count: tempVar];[testObject release]; } @endChoose File
Click the Build and Run button, or choose Build
Quit the program by clicking the Stop button or choosing Product
Choose Run
2010-09-10 17:44:55.769 VariableTest[1167:a0f] Hello, world!
2010-09-10 17:44:55.774 VariableTest[1167:a0f] Hello, John Doe
2010-09-10 17:44:55.775 VariableTest[1167:a0f] The loop will repeat 4 times
2010-09-10 17:44:55.775 VariableTest[1167:a0f] The value of i = 0
2010-09-10 17:44:55.777 VariableTest[1167:a0f] The value of i = 1
2010-09-10 17:44:55.778 VariableTest[1167:a0f] The value of i = 2
2010-09-10 17:44:55.787 VariableTest[1167:a0f] The value of i = 3
The applicationDidFinishLaunching method declares an integer variable called tempVar. Then it calls the calculateValue method inside testObject.
Peeking into the calculateValue method stored in the MyClass.m file, you can see that the calculateValue method is declared as an integer data type, and inside its curly brackets it uses the return command to return a value. In this case, the value is simply 4.
The value 4 replaces the code [testObject calculateValue] and gets assigned to the tempVar variable. This tempVar variable now gets inserted into the [testObject displayMessage:@"John Doe" count: tempVar]; line. Since tempVar represents the number 4, this 4 gets passed to the displayMessage method, which uses it to run its loop four times.
The calculateValue method always returns 4. To avoid returning the same value every time, most methods will accept outside data to calculate a different value to return. To see how to create a method that accepts a parameter and uses it to return a different value, follow these steps:
Open the VariableTest project.
Click the
MyClass.hfile inside the Classes folder, and modify the code as follows:#import <Cocoa/Cocoa.h> @interface MyClass : NSObject { @private } -(void)displayMessage: (NSString *) myName count:(int)myLoop;-(int)calculateValue: (int)outsideData;@endChoose File
Click the
MyClass.mfile inside the Classes folder, and add thedisplayMessagemethod as follows:#import "MyClass.h"
@implementation MyClass - (id)init { if ((self = [super init])) { // Initialization code here. NSLog (@"Hello, world!"); } return self; } - (void)dealloc { // Clean-up code here. [super dealloc]; } -(void)displayMessage: (NSString *) myName count:(int)myLoop { NSLog (@"Hello, %@", myName); NSLog (@"The loop will repeat %i times", myLoop); int i; for (i = 0; i < myLoop; i++) { NSLog (@"The value of i = %i", i); } }-(int)calculateValue: (int)outsideData{int hold;hold = outsideData + outsideData;return hold;}@endChoose File
Click the
VariableTestAppDelegate.mfile stored in the Classes folder, and modify the code in theVariableTestAppDelegate.mfile as follows:#import "VariableTestAppDelegate.h" #import "MyClass.h" @implementation VariableTestAppDelegate @synthesize window; - (void)applicationDidFinishLaunching:(NSNotification *)aNotification { MyClass *testObject = [[MyClass alloc] init]; int tempVar;tempVar = [testObject calculateValue:1];[testObject displayMessage:@"John Doe" count: tempVar]; [testObject release]; }@end
Choose File
Click the Build and Run button, or choose Build
Quit the program by clicking the Stop button or choosing Product
Choose Run
2010-09-10 19:45:23.746 VariableTest[1405:a0f] Hello, world!
2010-09-10 19:45:23.749 VariableTest[1405:a0f] Hello, John Doe
2010-09-10 19:45:23.750 VariableTest[1405:a0f] The loop will repeat 2 times
2010-09-10 19:45:23.751 VariableTest[1405:a0f] The value of i = 0
2010-09-10 19:45:23.751 VariableTest[1405:a0f] The value of i = 1
The applicationDidFinishLaunching method now calls the calculateValue method by passing it 1 as a parameter.
The calculateValue method in the MyClass.m file stores this number in a variable called outsideData. Then it creates an integer variable called hold, adds the value of outsideData to itself, and stores this value into the hold variable. Finally, it returns the hold variable to the [testObject calculateValue:1] line inside the applicationDidFinishLaunching method.
The tempVar variable now contains the value returned by the calculateValue method (which is now 2) and passes that value to the displayMessage method, which runs its loop two times.
Normally when you pass data to a method, that method can't change the value of that passed data. This is called passing by value, which essentially makes a separate copy of data and then lets the method manipulate that copy of the data, leaving the original data untouched. If you want a method to change and return more than one value, you have to pass data to a method through something called passing by reference.
Passing by reference relies on pointers. A pointer simply points or identifies a memory address that contains data. When you send data to a method through passing by reference, you're sending the method the pointer to data. This means that when the method alters that data, it's altering the only copy of that data. The end result is that the method can change the value of data that other parts of the program can then use.
To pass data by reference, you must use the asterisk symbol to identify a pointer in your method:
-(data type)methodName: (data type *) pointerName;
In the implementation (.m) file, you must always use the asterisk symbol to identify the parameter as a pointer:
-(data type)methodName: (data type *) pointerName
{
     return *pointerName + *pointerName;
}
When calling a method that passes data by reference, place the ampersand (&) symbol in front of the passed data:
[testObject methodName: &passedData];
Note
You only need to use the ampersand (&) symbol when passing data such as a number. You can omit the ampersand (&) symbol if you're passing a pointer.
To see how to pass data by reference and how that allows a method to change a value used by other parts of the program, follow these steps:
Open the VariableTest project.
Click the
MyClass.hfile inside the Classes folder, and modify the code as follows:#import <Cocoa/Cocoa.h> @interface MyClass : NSObject { @private } -(void)displayMessage: (NSString *) myName count:(int)myLoop;-(int)calculateValue: (int *)outsideData;@endChoose File
Click the
MyClass.mfile inside the Classes folder, and add thedisplayMessagemethod as follows:#import "MyClass.h" @implementation MyClass - (id)init { if ((self = [super init])) { // Initialization code here. NSLog (@"Hello, world!"); } return self; } - (void)dealloc { // Clean-up code here.[super dealloc]; } -(void)displayMessage: (NSString *) myName count:(int)myLoop { NSLog (@"Hello, %@", myName); NSLog (@"The loop will repeat %i times", myLoop); int i; for (i = 0; i < myLoop; i++) { NSLog (@"The value of i = %i", i); } }-(int)calculateValue: (int *)outsideData{int hold;hold = *outsideData + *outsideData;*outsideData = 99;return hold;}@endChoose File
Click the
VariableTestAppDelegate.mfile stored in the Classes folder, and modify the code in theVariableTestAppDelegate.mfile as follows:#import "VariableTestAppDelegate.h" #import "MyClass.h" @implementation VariableTestAppDelegate @synthesize window; - (void)applicationDidFinishLaunching:(NSNotification *)aNotification { MyClass *testObject = [[MyClass alloc] init];int counter = 1;NSLog (@"The value of counter = %i", counter);int tempVar;tempVar = [testObject calculateValue:&counter];NSLog (@"Now the value of counter = %i", counter);[testObject displayMessage:@"John Doe" count: tempVar]; [testObject release]; } @endChoose File
Click the Build and Run button, or choose Build
Quit the program by clicking the Stop button or choosing Product
Choose Run
010-09-10 21:33:44.345 VariableTest[1690:a0f] Hello, world!
2010-09-10 21:33:44.371 VariableTest[1690:a0f] The value of counter = 1
2010-09-10 21:33:44.385 VariableTest[1690:a0f] Now the value of counter = 99
2010-09-10 21:33:44.386 VariableTest[1690:a0f] Hello, John Doe
2010-09-10 21:33:44.388 VariableTest[1690:a0f] The loop will repeat 2 times
2010-09-10 21:33:44.389 VariableTest[1690:a0f] The value of i = 0
2010-09-10 21:33:44.390 VariableTest[1690:a0f] The value of i = 1
In the applicationDidFinishLaunching method, the counter variable gets passed by reference to the calculateValue method, which reassigns the value of its parameter (called *outsideData) to the value 99. Now when the applicationDidFinishLaunching method prints the value of the counter variable again, its value has changed from 1 to 99.
A class represents a self-contained arbitrary object. If you were writing a program to control an airplane, you might divide that program into objects where one object represents the wings, another object represents the tail, and a third object represents the engines. To do something useful, objects need methods. To store important data, objects also need properties.
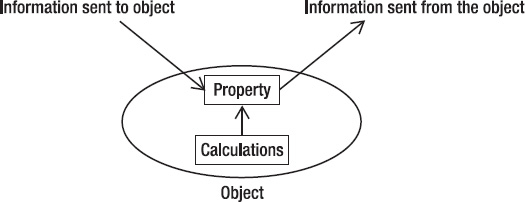
A property is nothing more than a variable that an object uses to hold information sent to it (from another object) or that it can send to other objects. For example, an object representing an airplane's engine might need to receive data from the pilot, telling it to increase or decrease thrust. Likewise, this engine object might also need to send fuel information to the pilot. Properties simply give objects the ability to accept and store information sent to it and create and send information, as shown in Figure 12-4.
To define a property in a class, you need to do the following:
The header file of a class is where you declare variable and make it a property. Declaring a variable is straightforward. Underneath the @private heading in the header file, just declare your variable normally:
@private
    datatype variableName;
    classType *pointerName;
Next, you need to define your declared variables as properties, which other parts of your program can access. To do this, you simply use the @property (assign) or @property (retain) command such as:
@property (assign) datatype variableName;
@property (retain) classType *pointerName;
When working with data types such as numbers (int or float) or Boolean values (BOOL), you use the @property (assign) command. When declaring an instance of a class to create an object, you use @property (retain). The retain command tells the computer to retain the object in memory, which you don't need to do when declaring integer or Boolean variables.
Note
In addition to the @property (retain) command, you can also use the @property(assign) or @property(copy) commands with objects. The @property(assign) command is used with objects when you need to keep track of memory, such as when writing iPhone/iPad apps. The @property(copy) command is used when working with objects that are mutable, such as NSMutableString.
Next, you need to create accessor methods in the implementation (.m) file for each property you declare. The accessor methods simply let other objects store or retrieve information in your defined property.
In other object-oriented programming languages, you must physically write these accessor methods yourself. In Objective-C, you can create these accessor methods automatically by simply using the @synthesize command for each property like this:
@synthesize variableName
@synthesize pointerName;
After you've created a property in a class file, you can create an instance of that class (an object) like this:
classType *objectName;
To assign a value to an object's property, there are two methods. First, you can use the traditional Objective-C technique that uses square brackets like this:
[objectName setPropertyName: value];
A second way to assign a value to an object's property uses something called dot syntax, which is what many other object-oriented programming languages use. The dot syntax version of assigning a value to a property looks like this:
objectName.propertyName = value;
Both methods are equivalent, so use whichever method you prefer. Dot syntax is simpler, and most of Apple's sample code and documentation uses dot syntax.
Note
One key difference between the two methods is that when using the first method with square brackets, the first letter of the property name is uppercase, while in the dot syntax method, the first letter of the property name is lowercase.
To retrieve a value from an object's property, you also have two methods. The first method looks like this:
variable = [objectName propertyName];
The dot syntax method looks similar:
variable = objectName.propertyName;
To see how to create and use properties, follow these steps:
Open the VariableTest project from the previous section.
Click the
MyClass.hfile inside the Classes folder, and modify the code as follows:#import <Cocoa/Cocoa.h> @interface MyClass : NSObject { @privateNSString *personName;int loopVar;}@property (retain) NSString *personName;@property (assign) int loopVar;-(void)displayMessage: (NSString *) myName count:(int)myLoop; -(int)calculateValue: (int *)outsideData; @endChoose File
Click the
MyClass.mfile inside the Classes folder, and add thedisplayMessagemethod as follows:#import "MyClass.h" @implementation MyClass
@synthesize personName;@synthesize loopVar;- (id)init { if ((self = [super init])) { // Initialization code here. NSLog (@"Hello, world!"); } return self; } - (void)dealloc { // Clean-up code here. [super dealloc]; } -(void)displayMessage: (NSString *) myName count:(int)myLoop; { NSLog (@"Hello, %@", myName); NSLog (@"The loop will repeat %i times", myLoop); int i; for (i = 0; i < myLoop; i++) { NSLog (@"The value of i = %i", i); } } -(int)calculateValue: (int *)outsideData { int hold; hold = *outsideData + *outsideData; *outsideData = 99; return hold; } @endChoose File
Click the
VariableTestAppDelegate.mfile stored in the Classes folder, and modify the code in theVariableTestAppDelegate.mfile as follows:#import "VariableTestAppDelegate.h" #import "MyClass.h" @implementation VariableTestAppDelegate @synthesize window; - (void)applicationDidFinishLaunching:(NSNotification *)aNotification { MyClass *testObject = [[MyClass alloc] init];testObject.personName = @"John Smith";testObject.loopVar = 2;//[testObject setPersonName: @"John Smith"];//[testObject setLoopVar: 2];int repeatLoop;repeatLoop = testObject.loopVar;[testObject displayMessage:testObject.personName count: repeatLoop];[testObject release]; } @endThe previous code lists the two methods for assigning values to a property. The dot syntax version is used, while the square bracket version is commented out. If you want, you can comment out the dot syntax version and remove the comment symbols (
//) from the square bracket version to see that they work identically.Choose File
Click the Build and Run button, or choose Build
Quit the program by clicking the Stop button or choosing Product
Choose Run
2010-09-11 11:39:24.448 VariableTest[2858:a0f] Hello, world!
2010-09-11 11:39:24.455 VariableTest[2858:a0f] Hello, John Smith
2010-09-11 11:39:24.458 VariableTest[2858:a0f] The loop will repeat 2 times
2010-09-11 11:39:24.460 VariableTest[2858:a0f] The value of i = 0
2010-09-11 11:39:24.462 VariableTest[2858:a0f] The value of i = 1
In the applicationDidFinishLaunching method, the code declares an integer variable called repeatLoop. Then it assigns the value of testObject.loopVar to this repeatLoop variable, which is then passed as a parameter to the displayMessage method. Another way to assign a value to the repeat Loop variable would be like this:
repeatLoop = [testObject loopVar];
You use Objective-C to create a class, which is divided into two files: the header (.h) file and the implementation (.m) file. After you've created a class, you can create an instance of that class, which is an object.
Classes need to define methods and properties. A method consists of a data type, method name, and parameter list. The data type of a method determines what type of data the method returns. If a method doesn't return any data, its data type is void:
-(void) methodName;
If the method returns a data type, just list that data type in the parentheses like this:
-(float) methodName;
If the method returns an object type, you must use the asterisk symbol to define a pointer like this:
-(NSString *) methodName;
If you need to pass data to a method, the method declaration needs to define the data type for that data and a variable name to hold that data. Separate multiple parameters with a colon like this:
-(void) methodName: (datatype) variableName1: name (datatype) variableName2;
To pass data to a method, you must send the correct data type and the correct number of values defined by the parameter list. So if the method expects two integer values, you can call that method like this:
[objectName methodName: 4 name: 98];
Methods can also change the values of their parameters through passing by reference. When you want to change a value of a parameter, you must define the method with the asterisk symbol to define a pointer like this:
-(void) methodName: (datatype *) variableName;
When you call that method and pass it a parameter, you must identify that parameter with the ampersand (&) symbol like this:
[objectName methodName: &variable];
If you pass a pointer as a parameter, you can omit the ampersand (&) symbol.
To create properties, you must declare a variable and define it as a property in the header (.h) file of the class. When creating properties from data types like integer or Boolean, you use the @property (assign) command. When creating properties from classes like NSString, you use the @property (retain) command.
After declaring your properties in the header (.h) file, the final step is to use the @synthesize command in the implementation (.m) file so you can save and retrieve data from that property.
To assign or retrieve values from properties, you can use the square bracket technique or the dot syntax technique. Storing a value in a property through both techniques looks like this:
[objectName setPropertyName: value];
objectName.propertyName = value;
To retrieve data from a property, you can use the square bracket or dot syntax technique like this:
Variable = [objectName propertyName];
Variable = objectName.propertyName;
An object's properties let it accept data from other parts of the program or create data that other parts of the program may need. Methods make the object do something useful. By understanding how to create objects from class files and how to create and use properties and methods, you'll be able to create your own objects and understand how to use Apple's prewritten and tested classes stored in the Cocoa framework.