Apple provides plenty of prewritten and tested code you can reuse from the Cocoa framework. Besides letting you create a program faster, prewritten code also ensures that your program looks and behaves like a typical Mac program. One of the common elements of every Mac program are dialog boxes, which are windows that pop up and allow the user to print, open, or save a file. Rather than force you to create these common user interface elements yourself, Apple provides you with built-in dialog boxes that you can plug into your own program.
One common built-in dialog box is an alert panel that pops up on the screen to alert the user to something, such as confirming that the computer is about to delete a file if the user confirms this delete action. Another common type of dialog box display is an Open or Save dialog box that lets the user select a folder and a file. By using these common user interface items in your programs, you can create programs that look and behave just like Apple's own programs such as iPhoto and iTunes.
An alert dialog is used whenever your program needs to bring something to the user's attention. To use an alert dialog box, you need to create and customize it, display it on the screen, and then retrieve any choices that the user made, such as clicking an OK or Cancel button.
The first step in creating an alert dialog box is to define a pointer to the NSAlert class and then initialize that pointer like this:
NSAlert *alert = [[NSAlertalloc] init];
After creating an alert dialog box, the next step is to define the type of dialog box to display, as shown in Figure 20-1. The following are the three types of alert dialog boxes:
NSWarningAlertStyle: Displays the default style used to warn the user about an impending eventNSInformationalAlertStyle: Creates a dialog box to warn the user of an event; looks identical to theNSWarningAlertStyleNSCriticalAlertStyle: Displays a caution icon, used to caution the user about an event that could have consequences

To define the type of dialog box style, just use alertStyle and specify the style you want to use like this:
NSAlert *alert = [[NSAlert alloc] init];
alert.alertStyle = NSWarningAlertStyle;
Note
The icon displayed in a dialog box is the icon assigned to your program. If you do not assign an icon to your program, the icon will be the default application icon (see Figure 20-1).
To make the alert dialog box actually appear (and release its memory usage when it's done), you need to add two additional lines of code:
NSAlert *alert = [[NSAlert alloc] init];
alert.alertStyle = NSWarningAlertStyle;
[alert runModal];
[alert release];
The [alert runModal] line makes your dialog box actually appear on the screen. While these four lines create and display a dialog box, you'll probably want to customize the dialog box with text and buttons, which the following sections explain.
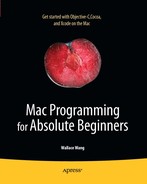
By default, a dialog box simply displays the word "Alert." To customize a dialog box, you can define message text and informative text. Message text appears in bold to catch the user's eye, while informative text appears underneath and provides additional explanation about the dialog box's message, as shown in Figure 20-2.
After you've created a dialog box, you can use messageText and informativeText to define the text to display on your dialog box:
alert.messageText = @"Message Text";
alert.informativeText = @"Informative Text";
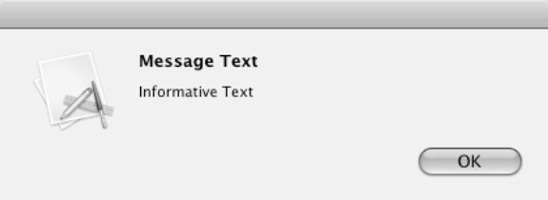
If you've ever used a new browser for the first time, you may have seen a dialog box pop up asking if you want to make the browser your default browser. This dialog box lets you click Yes or No, but it also includes a check box called a suppression check box, which you can check to make sure the dialog box doesn't keep popping up again and again, as shown in Figure 20-3.
To create a suppression check box, use suppressionBut-ton and set it to YES:
alert.showsSuppressionButton: = YES;
By default, a dialog box appears with only an OK button (see Figure 20-2). If you just need to alert the user about something noncritical, the user can acknowledge getting that message and remove the dialog box by clicking the OK button.
However, many times you may want to display more than one button and display custom text on each button. To do both, you need to use the addButtonWithTitle method and define the text that you want to appear on the button:
[alert addButtonWithTitle:@"OK"];
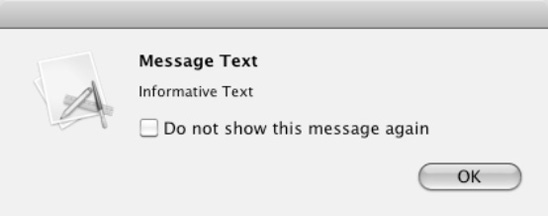
The first button you add to a dialog box appears on the far right. Each additional button you add appears to the left of the preceding button. Generally you don't want to use more than three or four buttons because then the dialog box starts to get cluttered and more confusing.
When the user clicks any button displayed on the dialog box, the dialog box immediately disappears. If you have two or more buttons displayed on the dialog box, you may want to know which button the user chose.
To determine the button that the user clicked, you can use a switch statement along with the NSAlertFirstButtonReturn, NSAlertSecondButtonReturn, and NSAlertThirdButtonReturn constants:
switch ([alert runModal])
    {
        case NSAlertFirstButtonReturn:
            NSLog (@"First button clicked");
            break;

        case NSAlertSecondButtonReturn:
            NSLog (@"Second clicked");
            break;

        case NSAlertThirdButtonReturn:
            NSLog (@"Third clicked");
            break;

        default:
            break;
    }
The [alert runModal] command displays the dialog box. The first button on the dialog box is the button on the far right, the second button is the button that appears to the left of the first button, and so on, as shown in Figure 20-4.
If you have more than three buttons on a dialog box, you can identify each additional button by checking for NSAlertThirdButton+ x, where x is a number that represents an additional button beyond the third one.
To see how to create and display a dialog box, follow these steps:
Open the MyTest program that you modified in the previous chapter.
Double-click the
MainMenu.xibfile stored in the Resources folder. Interface Builder appears and displays your user interface window.Click any items currently displayed on the user interface and press Delete to remove them.
Drag and drop one Push Button object on your user interface window.
Click the
MyTestAppDelegate.hfile stored in the Classes folder and modify the code as follows:#import <Cocoa/Cocoa.h> @interface MyTestAppDelegate : NSObject <NSApplicationDelegate> { NSWindow *window; } @property (retain) IBOutlet NSWindow *window;-(IBAction) displayDialog:(id)sender;@endChoose File

Click the
MyTestAppDelegate.mfile stored in the Classes folder and modify the code as follows:#import "MyTestAppDelegate.h" @implementation MyTestAppDelegate @synthesize window;
- (void)applicationDidFinishLaunching:(NSNotification *)aNotification { // Insert code here to initialize your application } - (void)dealloc { [window release]; [super dealloc]; }-(IBAction) displayDialog:(id)sender{NSAlert *alert = [[NSAlert alloc] init];alert.salertStyle = NSWarningAlertStyle;[alert addButtonWithTitle:@"OK"];[alert addButtonWithTitle:@"Cancel"];alert.messageText = @"Message Text";alert.informativeText = @"Informative Text";switch ([alert runModal]){case NSAlertFirstButtonReturn:NSLog (@"OK clicked");break;case NSAlertSecondButtonReturn:NSLog (@"Cancel clicked");break;default:break;}[alert release];}@endNote
After you create an alert dialog box, you need to use the
releasemethod (such as[alert release];) to remove the object from memory. If you fail to do this, each time the user opens the dialog box, it will gobble up memory and eventually could cause your program to crash when there's no more memory available.Choose File
Double-click the
MainMenu.xibfile stored in the Resources folder. Interface Builder appears and displays your user interface window.Right-click the My Test App Delegate icon in MainMenu.xib window. A heads-up window appears.
Click the circle that appear to the right of
displayDialogunder the Received Actions heading and drag the mouse to the push button on the user interface.Choose File
Switch to Xcode and click the Build and Run button or choose Build
Click the push button. Your dialog box appears.
Click the OK button. The dialog box disappears.
Repeat steps 14 and 15 except click the Cancel button.
Quit your program.
Choose Run
2010-09-25 22:44:52.232 UITest[19293:a0f] OK clicked
2010-09-25 22:44:54.426 UITest[19293:a0f] Cancel clicked
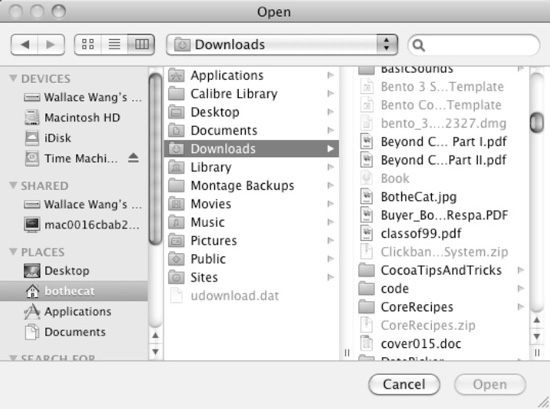
Many Mac programs need to let the user choose a file stored on a computer. To present this option in a consistent way, almost every Mac program uses a special window called an Open panel, as shown in Figure 20-5.
To create an Open panel, you need to use the NSOpenPanel class like this:
NSOpenPanel *myPanel = [NSOpenPanel openPanel];
This creates an Open panel, but you still need to display it and determine which button the user clicked (NSOKButton or NSCancelButton) and which file the user selected.
To display an Open panel, you need to use the runModal method, which looks like this:
[myPanel runModal];
This line of code returns an integer value that identifies which button the user clicked to make the Open panel disappear. To identify which button the user clicked (Open or Cancel), you need to check if the value of [myPanel runModal] is equal to the constant value NSOKButton (which represents the Open button):
if ([myPanel runModal] == NSOKButton)
    {
        // If the user selected a file, retrieve that file name
    }
If the user clicked the Cancel button, then there's no need to do anything else. However, if the user clicked the Open button (identified by the NSOKButton constant), then the user must have also selected a file from the Open panel.
To retrieve this file name (plus its directory path), you must use the URLs property, which contains an array of all the files that the user selected. (Most users will select only a single file, but it's possible to allow the user to select multiple files.) To use the URLs property, you must declare an NSArray like this:
NSArray *filenamesArray = myPanel.URLs;
Once the list of selected file names gets stored in an array, the second step is to retrieve each file name from this array. If the Open panel allowed the user to select only a single file, then you need to retrieve only the first item in the array, located at index position 0:
NSString *filename = [filenamesArray objectAtIndex:0];
The string stored in the filename string now identifies the file name (and directory path) of the file that the user chose.
To see how to create and display an Open panel, follow these steps:
Open the MyTest program that you modified in the previous section.
Double-click the
MainMenu.xibfile stored in the Resources folder. Interface Builder appears and displays your user interface window.Click any items currently displayed on the user interface and press Delete to remove them.
Drag and drop one Push Button object on your user interface window.
Click the
MyTestAppDelegate.hfile stored in the Classes folder and modify the code as follows:#import <Cocoa/Cocoa.h> @interfaceMyTestAppDelegate : NSObject <NSApplicationDelegate> { NSWindow *window; } @property (retain) IBOutlet NSWindow *window;-(IBAction) displayPanel:(id)sender;@endChoose File
Click the
MyTestAppDelegate.mfile stored in the Classes folder and modify the code as follows:#import "MyTestAppDelegate.h" @implementationMyTestAppDelegate @synthesize window; - (void)applicationDidFinishLaunching:(NSNotification *)aNotification { // Insert code here to initialize your application }- (void)dealloc { [window release]; [super dealloc]; }-(IBAction) displayPanel:(id)sender{NSOpenPanel *myPanel = [NSOpenPanel openPanel];if ([myPanel runModal] == NSOKButton){NSArray *files = myPanel.URLs;NSURL *filename = [files objectAtIndex:0];NSLog (@"File = %@", filename);}}@endChoose File
Double-click the
MainMenu.xibfile stored in the Resources folder to open Interface Builder.Click the Window (My Test) icon in the MainMenu.xib window. Your user interface window appears.
Right-click the My Test App Delegate icon. A heads-up window appears.
Click the circle that appears to the right of
displayPanelunder the Received Actions category and drag it to the push button on the user interface.Choose File
Switch to Xcode and click the Build and Run button or choose Build
Click the push button. The Open panel appears.
Click a file (open up different folders if you wish), and click the Open button.
Quit your program.
Choose Run
2010-09-26 20:48:21.314 UITest[21836:a0f] File = /Users/JohnDoe/Documents/About Stacks.pdf
The Open panel normally displays every file type on your computer. However, you can limit the Open panel to make available only certain types of files, such as PDF or Microsoft Word (.doc and .docx) files.
To define the types of files to allow the user to select, you must first create an array that lists all the file extensions that define all the files you want to allow the user to select, such as in this example:
NSArray *fileTypes = [NSArray arrayWithObjects:@"doc", @"pdf", nil];
This code would force the Open panel to display only .doc or .pdf files. Any file with a different file extension, such as .tif or .jpg, would appear dimmed so the user can't select it. By limiting the types of files the user can select, you can ensure that the user won't select an inappropriate file that won't work in your program.
After you've defined a list of acceptable file extensions, the next step is to tell the Open panel which files are acceptable by using the allowedFilesTypes property like this:
NSArray *fileTypes = [NSArray arrayWithObjects:@"doc", @"jpg", @"pdf", nil];
myPanel.allowedFileTypes = fileTypes;
In most cases, you may want the user to select only a single file from the Open panel. However, you can let the user select multiple files, by holding down the
[myPanel setAllowsMultipleSelection:YES];
When you allow the user to select multiple files, you have no idea how many files the user might have selected. To retrieve each file name, you must use a loop that keeps retrieving each selected file name until it finds them all:
if ([myPanel runModal] == NSOKButton)
    {
        NSArray *filenamesArray = myPanel.URLs;
        for (NSURL *element in filenamesArray) {
            NSLog(@"File = %@", element);
        }
    }
The for loop keeps repeating until it retrieves all the file names from filenamesArray, which holds the list of the multiple files the user selected.
To see how to limit the file types the user can select and allow the user to select multiple files, follow these steps:
Open the MyTest program that you modified in the previous section.
Double-click the
MainMenu.xibfile stored in the Resources folder. Interface Builder appears and displays your user interface window. One push button should appear on the user interface. If not, delete anything currently displayed and then drag and drop one Push Button object on the user interface window.Click the
MyTestAppDelegate.mfile stored in the Classes folder and modify the code as follows:#import "MyTestAppDelegate.h" @implementation MyTestAppDelegate @synthesize window; - (void)applicationDidFinishLaunching:(NSNotification *)aNotification { // Insert code here to initialize your application } - (void)dealloc { [window release]; [super dealloc]; }-(IBAction) displayPanel:(id)sender{NSOpenPanel *myPanel = [NSOpenPanel openPanel];NSArray *fileTypes = [NSArray arrayWithObjects:@"doc", @"jpg", @"pdf", nil];myPanel.allowedFileTypes = fileTypes;myPanel.allowsMultipleSelection = YES;if ([myPanel runModal] == NSOKButton){NSArray *filenamesArray = myPanel.URLs;for (NSURL *element in filenamesArray) {NSLog(@"File = %@", element);}}} @endChoose File
Double-click the
MainMenu.xibfile stored in the Resources folder. Interface Builder appears and displays your user interface window.Right-click the My Test App Delegate icon in the MainMenu.xib window. A heads-up window appears. Make sure the
displayPanelmethod is connected to the push button on your user interface. If not, click the circle that appears to the right ofdisplayPanelunder the Received Actions category and drag it to the push button on the user interface.Choose File
Switch to Xcode and click the Build and Run button or choose Build
Click the push button. The Open panel appears.
Hold down the

Quit your program.
Choose Run
2010-09-27 21:26:24.726 UITest[984:a0f] File = /Users/bothecat/Documents/ComputorEdge/Fig-3.jpg
2010-09-27 21:26:24.726 UITest[984:a0f] File = /Users/bothecat/Documents/ComputorEdge/Fig-5.jpg
In this example, the user clicked two files, named Fig-3.jpg and Fig-5.jpg. Depending on which files you selected, you'll see those file names displayed instead.
A Save panel is similar to an Open panel except that the Save panel lets you create a file by typing a new file name and selecting a folder in which to store that new file. (The Save panel won't actually create the file, though; you'll need to write Objective-C code that does this for you.)
To create a Save panel, you must create a pointer to the NSSavePanel class:
NSSavePanel *myPanel = [NSSavePanel savePanel];
Then to display the Save panel, you need to use the runModal method and check if the user clicked the Save button (represented by the NSOKButton constant). Then you need to retrieve the name of the file that the user typed, which gets stored in the URL or URL.lastPathComponent property. The URL property stores the entire path and file name, such as /Documents/filename, while the URL.lastPathComponent property just stores the file name. Depending on whether you want to retrieve the entire path or just the file name, you can use the URL or URL.lastPathComponent property like this:
if ([myPanel runModal] == NSOKButton)
    {
 // URL returns the entire path and file name
        NSLog (@"Path chosen = %@", myPanel.URL);
//URL.lastPathComponent returns just the file name
NSLog (@"File typed = %@", myPanel.URL);
}To see how to create and use a Save panel, follow these steps:
Open the MyTest program that you modified in the previous section.
Double-click the
MainMenu.xibfile stored in the Resources folder. Interface Builder appears and displays your user interface window. One push button should appear on the user interface. If not, delete anything currently displayed and drag and drop one Push Button object on the user interface window.Click the
MyTestAppDelegate.mfile stored in the Classes folder and modify the code as follows:#import "MyTestAppDelegate.h" @implementation MyTestAppDelegate @synthesize window; - (void)applicationDidFinishLaunching:(NSNotification *)aNotification { // Insert code here to initialize your application } - (void)dealloc { [window release]; [super dealloc]; }-(IBAction) displayPanel:(id)sender{NSSavePanel *myPanel = [NSSavePanel savePanel];if ([myPanel runModal] == NSOKButton){NSLog (@"Path chosen = %@", myPanel.URL);NSLog (@"File typed = %@", myPanel.URL.lastPathComponent);}}@endChoose File
Switch to Xcode and click the Build and Run button or choose Build
Click the push button. The Save panel appears.
Click in the Save As text field and type a filename such as My Files.
Choose Run
2010-09-28 13:57:15.920 MyTest[2250:a0f] Path chosen = file://localhost/Users/JohnDoe/Documents/My%20Files
2010-09-28 13:57:15.920 MyTest[2250:a0f] File typed = My Files
The Save panel and the Open panel look and work similarly because the Save panel inherits features from the Open panel. As a result, the Save panel can also use the allowedFileTypes property to automatically add a specific extension to every file the user types in the Save panel.
To define a file extension, such as .xyz, you could use the following:
NSArray *fileTypes = [NSArray arrayWithObjects:@"xyz", nil];
If the user typed the file name "MyFiles" into the Save panel, the preceding code would tell your program to add the .xyz file extension so that the complete file name would be MyFiles.xyz. After you've defined a file extension, the next step is to tell the Save panel to use the allowedFilesTypes property:
NSArray *fileTypes = [NSArray arrayWithObjects:@"xyz", nil];
myPanel.allowedFileTypes = fileTypes;
Dialog boxes let you display short messages, temporarily interrupting the user. You can customize the text inside an alert dialog box to display different types of messages. Generally a dialog box can simply display information, but it can also retrieve the choice that the user picked so your program can respond accordingly.
If your program needs to open or save a file, you can use the built-in Open and Save panels. Both of these panels provide the standard Mac Open and Save panel that lets users switch between drives and folders to search for a file. To make these Open and Save panels actually work, you'll need to write Objective-C code to retrieve or save a file.
By using the built-in dialog boxes and Open and Save panels, you can create a program that looks and behaves like every Mac program. Users will be familiar with the way these dialog boxes and Open/Save panels work, so you can focus your time just writing the code needed to make your program do something useful.