
In this chapter, we talk about setting up the right malware analysis and reversing environment and configuring the tools needed for malware analysis. We also introduce new tools that we developed to make the analysis process faster and simpler.
Any kind of malware analysis requires a safe environment to handle malware, whether it is analyzing malware statically or dynamically or executing it to understand its behavior. Often, novice analysts end up executing malware on their host machine and other production machines, thereby infecting them, and in more severe cases, infecting other computers on their network.
Apart from safety, another important and much-needed requirement of malware analysis is speed. Analyzing malware requires you to constantly reuse the same analysis environment with variations or from a different analysis point. A good analysis environment offers quick and easy environment reusability to re-run and re-analyze the malware.
Either a physical machine or a virtual machine can be used for malware analysis. Most malware includes anti-analysis and analysis environment detection functionalities to evade detection and analysis, also known as armoring (see Chapter 19). Physical analysis systems are more resilient to anti-evasion techniques compared to VM-based analysis systems. With physical analysis systems, the underlying hardware configuration and the state of the operating system, its files, drivers, and other artifacts closely resembles that of a regular end user’s system as opposed to an analyst’s system, thereby fooling the malware into exhibiting its real intention.
A physical analysis environment requires tools that create system restore points. Some of the tools that allow you to create snapshots or restore points on a physical system are Windows System Restore, Clonezilla, Deep Freeze, Time Freeze, Norton Ghost, and Reboot Restore Rx.
Alternatively, a more popular solution is to use a virtual machine (VM). A disadvantage of using a VM is that the state of the operating system and its files, drivers, and other artifacts doesn’t resemble that of a physical system. Since most end users rarely use virtual machines, malware exploits this difference in appearance to execute differently, or exhibit benign properties or exit execution early, thereby evading antiviruses and analysis.
But the advantages of VMs outweigh the cons. VMs allow one the ability to pause the system and create snapshots. Compared to physical analysis systems, the ability to easily and quickly snapshot a running system state and revert to older snapshots later, greatly improves the speed of analysis, making it the preferred solution for analysts and sandbox-based detection solutions. Also, certain open source hypervisors like Qemu give one the ability to tune the look of the emulated hardware to closely mimic a physical system, which greatly helps in deceiving the malware that it is running on a physical host and not on some analyst’s VM.
In this chapter, we focus on creating and turning a malware analysis lab using a virtual machine.
Host System Requirements
Before we walk you through setting up an analysis VM, you need to make sure your host has met certain important requirements—a fully updated host and the availability of minimum hardware resources on the host.
Although you could set up an analysis VM inside which to run malware, you should be under no illusion that the host running the analysis VM is safe from infection. Malware is known to exploit vulnerabilities in the underlying VM hypervisor platform so that they can make their way into the host and infect it. Before setting up the analysis VM and running any malware inside it, you should make sure that the host OS and the hypervisor software are fully updated with the latest security patches and updates.
200 GB free disk space per VM. You need sufficient disk space to create a VM and multiple snapshots through various phases of analysis. In most cases, a free disk space of 200 GB should suffice.
4 GB of spare memory (RAM) per VM.
Solid-state-disk (SSD) over a platter-based hard disk drive (HDD). During the analysis process, you need to quickly suspend the VM, create snapshots, and restore a snapshot. Having an SSD means disk reads and writes are faster than traditional platter-based HDDs, improving speed and efficiency of analysis.
Network Requirements
As explained in the previous section, malware is known to infect the host system, and having a fully updated host is important. But the host and the malware analysis VM running on the host are connected to the local network, which houses other desktops, laptops, and devices, thereby making these other devices on the network accessible to the malware running inside the analysis VM. Though your host might be fully updated with the latest security updates, these other devices on the network may not be updated with the latest security updates. They may have unpatched vulnerabilities that can be exploited and infected by malware run from inside the analysis VM.
It is very important to have your analysis VM’s network (or the network the host system is on) isolated from any network that houses other devices on the premises. This especially holds true for analysts working at corporations, where an isolated malware lab network is a must to protect other department devices in the corporation premises.
As an alternative to having your host on an isolated network, hypervisor environments like VMware Workstation and VirtualBox provide the ability to create an isolated, virtual host–only network for the analysis VM, where the isolated network only has the analysis VM and the underlying host on it. While this is safe, it isn’t foolproof since the malware can still connect to the host over this network, exploit any vulnerabilities in it and infect the host and then spread to other devices on the premises’ network from the host machine. A host-only network comes with drawbacks, mainly the lack of a direct Internet connection. Analyzing malware in the presence of an Internet connection is sometimes needed to capture the malware’s command-and-control behavior and network packets for further analysis.
The safest and most foolproof way to safeguard your premises is to ensure that your analysis VM and host device are on an isolated lab network that doesn’t run any other critical machines and is only meant to hold malware analysis–related devices/machines/hosts.
Creating the Malware Analysis VM
A hypervisor or an emulator has many choices in creating and running virtual machines. Some are paid, some are free, and some are open source. Three of the most popular ones are VirtualBox, VMWare Workstation, and QEMU/kvm. To set up a lab in this book, we used VMWare Workstation, but you can use whichever one that you are comfortable with.
Use Windows 7 32-bit operating system for the analysis VM. For all the exercises and labs used in this book, we are going to use Windows 7 32-bit as the analysis VM. Most malware is 32-bit, although 64-bit malware does exist. As and when the need arises, you can redo a fresh analysis VM setup with Windows 7 64-bit and retrace the steps mentioned in the book, which should still hold good for the 64-bit analysis VM.
Preferably, have another analysis VM that has Windows XP SP2+ installed. While most malware runs on Windows 7, some run on Windows XP only. Also, some malware has anti-evasion techniques or use libraries that only allow it to be analyzed on Windows XP. If possible, keep this second analysis VM setup handy.
150 GB virtual disk.
Minimum 4 GB of RAM, keeping in mind the amount of spare memory available on the host
Minimum 2 cores
Install Guest Additions tools
Create a base snapshot of the pristine state of the VM after tuning the VM and installation of all the analysis tools.
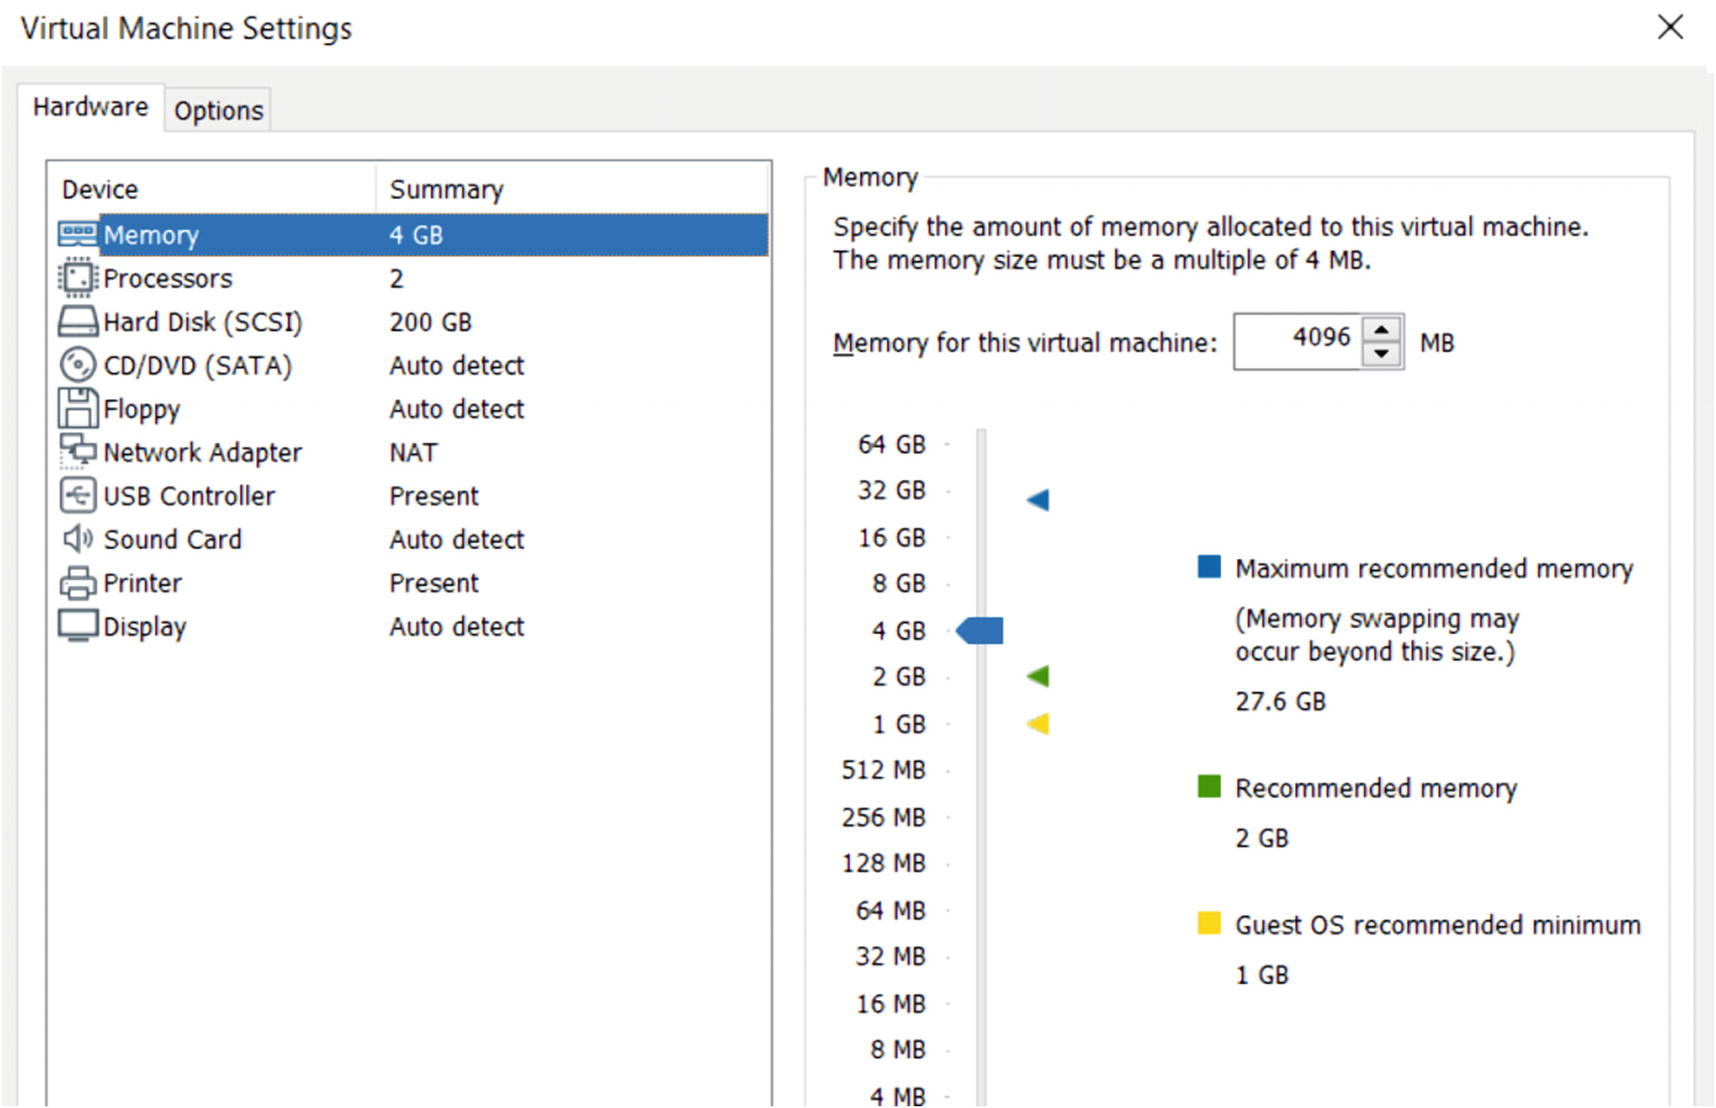
Hardware settings of an analysis VM using VMware Workstation
Tweaking an Analysis VM
In its raw setup form, an analysis VM doesn’t offer the best environment for analyzing malware samples. Next, we go through topics that discuss how to tweak and tune the VM environment to make it more resilient and efficient for the analysis process.
Disable Hidden Extensions

Disable extension hiding by unchecking this option in File Explorer Options
Show Hidden Files and Folders

Display Hidden Files and Folders by checking the option
Disable ASLR
Address space layout randomization, also known as ASLR , is a security feature that randomizes memory addresses used by executable code, including DLLs, to dissuade an attacker from exploiting a system when they do find a vulnerability in the program. Although this security feature exists and is enabled on Windows by default, attackers have developed techniques to bypass this protection mechanism. From a malware reversing standpoint, to improve speed and efficiency, disabling ASLR is preferable so that the same memory addresses are used for every execution of the same malware sample and its DLL dependencies.

Disabling ASLR in Windows 7 analysis VM
Disable Windows Firewall
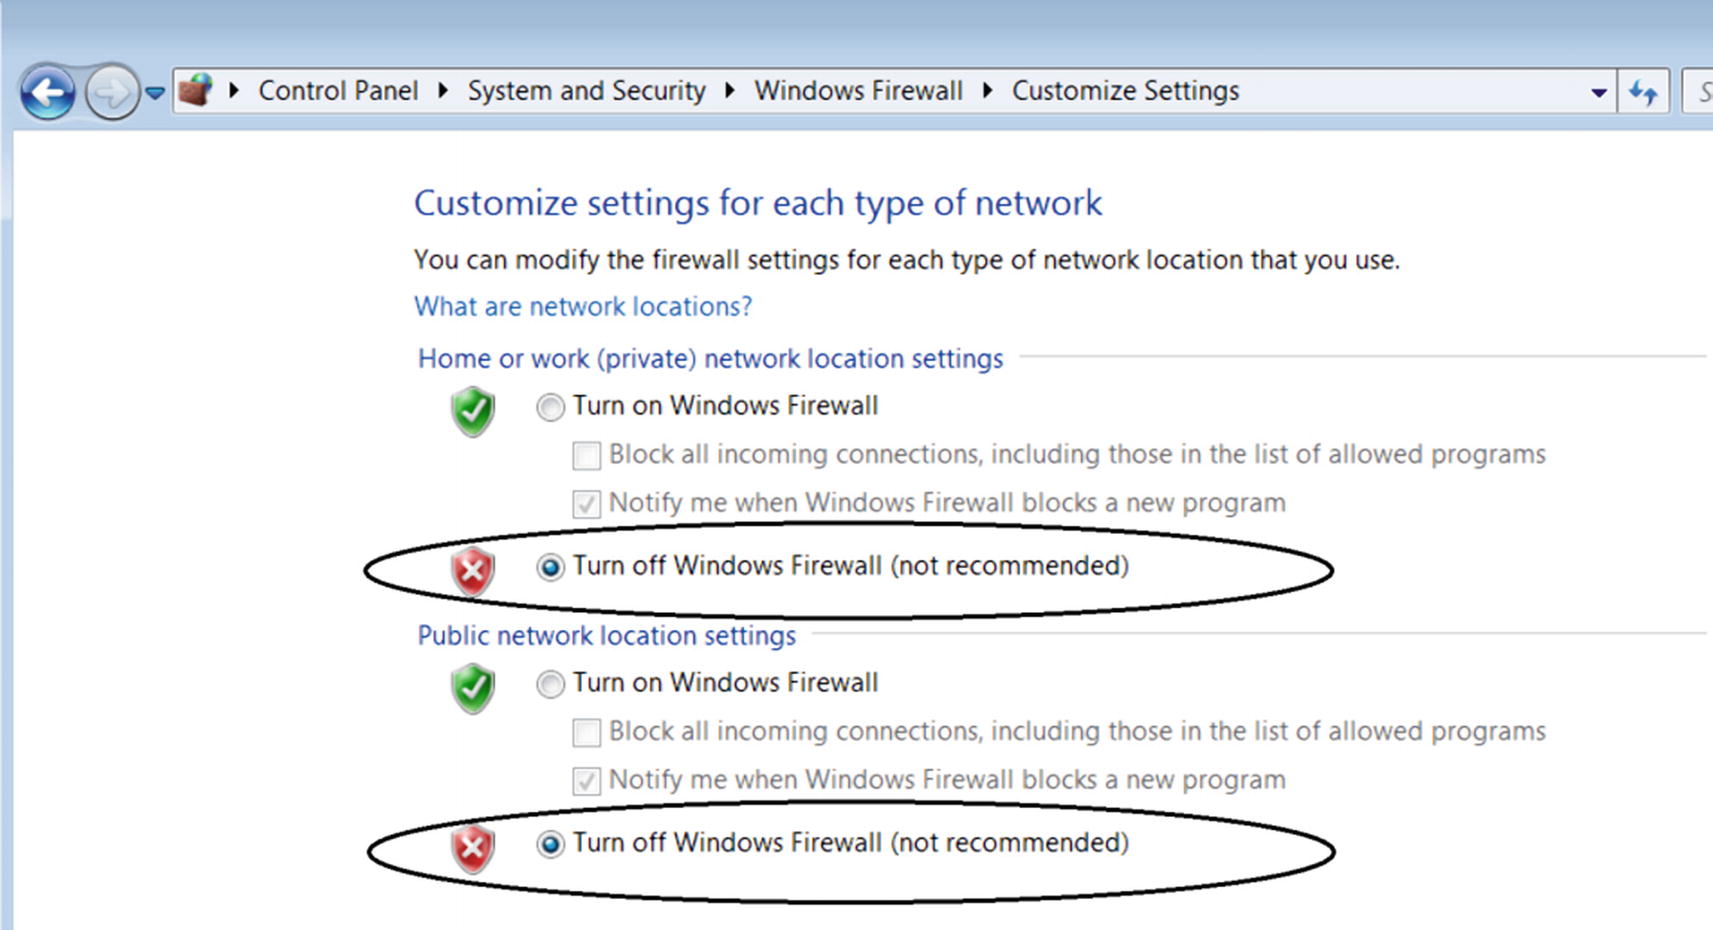
Disabling Windows Firewall inside the analysis VM
Disable Windows Defender (or Any Antivirus)

Disabling Windows Defender real-time protection inside the analysis VM
Mimic an End-User System
Most regular computer users in the world don’t use a VM and instead use the OS installed on physical machines, desktops, and laptops. VMs are mainly used by power users, developers, engineers, and malware analysts. Malware attackers are aware of this, and they try to exploit this knowledge by developing malware that has anti-detection armoring techniques . These armoring techniques aim to detect if the underlying OS environment is used for malware analysis or not, and if so, exhibit benign behavior or exit without displaying any malicious behavior, thereby evading any analysis, and leaving a minimum footprint.
Disk size. Most laptops come with 500 GB to 1 TB of disk. While starting with 150 GB as the disk size for your analysis, VM is okay; if possible, try to use a disk size as large as possible for the analysis VM during its creation.
RAM/memory. Most laptops come with at least 4 GB of RAM. While using a minimum of 4 GB for your analysis VM is necessary to have a smooth working environment, it also helps one look more like a regular user’s device.
Install software used by most end users. Malware is known to check if some of the popular tools are installed on the system, which includes browsers like Chrome and Firefox, PDF readers like Adobe Acrobat PDF Reader, productivity tools like Microsoft Office, media players, and so forth.
Copy over dummy files for PDF documents, .doc Word documents, .pptx files, media video and audio files, text files, images, and so forth. Having these dummy documents gives the analysis VM a more authentic end-user system feel if malware tries to scan the file system to check for the presence of these files.
For some of the tools installed, such as Microsoft Word, PDF Reader, and Chrome, open a couple of documents via these tools to populate its file history. Malware is known to verify the file history of these well-known tools to verify whether someone is indeed using these tools.
Snapshots
An important part of the analysis VM setup is snapshotting. Once the OS is installed and tweaked as described in the previous section and all the analysis tools installed from the next section, the VM should be suspended and snapshotted. This snapshotted state serves as the base snapshot, which you must restore and start/resume when you want to analyze malware samples.
If you need to make more tweaks to the VM or install more tools, it should be done against the previous base snapshot. You must restore the last base snapshot, start/resume it, make your tweaks and install your new tools, again suspend it and create a brand-new snapshot, which now serves as the new base snapshot for your analysis.

Snapshots of the analysis VM that serve as a base for the analysis of malware
Tools
Malware analysis requires the aid of various tools, some free, others paid. We will run through the list of various tools that need to be installed on the analysis VM and introduce the usage of these tools in later chapters as and when needed. Some of the tools come with installers that create desktop shortcuts, while others ship portable binaries that you manually need to add to the system path or create desktop shortcuts. A few of these tools lack a GUI and need to be run through the command line prompt.
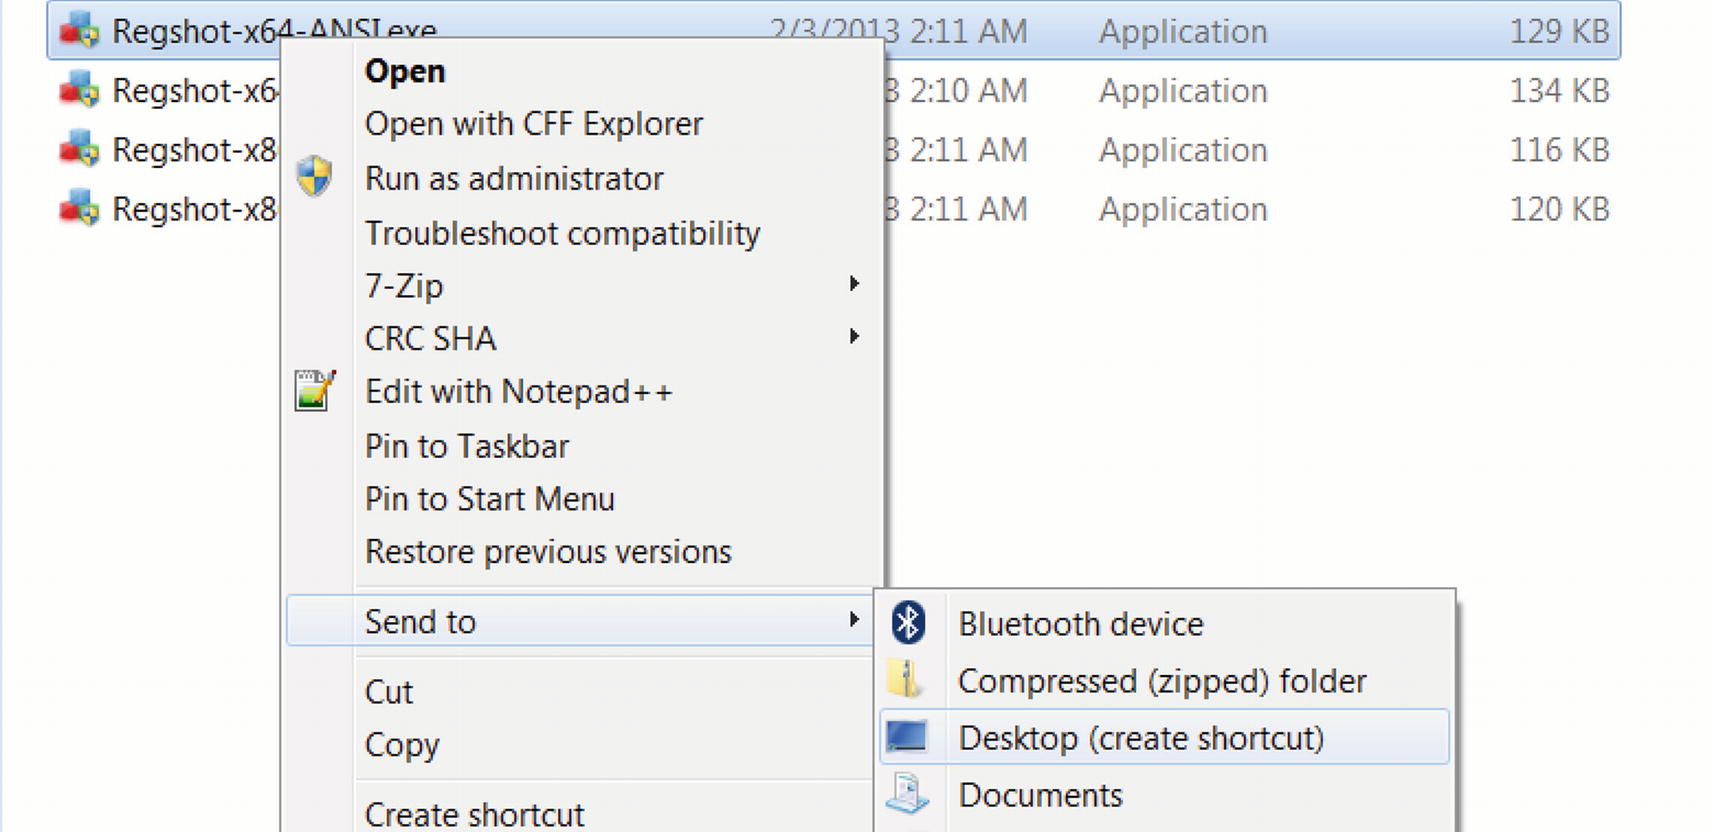
Creating a desktop shortcut for a portable executable binary
After setting up the analysis VM and installing all the analysis tools mentioned in this chapter, suspend, and create a snapshot of the analysis VM, which should then serve as the base snapshot for all the analysis work going forward.

Adding an executable to system executable search path
Hashing Tools: HashMyFiles and Others
Based on the platform, you have various options for hashing tools. One of the best tools that you can get for Windows is HashMyFiles, available at www.nirsoft.net/utils/hash_my_files.html in the form of a zipped package with a portable executable, which you can add to the desktop as a shortcut for quick accessibility.
Though we prefer HashMyFiles, you can also install another GUI tool for Windows called QuickHash, which can take in a file or raw content, and generate MD5, SHA1, and SHA256 hashes. QuickHash can be installed from https://quickhash-gui.org, where it is available in the form of a zipped package containing a portable executable, which you can then add to the desktop as a shortcut for quick accessibility.
Alternatively, Windows has the md5deep suite of tools, which comes with three command-line tools: md5deep, sha1deep, sha256deep. The tools can be downloaded from https://sourceforge.net/projects/md5deep/ as a zipped portable executable, which you have to extract and add to the PATH environment variable, as explained earlier in the chapter.
Linux usually comes preinstalled with command-line tools, namely md5sum, sha1sum, sha256sum. As the names suggest, they generate the MD5, SHA1, and SHA256 hashes, respectively, given a file as an argument to these commands.
APIMiner
APIMiner is a command-line API logging tool developed by us as a part of writing this book. The goal of this tool is to speed up the generation of API logs for malware by making a standalone tool that you can run from within your analysis VM, without needing to have a separate Sandbox VM. You can download the latest zipped version of this tool from https://github.com/poona/APIMiner/releases, which at the time of writing this book is version 1.0.0. The README.txt inside the zip contains instructions on how to set this tool up inside your analysis VM.
PE File Exploration: CFF Explorer and PEView
CFF Explorer is a popular PE file dissector that comes as a part of the Explorer Suite toolkit. You can install this tool by downloading the installer for Explorer Suite from https://ntcore.com/?page_id=388. To open a file using CFF Explorer, you can right-click any binary executable file and select Open with CFF Explorer.
Like CFF Explorer, PEView is a popular PE file dissector. This tool is available for download at http://wjradburn.com/software/ as a zipped portable binary executable, which you can then add to the desktop as a shortcut for quick accessibility.
File Type Identification Tools
Identifying the type of files is done using two popular tools. On Linux, you can use the file command-line tool that comes preinstalled on popular distributions like ubuntu.
Another relatively new and popular command-line tool is trid, which is available on Windows as well. It is downloaded as a zipped portable executable from http://mark0.net/soft-trid-e.html, which you have to extract and add to the PATH environment variable, as explained earlier in the chapter. Like the file command, the trid tool works by using a signature database to correctly identify the file type. The signature database, also known as a definition database, must be downloaded from the same URL, and its definition database file (TrIDDefs.trd) must be moved to the same folder that contains the trid.exe portable executable.
trid.exe is a command-line tool; it has a GUI alternative called TriDNet, available at the same URL. Similar to the command-line tool, it needs a signature database available via the same URL, which needs to be extracted. It also needs for its contents (a folder named defs) to be moved to the folder containing the TriDNet.exe portable executable.
Process Hacker, Process Explorer, CurrProcess
Process Hacker, Process Explorer, and CurrProcess are three tools that help visualize the various states of the system, including displaying the currently running processes, their threads, running services, network connections made, disk utilization, loaded DLLs per process and so forth. It also shows various process-related properties, which, if properly utilized, can help one analyze and dissect malware. Process Hacker can be downloaded from https://processhacker.sourceforge.io/. Process Explorer is available for download at https://docs.microsoft.com/en-us/sysinternals/downloads/process-explorer. CurrProcess may be downloaded from www.nirsoft.net/utils/cprocess.html. Each of these tools is available as a portable executable zipped package that you can add to your desktop as a shortcut for quick accessibility.
ProcMon: Process Monitor
ProcMon is a well-known process monitoring tool that captures and displays various activities of processes running on the system, including process and thread creation, network activities, file related activities like file creation and deletion, registry-related activities, and so forth. ProcMon is available as a zipped portable executable from https://docs.microsoft.com/en-us/sysinternals/downloads/procmon, which you can then add to your desktop as a shortcut for quick accessibility.
Autoruns
Malware uses persistence mechanisms to persist and automatically run after a system reboot or user relogin. Autoruns catches persistence mechanisms used by malware and provides a list of all the programs that are configured to run at system bootup or login. It is available for download at https://docs.microsoft.com/en-us/sysinternals/downloads/autoruns as a zipped portable executable, which you can then add to the desktop as a shortcut for quick accessibility.
Regshot
Regshot is a registry diff/comparison tool that allows you to take a snapshot of the Windows registry and compare it against a second snapshot, to display the difference in the registry. Regshot is available for download at https://sourceforge.net/projects/regshot/ as a portable executable, which you can then add to the desktop as a shortcut for quick accessibility.
NTTrace
NTTrace works similarly to Strace on Linux, logging native API calls made by a process on Windows. By default, it can log calls made to the native Windows system NT APIs provided by ntdll.dll. It can either spawn and trace a new process or attach and trace a process that is already running. NTTrace can trace child processes and deal with multithreaded processes. Although we use other API monitoring tools in this book (such as APIMiner), NTTrace sometimes serves as a useful API comparison tool to these other tools. NTTrace is a command-line tool, available as a zipped portable binary executable from www.howzatt.demon.co.uk/NtTrace/, which you have to extract and add to the PATH environment variable, as explained earlier.
FakeNet
FakeNet is a dynamic malware analysis tool available for Windows that intercepts and logs outgoing network connections from malware and returns simulated responses, thereby disabling external network access to the malware. At the same time, it gives the malware the perception that it can still connect to an external network and talk to the services on it. It uses custom HTTP and DNS servers to respond to incoming network requests. FakeNet is available at https://sourceforge.net/projects/fakenet/ as a portable binary executable, which you can add to the desktop as a shortcut for quick accessibility.
BinText

BinText displaying various text strings present in an executable file
YARA

YARA in action , matching “Notepad” pattern against Notepad.exe executable
Wireshark
Wireshark is a graphical packet analyzer that can capture and dissect live network traffic or analyze static packet capture (PCAP) files. Wireshark supports decoding various protocols and provides inbuilt packet filtering capability, that let’s one speedily dissect any network traffic. Wireshark is a must-have tool that not only analyzes malware traffic but also troubleshoots any network-related issues. Wireshark is available for download at www.wireshark.org.
Microsoft Network Monitor
Microsoft Network Monitor is a graphical packet analyzer from Microsoft that enables one to capture, decode, view, and analyze networking protocols. While it does sound similar to Wireshark, one important difference is its ability to provide the PID process from which network traffic originated, which is useful in malware analysis to pinpoint the source of traffic when executing malware and its child processes. Microsoft Network Monitor, although deprecated and replaced by Microsoft Message Analyzer, is still is available for download at www.microsoft.com/en-in/download/details.aspx?id=4865.
OllyDbg 2.0
OllyDbg , a must-have tool for every malware reverse engineer, is a graphical x86 debugger, that can execute and debug x86 executables on Windows. The tool is free of cost and can be downloaded from www.ollydbg.de/version2.html as a zipped portable binary executable, which you can then add to the desktop as a shortcut for quick accessibility. You must enable administrator privileges for this tool. While this tool seems as if it is an advanced tool for expert malware reverse engineers, it comes in handy for various other scenarios of malware analysis. It is useful for novice malware analysts as well, which we cover in later chapters.
Notepad++

File opened using Notepad++ using its HEX View plugin
Malzilla
Malzilla is a GUI tool for analyzing malicious JavaScript. It can be downloaded as a zipped portable executable from www.malzilla.org/downloads.html, which you can then add to the desktop as a shortcut for quick accessibility.
PEiD
PEiD is a useful tool that can figure out various aspects of a PE file, such as the packer, its entropy, and so forth. PEiD can be downloaded as a zipped portable executable, which you can extract and then add to the desktop as a shortcut for quick accessibility.
FTK Imager Lite
FTK Imager Lite is a tool that we are going to use to dump the system’s memory for the conducting memory analysis in Chapter 14. You can download the latest version of this tool from https://accessdata.com, available as a zipped portable executable, which you can extract and then add to the desktop as a shortcut for quick accessibility.
Volatility Standalone
Volatility is a famous memory forensics tool that we use in Chapter 14, where we talk about using it for various memory forensics operations. We use the standalone version of this tool called Volatility Standalone, which doesn’t require the extra installation of the Python framework. You can download the zipped portable executable variant of this tool from www.volatilityfoundation.org/26, which you have to extract and add to the PATH environment variable, as explained earlier in the chapter so that you can access it from the command prompt.
Ring3 API Hook Scanner
NoVirusThanks’s Ring3 API Hook Scanner is a useful tool that we can use to detect any API hooks placed on the system by malware or any other application. You can download the installer for this tool from www.novirusthanks.org/products/ring3-api-hook-scanner/.
GMER
GMER is another useful tool that we can use to detect both user space API hooks and kernel model SSDT hooks. GMER can be downloaded as a zipped portable executable from www.gmer.net, which you can extract and then add to the desktop as a shortcut for quick accessibility.
SSDTView
SSDTView is a tool used in this book to view the contents of the SSDT in the kernel. It alerts you when an SSDT function or any application on your system is hooked by malware. You can download the zipped portable version from www.novirusthanks.org/products/ssdt-view/, which you can extract and then add to the desktop as a shortcut for quick accessibility.
DriverView
DriverView is a GUI tool that helps you view all the loaded drivers in your system and is a great tool to check if any malware kernel modules/rootkits are loaded in your system. You can download DriverView as a zipped portable executable from www.nirsoft.net/utils/driverview.html, which you can extract and then add to the desktop as a shortcut for quick accessibility.
Strings
Sysinternals Strings is a command-line tool that helps you dump all the strings from files. You can download a zipped portable executable from https://docs.microsoft.com/en-us/sysinternals/downloads/strings, which you must extract and add to the PATH environment variable as explained earlier in the chapter so that you can access it from the command prompt.
SimpleWMIView
SimpleWMIView is a GUI tool that helps you run and view the results of WMI queries on your system. You can download SimpleWMIView as a zipped portable executable from www.nirsoft.net/utils/simple_wmi_view.html, which you can extract and then add to the desktop as a shortcut for quick accessibility.
Registry Viewer
Registry Viewer is a tool that you can use to load and view registry dumps that have been dumped using forensic tools like Volatility. You can download the installer for the latest version of this tool from https://accessdata.com.
Bulk Extractor
Bulk Extractor is a command-line tool that we use in Chapter 14 to extract network packet captures files from memory dumps, the installer for which you can download from http://downloads.digitalcorpora.org/downloads/bulk_extractor/.
Suricata
Suricata is a free and open source network security monitoring (NSM) tool that can function as a network intrusion detection and prevention system (IDS/IPS). It can capture and process live traffic or process packet captures (PCAPs) offline. Suricata supports an extensive rule language that is syntactically like the snort rule language. It can also log meta-information about the packets and its various protocols in multiple log formats, JSON included, which, when combined with other host-based events from other host endpoint agents, can serve as a powerful threat detector. It is a must-have tool for a good detection solution that covers the network analysis aspect of malware and threat detection. Instructions to download and install Suricata on Linux systems are covered in Chapter 21.
Cuckoo Sandbox
Malware Sandboxes play a very crucial role in the dynamic analysis of malware. Cuckoo Sandbox is an open source malware sandbox that can automatically run and analyze malware inside an isolated operating system, and gather detailed analysis results on the behavior of the executed malware processes. It can give details on the API calls performed by the malware, including APIs that spawn processes, threads, file creation, file deletion, registry creation, registry deletion and registry modification, and other Win32 APIs. It also supports the dumping of the malware process memory and capturing network traffic from the analyzed malware in PCAP format for further analysis. With Cuckoo Sandbox being open source, it provides one with the ability to make modifications and enhance it with new features. Instructions on how to install, set up, and use Cuckoo Sandbox are available in the Cuckoo-Installation-And-Usage.txt file in our samples repository.
rundll32
Rundll32.exe is a natively available command-line tool on Windows OS that can load a dynamic-linked library (DLL) into memory. A lot of malware is delivered as DLL files instead of executables. Since you can’t natively run DLLs like executable files when analyzing malware DLLs, rundll32 helps fill this gap by allowing you to do so. You can load it in memory and invoke its DLLMain function. Alternatively, rundll32.exe allows you to run specific exported functions in the DLL.
oledump.py
oledump.py is a Python tool that can parse Microsoft Office files and extract various types of data from these files, including macros and embedded binaries. It is a Python script available for use from the command line. This tool also is dependent on the presence of the Python framework on your system, so do make sure you install Python. It also depends on another third-party Python library called OleFileIO. To install oledump.py, start by installing Python. You can then install OleFileIO from www.decalage.info/python/olefileio. You can then download the zipped package for oledump.py from https://blog.didierstevens.com/programs/oledump-py/, which you must extract and add to the PATH environment variable as explained earlier in the chapter so that you can access it from the command prompt.
OllyDumpEx
OllyDumpEx is a plugin for OllyDbg that you can use to dump the contents of a process’ memory that you are debugging using OllyDbg. You can download the plugin zip package from https://low-priority.appspot.com/ollydumpex/#download, which you can unzip. The unzipped content contains plugin DLLs for various target tools. Since we are using this plugin in conjunction with OllyDbg in this book, search for the DLL file, which is named to target OllyDbg, which should mostly be OllyDumpEx_Od20.dll. You can then copy this DLL to the OllyDbg plugins directory on your system, which is the root folder containing ollydbg.exe by default. You can also change the plugins directory path in OllyDbg by going to Options ➤ Options ➤ Directories ➤ Plugin Directory and keying in the path to the plugins folder on your system.
DocFileViewerEx
DocFileViewer is a GUI tool that can parse and view the OLE structure of Microsoft Doc files, which we use in Chapter 20 to analyze Microsoft Office based malware. You can download the portable executable version for this tool from www.docfileviewer.wedding-soft.com, which you can add to the desktop as a shortcut for quick accessibility.
Fiddler
Fiddler is a tool that provides a rich visualization of network packet captures and is useful for analyzing HTTP PCAPs that carry malicious exploits. In our book, we specifically use Fiddler 4. You can download the installer from www.telerik.com/download/fiddler/fiddler4.
IDA Pro
IDA Pro is probably the most famous tool used by advanced reverse engineers that can both statically disassemble executable files and debug them. It is a paid tool that you can purchase from www.hex-rays.com/products/ida/. Hex-Rays Decompiler is a useful addition/plugin that can be purchased along with standard IDA Pro. Hex-Rays Decompiler can disassemble machine code into a more human-friendly readable C type pseudo-code. Alternatively, they also provide a free version of this tool, but with limited features that you can download from www.hex-rays.com/products/ida/support/download_freeware/.
x64dbg and Immunity Debugger
x64dbg and Immunity Debugger are two popular free debuggers. Both have a UI similar to OllyDbg and are in active development. x64dbg is a great debugger that comes integrated with the Sandman decompiler, which is a great alternative to the IDA Pro Hex-Rays decompiler.
Summary
The first step to malware analysis is a safe and efficient lab setup. In this chapter, you learned how to set up a malware analysis lab, where one can run all kinds of malware without fear of infecting the host device and other hosts on the network. You also learned the various other host and network-based requirements needed to have an effective and safe lab setup. This chapter also introduced various analysis VM environments and settings tweaks needed to make the lab machine more analysis resilient against malware. With the analysis related tools introduced and installed in this chapter, we now have an analysis VM snapshotted and handy to be used for analyzing malware samples going forward.